
:max_bytes(150000):strip_icc():format(webp)/TwitterVideoDownload-5b605aaac9e77c002c3a42f3.jpg)
Updated Transform Your Audio Projects Professional Tips on Utilizing Keyframes in Adobe Premiere Pro for macOS
Transform Your Audio Projects: Professional Tips on Utilizing Keyframes in Adobe Premiere Pro for macOS
How to Create Audio Keyframes in Adobe Premiere Pro on Mac

Benjamin Arango
Aug 18, 2022• Proven solutions
Keyframing is one of the most vital components in post-production that can be applied to video and audio tracks. For instance, by adding keyframes in Premiere Pro, you can easily apply properties and values to a specific segment. To do this, you can set up an audio keyframe at the start and another one at the ending of the selected part.
Therefore, with the Premiere Pro keyframe options, you can achieve a gradual flow in your tracks. Without much ado, I’m going to help you set up audio keyframes in Premiere Pro with their vital operations in this post.
Part 1: How to Add Audio Keyframes in Adobe Premiere Pro on Mac?
As I have mentioned, to apply adjustments or properties to a specific point in the audio track, we can use Adobe Premiere keyframes. As of now, there are two kinds of keyframes in Adobe Premiere – Clip Keyframe and Track Keyframe. Before you start adding keyframes in Premiere Pro, you should know their difference.
- Clip Keyframes: This would apply audio effects for the selected clip (like adjusting the volume level). The audio keyframe will only apply to the clip that you have selected and not the entire track.
- Track Keyframes: These audio keyframes in Premiere are applied to the entire audio track (they have values like Volume and Mute).
Now when we have covered the basics, let’s learn how to set up audio keyframes in Premiere on your Mac.
Step 1: Add the Audio Track on Adobe Premiere Pro
To start with, you can launch Adobe Premiere Pro, go to your Project > Import, and simply load any audio track. You can also drag and drop any audio file to the project as well.

Once the audio track is added to the project, you can further drag and drop it to the sequence section (timelines) at the bottom.

Step 2: Show Keyframes for the Track
The application would automatically render different keyframes already present in the track. For this, you need to first select the ribbon of your audio track from the timeline. Now, just right-click on the working area and click on the “Show Audio Keyframes” button from the context menu.

If you want, you can also click on the “Show Keyframes” button that is depicted by a radio/circle icon on the timeline.

Step 3: Work on Audio Keyframes in Premiere Pro
Now, you can view either clip or track keyframes for the track. For this, you can just right-click the keyframe button on the timeline to get different options. Here, you can choose to get Clip or Track keyframes in Premiere Pro. There are options to mute the entire audio or set up its volume under the track option.

Once you have enabled the audio keyframe options in Premiere Pro, you can view keyframes in a highlighted color. You can now take the assistance of the Pen tool or press the CMD key on your Mac to select keyframes. This will let you select the starting and ending keyframes in Premiere Pro so that you can easily apply the desired effect to the selected segment.

Part 2: How to Fade Audio In/Out with Keyframes in Adobe Premiere Pro on Mac?
Once you have learned how to use the Adobe Premiere keyframe feature, you can apply all kinds of transitions and effects to a segment. Let’s suppose you wish to implement fade-in or out features for any segment. In this case, we will use the Clip Keyframing option in Premiere Pro to achieve these transitions the way we like.
Step 1: Get Clip Keyframes in Premiere Pro
Firstly, you can just add any audio track to your Premiere Pro project and drag it to the timeline. You can just click on the show keyframes button to start adding keyframes in Premiere Pro.
If you want, you can just right-click the track, go to the Show Clip Keyframes > Volume > Level option. This will show the level of the volume for different keyframes, letting you pick the right segments to fade in and out.

Step 2: Apply Fade-in or Out options
Once you have clip keyframes in your track, you can easily do whatever you like. You can use the Pen tool or press the CMD key on your Mac to select the starting and the ending of the clip.
Now, go to the audio segment from the timeline and simply place the audio level up (to fade-in) or down (to fade-out). You can set the audio levels for different segments the way you like to customize these operations in your audio track.

Pro Tip: Use Inbuilt Fade In/Out Transitions
With keyframes in Premiere Pro, you can certainly customize the fade in/out options. Though, if you are running short on time, then you can use its inbuilt features for audio adjustments.
For this, you can just go to its Effects > Audio Transitions option. To fade-out any clip, select the Crossfade > Exponential Fade and simply drag and drop to the location of your choice.

In the same way, you can also go to Effects > Audio Transitions > Crossfade and choose the “Constant Gain” feature. You can drag and drop the Contact Gain effect on any segment to implement the fade-in effect.
That’s a wrap, everyone! I’m sure that after reading this post, you would be able to set up audio keyframes in Adobe Premiere Pro. Since adding keyframes in Premiere can be done automatically, it would save your time in audio editing and post-production. Mostly, the clip audio keyframing is used in Adobe to customize the sound at any desired segment. Apart from fade-in or out, there are tons of other effects that you can apply to your audio tracks with the help of keyframes. Go ahead and try the Adobe Premiere Pro keyframing feature and let us know about your experience in the comments.
Benjamin Arango
Benjamin Arango is a writer and a lover of all things video.
Follow @Benjamin Arango
Benjamin Arango
Aug 18, 2022• Proven solutions
Keyframing is one of the most vital components in post-production that can be applied to video and audio tracks. For instance, by adding keyframes in Premiere Pro, you can easily apply properties and values to a specific segment. To do this, you can set up an audio keyframe at the start and another one at the ending of the selected part.
Therefore, with the Premiere Pro keyframe options, you can achieve a gradual flow in your tracks. Without much ado, I’m going to help you set up audio keyframes in Premiere Pro with their vital operations in this post.
Part 1: How to Add Audio Keyframes in Adobe Premiere Pro on Mac?
As I have mentioned, to apply adjustments or properties to a specific point in the audio track, we can use Adobe Premiere keyframes. As of now, there are two kinds of keyframes in Adobe Premiere – Clip Keyframe and Track Keyframe. Before you start adding keyframes in Premiere Pro, you should know their difference.
- Clip Keyframes: This would apply audio effects for the selected clip (like adjusting the volume level). The audio keyframe will only apply to the clip that you have selected and not the entire track.
- Track Keyframes: These audio keyframes in Premiere are applied to the entire audio track (they have values like Volume and Mute).
Now when we have covered the basics, let’s learn how to set up audio keyframes in Premiere on your Mac.
Step 1: Add the Audio Track on Adobe Premiere Pro
To start with, you can launch Adobe Premiere Pro, go to your Project > Import, and simply load any audio track. You can also drag and drop any audio file to the project as well.
Once the audio track is added to the project, you can further drag and drop it to the sequence section (timelines) at the bottom.
Step 2: Show Keyframes for the Track
The application would automatically render different keyframes already present in the track. For this, you need to first select the ribbon of your audio track from the timeline. Now, just right-click on the working area and click on the “Show Audio Keyframes” button from the context menu.
If you want, you can also click on the “Show Keyframes” button that is depicted by a radio/circle icon on the timeline.
Step 3: Work on Audio Keyframes in Premiere Pro
Now, you can view either clip or track keyframes for the track. For this, you can just right-click the keyframe button on the timeline to get different options. Here, you can choose to get Clip or Track keyframes in Premiere Pro. There are options to mute the entire audio or set up its volume under the track option.
Once you have enabled the audio keyframe options in Premiere Pro, you can view keyframes in a highlighted color. You can now take the assistance of the Pen tool or press the CMD key on your Mac to select keyframes. This will let you select the starting and ending keyframes in Premiere Pro so that you can easily apply the desired effect to the selected segment.
Part 2: How to Fade Audio In/Out with Keyframes in Adobe Premiere Pro on Mac?
Once you have learned how to use the Adobe Premiere keyframe feature, you can apply all kinds of transitions and effects to a segment. Let’s suppose you wish to implement fade-in or out features for any segment. In this case, we will use the Clip Keyframing option in Premiere Pro to achieve these transitions the way we like.
Step 1: Get Clip Keyframes in Premiere Pro
Firstly, you can just add any audio track to your Premiere Pro project and drag it to the timeline. You can just click on the show keyframes button to start adding keyframes in Premiere Pro.
If you want, you can just right-click the track, go to the Show Clip Keyframes > Volume > Level option. This will show the level of the volume for different keyframes, letting you pick the right segments to fade in and out.
Step 2: Apply Fade-in or Out options
Once you have clip keyframes in your track, you can easily do whatever you like. You can use the Pen tool or press the CMD key on your Mac to select the starting and the ending of the clip.
Now, go to the audio segment from the timeline and simply place the audio level up (to fade-in) or down (to fade-out). You can set the audio levels for different segments the way you like to customize these operations in your audio track.
Pro Tip: Use Inbuilt Fade In/Out Transitions
With keyframes in Premiere Pro, you can certainly customize the fade in/out options. Though, if you are running short on time, then you can use its inbuilt features for audio adjustments.
For this, you can just go to its Effects > Audio Transitions option. To fade-out any clip, select the Crossfade > Exponential Fade and simply drag and drop to the location of your choice.
In the same way, you can also go to Effects > Audio Transitions > Crossfade and choose the “Constant Gain” feature. You can drag and drop the Contact Gain effect on any segment to implement the fade-in effect.
That’s a wrap, everyone! I’m sure that after reading this post, you would be able to set up audio keyframes in Adobe Premiere Pro. Since adding keyframes in Premiere can be done automatically, it would save your time in audio editing and post-production. Mostly, the clip audio keyframing is used in Adobe to customize the sound at any desired segment. Apart from fade-in or out, there are tons of other effects that you can apply to your audio tracks with the help of keyframes. Go ahead and try the Adobe Premiere Pro keyframing feature and let us know about your experience in the comments.
Benjamin Arango
Benjamin Arango is a writer and a lover of all things video.
Follow @Benjamin Arango
Tuned in Truth: Exploring How to Identify Songs on Apple Devices without Specialized Software
How to Recognize Songs on iPhone?
Benjamin Arango
Mar 27, 2024• Proven solutions
You listen to a catchy song or a tune you have never heard before and want to add it to your iPhone playlist, but you do not know any relevant details of that song to look for it online. What is the title of the song? Who sang it?
Now you can get all these details by just making the in-built iPhone music recognition feature listen to the song. Read on to know how to do that.
- Part 1: How to Use the In-built Music Recognition on iPhone?
- Part 2: How to Use Siri to Identify Songs by Humming on iPhone?
- Part 3: Best Apps for iPhone Music Recognition
- Part 4: How to Choose a Music Recognition App?
How to Use the In-built Music Recognition on iPhone?
In November 2020, Apple released the iOS 14.2 update for their iPads and iPhones. One of the features of this update was that it included built-in music and song recognition button that makes it easier for the user to recognize any song playing around them.
You just need to add the iPhone music recognition button to the Control Center menu and simply press that button when you hear a song that you like. You will then get all the information related to that song; title, artist’s name, and album title.
Here is how you add the in-built iPhone music recognition button to the Control Center:
Note: Make sure that you have the latest version of the iOS installed on your iPhone as this feature is not available on older versions. To check the running version, go to Settings -> General -> About, and then you will see the software version.
Step 1 - Open Settings> Control Center, and then tap More to scroll down.
Step 2- Tap the “+” button that is next to “Music Recognition”, and the iPhone music recognition button is added to the Control Center

It is very easy to access and use this music recognition feature. If you have an iPhone that uses facial ID recognition to unlock, then pull down the Control Center shade by swiping down from the top right corner of the phone and tap the music recognition button.

If your iPhone has a home button, then swipe up to get into the Control Center menu and tap the music recognition button.
You will see the Music Recognition notification icon that shows which song is playing.
The iPhone will listen for around 10 to 15 seconds once you tap the button – and will attempt to identify the song in that time period.
This feature can recognize songs playing in your environment even when your headphones are plugged in.
YouTuber Ricardo Gardener has made a video showing how to use the iPhone Music Recognition feature step by step as well, enjoy!
How to Use Siri to Identify Songs by Humming on iPhone?
You can also identify a song on your iPhone by using its virtual assistant, Siri. Siri can recognize a song playing in your environment and even the song you are humming. This how you do it:
Step 1- Activate Siri. You can do it two ways; the first is by long-pressing the home button or Wake/Sleep button in iPhone X and the second is by the voice command “Hey Siri”.
Step 2- Then say, “Hey Siri, which song is this”. This starts Siri’s listening mode.
Step 3 - Hum the tune that you want to be identified and Siri will return with results after a few seconds.
Mike has shown us how he uses Siri to identify the song playing on iPhone, let’s have a look!
Best Apps for iPhone Music Recognition
If your iPhone or iPad is not yet upgraded to iOS version 14.2 then you would have to use third part apps to identify songs. Following are the two best iPhone music recognition apps that you can use:
1. SoundHound
SoundHound is one of the best iPhone music recognition app out there. It has some of the most useful features regards to song recognition that helps you get a complete music experience.
The standout feature of SoundHound is that you can have a song recognized in it by merely humming a short tune. This is very helpful when you don’t remember the lyrics of the song or the song’s title or who sang it.
The service is pretty quick meaning you can have songs and music identified in a matter of seconds. You will get all available details of the concerned song or tune and what more, you can also sing along to real-time lyrics in the app.
It also allows you to stream your playlists from other music apps like Spotify, YouTube and others. Your song search list is stored so that you don’t have to look for a song all over again if you have once searched it on SoundHound. This saves time and keeps your discovered songs organized.
You can use the app for The paid service of Shazam goes by the name of Shazam Encore and it costs $2.99.
2. Shazam
Shazam is the most popular music recognition app available out there, and its features will tell you why. To begin with, it does the basic task of any music recognition service with near 100% accuracy.
It draws up all available information of a song you want identifying, from its huge database in a short time. There is also a lyrics feature that displays lyrics in sync with the song being played so you can sing along with it.
But these are regular features that you can find in any music recognition app. What gives Shazam an edge over other apps is the following additional features: offline usage and Pop-Up Shazam. You can use Shazam offline. It records the song offline, and later when you go online, it provides all the information about that song.
The Pop-Up Shazam is a unique feature that helps you identify any song that is played in your smartphone. It works with any app and is especially helpful when you are surfing social media and want to know about a song or background music you just came across on it.
There is also an Auto Shazam feature that works like “Now Playing” on Pixel devices. This feature works in the background and gives you song info notifications as it recognizes songs in your environment. The only drawback of this feature is that it doesn’t work offline.
Shazam is a free iPhone music recognition app.
How to Choose a Music Recognition App?
Version 14.2 has made it easy to recognize songs on your iDevices. But those who do not have it need a third-party app to do that job. You need to look for a good iPhone song recognition app, one that does the job to your satisfaction.
There are hundreds of such apps available on the Apple App Store, and you need to sift through them to get the best one. Following are the features you should consider while choosing the most appropriate app:
- Speed
Most of the time, you come across unknown songs in noisy surroundings. It can be at a party or the supermarket. Your song recording can be interrupted by some loud noise like joyous shouts or announcements in both scenarios. Hence, it is vital that the music recognition app launches, listens and identifies in a few seconds before any interruption takes place.
Ideally, the app should recognize the song within a span of 5 to 10 seconds of launching.
- Tenacity
As already been said, you are more likely to encounter an unknown song or tune you like in a noisy environment. Keeping that in mind, the song identifier app must be able to distinguish between the song you want to identify and the surrounding noise accompanying it.
The Trial and error method is the best way to determine which app does the best job in this case. Test the apps in a noisy environment before you decide which you will ultimately use.
- Accuracy
Identifying a song title, the artists, the album it belongs to with nearly 100% accuracy is a must for any music recognition app. Besides that basic info, it must give accurate allied information like music videos, covers and trivia regarding the singer and the song.
Don’t bother yourself with an app that doesn’t recognize at least 8 of 10 songs it hears.
FAQs About Recognizing Songs on iPhone
- Should I install Shazam app on iPhone to recognize songs?
It depends on what version of iOS you are running. If the version is 14.2 and above, you don’t need to install Shazam separately as it comes integrated with your iPhone software. The in-built music recognition feature of the iPhone uses the Shazam database, and it recognizes songs and tunes the way the Shazam app does.
If you are running an older version, you need to install Shazam separately if you want to use it.
- What’s the difference between the Shazam app and the in-built Shazam music recognition feature?
iOS users who haven’t upgraded to the iOS 14.2 update will not be able to access the features
When the process is complete, you’ll see a “Music Recognition” notification banner showing you what song is playing. This notification appears along with all your other apps’ notifications in your notification center.
Your iPhone will only listen for 10 to 15 seconds after you tap the button. If it can’t identify a song in that period of time, you’ll see a notification saying a song wasn’t detected.
Benjamin Arango
Benjamin Arango is a writer and a lover of all things video.
Follow @Benjamin Arango
Benjamin Arango
Mar 27, 2024• Proven solutions
You listen to a catchy song or a tune you have never heard before and want to add it to your iPhone playlist, but you do not know any relevant details of that song to look for it online. What is the title of the song? Who sang it?
Now you can get all these details by just making the in-built iPhone music recognition feature listen to the song. Read on to know how to do that.
- Part 1: How to Use the In-built Music Recognition on iPhone?
- Part 2: How to Use Siri to Identify Songs by Humming on iPhone?
- Part 3: Best Apps for iPhone Music Recognition
- Part 4: How to Choose a Music Recognition App?
How to Use the In-built Music Recognition on iPhone?
In November 2020, Apple released the iOS 14.2 update for their iPads and iPhones. One of the features of this update was that it included built-in music and song recognition button that makes it easier for the user to recognize any song playing around them.
You just need to add the iPhone music recognition button to the Control Center menu and simply press that button when you hear a song that you like. You will then get all the information related to that song; title, artist’s name, and album title.
Here is how you add the in-built iPhone music recognition button to the Control Center:
Note: Make sure that you have the latest version of the iOS installed on your iPhone as this feature is not available on older versions. To check the running version, go to Settings -> General -> About, and then you will see the software version.
Step 1 - Open Settings> Control Center, and then tap More to scroll down.
Step 2- Tap the “+” button that is next to “Music Recognition”, and the iPhone music recognition button is added to the Control Center
It is very easy to access and use this music recognition feature. If you have an iPhone that uses facial ID recognition to unlock, then pull down the Control Center shade by swiping down from the top right corner of the phone and tap the music recognition button.
If your iPhone has a home button, then swipe up to get into the Control Center menu and tap the music recognition button.
You will see the Music Recognition notification icon that shows which song is playing.
The iPhone will listen for around 10 to 15 seconds once you tap the button – and will attempt to identify the song in that time period.
This feature can recognize songs playing in your environment even when your headphones are plugged in.
YouTuber Ricardo Gardener has made a video showing how to use the iPhone Music Recognition feature step by step as well, enjoy!
How to Use Siri to Identify Songs by Humming on iPhone?
You can also identify a song on your iPhone by using its virtual assistant, Siri. Siri can recognize a song playing in your environment and even the song you are humming. This how you do it:
Step 1- Activate Siri. You can do it two ways; the first is by long-pressing the home button or Wake/Sleep button in iPhone X and the second is by the voice command “Hey Siri”.
Step 2- Then say, “Hey Siri, which song is this”. This starts Siri’s listening mode.
Step 3 - Hum the tune that you want to be identified and Siri will return with results after a few seconds.
Mike has shown us how he uses Siri to identify the song playing on iPhone, let’s have a look!
Best Apps for iPhone Music Recognition
If your iPhone or iPad is not yet upgraded to iOS version 14.2 then you would have to use third part apps to identify songs. Following are the two best iPhone music recognition apps that you can use:
1. SoundHound
SoundHound is one of the best iPhone music recognition app out there. It has some of the most useful features regards to song recognition that helps you get a complete music experience.
The standout feature of SoundHound is that you can have a song recognized in it by merely humming a short tune. This is very helpful when you don’t remember the lyrics of the song or the song’s title or who sang it.
The service is pretty quick meaning you can have songs and music identified in a matter of seconds. You will get all available details of the concerned song or tune and what more, you can also sing along to real-time lyrics in the app.
It also allows you to stream your playlists from other music apps like Spotify, YouTube and others. Your song search list is stored so that you don’t have to look for a song all over again if you have once searched it on SoundHound. This saves time and keeps your discovered songs organized.
You can use the app for The paid service of Shazam goes by the name of Shazam Encore and it costs $2.99.
2. Shazam
Shazam is the most popular music recognition app available out there, and its features will tell you why. To begin with, it does the basic task of any music recognition service with near 100% accuracy.
It draws up all available information of a song you want identifying, from its huge database in a short time. There is also a lyrics feature that displays lyrics in sync with the song being played so you can sing along with it.
But these are regular features that you can find in any music recognition app. What gives Shazam an edge over other apps is the following additional features: offline usage and Pop-Up Shazam. You can use Shazam offline. It records the song offline, and later when you go online, it provides all the information about that song.
The Pop-Up Shazam is a unique feature that helps you identify any song that is played in your smartphone. It works with any app and is especially helpful when you are surfing social media and want to know about a song or background music you just came across on it.
There is also an Auto Shazam feature that works like “Now Playing” on Pixel devices. This feature works in the background and gives you song info notifications as it recognizes songs in your environment. The only drawback of this feature is that it doesn’t work offline.
Shazam is a free iPhone music recognition app.
How to Choose a Music Recognition App?
Version 14.2 has made it easy to recognize songs on your iDevices. But those who do not have it need a third-party app to do that job. You need to look for a good iPhone song recognition app, one that does the job to your satisfaction.
There are hundreds of such apps available on the Apple App Store, and you need to sift through them to get the best one. Following are the features you should consider while choosing the most appropriate app:
- Speed
Most of the time, you come across unknown songs in noisy surroundings. It can be at a party or the supermarket. Your song recording can be interrupted by some loud noise like joyous shouts or announcements in both scenarios. Hence, it is vital that the music recognition app launches, listens and identifies in a few seconds before any interruption takes place.
Ideally, the app should recognize the song within a span of 5 to 10 seconds of launching.
- Tenacity
As already been said, you are more likely to encounter an unknown song or tune you like in a noisy environment. Keeping that in mind, the song identifier app must be able to distinguish between the song you want to identify and the surrounding noise accompanying it.
The Trial and error method is the best way to determine which app does the best job in this case. Test the apps in a noisy environment before you decide which you will ultimately use.
- Accuracy
Identifying a song title, the artists, the album it belongs to with nearly 100% accuracy is a must for any music recognition app. Besides that basic info, it must give accurate allied information like music videos, covers and trivia regarding the singer and the song.
Don’t bother yourself with an app that doesn’t recognize at least 8 of 10 songs it hears.
FAQs About Recognizing Songs on iPhone
- Should I install Shazam app on iPhone to recognize songs?
It depends on what version of iOS you are running. If the version is 14.2 and above, you don’t need to install Shazam separately as it comes integrated with your iPhone software. The in-built music recognition feature of the iPhone uses the Shazam database, and it recognizes songs and tunes the way the Shazam app does.
If you are running an older version, you need to install Shazam separately if you want to use it.
- What’s the difference between the Shazam app and the in-built Shazam music recognition feature?
iOS users who haven’t upgraded to the iOS 14.2 update will not be able to access the features
When the process is complete, you’ll see a “Music Recognition” notification banner showing you what song is playing. This notification appears along with all your other apps’ notifications in your notification center.
Your iPhone will only listen for 10 to 15 seconds after you tap the button. If it can’t identify a song in that period of time, you’ll see a notification saying a song wasn’t detected.
Benjamin Arango
Benjamin Arango is a writer and a lover of all things video.
Follow @Benjamin Arango
Top 10 Best Websites Like Omegle
Top 10 Best Websites Like Omegle

Liza Brown
Mar 27, 2024• Proven solutions
One of the main reasons we use the Internet is to be social. Interaction brings comfort and satisfaction to most normal people, and most people need to interact. It is for this reason that Facebook is so popular. Nevertheless, there are other websites where people can meet. People usually post comments on these sites and return later to see if someone else has responded. However, many sites facilitate real-time online conversations that are as close as you can get to face-to-face communications.
Omegle’s website allows members to converse via video, audio, or plain text. You can talk to a stranger and meet random people there. Unfortunately, Omegle has become overpopulated like most big sites. Also, on Omegle, many people prey upon others and make illicit conversations due to which using Omegle is getting difficult day by day. This article brings you a list of 10 websites like Omegle that serve the same purpose as Omegle. You can say them as Omegle alternatives, but they are more secure and more fun to use.
![]()
A cross-platform for making videos anywhere for all creators

Why your video editing isn’t good enough? How about some creative inspo?
- 100 Million+ Users
- 150+ Countries and Regions
- 4 Million+ Social Media Followers
- 5 Million+ Stock Media for Use
* Secure Download

Best Websites Like Omegle (Omegle Alternatives)
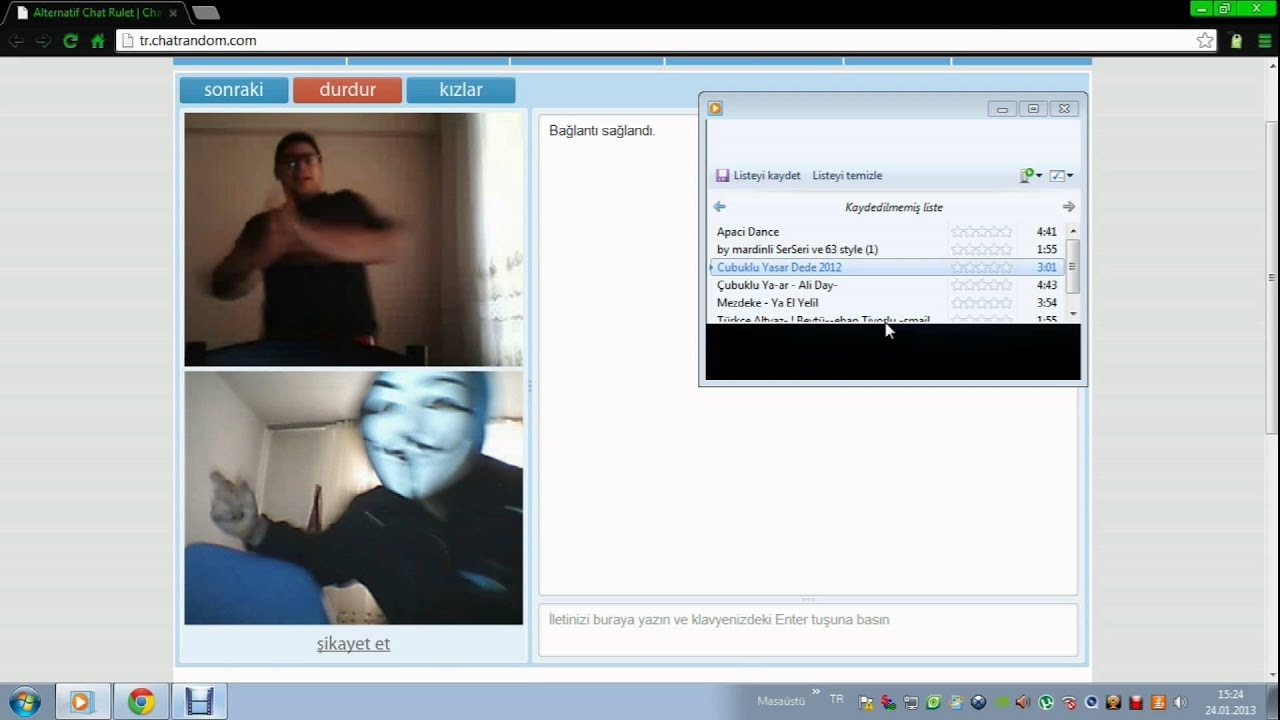
1. Chatroulette

The webcam-based Chatroulette service is notable for pairing users with random strangers using a random pairing algorithm. Instead of using guns, you parry verbally with typewritten messages and/or a digital camera, and the person who does not agree with you leaves the chat (“kills the conversation”).
A 17-year-old child who created it in 2009 ran it out of a chamber in his parents’ house. Despite not running any advertisements, this website grew to a massive size through word of mouth. In recent years, after much trial and error, it has finally reached the stage where it can distinguish between appropriate and inappropriate behavior.
Moderators screen violators who have not adhered to the site’s terms of service. Users who do not do so will not be able to access the site. Approximately half of the users of this website are under thirty, and there are more men than women. There’s no doubt that it’s R-rated. Like Omegle, this site is a great alternative.
Features:
  * Anonymously Chat With Strangers.
  * Millions of Users Across Different Countries
  * Android and iOS apps are also available.
  * Fewer Scammers and Bots.
  * One of the best monitoring and moderating systems.
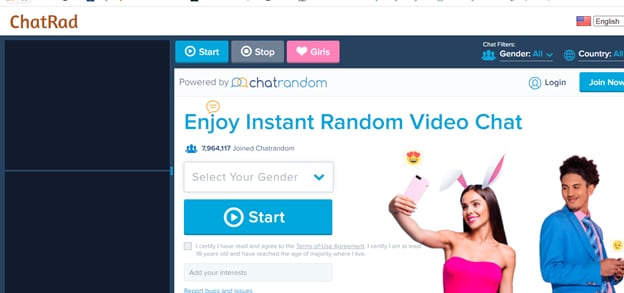
2. ChatRandom
The ChatRandom service is a wonderful, chaotic, and people-packed place where users share all kinds of information. There is no shortage of fun stuff on ChatRandom, no matter what you want. Even though this stranger chat website has declined in popularity, it remains popular in the minds of many. The community is moderate, and there are a variety of people in it.
There have been a couple of changes to the site over the years, and what makes it one of the best websites like Omegle is its polished UI, better matchmaking algorithm, and general trend of catering to both genders.
Features:
  * You do not need to register to chat on Chatrandom; it is free to use.
  * Users of the site can access most of its features free of charge.
  * A total of 20 languages are available for users to use.
  * Chat rooms are available for members to connect.
  * Members are matched by their unique code.
  * On the site, you can video chat with others.
  * You can easily use the site's features.
3. YouNow

Is YouNow an app for broadcasting, chatting, streaming, or watching live videos? In contrast to Omegle, YouNow’s goal is to create a large audience, and trend, and build a loyal following.
Users can comment or buy gold bars to share with others during the viewing process. A user must be 13 years of age or older to use the chat app. Users of YouNow must register to begin chatting, unlike Omegle, which doesn’t require them to create a Facebook or Twitter account before chatting.
Though both platforms still have privacy concerns, YouNow lets you customize your usernames so that they don’t match anything about your Facebook or Twitter identities. Additionally, YouNow has stricter guidelines that prohibit sexual content, nudity, and bullying. However, there is no guarantee that such content will be monitored or removed.
The community guidelines can be broken, and you can report violators, but there’s no way to guarantee you won’t be exposed to objectionable live content. As long as you retain ownership of your content, posting content to the app gives the app permission to use it how it likes.
Features:
  * Allows you to integrate social media platforms.
  * Web, Android, and iOS versions are available.
  * Allows you to start a broadcast.
  * You can join the broadcast of other streams also to interact with them.
  * You can also make friends and send and receive gifts from them
,.
4. TinyChat

An alternative chat platform, TinyChat, offers chat rooms with video feeds of 12 each. With this chat site, you do not have to pay because you can invite people you know and set up topics for your chat. The platform offers the most extensive video and voice chat service online for five million minutes of airtime each day.
Numerous chat rooms are available, including those set up by residents of your area. TinyChat hosts live video streaming of TV shows that will let you watch them as they happen. If you can’t find a topic that interests you, create one. With TinyChat, you can connect with others through your webcam through audio, video, or text communication, just like with Omegle.
TinyChat is also a browser-based IM client and can be accessed from a PC, mobile device, or browser. While Omegle does not offer coins or points for unlocking special achievements or increasing your chances of landing in the live directory, it does provide you with a chance to interact with other users. A 500-coin token will also be awarded to you if you promote your room via TinyChat.
Features:
  * The process of starting a video call is very simple.
  * There are no issues with the webcam.
  * In your chat, you can control how many people participate.
  * It's possible to block someone if you don't want to communicate with them.
  * You can improve your experience with a variety of features.
5. FaceFlow

Users can have up to three video chats at the same time with these guys, taking social networking to a whole new level. In addition to offering free video chat and video conferencing with your friends, you can also communicate with strangers via FaceFlow. The new feature allows users to create a searchable profile and share their favorite online videos and pictures.
Aside from being simply another webcam chat service, this site is more like the amazing services offered by Skype. There is a one-to-one video chat feature as well as text chat. Furthermore, FaceFlow has released a multiplayer game called Flappy in which you have to team up against someone in order to complete the game.
Features
  * Signing up takes no time at all;
  * The service supports five languages;
  * It has a modern interface;
  * It offers a lot of free features;
  * FaceFlow can connect with your friends and family while still using a dating website.
6. CamSurf

There are many websites similar to Omegle, but Camsurf has a unique twist - it is wild. If you’re trying to have fun, then you should visit this website. CamSurf has consistently delivered the most bizarre video chats we’ve ever experienced. The CamSurf website itself is straightforward and almost identical to the OmeTV website.
These two have a major difference in the types of people they attract. CamSurf has a vastly wider audience than OmeTV. While some individuals on OmeTV are looking for genuine conversation, on CamSurf, you’ll find people looking for genuine chat. It is our top choice for next time.
Features:
  * Feature-rich website.
  * A huge range of topics is available to discuss.
  * You Mostly find genuine people here.
7. ChatRad
This site claims to be a G-rated alternative to chat sites like Chatroulette, and it is quite harsh toward behavior that is not appropriate. People need to act the same in the real world, where they don’t run around naked or try to expose themselves all of the time… at least not in my world. Despite being a random video chat site, ChatRad is managed by a team of 24x7 moderators, so anything 18 and older can take advantage of the service in a safe environment regardless of their sexual orientation.
Features:
  * Very Strict Policies For Disrespectful People
  * The chat is moderated 24/7 by an active team of moderators.
  * It offers a very safe environment for people.
8.Bazoocam
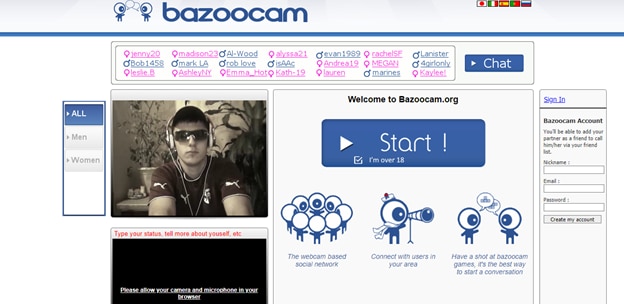
The Bazoocam webcam chat environment is another random digital camera chat site that maintains a high level of cleanliness. Like most of the other websites mentioned, you’re paired up with an interloper haphazardly. Press “skip” and move on to the next person if you are unsatisfied with what you see.
As icebreakers or when you are bored of talking about yourself, you can join one of the multiplayer games on Boomcam. You are advised to do something unusual if you’re bored, but you are urged to wear your clothes. Put your best foot forward when playing golf in fancy dress or taking part in your favorite music. Try playing a string or wind instrument, and you’ll find many people to talk to.
Features
  * The site offers a very high level of cleanliness.
  * You can chat with the person of your choice.
  * If you don't like a person you can skip to check the next candidate.
  * It also offers a lot of multiplayer games to play with strangers.
  * It will never let you get bored.
9. CamGo

Getting to know new people and making new connections is fun with Camgo. Start a conversation with strangers, develop relationships without worrying about running into Covid, and explore webcam dating! Camgo’s Safe Search feature uses artificial intelligence to discover potential matchmaking partners. Your webcam chat loop will be kept out of the reach of people you don’t want to see! By chatting online with new people from your home, you can meet new people in a much easier and safe manner.
Features:
  * Easy To Meet New Strangers.
  * The site is completely safe to use.
  * It offers a great video chatting experience.
10. iMeetzu

It is similar to Omegle in that there are random live video chats and text chat rooms available, but iMeetzu goes over and above that. Once you get past the randomness, you are given the option of joining a free online dating service or friend finder.
Over a thousand new members are joining every day on this one of the fastest-growing social networking sites. If you’re looking to find a date or if you practice your lines, this is the closest you can get to practice face-to-face before you dive back into the dating pool.
Features:
  * It is identical to Omegle.
  * As it is a new platform so there are mostly genuine users.
  * You can do both text and video chats with strangers.
  * You can also join group chats.
Conclusion
These are some of the best Omegle alternative sites. Every site has its own unique features, but if you compare them in functionality, they are quite similar. It’s just the working of every site is different. You can try these sites one by one and stick to those that you find the most suitable and according to your taste.


Liza Brown
Liza Brown is a writer and a lover of all things video.
Follow @Liza Brown
Liza Brown
Mar 27, 2024• Proven solutions
One of the main reasons we use the Internet is to be social. Interaction brings comfort and satisfaction to most normal people, and most people need to interact. It is for this reason that Facebook is so popular. Nevertheless, there are other websites where people can meet. People usually post comments on these sites and return later to see if someone else has responded. However, many sites facilitate real-time online conversations that are as close as you can get to face-to-face communications.
Omegle’s website allows members to converse via video, audio, or plain text. You can talk to a stranger and meet random people there. Unfortunately, Omegle has become overpopulated like most big sites. Also, on Omegle, many people prey upon others and make illicit conversations due to which using Omegle is getting difficult day by day. This article brings you a list of 10 websites like Omegle that serve the same purpose as Omegle. You can say them as Omegle alternatives, but they are more secure and more fun to use.
![]()
A cross-platform for making videos anywhere for all creators
Why your video editing isn’t good enough? How about some creative inspo?
- 100 Million+ Users
- 150+ Countries and Regions
- 4 Million+ Social Media Followers
- 5 Million+ Stock Media for Use
* Secure Download
Best Websites Like Omegle (Omegle Alternatives)
1. Chatroulette
The webcam-based Chatroulette service is notable for pairing users with random strangers using a random pairing algorithm. Instead of using guns, you parry verbally with typewritten messages and/or a digital camera, and the person who does not agree with you leaves the chat (“kills the conversation”).
A 17-year-old child who created it in 2009 ran it out of a chamber in his parents’ house. Despite not running any advertisements, this website grew to a massive size through word of mouth. In recent years, after much trial and error, it has finally reached the stage where it can distinguish between appropriate and inappropriate behavior.
Moderators screen violators who have not adhered to the site’s terms of service. Users who do not do so will not be able to access the site. Approximately half of the users of this website are under thirty, and there are more men than women. There’s no doubt that it’s R-rated. Like Omegle, this site is a great alternative.
Features:
  * Anonymously Chat With Strangers.
  * Millions of Users Across Different Countries
  * Android and iOS apps are also available.
  * Fewer Scammers and Bots.
  * One of the best monitoring and moderating systems.
2. ChatRandom
The ChatRandom service is a wonderful, chaotic, and people-packed place where users share all kinds of information. There is no shortage of fun stuff on ChatRandom, no matter what you want. Even though this stranger chat website has declined in popularity, it remains popular in the minds of many. The community is moderate, and there are a variety of people in it.
There have been a couple of changes to the site over the years, and what makes it one of the best websites like Omegle is its polished UI, better matchmaking algorithm, and general trend of catering to both genders.
Features:
  * You do not need to register to chat on Chatrandom; it is free to use.
  * Users of the site can access most of its features free of charge.
  * A total of 20 languages are available for users to use.
  * Chat rooms are available for members to connect.
  * Members are matched by their unique code.
  * On the site, you can video chat with others.
  * You can easily use the site's features.
3. YouNow
Is YouNow an app for broadcasting, chatting, streaming, or watching live videos? In contrast to Omegle, YouNow’s goal is to create a large audience, and trend, and build a loyal following.
Users can comment or buy gold bars to share with others during the viewing process. A user must be 13 years of age or older to use the chat app. Users of YouNow must register to begin chatting, unlike Omegle, which doesn’t require them to create a Facebook or Twitter account before chatting.
Though both platforms still have privacy concerns, YouNow lets you customize your usernames so that they don’t match anything about your Facebook or Twitter identities. Additionally, YouNow has stricter guidelines that prohibit sexual content, nudity, and bullying. However, there is no guarantee that such content will be monitored or removed.
The community guidelines can be broken, and you can report violators, but there’s no way to guarantee you won’t be exposed to objectionable live content. As long as you retain ownership of your content, posting content to the app gives the app permission to use it how it likes.
Features:
  * Allows you to integrate social media platforms.
  * Web, Android, and iOS versions are available.
  * Allows you to start a broadcast.
  * You can join the broadcast of other streams also to interact with them.
  * You can also make friends and send and receive gifts from them
,.
4. TinyChat
An alternative chat platform, TinyChat, offers chat rooms with video feeds of 12 each. With this chat site, you do not have to pay because you can invite people you know and set up topics for your chat. The platform offers the most extensive video and voice chat service online for five million minutes of airtime each day.
Numerous chat rooms are available, including those set up by residents of your area. TinyChat hosts live video streaming of TV shows that will let you watch them as they happen. If you can’t find a topic that interests you, create one. With TinyChat, you can connect with others through your webcam through audio, video, or text communication, just like with Omegle.
TinyChat is also a browser-based IM client and can be accessed from a PC, mobile device, or browser. While Omegle does not offer coins or points for unlocking special achievements or increasing your chances of landing in the live directory, it does provide you with a chance to interact with other users. A 500-coin token will also be awarded to you if you promote your room via TinyChat.
Features:
  * The process of starting a video call is very simple.
  * There are no issues with the webcam.
  * In your chat, you can control how many people participate.
  * It's possible to block someone if you don't want to communicate with them.
  * You can improve your experience with a variety of features.
5. FaceFlow
Users can have up to three video chats at the same time with these guys, taking social networking to a whole new level. In addition to offering free video chat and video conferencing with your friends, you can also communicate with strangers via FaceFlow. The new feature allows users to create a searchable profile and share their favorite online videos and pictures.
Aside from being simply another webcam chat service, this site is more like the amazing services offered by Skype. There is a one-to-one video chat feature as well as text chat. Furthermore, FaceFlow has released a multiplayer game called Flappy in which you have to team up against someone in order to complete the game.
Features
  * Signing up takes no time at all;
  * The service supports five languages;
  * It has a modern interface;
  * It offers a lot of free features;
  * FaceFlow can connect with your friends and family while still using a dating website.
6. CamSurf
There are many websites similar to Omegle, but Camsurf has a unique twist - it is wild. If you’re trying to have fun, then you should visit this website. CamSurf has consistently delivered the most bizarre video chats we’ve ever experienced. The CamSurf website itself is straightforward and almost identical to the OmeTV website.
These two have a major difference in the types of people they attract. CamSurf has a vastly wider audience than OmeTV. While some individuals on OmeTV are looking for genuine conversation, on CamSurf, you’ll find people looking for genuine chat. It is our top choice for next time.
Features:
  * Feature-rich website.
  * A huge range of topics is available to discuss.
  * You Mostly find genuine people here.
7. ChatRad
This site claims to be a G-rated alternative to chat sites like Chatroulette, and it is quite harsh toward behavior that is not appropriate. People need to act the same in the real world, where they don’t run around naked or try to expose themselves all of the time… at least not in my world. Despite being a random video chat site, ChatRad is managed by a team of 24x7 moderators, so anything 18 and older can take advantage of the service in a safe environment regardless of their sexual orientation.
Features:
  * Very Strict Policies For Disrespectful People
  * The chat is moderated 24/7 by an active team of moderators.
  * It offers a very safe environment for people.
8.Bazoocam
The Bazoocam webcam chat environment is another random digital camera chat site that maintains a high level of cleanliness. Like most of the other websites mentioned, you’re paired up with an interloper haphazardly. Press “skip” and move on to the next person if you are unsatisfied with what you see.
As icebreakers or when you are bored of talking about yourself, you can join one of the multiplayer games on Boomcam. You are advised to do something unusual if you’re bored, but you are urged to wear your clothes. Put your best foot forward when playing golf in fancy dress or taking part in your favorite music. Try playing a string or wind instrument, and you’ll find many people to talk to.
Features
  * The site offers a very high level of cleanliness.
  * You can chat with the person of your choice.
  * If you don't like a person you can skip to check the next candidate.
  * It also offers a lot of multiplayer games to play with strangers.
  * It will never let you get bored.
9. CamGo
Getting to know new people and making new connections is fun with Camgo. Start a conversation with strangers, develop relationships without worrying about running into Covid, and explore webcam dating! Camgo’s Safe Search feature uses artificial intelligence to discover potential matchmaking partners. Your webcam chat loop will be kept out of the reach of people you don’t want to see! By chatting online with new people from your home, you can meet new people in a much easier and safe manner.
Features:
  * Easy To Meet New Strangers.
  * The site is completely safe to use.
  * It offers a great video chatting experience.
10. iMeetzu
It is similar to Omegle in that there are random live video chats and text chat rooms available, but iMeetzu goes over and above that. Once you get past the randomness, you are given the option of joining a free online dating service or friend finder.
Over a thousand new members are joining every day on this one of the fastest-growing social networking sites. If you’re looking to find a date or if you practice your lines, this is the closest you can get to practice face-to-face before you dive back into the dating pool.
Features:
  * It is identical to Omegle.
  * As it is a new platform so there are mostly genuine users.
  * You can do both text and video chats with strangers.
  * You can also join group chats.
Conclusion
These are some of the best Omegle alternative sites. Every site has its own unique features, but if you compare them in functionality, they are quite similar. It’s just the working of every site is different. You can try these sites one by one and stick to those that you find the most suitable and according to your taste.
Liza Brown
Liza Brown is a writer and a lover of all things video.
Follow @Liza Brown
Also read:
- In 2024, Top 10 Song Recorder to Capture Your Favorite Song Easily
- New In 2024, Enhancing Mobile Audio Clarity Ranking the Best Apps to Improve iPhone & Android Sound
- New 2024 Approved Navigating the World of In-Game Voice Changing Software
- Updated Expert Roundup IPhone Vs. Android – Top 10 Music Editing Applications for 2024
- New In 2024, Karaoke Comfort Zone Free MP3 Downsamper to Trim Tracks and Tune Into the Beat.
- Updated 2024 Approved Soundtrack Your Snaps Add Free Music to Photographs PC/Mobile
- Updated Discovering the Finest Zero-Cost, Open-Source Audio Management on Windows
- In 2024, Audiovisual Mastery on a Budget The Ultimate List of Free Audio Mixers
- Updated Separating Sounds From Visuals MP4 to Audioclip
- New The Art of Audio Zoning Implementing Ducking Effects for Clear Soundscapes
- In 2024, Crafting Original Soundscapes A Guide to Producing Music Video Tracks
- New 2024 Approved Add Audio to Video in Premiere Pro
- Updated 2024 Approved Animation Enthusiasts Choice Top 8 Downloaded Sound Effects for Your Projects
- 2024 Approved Essential Online Hubs for Natural Environment Recordings
- In 2024, No Spending, No Sweat The Ultimate List of Six Video to Audio Conversion Hacks
- Updated How Can You Choose the Best Sound Editor?
- Unleashing Creativity on a Budget The Leading Free Digital Audio Workstations (For Newbies) for 2024
- Updated 2024 Approved The Seamless Journey of Audio Recording in Windows 10 Tips and Tricks for Clear Soundscape Creation
- New 2024 Approved Reverse Audio Best Audio Reversers
- New In 2024, Windows Auditory Enhancement Tools Selecting the Prime Candidates for Decibel Reduction
- 2024 Approved HushHour Pro Advanced Application Crafted to Mute the Chaos, Now Available on Android & iOS As
- New In 2024, 7 Best Audacity Alternatives for Android
- New Essential Soundtracks Every Smartphone Owner Should Have
- 2024 Approved The Editors Beat Pairing Visual Sequences with Musical Tempo Using Adobe Premiere Pro
- New In 2024, Revolutionizing Your Sound IOSs Leading Audio Editing Applications
- 2024 Approved Premier Free MP3 Harmonizer Software
- In 2024, Elevating Your Listening Experience Online Techniques for Speed and Pitch Alteration
- New Troubleshooting Sound Quality Strategies for Easing Audio Deformation for 2024
- Updated In 2024, The Engineers Dream Set-Up Unveiling the Five Cutting-Edge Audio Ducking Programs
- New Mastering Audio Manipulation Adjusting Speed & Tone Over the Internet for 2024
- 2024 Approved How to Remove Audio From Video Online?
- The Ultimate Guide to Modifying Sound Intensity in Audacity for 2024
- New 2024 Approved Innovative Strategies for Enhancing Your Music Videos
- 11 Best Location Changers for Vivo Y100 5G | Dr.fone
- In 2024, How to Unlock Motorola G24 Power Phone without PIN
- In 2024, How to Mirror Your Vivo Y100 5G Screen to PC with Chromecast | Dr.fone
- New 2024 Approved 8 Apps to Custom Your GIF Stickers
- 9 Mind-Blowing Tricks to Hatch Eggs in Pokemon Go Without Walking On Asus ROG Phone 7 Ultimate | Dr.fone
- In 2024, The Best Android SIM Unlock Code Generators Unlock Your Samsung Galaxy Z Flip 5 Phone Hassle-Free
- In 2024, Top 11 Free Apps to Check IMEI on Oppo F23 5G Phones
- How to Simulate GPS Movement in AR games On Oppo Reno 10 5G? | Dr.fone
- New 2024 Approved Rotate MOV Videos for Free Best Solutions
- Pattern Locks Are Unsafe Secure Your Vivo V30 Pro Phone Now with These Tips
- 4 Feasible Ways to Fake Location on Facebook For your Xiaomi Redmi K70 Pro | Dr.fone
- Updated In 2024, Why Vimeo Slideshow Maker Become Popular
- Updated 10 Free QuickTime Editors to Edit MOV Files with Ease
- Use Device Manager to identify missing your drivers with Windows Device Manager in Windows 7
- How to Use Google Assistant on Your Lock Screen Of Infinix Zero 30 5G Phone
- How to Upgrade iPhone XS without Losing Any Data? | Dr.fone
- In 2024, Fake Android Location without Rooting For Your Motorola Razr 40 Ultra | Dr.fone
- New 2024 Approved Mac VLC Video Cutter Trim, Cut, and Edit Videos Without Quality Degradation
- In 2024, How to Remove iPhone 13 Pro SIM Lock?
- Samsung Galaxy Z Flip 5 Video Recovery - Recover Deleted Videos from Samsung Galaxy Z Flip 5
- In 2024, 5 Techniques to Transfer Data from ZTE Blade A73 5G to iPhone 15/14/13/12 | Dr.fone
- Here are Some Pro Tips for Pokemon Go PvP Battles On Oppo Reno 8T | Dr.fone
- New 2024 Approved Free Video Looper Apps for Desktop and Mobile
- Title: Updated Transform Your Audio Projects Professional Tips on Utilizing Keyframes in Adobe Premiere Pro for macOS
- Author: Jacob
- Created at : 2024-05-05 03:41:30
- Updated at : 2024-05-06 03:41:30
- Link: https://audio-shaping.techidaily.com/updated-transform-your-audio-projects-professional-tips-on-utilizing-keyframes-in-adobe-premiere-pro-for-macos/
- License: This work is licensed under CC BY-NC-SA 4.0.
