
:max_bytes(150000):strip_icc():format(webp)/178665671_HighRes-56a532a83df78cf77286de1b.jpg)
Updated Top 13 Gratis Audio Creation Tools for PC and Mac, Updated List for 2024
“Top 13 Gratis Audio Creation Tools for PC and Mac, Updated List “
13 Free Music Production Software for Windows/Mac/Online

Benjamin Arango
Mar 27, 2024• Proven solutions
13 Free Music Production Software for Windows/Mac/Online
Technology advances have spread through all fields of human activity, including music recording and development. The invention of music development tools has made it simpler for people engaged in the creation of music in one form or another.
Numerous applications for music development are on the market, and some are meant for musicians, and others are for educators and teachers. There is also a need to direct prospective customers to the right free music production software.
A comprehensive analysis of some of the best music development tools has been conducted to help you make the correct decision while you’re ready to purchase the app. This comprehensive Music Production Software Guide will provide solutions to many of your unanswered questions relating to the purchase of music production software.
- Part 1: Free Music Production Software for Windows
- Part 2: Free Music Production Software for Mac
- Part 3: Free Music Production Software Online
Part 1: Free Music Production Software for Windows
1. Audacity
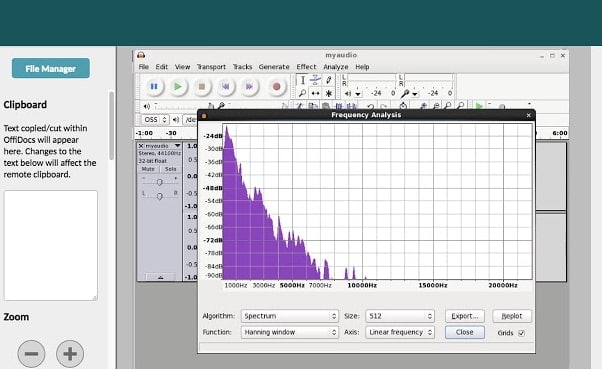
The system for music development is not complete without an audio editor. Audacity is the best free music creation software available on the market. Audacity is open-source and extensive and provides a wide range of tools and effects for performing all audio editing and recording activities. It is created by a community of volunteers and provides regular notifications almost every month. It’s lightweight, safe, and intuitive enough to be used by novice music makers.
Pros
- It is open-source
- It can load VST plugins
Cons
- Only 32-bit plugins are allowed
- Limited features
2. Ardour
Ardour is a highly integrated program of music production that allows users to record and edit on Mac, Linux, and Windows operating systems. Ardour Music Production Software was created by integrating the efforts of the world’s skilled team, such as recording technicians, programmers, and musicians. Such experienced technicians make their concerted and thorough efforts to build the program. Ardour is one of the few applications in music production that respects honesty. The accessibility of this program allows app developers to concentrate on functionality that matters to consumers rather than to construct compelling apps for advertising purposes. This is a system that should be celebrated for its user-focused functionality.
Pros
- It has excellent user-friendliness
- It is available on Mac, Linux, and Windows
Cons
- It lacks a few integral features
- It is difficult to operate for people new to audio editing

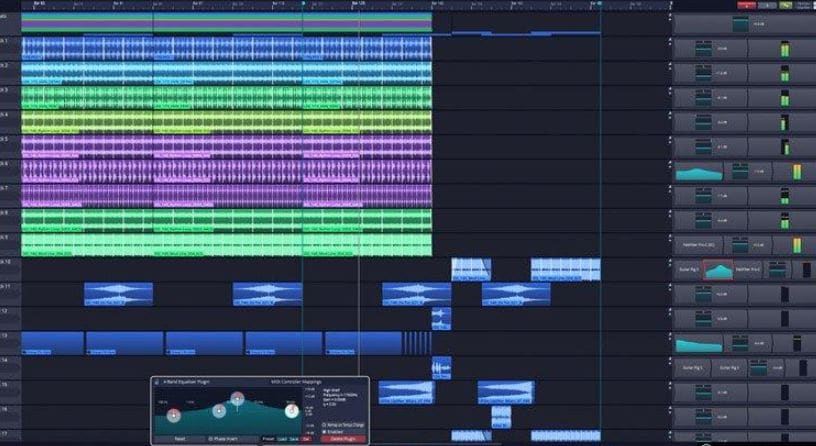
3. Tracktion T7
The people at Tracktion seem to have reached a reasonably canny business model by launching older DAW versions for free and without anything removed.
The convention appears to make it possible to access the edition without charge of two iterations before the new one. You will not be provided with all new functionality, but you will receive an update every time the company updates its flagship DAW, which it does nearly every year.
The growing section is adjustable to match the workflow, and the bottom panel adjusts so that any parameters anywhere on the screen can be seen.
Pros
- It features an unlimited number of audio and MIDI tracks
- It is able to host multiple plugin formats
Cons
- It doesn’t provide all the features at once
- It does not support many plugins
4. LMMS
LMMS is a fully free music production software for windows for music development. It is an open-source and also a project platform for the community. LMMS is a cross-platform device app. It makes it easier to manufacture beats, particularly when many music production professionals have to manufacture quality music with their computers.
Thanks to the powerful sample, beat and melody design, mixing and synthetic sound processes, and many other features, the LMMS music production software provides high-quality audio output. The product also features playback tools, plugins, and samples to produce powerful, high-quality sound.
Pros
- It is compatible with Linux, Windows, and Mac
- Hydrogen project files and MIDI can be imported easily for editing
Cons
- It eats a lot of memory and requires a high-end device to support it
- Some users complained that understanding its working is difficult

5. Cakewalk
This is an exciting app for music production to purchase. It is a fantastic tech to invest in music production. Cakewalk Sonar Artist Software is one of Cakewalk Sonar Artist ‘s great productions. Cakewalk is known for an excellent GUI, an excellent mixing console, an excellent commercial radio system, and limitless MIDI tracks.
A good device to use as part of your instruments for the development of music is the Cakewalk Sonar Artist Music Production program. It stands out as a program packed with excellent features amongst its counterparts. And the app is unmatched in the area of apps.
Pros
- You can share music compilation directly to social media
- You can easily add effects to your tracks
Cons
- It is priced, very high
- One window interface makes it hectic

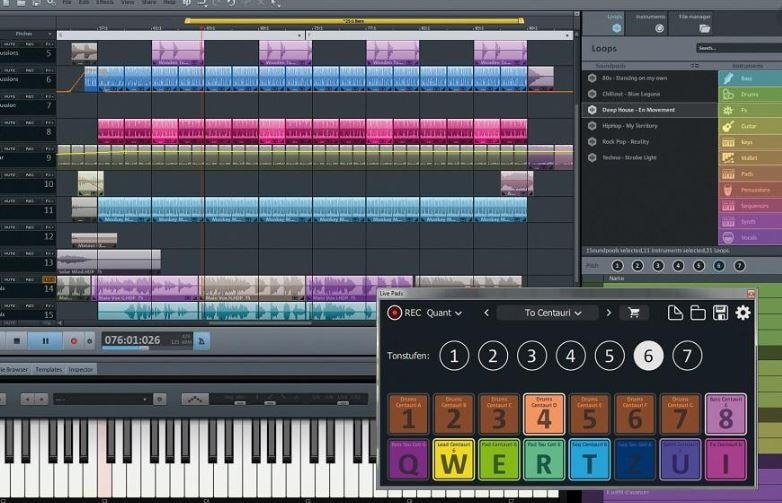
6. Music Maker by Magix
This app is a special program for sound engineers, skilled musicians, and accomplished music producers, developed by US Magix Entertainment. It offers an excellent forum for creative music development in music production professionals.
In reality, the software for music production is excellent software for the Music Maker by Magix. In the field of music post-production and music mastering, mixing and arrangement, recording, and more, the software achieved remarkable breakthroughs. Thanks to the successful combination of a technical device and highly flexible workflow, the Music Maker by Magix has achieved this groundbreaking success.
With creative algorithm and superb plugin effects, the Music Maker by Magix program enables music manufacturers to develop their ideas in line with the highest quality in this industry.
Pros
- It is great for EDM producers
Cons
- It is not suitable for newbies
- The GUI feels a bit cluttered
Part 2: Free Music Production Software for Mac
7. Garageband
This is a music development studio app that is designed to function on Mac. It is a great free music production software for Mac. This software has a full sound collection, which includes virtual instruments, voice, and guitar preset.
GarageBand is a well-known app for music development and is an excellent tool for music beginners. Many people have chosen GarageBand because it does not match the ease and ease of use for recording purposes in particular.
The user-friendly interface makes you easy to create music with a more unobstructed view of what you’re recording. Apps from GarageBand captured the attention of others because of their ease-to-use and user-friendliness.
Pros
- The software offers some nicely packaged preset for vocal and guitar recording
- Productive workflow
Cons
- It has limited plugins
- It is only supported for Mac platforms

8. Ableton Live
The Ableton Live 10 Suite is a dynamic and comprehensive program for the creation and performance of musical recordings.
An essential feature of this software is that it allows you to work on your time-based workflow without affecting the live session. This means that the software gives you a rare chance to get involved with the workflow without stopping live performance.
The Multitrack Recording Technology of Ableton Live10 Suite allows music producers to adjust the speed and pacing of any audio during the recording. To make these adjustments, you don’t have to pause the recording. This is one of the striking characteristics which makes this product a good option for all.
Pros
- Adjusting the speed and pace of audio is a delight
- Sophisticated MIDI/audio routing capabilities
Cons
- It has a traditional design
- Not enough updates to fix the buggy features

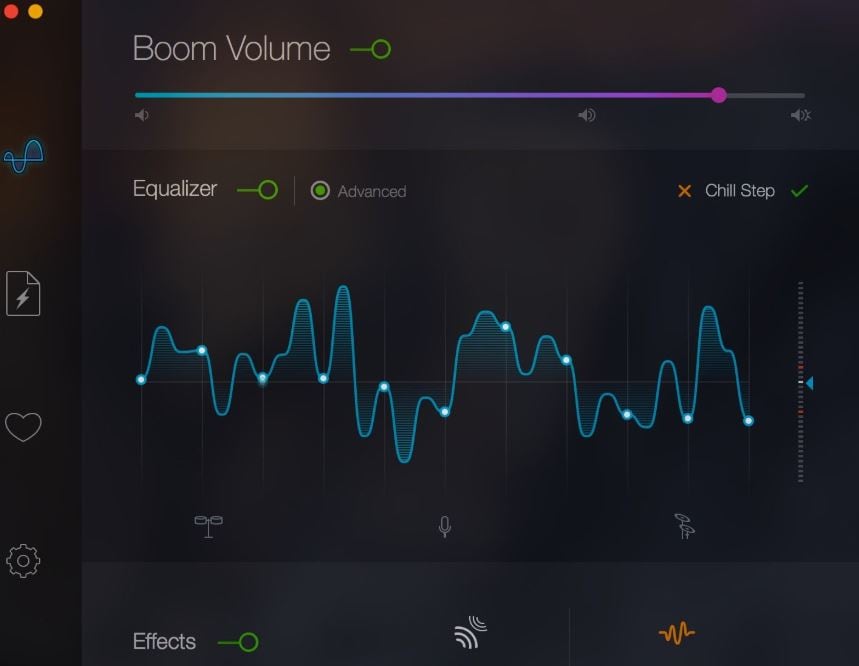
9. Boom 3D
Boom 3D for Mac & Windows is an award-winning pro sound improvement software designed to play your media content on any and all of your devices, phones, or streaming services with amazing 3D effects. No costly headphones or sound boosters will be needed to make your music feel like it! Designed in a new immersive 3D surround sound technology, Boom 3D redefines how people listen to music, watch films, or play games with some headphones on their devices. 3D sound provides the option to check the LFE (subwoofer), and the audio intensity of each Virtual 3D Surround audio system speaker.
Pros
- It comes with loads of content
- Audio quality can be enhanced
Cons
- The design is not suitable for everybody
- It does not have a Linux version
10. Mixxx
For beginners, Mixxx is just another great device. This is also one of the best free music production software downloads for your music. This software supports all Mac, Windows, and Linux platforms.
The application provides you with a DJ-mixing environment and supports all standard formats such as Mp3 and many other formats.
Pros
- It is a great app for beginners
- Supported by Mac, Windows, and Linux
Cons
- It doesn’t support many plugins
- GUI isn’t that great

Part 3: Free Music Production Software Online
11. Soundation
Soundation is a platform that provides free music production software online only capabilities. The free version and three paid versions are offered. You can use this to build your tracks unless you have the resources to do so if you need a web-based music maker and editor.
If you pay, even after you have made your music, you can always cancel. Remember first to save them to your hard drive. If you need paid characteristics, pay for the monthly plan again through PayPal, and you have to use it for a month.
Pros
- Great SSL-modelled mixer
- You can use its devices as a plugin
Cons
- It works only online

12. Audiotool
Audiotool is a popular app for music production hosted online and can be used without installation from inside your browser. It uses a cloud-based network to store all your music and files wherever you are. It is also confirmed that you will share music and tracks directly with YouTube, SoundCloud, and Facebook on its own publishing site. They have premium releases from Loopmasters and some fantastic online VSTs, for example, Heisenberg, Machiniste, Bassline, and Beatbox 8 & 9.
Pros
- No installation needed
- You can directly share it to your social media
Cons
- It works only online
- No upgrades

13. Soundtrap
Soundtrap is not only an online music studio but a training site for students and instructors. The STEAM Curriculum is an online learning resource that helps students to follow music and podcasts, incorporated into the Web app. As we mentioned earlier, in addition to the online Web App, you can also use it on different devices, share it with other users, and work in innovative projects for your music.
The interface is simple, easy to use, and easy to understand. It is simply an instrument for innovation; you don’t have to learn how to apply VST or any other technical elements to music creation. You can also record your MIDI instruments directly from your machine or device’s mic.
Pros
- It provides a great platform for teachers to teach their students
- It is very easy to use
Cons
- It only has a limited number of plugins
- It cannot be used professionally

Conclusion
If you make music on a computer, the most important resource in your artistic arsenal is your DAW; in your home recording system, you ‘re probably going to have the MIDI keyboard, audio interface, studio monitor speakers, and maybe a microphone or two. But your program is at the core of it all. Not everyone can afford expensive DAWs, but one must not worry as free music production software are present to aid us.
It is important to have a DAW with which you are pleased and, perhaps more importantly, a DAW, which allows you to turn your ideas into music as quickly and painlessly as possible. So make sure you choose the best one for you according to your needs. Hopefully, this guide will aid you!


Benjamin Arango
Benjamin Arango is a writer and a lover of all things video.
Follow @Benjamin Arango
Benjamin Arango
Mar 27, 2024• Proven solutions
13 Free Music Production Software for Windows/Mac/Online
Technology advances have spread through all fields of human activity, including music recording and development. The invention of music development tools has made it simpler for people engaged in the creation of music in one form or another.
Numerous applications for music development are on the market, and some are meant for musicians, and others are for educators and teachers. There is also a need to direct prospective customers to the right free music production software.
A comprehensive analysis of some of the best music development tools has been conducted to help you make the correct decision while you’re ready to purchase the app. This comprehensive Music Production Software Guide will provide solutions to many of your unanswered questions relating to the purchase of music production software.
- Part 1: Free Music Production Software for Windows
- Part 2: Free Music Production Software for Mac
- Part 3: Free Music Production Software Online
Part 1: Free Music Production Software for Windows
1. Audacity
The system for music development is not complete without an audio editor. Audacity is the best free music creation software available on the market. Audacity is open-source and extensive and provides a wide range of tools and effects for performing all audio editing and recording activities. It is created by a community of volunteers and provides regular notifications almost every month. It’s lightweight, safe, and intuitive enough to be used by novice music makers.
Pros
- It is open-source
- It can load VST plugins
Cons
- Only 32-bit plugins are allowed
- Limited features
2. Ardour
Ardour is a highly integrated program of music production that allows users to record and edit on Mac, Linux, and Windows operating systems. Ardour Music Production Software was created by integrating the efforts of the world’s skilled team, such as recording technicians, programmers, and musicians. Such experienced technicians make their concerted and thorough efforts to build the program. Ardour is one of the few applications in music production that respects honesty. The accessibility of this program allows app developers to concentrate on functionality that matters to consumers rather than to construct compelling apps for advertising purposes. This is a system that should be celebrated for its user-focused functionality.
Pros
- It has excellent user-friendliness
- It is available on Mac, Linux, and Windows
Cons
- It lacks a few integral features
- It is difficult to operate for people new to audio editing
3. Tracktion T7
The people at Tracktion seem to have reached a reasonably canny business model by launching older DAW versions for free and without anything removed.
The convention appears to make it possible to access the edition without charge of two iterations before the new one. You will not be provided with all new functionality, but you will receive an update every time the company updates its flagship DAW, which it does nearly every year.
The growing section is adjustable to match the workflow, and the bottom panel adjusts so that any parameters anywhere on the screen can be seen.
Pros
- It features an unlimited number of audio and MIDI tracks
- It is able to host multiple plugin formats
Cons
- It doesn’t provide all the features at once
- It does not support many plugins
4. LMMS
LMMS is a fully free music production software for windows for music development. It is an open-source and also a project platform for the community. LMMS is a cross-platform device app. It makes it easier to manufacture beats, particularly when many music production professionals have to manufacture quality music with their computers.
Thanks to the powerful sample, beat and melody design, mixing and synthetic sound processes, and many other features, the LMMS music production software provides high-quality audio output. The product also features playback tools, plugins, and samples to produce powerful, high-quality sound.
Pros
- It is compatible with Linux, Windows, and Mac
- Hydrogen project files and MIDI can be imported easily for editing
Cons
- It eats a lot of memory and requires a high-end device to support it
- Some users complained that understanding its working is difficult
5. Cakewalk
This is an exciting app for music production to purchase. It is a fantastic tech to invest in music production. Cakewalk Sonar Artist Software is one of Cakewalk Sonar Artist ‘s great productions. Cakewalk is known for an excellent GUI, an excellent mixing console, an excellent commercial radio system, and limitless MIDI tracks.
A good device to use as part of your instruments for the development of music is the Cakewalk Sonar Artist Music Production program. It stands out as a program packed with excellent features amongst its counterparts. And the app is unmatched in the area of apps.
Pros
- You can share music compilation directly to social media
- You can easily add effects to your tracks
Cons
- It is priced, very high
- One window interface makes it hectic
6. Music Maker by Magix
This app is a special program for sound engineers, skilled musicians, and accomplished music producers, developed by US Magix Entertainment. It offers an excellent forum for creative music development in music production professionals.
In reality, the software for music production is excellent software for the Music Maker by Magix. In the field of music post-production and music mastering, mixing and arrangement, recording, and more, the software achieved remarkable breakthroughs. Thanks to the successful combination of a technical device and highly flexible workflow, the Music Maker by Magix has achieved this groundbreaking success.
With creative algorithm and superb plugin effects, the Music Maker by Magix program enables music manufacturers to develop their ideas in line with the highest quality in this industry.
Pros
- It is great for EDM producers
Cons
- It is not suitable for newbies
- The GUI feels a bit cluttered
Part 2: Free Music Production Software for Mac
7. Garageband
This is a music development studio app that is designed to function on Mac. It is a great free music production software for Mac. This software has a full sound collection, which includes virtual instruments, voice, and guitar preset.
GarageBand is a well-known app for music development and is an excellent tool for music beginners. Many people have chosen GarageBand because it does not match the ease and ease of use for recording purposes in particular.
The user-friendly interface makes you easy to create music with a more unobstructed view of what you’re recording. Apps from GarageBand captured the attention of others because of their ease-to-use and user-friendliness.
Pros
- The software offers some nicely packaged preset for vocal and guitar recording
- Productive workflow
Cons
- It has limited plugins
- It is only supported for Mac platforms
8. Ableton Live
The Ableton Live 10 Suite is a dynamic and comprehensive program for the creation and performance of musical recordings.
An essential feature of this software is that it allows you to work on your time-based workflow without affecting the live session. This means that the software gives you a rare chance to get involved with the workflow without stopping live performance.
The Multitrack Recording Technology of Ableton Live10 Suite allows music producers to adjust the speed and pacing of any audio during the recording. To make these adjustments, you don’t have to pause the recording. This is one of the striking characteristics which makes this product a good option for all.
Pros
- Adjusting the speed and pace of audio is a delight
- Sophisticated MIDI/audio routing capabilities
Cons
- It has a traditional design
- Not enough updates to fix the buggy features
9. Boom 3D
Boom 3D for Mac & Windows is an award-winning pro sound improvement software designed to play your media content on any and all of your devices, phones, or streaming services with amazing 3D effects. No costly headphones or sound boosters will be needed to make your music feel like it! Designed in a new immersive 3D surround sound technology, Boom 3D redefines how people listen to music, watch films, or play games with some headphones on their devices. 3D sound provides the option to check the LFE (subwoofer), and the audio intensity of each Virtual 3D Surround audio system speaker.
Pros
- It comes with loads of content
- Audio quality can be enhanced
Cons
- The design is not suitable for everybody
- It does not have a Linux version
10. Mixxx
For beginners, Mixxx is just another great device. This is also one of the best free music production software downloads for your music. This software supports all Mac, Windows, and Linux platforms.
The application provides you with a DJ-mixing environment and supports all standard formats such as Mp3 and many other formats.
Pros
- It is a great app for beginners
- Supported by Mac, Windows, and Linux
Cons
- It doesn’t support many plugins
- GUI isn’t that great
Part 3: Free Music Production Software Online
11. Soundation
Soundation is a platform that provides free music production software online only capabilities. The free version and three paid versions are offered. You can use this to build your tracks unless you have the resources to do so if you need a web-based music maker and editor.
If you pay, even after you have made your music, you can always cancel. Remember first to save them to your hard drive. If you need paid characteristics, pay for the monthly plan again through PayPal, and you have to use it for a month.
Pros
- Great SSL-modelled mixer
- You can use its devices as a plugin
Cons
- It works only online
12. Audiotool
Audiotool is a popular app for music production hosted online and can be used without installation from inside your browser. It uses a cloud-based network to store all your music and files wherever you are. It is also confirmed that you will share music and tracks directly with YouTube, SoundCloud, and Facebook on its own publishing site. They have premium releases from Loopmasters and some fantastic online VSTs, for example, Heisenberg, Machiniste, Bassline, and Beatbox 8 & 9.
Pros
- No installation needed
- You can directly share it to your social media
Cons
- It works only online
- No upgrades
13. Soundtrap
Soundtrap is not only an online music studio but a training site for students and instructors. The STEAM Curriculum is an online learning resource that helps students to follow music and podcasts, incorporated into the Web app. As we mentioned earlier, in addition to the online Web App, you can also use it on different devices, share it with other users, and work in innovative projects for your music.
The interface is simple, easy to use, and easy to understand. It is simply an instrument for innovation; you don’t have to learn how to apply VST or any other technical elements to music creation. You can also record your MIDI instruments directly from your machine or device’s mic.
Pros
- It provides a great platform for teachers to teach their students
- It is very easy to use
Cons
- It only has a limited number of plugins
- It cannot be used professionally
Conclusion
If you make music on a computer, the most important resource in your artistic arsenal is your DAW; in your home recording system, you ‘re probably going to have the MIDI keyboard, audio interface, studio monitor speakers, and maybe a microphone or two. But your program is at the core of it all. Not everyone can afford expensive DAWs, but one must not worry as free music production software are present to aid us.
It is important to have a DAW with which you are pleased and, perhaps more importantly, a DAW, which allows you to turn your ideas into music as quickly and painlessly as possible. So make sure you choose the best one for you according to your needs. Hopefully, this guide will aid you!
Benjamin Arango
Benjamin Arango is a writer and a lover of all things video.
Follow @Benjamin Arango
Perfect Harmony in Post-Production: Innovative iMovie Audio Techniques for Seamless Soundscape Integration
All You Need to Know About iMovie Audio Editing

Marion Dubois
Oct 26, 2023• Proven solutions
iMovie offers a fantastic platform for video editing where you can merge multiple video clips to create something very phenomenal. Plus, it’s simply here to navigate between different scenes, edit video clips and save results directly to the digital format without making any videotape transformations.
It provides lots of things to beginners and professionals with its easy-to-use interface without any quality loss for your results even after adding lots of transitions, changes, and effects.
However, it is not accessible to master software, precisely when you’re not familiar with it, or you’re not its professional user. So today, we’d like to explore or pay attention to iMovie’s audio editing steps, tips, and tricks to help you become an iMovie master quickly.
What’s more, a practical yet professional iMovie alternative software is also advisable in this guide. So when the iMovie cannot fulfil your editing requirements, why don’t you hop on an iMovie alternative software?
Now, let’s get started!
Part 1: How to Edit Audio Clips in iMovie?
To learn how to edit audio clips in iMovie, you can use actions in the menu along with the quick shortcuts to make adjustments to your audio clips in iMovie on Mac. It’s a tip for your convenience!
Trim Audio Clips
There are a couple of options to trim an audio clip in iMovie.
#1. Trim to Playhead
You can place the playhead in your timeline. Now, trim an audio clip to that exact spot. Next, start moving the playhead and do one from the following.
- Select Modify > Trim to Playhead option in the menu bar.
- Right-click the audio clip and select the option of Trim to Playhead in the shortcut menu.
#2. Use the Clip Trimmer
You can use the Clip Trimmer to trim an exact section of the clip.
Step 1. Right-click the audio clip and select Show Clip Trimmer in the shortcut menu.
Step 2. After the Clip Trimmer shows, select a section you wish to trim by dragging the arrows right and left while holding the white lines. The area within those lines is what will get entirely deleted.
Move the entire clip but keep the trim area in place if arrows turn to a film strip icon.
Step 3. Click Close Clip Trimmer after you finish this section.
Shorten or Lengthen Audio Clips
You can easily shorten or lengthen an audio clip in iMovie. Just choose the pin in the timeline and drag one of its edges. The duration of the clip change will change as you carry. And a new course will be displayed after you finish in the upper left menu.
You can also set the clip’s duration to an exact time. Select the clip in the timeline and hit the Clip Information (small letter “i”) tab located above the Viewer. Put the value of the time you want in seconds in the Duration box on the right.
Change the Speed of an Audio Clip
You may want to speed up or slow down an audio clip while editing music in iMovie. So, here’s what you need to do!
Method 1. Click the Speed button above the Viewer. Next, select Custom in the Speed drop-down box and enter a percentage next to it. You can also set a different speed in that box if you prefer.
Method 2. Right-click the clip and select Show Speed Editor from the shortcut menu. A slider will then display at the top of the clip that you can move to change the speed.
Adjust the Volume of an Audio Clip
You can set the audio clip’s volume at higher or lower, or even mute it. Just select the clip and then do one of the following.
- Select the Volume tab above the Viewer option and move the slider to the percentage of volume. Hit the Mute button to mute the audio clip.
- Tap inside the clip, and when the two-sided arrow appears, drag up or down to adjust the volume.
Fade an Audio Clip
While editing audio in iMovie, you can also fade in or out the clip. Choose a clip in the timeline and then drag the fade handle (small circle) at either the ending or the beginning of the clip to make a fade-out or a fade-in effect.
As you drag, you will see the arcs displaying the shadow for the clips fade in or fade out.
How to Edit Audio Clips in iMovie on iOS?
The iMovie timeline is where you sort or organize all your audio clips, such as the special effects and background music. Audio clips are always present below the video clips in the timeline. To edit audio clips in iMovie on your iPhones or iPads, you can follow the guide belo
Move an Audio Clip
You can transfer the whole audio clip, except the background music, to another location.
- Touch and hold the purple or blue audio clip with your project open in the timeline until it comes over the timeline bar.
- Drag the clip to another place and release.
Adjust the Audio Clip’s Duration
Step 1. While the project is launched in the timeline, tap the audio clip (in blue or purple) or the background music clip you wish to adjust.
Step 2. Now, you can see the display of yellow trim handles. Drag them either at the end of the clip to the points where you wish the audio to start and end. If a trim handle won’t move left or right, it simply indicates there is no additional audio to work with on that clip’s end.
Step 3. Tap outside the audio clip and let the trim handles disappear.
Split an Audio Clip
There are around two options to split audio clips in iMovie. You can remove unwanted parts or adjust each section’s duration, volume, or speed while you split a clip.
Step 1. With your launched project in the timeline, scroll the timeline to the playhead’s position where you want to split the audio.
Step 2. Click the audio clip to display the inspector at the screen’s bottom.
Step 3. Now, click the Actions button, and select the Split tab.
Or, you can tap the clip (it becomes outlined in yellow), then swipe above the playhead as if you were placing your finger to slide over it.
Detach the Audio Part from a Video
You can detach the video clip’s audio to remove or edit it as a separate video clip.
Step 1. When the project is open in the timeline, select a video clip and display the inspector at the screen’s bottom.
Step 2. Tap the Actions button, then tap Detach.
Step 3. A new blue-colored audio clip will then appear below the video project. You can now move, edit, or delete the audio clip separately from its parent video clip.
Move Audio to the Foreground or Background
To ensure the sound in your video clips can listen above the background music, iMovie implies audio “ducking”. Ducking lowers the background music clips’ volume whenever there’s a video clip whose sound is playing simultaneously.
You can select which audio clips are in the foreground or the background.
Step 1. Select the timeline’s audio clip to display the inspector at the screen’s bottom.
Step 2. Hit the Actions tab and proceed with selecting the Foreground or Background.
The clip color changes to indicate whether it’s the background music (green) or foreground audio (blue or purple).
Part 2: An Easier Way to Edit Audio Clips
Windows users might be wandering for an alternative to iMovie as this software tool is only compatible with Mac and iOS devices. You will be thrilled to know that Wondershare Filmora can serve you with all synonymous and extra features more than the iMovie, and it works significantly in the Windows environment.
This latest software tool also assists users with easy video editing tricks and the intuitive interface that best serves quality editing to beginners and professionals.
Despite the basic video editing features, such as trimming, splitting, merging, cutting, and cropping, Filmora also offers various advanced editing elements that are far better than iMovie. And, with its video editing features, you can make a green screen effect, stabilize your video footage, reverse your video clip, and more.
Moreover, you can enjoy royalty-free music tracks for different themes, such as Young and Bright, Tender and Sentimental, Rock, Folk, Electronic Rock, and Hipster Folk, for selection.
All this will be available with a single program called Wondershare Filmora to take advantage of them for free. You do not have to search the background music files like a needle in a haystack. The program has nicely organized the music themes into six different folders. You can apply it for your video and make advanced editing, such as split/trim the clip, adjust the playback speed, pitch, volume, etc.
How to Edit Audio with Wondershare Filmora?
In Wondershare Filmora, you can insert background music and other files from the audio library or your computer. You can even record your voiceover using it.
Add Background Music
Filmora provides a royalty-free music library you can access or import your music within the program. You can select a song from the royalty-free audio library and use it for free.
The audio library has categorized into: YOUNG & BRIGHT, TENDER & SENTIMENTAL, ROCK, FOLK, and ELECTRONIC. The different kinds of sound effects are also available under the Sound Effects tab.
Once you find a sound effect or a song, either right-click on it and go with the Apply or drag and drop it into an audio track in the timeline.
Or, you can click the Import button above the Media Library panel to browse for audio files in your PC system. Then, select and import it into the Media Library when you find the song or other audio files you wish to add.
Once you place the song in the timeline, double-click to edit it in the Audio editing panel. You can apply fade-in or fade-out effects or adjust the pitch and volume. Filmora lets you add up to 100 audio tracks.
Split Audio Clips
Choose your audio clip and place the playhead where you want to split it, then right-click on the clip and choose the Split tab or click the Split icon right above on the toolbar.
Adjust Audio Settings
Double click on the audio clip to make adjustments to your audio. Open a panel with adjustment sliders in the timeline for pitch and volume.
Another element that you’ll find in this panel is Denoise, which is a feature that can remove background noise from your audio clips.
For a more professional audio editing experience, you can also access the Audio Equalizer from this panel. Select from presets or make manual adjustments by hitting the Customize tab.
Play it when you are done and, if you’re not happy with the results, tap the Reset button to start over.
Audio Equalizer (EQ)
All videos have plenty of sounds like speech, music, or sound effects. Changing the strength of sound waves will help you to mix these sounds within a coherent soundtrack.
Locate your audio clip in an audio track and double-click on it to open the Audio settings menu window. A drop-down menu next to the Equalizer feature will display presets such as Classic, Default, Rock’n’Roll, Techno, Sparkle, Bass, Hard Rock, Pop, Ska, Blues, Folk, Acoustic, Custom, or Country. Choose the preset that best fits your current needs and hit the OK tab to apply it.
Now, hit the Customize tab next to the drop-down bar to adjust the Audio Equalizer manually. Drag the sliders up or down and make the adjustments until you find their ideal value. Finally, hit OK and save your settings.
Besides the included music tracks and sound effects in Filmora initially, you can also find more audio files from Filmora’s effects store – Filmstock, and even get some free music and sound.
Part 3: iMovie Audio Editing Tips & Tricks
iMovie is a great video editor for Mac computers. After understanding the best alternative of iMovie sound editin g, let’s check out some tips on editing audio in iMovie best.
The explanations and screenshots below are for iMovie 10 only. However, the steps are a bit similar to older versions.
So, here we go!
1. Use Waveforms to See What You Hear
To properly edit the audio track in iMovie, you need a good pair of headphones and speakers to hear the sound, but you also need to check the sound.
You can check the sound in iMovie by considering the waveforms on each clip. If the waveforms can’t be seen, go to the View drop-down menu and choose the Show Waveforms option. The clip size for your project can also adjust to get an even better appearance for each video clip.
The waveforms will display the volume level of a clip and give you a good idea of what sections will require to turn up or down. You can also check how the levels of different clips compare to one another.
2. Audio Adjustments
With the help of Adjust tab in the top right, you can access some basic audio editing tools for changing your selected clip’s volume or changing the volume of other relative clips in the project.
The adjustment window of audio also provides basic audio equalization and noise reduction tools, along with a range of effects - from echo to robot - that will change the way people in your video sound.
3. Edit Audio with the Timeline
iMovie assists you in adjusting the audio within the clips themselves. Each pin has a volume bar, moving up and down to decrease or increase the audio level. The clips also contain Fade In and Fade Out tabs at the beginning and end, dragging to adjust the fade’s length.
By adding a short fade effect, whether in or out, the sound becomes relatively smoother and less conflicting to the ear when a new clip begins.
4. Detach the Audio
By default, iMovie keeps the video and audio sections of clips together for convenience. Yet, you want to use the video and audio sections of a clip separately sometimes.
For this purpose, choose your clip in the timeline, visit the Modify drop-down menu, and hit the Detach Audio button. You’ll now have two clips - one with the images and another with the sound.
A lot you can do with the detached audio. For instance, you could extend the audio clip to begin before the video plays, or so that it plays for a few seconds even after the video fades out. You could also cut out pieces from the audio’s middle portion while leaving the video intact.
Conclusion
Coming towards the end of the discussion, after understanding iMovie audio editingand going through an elaborated alternative of iMovie application, we decided that Wondershare Filmora sounds the best out of it. It allows you to flawlessly edit video and audio files on your desktop, with various inbuilt royalty-free music tracks to select from that can further improve your project’s presence.
Marion Dubois
Marion Dubois is a writer and a lover of all things video.
Follow @Marion Dubois
Marion Dubois
Oct 26, 2023• Proven solutions
iMovie offers a fantastic platform for video editing where you can merge multiple video clips to create something very phenomenal. Plus, it’s simply here to navigate between different scenes, edit video clips and save results directly to the digital format without making any videotape transformations.
It provides lots of things to beginners and professionals with its easy-to-use interface without any quality loss for your results even after adding lots of transitions, changes, and effects.
However, it is not accessible to master software, precisely when you’re not familiar with it, or you’re not its professional user. So today, we’d like to explore or pay attention to iMovie’s audio editing steps, tips, and tricks to help you become an iMovie master quickly.
What’s more, a practical yet professional iMovie alternative software is also advisable in this guide. So when the iMovie cannot fulfil your editing requirements, why don’t you hop on an iMovie alternative software?
Now, let’s get started!
Part 1: How to Edit Audio Clips in iMovie?
To learn how to edit audio clips in iMovie, you can use actions in the menu along with the quick shortcuts to make adjustments to your audio clips in iMovie on Mac. It’s a tip for your convenience!
Trim Audio Clips
There are a couple of options to trim an audio clip in iMovie.
#1. Trim to Playhead
You can place the playhead in your timeline. Now, trim an audio clip to that exact spot. Next, start moving the playhead and do one from the following.
- Select Modify > Trim to Playhead option in the menu bar.
- Right-click the audio clip and select the option of Trim to Playhead in the shortcut menu.
#2. Use the Clip Trimmer
You can use the Clip Trimmer to trim an exact section of the clip.
Step 1. Right-click the audio clip and select Show Clip Trimmer in the shortcut menu.
Step 2. After the Clip Trimmer shows, select a section you wish to trim by dragging the arrows right and left while holding the white lines. The area within those lines is what will get entirely deleted.
Move the entire clip but keep the trim area in place if arrows turn to a film strip icon.
Step 3. Click Close Clip Trimmer after you finish this section.
Shorten or Lengthen Audio Clips
You can easily shorten or lengthen an audio clip in iMovie. Just choose the pin in the timeline and drag one of its edges. The duration of the clip change will change as you carry. And a new course will be displayed after you finish in the upper left menu.
You can also set the clip’s duration to an exact time. Select the clip in the timeline and hit the Clip Information (small letter “i”) tab located above the Viewer. Put the value of the time you want in seconds in the Duration box on the right.
Change the Speed of an Audio Clip
You may want to speed up or slow down an audio clip while editing music in iMovie. So, here’s what you need to do!
Method 1. Click the Speed button above the Viewer. Next, select Custom in the Speed drop-down box and enter a percentage next to it. You can also set a different speed in that box if you prefer.
Method 2. Right-click the clip and select Show Speed Editor from the shortcut menu. A slider will then display at the top of the clip that you can move to change the speed.
Adjust the Volume of an Audio Clip
You can set the audio clip’s volume at higher or lower, or even mute it. Just select the clip and then do one of the following.
- Select the Volume tab above the Viewer option and move the slider to the percentage of volume. Hit the Mute button to mute the audio clip.
- Tap inside the clip, and when the two-sided arrow appears, drag up or down to adjust the volume.
Fade an Audio Clip
While editing audio in iMovie, you can also fade in or out the clip. Choose a clip in the timeline and then drag the fade handle (small circle) at either the ending or the beginning of the clip to make a fade-out or a fade-in effect.
As you drag, you will see the arcs displaying the shadow for the clips fade in or fade out.
How to Edit Audio Clips in iMovie on iOS?
The iMovie timeline is where you sort or organize all your audio clips, such as the special effects and background music. Audio clips are always present below the video clips in the timeline. To edit audio clips in iMovie on your iPhones or iPads, you can follow the guide belo
Move an Audio Clip
You can transfer the whole audio clip, except the background music, to another location.
- Touch and hold the purple or blue audio clip with your project open in the timeline until it comes over the timeline bar.
- Drag the clip to another place and release.
Adjust the Audio Clip’s Duration
Step 1. While the project is launched in the timeline, tap the audio clip (in blue or purple) or the background music clip you wish to adjust.
Step 2. Now, you can see the display of yellow trim handles. Drag them either at the end of the clip to the points where you wish the audio to start and end. If a trim handle won’t move left or right, it simply indicates there is no additional audio to work with on that clip’s end.
Step 3. Tap outside the audio clip and let the trim handles disappear.
Split an Audio Clip
There are around two options to split audio clips in iMovie. You can remove unwanted parts or adjust each section’s duration, volume, or speed while you split a clip.
Step 1. With your launched project in the timeline, scroll the timeline to the playhead’s position where you want to split the audio.
Step 2. Click the audio clip to display the inspector at the screen’s bottom.
Step 3. Now, click the Actions button, and select the Split tab.
Or, you can tap the clip (it becomes outlined in yellow), then swipe above the playhead as if you were placing your finger to slide over it.
Detach the Audio Part from a Video
You can detach the video clip’s audio to remove or edit it as a separate video clip.
Step 1. When the project is open in the timeline, select a video clip and display the inspector at the screen’s bottom.
Step 2. Tap the Actions button, then tap Detach.
Step 3. A new blue-colored audio clip will then appear below the video project. You can now move, edit, or delete the audio clip separately from its parent video clip.
Move Audio to the Foreground or Background
To ensure the sound in your video clips can listen above the background music, iMovie implies audio “ducking”. Ducking lowers the background music clips’ volume whenever there’s a video clip whose sound is playing simultaneously.
You can select which audio clips are in the foreground or the background.
Step 1. Select the timeline’s audio clip to display the inspector at the screen’s bottom.
Step 2. Hit the Actions tab and proceed with selecting the Foreground or Background.
The clip color changes to indicate whether it’s the background music (green) or foreground audio (blue or purple).
Part 2: An Easier Way to Edit Audio Clips
Windows users might be wandering for an alternative to iMovie as this software tool is only compatible with Mac and iOS devices. You will be thrilled to know that Wondershare Filmora can serve you with all synonymous and extra features more than the iMovie, and it works significantly in the Windows environment.
This latest software tool also assists users with easy video editing tricks and the intuitive interface that best serves quality editing to beginners and professionals.
Despite the basic video editing features, such as trimming, splitting, merging, cutting, and cropping, Filmora also offers various advanced editing elements that are far better than iMovie. And, with its video editing features, you can make a green screen effect, stabilize your video footage, reverse your video clip, and more.
Moreover, you can enjoy royalty-free music tracks for different themes, such as Young and Bright, Tender and Sentimental, Rock, Folk, Electronic Rock, and Hipster Folk, for selection.
All this will be available with a single program called Wondershare Filmora to take advantage of them for free. You do not have to search the background music files like a needle in a haystack. The program has nicely organized the music themes into six different folders. You can apply it for your video and make advanced editing, such as split/trim the clip, adjust the playback speed, pitch, volume, etc.
How to Edit Audio with Wondershare Filmora?
In Wondershare Filmora, you can insert background music and other files from the audio library or your computer. You can even record your voiceover using it.
Add Background Music
Filmora provides a royalty-free music library you can access or import your music within the program. You can select a song from the royalty-free audio library and use it for free.
The audio library has categorized into: YOUNG & BRIGHT, TENDER & SENTIMENTAL, ROCK, FOLK, and ELECTRONIC. The different kinds of sound effects are also available under the Sound Effects tab.
Once you find a sound effect or a song, either right-click on it and go with the Apply or drag and drop it into an audio track in the timeline.
Or, you can click the Import button above the Media Library panel to browse for audio files in your PC system. Then, select and import it into the Media Library when you find the song or other audio files you wish to add.
Once you place the song in the timeline, double-click to edit it in the Audio editing panel. You can apply fade-in or fade-out effects or adjust the pitch and volume. Filmora lets you add up to 100 audio tracks.
Split Audio Clips
Choose your audio clip and place the playhead where you want to split it, then right-click on the clip and choose the Split tab or click the Split icon right above on the toolbar.
Adjust Audio Settings
Double click on the audio clip to make adjustments to your audio. Open a panel with adjustment sliders in the timeline for pitch and volume.
Another element that you’ll find in this panel is Denoise, which is a feature that can remove background noise from your audio clips.
For a more professional audio editing experience, you can also access the Audio Equalizer from this panel. Select from presets or make manual adjustments by hitting the Customize tab.
Play it when you are done and, if you’re not happy with the results, tap the Reset button to start over.
Audio Equalizer (EQ)
All videos have plenty of sounds like speech, music, or sound effects. Changing the strength of sound waves will help you to mix these sounds within a coherent soundtrack.
Locate your audio clip in an audio track and double-click on it to open the Audio settings menu window. A drop-down menu next to the Equalizer feature will display presets such as Classic, Default, Rock’n’Roll, Techno, Sparkle, Bass, Hard Rock, Pop, Ska, Blues, Folk, Acoustic, Custom, or Country. Choose the preset that best fits your current needs and hit the OK tab to apply it.
Now, hit the Customize tab next to the drop-down bar to adjust the Audio Equalizer manually. Drag the sliders up or down and make the adjustments until you find their ideal value. Finally, hit OK and save your settings.
Besides the included music tracks and sound effects in Filmora initially, you can also find more audio files from Filmora’s effects store – Filmstock, and even get some free music and sound.
Part 3: iMovie Audio Editing Tips & Tricks
iMovie is a great video editor for Mac computers. After understanding the best alternative of iMovie sound editin g, let’s check out some tips on editing audio in iMovie best.
The explanations and screenshots below are for iMovie 10 only. However, the steps are a bit similar to older versions.
So, here we go!
1. Use Waveforms to See What You Hear
To properly edit the audio track in iMovie, you need a good pair of headphones and speakers to hear the sound, but you also need to check the sound.
You can check the sound in iMovie by considering the waveforms on each clip. If the waveforms can’t be seen, go to the View drop-down menu and choose the Show Waveforms option. The clip size for your project can also adjust to get an even better appearance for each video clip.
The waveforms will display the volume level of a clip and give you a good idea of what sections will require to turn up or down. You can also check how the levels of different clips compare to one another.
2. Audio Adjustments
With the help of Adjust tab in the top right, you can access some basic audio editing tools for changing your selected clip’s volume or changing the volume of other relative clips in the project.
The adjustment window of audio also provides basic audio equalization and noise reduction tools, along with a range of effects - from echo to robot - that will change the way people in your video sound.
3. Edit Audio with the Timeline
iMovie assists you in adjusting the audio within the clips themselves. Each pin has a volume bar, moving up and down to decrease or increase the audio level. The clips also contain Fade In and Fade Out tabs at the beginning and end, dragging to adjust the fade’s length.
By adding a short fade effect, whether in or out, the sound becomes relatively smoother and less conflicting to the ear when a new clip begins.
4. Detach the Audio
By default, iMovie keeps the video and audio sections of clips together for convenience. Yet, you want to use the video and audio sections of a clip separately sometimes.
For this purpose, choose your clip in the timeline, visit the Modify drop-down menu, and hit the Detach Audio button. You’ll now have two clips - one with the images and another with the sound.
A lot you can do with the detached audio. For instance, you could extend the audio clip to begin before the video plays, or so that it plays for a few seconds even after the video fades out. You could also cut out pieces from the audio’s middle portion while leaving the video intact.
Conclusion
Coming towards the end of the discussion, after understanding iMovie audio editingand going through an elaborated alternative of iMovie application, we decided that Wondershare Filmora sounds the best out of it. It allows you to flawlessly edit video and audio files on your desktop, with various inbuilt royalty-free music tracks to select from that can further improve your project’s presence.
Marion Dubois
Marion Dubois is a writer and a lover of all things video.
Follow @Marion Dubois
“Top 7 Digital Tools for Seamless Audio Cutting and Editing”
Best Free Online Audio Trimmers to Trim Audio Easily

Liza Brown
Mar 27, 2024• Proven solutions
If you are a music enthusiast and you have a good collection of all genres you love. But keeping large files on your hard drive is a bit messy to manage, given that you would search for a tool to trim audio files on your storage. There are ample online audio trimmers available today however getting the best is still unknown to a lot of people. If you are going to trim your favorite music into short files then you may not want to compromise with the quality that you loved in that music. To make it happen you need to search for the best online audio trimmers that would not only cut off the unpleasant parts of your music but will also keep the quality as it was. In this article, you will learn:
  * [**Part 1:** **8 Free Online Trimmers to Trim Audio**](#part1)
  * [**Part 2:** **Try Advanced Audio Editing With Wondershare Filmora**](#part2)
Part 1: 8 Free Online Trimmers to Trim Audio:
Now, that you are all set to get the best audio cutter online, here are the top 8 audio trimmers that you can use and get the job done. These tools are absolutely free to use and you can use their other functionality as well without paying a single penny to anyone. Let’s see then at a glance:
- [**2. Clideo Audio Cutter** ](#Clideo Audio Cutter)
- [**3. Online Audio & Mp3 Cutter**](#Online Audio & Mp3 Cutter)
- [**4. MP3 Cut**](#MP3 Cut)
- [**5. Kapwing Audio Trimmer**](#Kapwing Audio Trimmer)
- [**6. Bear Audio Tool**](#Bear Audio Tool)
- [**7. Aconvert Audio Tool**](#Aconvert Audio Tool)
- [**8. Audio Alter**](#Audio Alter)
- [**2. Clideo Audio Cutter** ](#Clideo Audio Cutter)
2. Clideo Audio Cutter
Clideo is a great choice to trim audio online, the best part about this tool is the interface that is smooth and you can choose multiple files at once to edit. This tool is secure and free to some extent with all the file formats supported such as MP3, WMA, OGG, WAV, etc. The best way to use this online trimmer is to select audio on your PC, Mac, Android, and iPhone ( yes, it supports all the OS) either from the storage or the Google drive and select the points where you want to start and end. You can change the audio format accordingly after that you can process the file and download it back to your hard drive or cloud storage.

3. Online Audio & Mp3 Cutter
This is a free online tool that would help you trim audio files online without installing complicated software. You only need to choose the mp3 or the audio file from your storage and the audio will start on its own if the browser is supported. Drag the points to the points you want to trim audio and then press the crop button, now you can download your trimmed audio file. This tool is free and it supports file formats such as mp3, m4a, wav, WMA, AMR, ogg, FLAC, m4r, AIFF, 3gpp, ape, and opus.

4. MP3 Cut
Mp3 cut is a free-of-charge tool that makes it easy for you to trim audio online and create ringtones for your iPhone. You don’t need to install any audio editor or cutter to your computer to trim your favorite audio while going through a complicated process. You don’t need to worry about the audio formats because this tool supports over 300 audio formats. The best part about this tool is that it’s free of cost to use and you have an add-on feature of this tool that can extract audio from video files. This is amazing if you have any favorite tracks between a movie then you can easily trim them.

5. Kapwing Audio Trimmer
Kapwing is a free-to-use audio trimmer that can be a wonderful tool to trim your audio online. You just need to upload your files on the UI of this tool or you can paste the link to the video that you want to trim. The process remains the same you need to select the end and start points to download the trimmed audio. It supports almost all the audio formats and can be accessed on any operating system such as Windows, Mac, Android, and iPhone.

6. Bear Audio Tool
Bear audio is a web-based tool that comes with html5 technology where the uploading is directly done on the server and it saves you a lot of time. You can cut, delete, merge, split, fade in, fade out, and adjust the pitch of your file. Make ringtones and play with your favorite songs while trimming and merging them into one another. This tool supports file formats such as MP3, WAV, OGG, WAV, MP3, M4R, OGG, and WMA.

7. Aconvert Audio Tool
Aconvert audio is a good tool that you can use on your computer to convert your files online. You can upload the source file as a video and then convert it to a format like MP3, WAV, etc. It supports a file size of up to 200MB with supported formats such as WAV, WMA, MP3, OGG, AU, FLAC, M4A, MKA, AIFF, OPUS, and RA. The final phase involves the conversion of your favorite file by clicking on the Convert Now button. The download button could be used to save the file to your hard drive or Google storage.

8. Audio Alter
Audio alter is another tool that would help you trim your audio files online. You can select the files from your computer storage and select the Start to endpoints. After selecting the relevant points you need to click on trim and download the file easily. It can handle file sizes up to 20MB with supported file formats such as WAV, MP3, FLAC, OGG. This tool is free to use and anybody can use this tool not only for audio editing but for several other converting tasks that are given on the website panel.

Part 2: Try Advanced Audio Editing With Wondershare Filmora
After trimming the audio files you would need some more add-on features like background noise removal, adjusting volume, and fade in/out audio.
Now, none other than Wondershare Filmora audio editor can do this job because this tool is the best in its category of audio and video editing. You will get different options to debug your audio files for any noise or other errors that you might don’t like in the final copy.
Let’s see how to trim and edit a video with Filmora step by step:
**Step 1: Download and install Filmora on your computer–**You can download Wondershare Filmora below on your computer as it’s compatible with both windows and mac operating systems.
**Step 2: Go to the Filmora dashboard and import your audio files–**Now, you have entered the dashboard and it’s time to import your audio files to start making your audio files best in their quality. Go to the File tab and select Import media to import the audio file to the dashboard and start editing.

**Step 3: Drag the audio to the timeline and make the changes–**Then you need to take the drag and drop the audio file to the timeline, right-click on the audio file and select the Adjust Audio option to view several options to edit the audio file.

Tips:
You can move the indicator to the place where you want to trim, then click the red scissor icon to split or trim the audio. And here is the youtube tutorial to edit the audio:
**Step 4: Get advanced audio editing options–**You can see different options like fade in, fade out, pitch, equalizer, and denoise. You can choose any of these options and get started with the audio adjustments. When you are done with the editing, click on the OK button to save the changes.

Tips:
In case, you have made any mistake and you want to revert the changes to default then you can simply click on RESET and adjust the settings again.
Conclusion
Are you struggling to find an online audio trimmer to trim your audio files? In this article, you have all the solutions in front of you where you can trim and edit your audio files for free, make them more usable and add the audio to your video with the Filmora audio editor that helps you remove background noise, fade in/out, and much more. If you are still stuck somewhere then please drop your queries in the comment box and if you are loving our tool then please don’t forget to share your feedback. You can download and share the tool as much as you can because everybody today needs a reliable tool that is good to use.
Liza Brown
Liza Brown is a writer and a lover of all things video.
Follow @Liza Brown
Liza Brown
Mar 27, 2024• Proven solutions
If you are a music enthusiast and you have a good collection of all genres you love. But keeping large files on your hard drive is a bit messy to manage, given that you would search for a tool to trim audio files on your storage. There are ample online audio trimmers available today however getting the best is still unknown to a lot of people. If you are going to trim your favorite music into short files then you may not want to compromise with the quality that you loved in that music. To make it happen you need to search for the best online audio trimmers that would not only cut off the unpleasant parts of your music but will also keep the quality as it was. In this article, you will learn:
  * [**Part 1:** **8 Free Online Trimmers to Trim Audio**](#part1)
  * [**Part 2:** **Try Advanced Audio Editing With Wondershare Filmora**](#part2)
Part 1: 8 Free Online Trimmers to Trim Audio:
Now, that you are all set to get the best audio cutter online, here are the top 8 audio trimmers that you can use and get the job done. These tools are absolutely free to use and you can use their other functionality as well without paying a single penny to anyone. Let’s see then at a glance:
- [**2. Clideo Audio Cutter** ](#Clideo Audio Cutter)
- [**3. Online Audio & Mp3 Cutter**](#Online Audio & Mp3 Cutter)
- [**4. MP3 Cut**](#MP3 Cut)
- [**5. Kapwing Audio Trimmer**](#Kapwing Audio Trimmer)
- [**6. Bear Audio Tool**](#Bear Audio Tool)
- [**7. Aconvert Audio Tool**](#Aconvert Audio Tool)
- [**8. Audio Alter**](#Audio Alter)
- [**2. Clideo Audio Cutter** ](#Clideo Audio Cutter)
2. Clideo Audio Cutter
Clideo is a great choice to trim audio online, the best part about this tool is the interface that is smooth and you can choose multiple files at once to edit. This tool is secure and free to some extent with all the file formats supported such as MP3, WMA, OGG, WAV, etc. The best way to use this online trimmer is to select audio on your PC, Mac, Android, and iPhone ( yes, it supports all the OS) either from the storage or the Google drive and select the points where you want to start and end. You can change the audio format accordingly after that you can process the file and download it back to your hard drive or cloud storage.
3. Online Audio & Mp3 Cutter
This is a free online tool that would help you trim audio files online without installing complicated software. You only need to choose the mp3 or the audio file from your storage and the audio will start on its own if the browser is supported. Drag the points to the points you want to trim audio and then press the crop button, now you can download your trimmed audio file. This tool is free and it supports file formats such as mp3, m4a, wav, WMA, AMR, ogg, FLAC, m4r, AIFF, 3gpp, ape, and opus.
4. MP3 Cut
Mp3 cut is a free-of-charge tool that makes it easy for you to trim audio online and create ringtones for your iPhone. You don’t need to install any audio editor or cutter to your computer to trim your favorite audio while going through a complicated process. You don’t need to worry about the audio formats because this tool supports over 300 audio formats. The best part about this tool is that it’s free of cost to use and you have an add-on feature of this tool that can extract audio from video files. This is amazing if you have any favorite tracks between a movie then you can easily trim them.
5. Kapwing Audio Trimmer
Kapwing is a free-to-use audio trimmer that can be a wonderful tool to trim your audio online. You just need to upload your files on the UI of this tool or you can paste the link to the video that you want to trim. The process remains the same you need to select the end and start points to download the trimmed audio. It supports almost all the audio formats and can be accessed on any operating system such as Windows, Mac, Android, and iPhone.
6. Bear Audio Tool
Bear audio is a web-based tool that comes with html5 technology where the uploading is directly done on the server and it saves you a lot of time. You can cut, delete, merge, split, fade in, fade out, and adjust the pitch of your file. Make ringtones and play with your favorite songs while trimming and merging them into one another. This tool supports file formats such as MP3, WAV, OGG, WAV, MP3, M4R, OGG, and WMA.
7. Aconvert Audio Tool
Aconvert audio is a good tool that you can use on your computer to convert your files online. You can upload the source file as a video and then convert it to a format like MP3, WAV, etc. It supports a file size of up to 200MB with supported formats such as WAV, WMA, MP3, OGG, AU, FLAC, M4A, MKA, AIFF, OPUS, and RA. The final phase involves the conversion of your favorite file by clicking on the Convert Now button. The download button could be used to save the file to your hard drive or Google storage.
8. Audio Alter
Audio alter is another tool that would help you trim your audio files online. You can select the files from your computer storage and select the Start to endpoints. After selecting the relevant points you need to click on trim and download the file easily. It can handle file sizes up to 20MB with supported file formats such as WAV, MP3, FLAC, OGG. This tool is free to use and anybody can use this tool not only for audio editing but for several other converting tasks that are given on the website panel.
Part 2: Try Advanced Audio Editing With Wondershare Filmora
After trimming the audio files you would need some more add-on features like background noise removal, adjusting volume, and fade in/out audio.
Now, none other than Wondershare Filmora audio editor can do this job because this tool is the best in its category of audio and video editing. You will get different options to debug your audio files for any noise or other errors that you might don’t like in the final copy.
Let’s see how to trim and edit a video with Filmora step by step:
**Step 1: Download and install Filmora on your computer–**You can download Wondershare Filmora below on your computer as it’s compatible with both windows and mac operating systems.
**Step 2: Go to the Filmora dashboard and import your audio files–**Now, you have entered the dashboard and it’s time to import your audio files to start making your audio files best in their quality. Go to the File tab and select Import media to import the audio file to the dashboard and start editing.
**Step 3: Drag the audio to the timeline and make the changes–**Then you need to take the drag and drop the audio file to the timeline, right-click on the audio file and select the Adjust Audio option to view several options to edit the audio file.
Tips:
You can move the indicator to the place where you want to trim, then click the red scissor icon to split or trim the audio. And here is the youtube tutorial to edit the audio:
**Step 4: Get advanced audio editing options–**You can see different options like fade in, fade out, pitch, equalizer, and denoise. You can choose any of these options and get started with the audio adjustments. When you are done with the editing, click on the OK button to save the changes.
Tips:
In case, you have made any mistake and you want to revert the changes to default then you can simply click on RESET and adjust the settings again.
Conclusion
Are you struggling to find an online audio trimmer to trim your audio files? In this article, you have all the solutions in front of you where you can trim and edit your audio files for free, make them more usable and add the audio to your video with the Filmora audio editor that helps you remove background noise, fade in/out, and much more. If you are still stuck somewhere then please drop your queries in the comment box and if you are loving our tool then please don’t forget to share your feedback. You can download and share the tool as much as you can because everybody today needs a reliable tool that is good to use.
Liza Brown
Liza Brown is a writer and a lover of all things video.
Follow @Liza Brown
Also read:
- Updated Mastering Sound on Your Mac The Top 8 DAWs Ranked
- In 2024, Charting the Top Melodic Havens S Downloadable BGM Scores
- New In 2024, Indispensable Sources for Subtle Acoustic Harmonies
- Updated In-Depth Tutorial Removing Vocals In Adobe Audition - 6 Proven Steps for 2024
- Updated In 2024, From Silence to Symphony A Practical Approach to Changing Video Audio (Part 1)
- How to Remove Audio Seamlessly A Windows 10 Users Handbook for Sound-Free Vids (Free of Charge) for 2024
- In 2024, Top 10 Essential Harvesting Tools for Video Editors
- New 2024 Approved Top 6 Chrome OS Devices with Exceptional Vocal Modification Capabilities Worth Exploring - VideoCreator
- In 2024, Mastering the Art of Selecting Purpose-Driven Instrumental Music in Videos
- 2024 Approved The Leading PC Audio Recorders A List of 10 Hits
- How To Download Podcasts to Computers?
- Updated Step-by-Step Guide to Eradicating Audios in Video Projects Using iMovie
- Updated Compilation of Websites Offering Feline-Inspired MP3 Sounds for 2024
- 2024 Approved Audio Eradication on iOS Devices A Complete Guide to Clearer Videos
- Updated Essential Online Tools to Refine Your Music with Superior MP3 Processing
- 2024 Approved Discovering the Top 6 Innovative Tools for Live Voice Modification
- In 2024, Exploring the Leading Edge of Audio Production Does MAGIX Samplitude Hold Sway?
- New 2024 Approved Chromecast to the Future Exploring Popular Audio Recorders
- 2024 Approved Top 10 Complimentary Web-Based Sound Level Regulators
- Updated In 2024, Echoes of Interaction Searching for Buttons Acoustic Footprints
- Updated Digital Audio Trimmer and Merger Tool
- Updated Unveiling Key Features A Deep Dive Into TwistedWave Audio Processor
- Updated Identifying Sources for Authentic Canine Symphony Sounds
- In 2024, The Ultimate List of Top 10 Podcast Editors, Including Both Cost-Free and Paid Variants
- The Sound Engineers Playbook Techniques for Distilling Song Beats Through Technology for 2024
- Cut, Trim, and Tailor Audio Files in Seconds Using These Top 7 Web-Based Tools
- In 2024, Expert Roundup IPhone Vs. Android – Top 10 Music Editing Applications
- In 2024, Pioneering Poetic Presentations in Motion Graphics
- New The Ultimate Guide to Audio Length Reduction in Apples iMovie App for 2024
- Updated 2024 Approved Audio Engineering Simplified Utilizing Dynamic Ducking Techniques in Final Cut Pro X for Professional Results
- New 2024 Approved The Ultimate Guide to Musical Matchmaking Top Tunes for Dynamic Montage Videos
- Updated The Filmmakers Guide to a Bolder Bass Enhancing Audio with Filmora
- New The Essential Tutorial for Archiving Your Google Voice Dialogue with Both Mobile & Computer Devices for 2024
- Leveraging Machine Learning for Clean Audio Transmission
- New 2024 Approved Winning the Acoustic Illusion Techniques for Adding Delay and Echo via Web-Based Audio Tools
- 2024 Approved Building Anticipation Compositional Techniques Using Cliffhanger Melodies in Movies
- New 2024 Approved From Full Spectrum to Focus Extracting Core Rhythms for Multimedia Use
- In 2024, Sonic Cleanliness Removing Unwanted Resonance From Your Films Audio Track
- Updated 2024 Approved Congratulatory Rattle Fabricator
- 2024 Approved Techniques for Altering Decibel Settings on Media Playback
- Updated 2024 Approved The Modern Sound Engineers Guide Ranking the Best iOS DAWs for iPad and iPhone
- Updated The Ultimate List of Preferred Linux Audio Recorders and How to Make the Most Out of Your Sessions
- New The A-List Articulation Assistants Comprehensive Device Features, How-To Guides & Voice Alternatives for Celebrity Singers for 2024
- In 2024, Three Ways to Sim Unlock Samsung Galaxy XCover 6 Pro Tactical Edition
- Updated 2024 Approved Free and Paid iMovie Equivalents for Windows 10 Users
- The Top Virtualdub Replacements for Video Editing Enthusiasts and Pros for 2024
- Is This a Pigeon Meme Generator
- Planning to Use a Pokemon Go Joystick on Samsung Galaxy A05? | Dr.fone
- In 2024, How To Reset the Security Questions of Your Apple ID From Your iPhone XS Max
- In 2024, Hacks to do pokemon go trainer battles For Motorola Moto G04 | Dr.fone
- Tips and Tricks for Setting Up your Samsung Galaxy A14 4G Phone Pattern Lock
- 3 Methods to Mirror Samsung Galaxy M34 to Roku | Dr.fone
- New 2024 Approved The Perfect Fit How to Adjust Amazon Prime Video Aspect Ratio for Your TV
- 3 Easy Solutions to Hard Reset Honor Magic 5 | Dr.fone
- In 2024, Why is iPogo not working On Realme C67 5G? Fixed | Dr.fone
- New 2024 Approved How to Make a Movie with Windows Movie Maker?
- Authentication Error Occurred on Vivo V29? Here Are 10 Proven Fixes | Dr.fone
- How to Show Wi-Fi Password on Vivo X Fold 2
- Title: Updated Top 13 Gratis Audio Creation Tools for PC and Mac, Updated List for 2024
- Author: Jacob
- Created at : 2024-05-05 04:12:01
- Updated at : 2024-05-06 04:12:01
- Link: https://audio-shaping.techidaily.com/updated-top-13-gratis-audio-creation-tools-for-pc-and-mac-updated-list-for-2024/
- License: This work is licensed under CC BY-NC-SA 4.0.
