
:max_bytes(150000):strip_icc():format(webp)/GettyImages-753288077-5bb0f9b2cff47e00261aa8fc.jpg)
Updated Mastering Sound Manipulation The Application of Clownfish Voice Modification Tools on Discord, Fortnite, and Skype
Mastering Sound Manipulation: The Application of Clownfish Voice Modification Tools on Discord, Fortnite, and Skype
Want to do something interesting? Think about using a voice changer. A voice changer is used to change your voice to make your daily interaction more interesting. A voice changer changes the pitch or tone of your voice. People also use it to add voice effects that could be either of a certain type or any random effect that the user likes.
You can use voice changers on your live stream. You can also use it on platforms like Discord and Skype. A voice changer can be used to make the gaming experience better as well. You can also use voice changer on online games like Fortnite. If you want to know about Clownfish Voice Changer, then let’s get started.
In this article
01 What Is Clownfish Voice Changer?
02 Tips to Use Clownfish Voice Changer on Discord and Fortnite?
03 Guidelines to Better Use Clownfish Voice Changer on Skype
04 Solution to Fix Clownfish Voice Changer Not Working
For Win 7 or later (64-bit)
For macOS 10.12 or later
Part 1. What Is Clownfish Voice Changer?
Clownfish is considered a famous voice changer. Clownfish Voice Changer is used to change voices for various purposes. It is installed on the system as it uses the microphone of the system that it is installed on. Clownfish Voice Changer has an attractive and intuitive interface that gives the user the best experience. It has plug-in support for Virtual Sound Technology (VST).

Clownfish voice provides multiple choices for voice after-effects that are available in the built-in library. These voices include male/female voices, robotic sounds, radio voices along with alien voices. Clownfish Voice Changer PC is compatible with Windows 7/8/8.1/10 and 11. It also has a built-in music player that supports various media formats.
Part 2. Tips to Use Clownfish Voice Changer on Discord and Fortnite?
As we have discussed earlier, what clownfish voice changer is and how amazing it is, now let’s move further. The following section of this article will share the tips that will help someone use Clownfish Discord and also Clownfish on Fortnite.
Before we start, you should know how to configure the Clownfish voice changer on your device. For this, you can follow the steps given below. Let’s begin!
Step 1: Setup Clownfish
After you have successfully downloaded and installed Clownfish Voice Changer, it’s time to setup. For this, firstly, locate the voice changer in your systems tray. Then, right-click on the icon, and from the menu list, select the ‘Setup’ option to set clownfish across different applications.

Step 2: Install Microphone
You cannot use the voice changer until you have attached a microphone to your device. For this, you need to install the microphone by hitting the ‘Install’ button next to the microphone.

Step 3: Set Microphone as Default Device
For the microphone to work in Clownfish, it should be selected as the default device. For doing this, select the ‘Recording’ option from the ‘Sounds’ tabs. A list of all the compatible devices will appear on the screen, you have to right-click on your device and hit the ‘Set as the Default Device’ option.

Step 4: Default Device is Set
After that, right-click on the Clownfish icon in the system tray and hit the ‘Hear Microphone’ option. The Clownfish Voice Changer is set to the default option. In case you ever plan to change it, right-click on the Clownfish icon from the system tray and tap on ‘Set Voice Changer.’

Step 5: Select Voice Changer Effects
Once Clownfish has been installed and successfully configured, you now have complete access to all voice changer options. There are dozens of effects that you can select from.

How to use Clownfish on Discord
If you want to use Clownfish on Discord, then you have to select Clownfish voice changer as the input device. For this, open Discord and head to ‘App Settings’ under the ‘User Settings’ option. There, look for the ‘Voice and Video’ option. A category of ‘Input Device’ will appear on the screen; from the drop-down list, switch to ‘Clownfish Voice Changer.’

How to use Clownfish on Fortnite
For using Clownfish on Fortnite, start by selecting the ‘Menu’ icon. There, head to the ‘Settings’ and select the ‘Audio’ option. Now, you have to set the input device; for that, go to the ‘Voice Chat’ option and select Clownfish Voice Changer as your input device under the ‘Voice Chat Input Device’ category.

Part 3. Guidelines to Better Use Clownfish Voice Changer on Skype
You can use voice changers on various platforms according to their compatibility; for instance, Clownfish is compatible with Skype. The question is, do you know how to use Clownfish voice changer on Skype? If ‘no,’ then let us share some helping guidelines to use Clownfish on Skype in a better way.
Step 1: If you want to change voice on Skype with Clownfish, then, first of all, download and install Skype on your PC or laptop and launch it.

Step 2: After Skype has been successfully launched, head over to ‘Settings’ by clicking on the three dots present next to your username.

Step 3: From the Settings screen, you have to look for the ‘Audio & Video’ tab and then select it. Lastly, you have to select the microphone ‘Clownfish Voice Changer’ under the ‘Microphone’ option, and you are all done.

Part 4. Solution to Fix Clownfish Voice Changer Not Working
While using Clownfish Voice Changer, you might also come across some troubles. They might be because either the voice changer is not updated, or maybe the apps you are using are not up to date. Let us share some fixes with you for smooth Clownfish functioning.
Fix 1: Update Clownfish Voice Changer
The most significant reason why you face trouble is that your Clownfish version is outdated. For this, you should update the voice changer to its latest version by following the steps given below:
Step 1: You have to start by opening the ‘Control Panel’ from the ‘Run’ window. For that, press ‘Windows and R’ together and then type ‘Control’ and press ‘Enter.’ Now, look for the ‘Programs’ section, and under that section, click on the ‘Uninstall a Program.’

Step 2: A list of all the installed programs will appear on the screen. From that list, look for ‘Clownfish Voice Changer’ and then left-click on it. Lastly, select the option of ‘Uninstall.’

Step 3: Once this is done successfully, head over to the official website of Clownfish Voice Changer and install the latest version. Restart your computer and open the application to check if the problem has been resolved or not.

Fix 2: Check the Application’s Version
Another reason that might be causing the problem is an incompatible version of the application with Clownfish. Both the voice changer and the application must have compatible versions. You can take assistance from the steps below to check the version of Skype.
Step 1: Start by opening Skype, and then from the left menu pane, click on your Skype profile. Then, from the quick access menu list, look for the ‘Settings’ option.

Step 2: After the ‘Settings’ window opens, click on the ‘Help & Feedback’ option once located from the left pane. As the Help & Feedback screen opens, you will see the Skype logo on the screen, and under the logo, you will see the version of Skype.

Fix 3: Microphone Installation in Clownfish
The Voice changer is of no use if the microphone cannot be used as a microphone is an essential component for using a voice changer. An outdated microphone or wrongly installed microphone can cause an error in using Clownfish voice change.
Step 1: Run Clownfish on the computer and open it from the taskbar icon by right-clicking it. Keep your mouse over ‘Setup’ till the sub-menu opens.
Step 2: From the sub-menu, click on ‘System Integration.’ Then, select the microphone which is working fine, and click on ‘Install,’ which will install the microphone automatically.

Step 3: After the installation of the microphone, reboot the computer. Check whether the microphone error is resolved or not.

Bottom Line
Clownfish voice changer is a famous and known software with many amazing features and functionalities. The article above has shared great details about the voice changer and its use on Skype, Discord, and Fortnite.
Additionally, let’s talk about video editing software. As the videos need editing after they are filmed so, why not use Wondershare Filmora for editing your videos? The software offers some crazy and cool features like cut, trim, split, crop, etc.
You can also color match, do animation keyframing and advanced color tuning with the Filmora video editor . The software also owns a media library with hundreds of distinct titles, elements, transitions, effects, and whatnot.
For Win 7 or later (64-bit)
For macOS 10.12 or later
02 Tips to Use Clownfish Voice Changer on Discord and Fortnite?
03 Guidelines to Better Use Clownfish Voice Changer on Skype
04 Solution to Fix Clownfish Voice Changer Not Working
For Win 7 or later (64-bit)
For macOS 10.12 or later
Part 1. What Is Clownfish Voice Changer?
Clownfish is considered a famous voice changer. Clownfish Voice Changer is used to change voices for various purposes. It is installed on the system as it uses the microphone of the system that it is installed on. Clownfish Voice Changer has an attractive and intuitive interface that gives the user the best experience. It has plug-in support for Virtual Sound Technology (VST).
Clownfish voice provides multiple choices for voice after-effects that are available in the built-in library. These voices include male/female voices, robotic sounds, radio voices along with alien voices. Clownfish Voice Changer PC is compatible with Windows 7/8/8.1/10 and 11. It also has a built-in music player that supports various media formats.
Part 2. Tips to Use Clownfish Voice Changer on Discord and Fortnite?
As we have discussed earlier, what clownfish voice changer is and how amazing it is, now let’s move further. The following section of this article will share the tips that will help someone use Clownfish Discord and also Clownfish on Fortnite.
Before we start, you should know how to configure the Clownfish voice changer on your device. For this, you can follow the steps given below. Let’s begin!
Step 1: Setup Clownfish
After you have successfully downloaded and installed Clownfish Voice Changer, it’s time to setup. For this, firstly, locate the voice changer in your systems tray. Then, right-click on the icon, and from the menu list, select the ‘Setup’ option to set clownfish across different applications.
Step 2: Install Microphone
You cannot use the voice changer until you have attached a microphone to your device. For this, you need to install the microphone by hitting the ‘Install’ button next to the microphone.
Step 3: Set Microphone as Default Device
For the microphone to work in Clownfish, it should be selected as the default device. For doing this, select the ‘Recording’ option from the ‘Sounds’ tabs. A list of all the compatible devices will appear on the screen, you have to right-click on your device and hit the ‘Set as the Default Device’ option.
Step 4: Default Device is Set
After that, right-click on the Clownfish icon in the system tray and hit the ‘Hear Microphone’ option. The Clownfish Voice Changer is set to the default option. In case you ever plan to change it, right-click on the Clownfish icon from the system tray and tap on ‘Set Voice Changer.’
Step 5: Select Voice Changer Effects
Once Clownfish has been installed and successfully configured, you now have complete access to all voice changer options. There are dozens of effects that you can select from.
How to use Clownfish on Discord
If you want to use Clownfish on Discord, then you have to select Clownfish voice changer as the input device. For this, open Discord and head to ‘App Settings’ under the ‘User Settings’ option. There, look for the ‘Voice and Video’ option. A category of ‘Input Device’ will appear on the screen; from the drop-down list, switch to ‘Clownfish Voice Changer.’
How to use Clownfish on Fortnite
For using Clownfish on Fortnite, start by selecting the ‘Menu’ icon. There, head to the ‘Settings’ and select the ‘Audio’ option. Now, you have to set the input device; for that, go to the ‘Voice Chat’ option and select Clownfish Voice Changer as your input device under the ‘Voice Chat Input Device’ category.
Part 3. Guidelines to Better Use Clownfish Voice Changer on Skype
You can use voice changers on various platforms according to their compatibility; for instance, Clownfish is compatible with Skype. The question is, do you know how to use Clownfish voice changer on Skype? If ‘no,’ then let us share some helping guidelines to use Clownfish on Skype in a better way.
Step 1: If you want to change voice on Skype with Clownfish, then, first of all, download and install Skype on your PC or laptop and launch it.
Step 2: After Skype has been successfully launched, head over to ‘Settings’ by clicking on the three dots present next to your username.
Step 3: From the Settings screen, you have to look for the ‘Audio & Video’ tab and then select it. Lastly, you have to select the microphone ‘Clownfish Voice Changer’ under the ‘Microphone’ option, and you are all done.
Part 4. Solution to Fix Clownfish Voice Changer Not Working
While using Clownfish Voice Changer, you might also come across some troubles. They might be because either the voice changer is not updated, or maybe the apps you are using are not up to date. Let us share some fixes with you for smooth Clownfish functioning.
Fix 1: Update Clownfish Voice Changer
The most significant reason why you face trouble is that your Clownfish version is outdated. For this, you should update the voice changer to its latest version by following the steps given below:
Step 1: You have to start by opening the ‘Control Panel’ from the ‘Run’ window. For that, press ‘Windows and R’ together and then type ‘Control’ and press ‘Enter.’ Now, look for the ‘Programs’ section, and under that section, click on the ‘Uninstall a Program.’
Step 2: A list of all the installed programs will appear on the screen. From that list, look for ‘Clownfish Voice Changer’ and then left-click on it. Lastly, select the option of ‘Uninstall.’
Step 3: Once this is done successfully, head over to the official website of Clownfish Voice Changer and install the latest version. Restart your computer and open the application to check if the problem has been resolved or not.
Fix 2: Check the Application’s Version
Another reason that might be causing the problem is an incompatible version of the application with Clownfish. Both the voice changer and the application must have compatible versions. You can take assistance from the steps below to check the version of Skype.
Step 1: Start by opening Skype, and then from the left menu pane, click on your Skype profile. Then, from the quick access menu list, look for the ‘Settings’ option.
Step 2: After the ‘Settings’ window opens, click on the ‘Help & Feedback’ option once located from the left pane. As the Help & Feedback screen opens, you will see the Skype logo on the screen, and under the logo, you will see the version of Skype.
Fix 3: Microphone Installation in Clownfish
The Voice changer is of no use if the microphone cannot be used as a microphone is an essential component for using a voice changer. An outdated microphone or wrongly installed microphone can cause an error in using Clownfish voice change.
Step 1: Run Clownfish on the computer and open it from the taskbar icon by right-clicking it. Keep your mouse over ‘Setup’ till the sub-menu opens.
Step 2: From the sub-menu, click on ‘System Integration.’ Then, select the microphone which is working fine, and click on ‘Install,’ which will install the microphone automatically.
Step 3: After the installation of the microphone, reboot the computer. Check whether the microphone error is resolved or not.
Bottom Line
Clownfish voice changer is a famous and known software with many amazing features and functionalities. The article above has shared great details about the voice changer and its use on Skype, Discord, and Fortnite.
Additionally, let’s talk about video editing software. As the videos need editing after they are filmed so, why not use Wondershare Filmora for editing your videos? The software offers some crazy and cool features like cut, trim, split, crop, etc.
You can also color match, do animation keyframing and advanced color tuning with the Filmora video editor . The software also owns a media library with hundreds of distinct titles, elements, transitions, effects, and whatnot.
For Win 7 or later (64-bit)
For macOS 10.12 or later
Exploring the Best Virtual Music Production Suites – Comparison Chart Included
FREE 10 Best Online Music Makers

Benjamin Arango
Apr 26, 2024• Proven solutions


Expressing ideas through music was never easy, and even today in the age of powerful digital audio stations like Ableton Live or FruityLoops , producing original music requires a certain set of skills. However, online content producers often need music for their videos, but they neither have the time or the budget to hire a professional musician to create a soundtrack for their project in studio conditions. If you are looking for a quick way to make your own music online, then you should keep reading, because in this article we are going to take you through the ten best online music makers you should check out in 2021.
10 Best Online Music Makers in 2021
The music-making platforms that are currently available online are still not as nearly as powerful as professional software products for music producers. Nonetheless, this doesn’t mean that you can’t use them to create the music you like or just have fun with them. Here are the ten best online music makers in 2019.
1. Typeatone
Price: Free
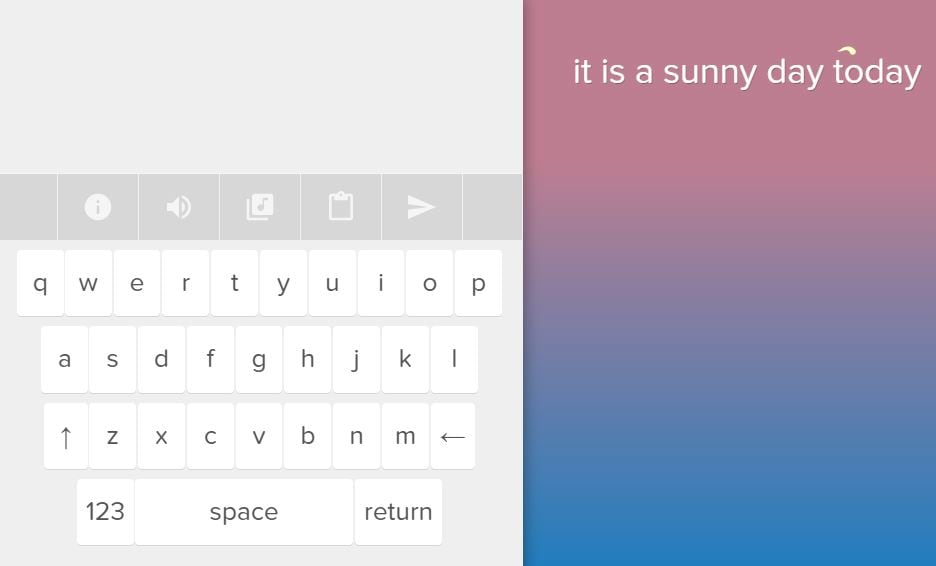
Image from Internet
Have you ever wondered what your words would sound like if they were turned into music? Head over to the Typeatone platform if you want to find out since all you have to do in order to start creating your own music is type in the text. As you type, the platform will automatically start playing your words and once you’re done, you’ll be able to hear your new song. You can also choose between different instruments to make the process of creating music with Typeatone even more entertaining. You can share all of your creations with your friends on social media.
![]()
A cross-platform for making videos anywhere for all creators

Why your video editing isn’t good enough? How about some creative inspo?
- 100 Million+ Users
- 150+ Countries and Regions
- 4 Million+ Social Media Followers
- 5 Million+ Stock Media for Use
* Secure Download

2. Audiotool
Price: Free
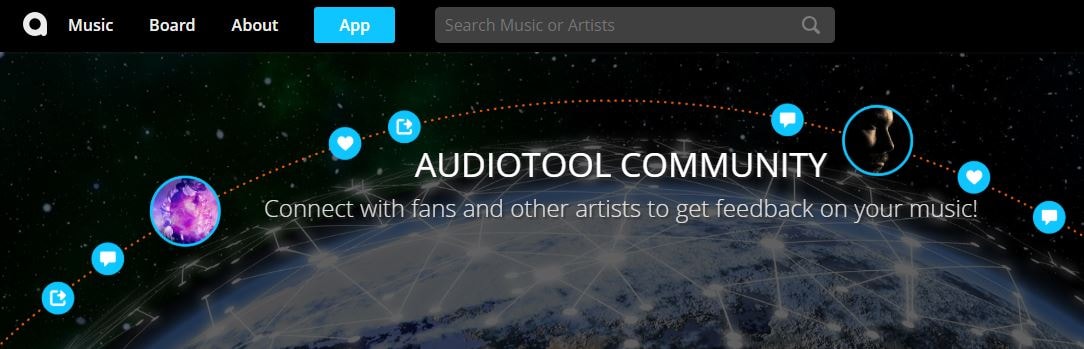
Image from Internet
Electronic music producers who often use synthesizers like Roland TB-303 or Roland TR-909 are going to love the features this online collaborative platform offers. Audiotool hosts a huge music library, you can explore even if you are not a registered user. In order to access the platform’s music studio, you first have to create an account and make sure that you are signed in. Audiotool is also a community of like-minded people where you can meet artists whose work you appreciate or hear what others think about your work. The only downside is that Audiotool’s abundance of features can be overwhelming for the newcomers to the world of electronic music production.
3. AudioSauna
Price: Free
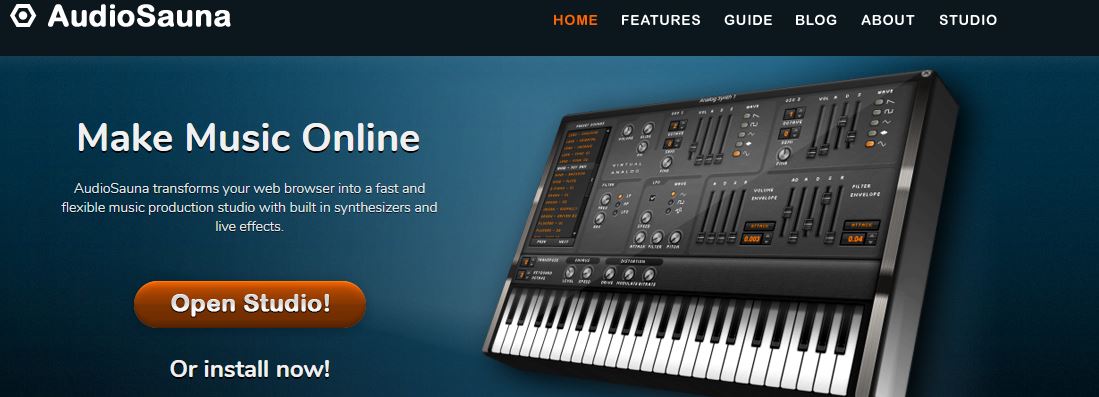
Image from Internet
AudioSauna seems to offer everything its users need to create inspiring music because it is equipped with frequency modulation synth, virtual analog synth and a sampler that provides layering features. Moreover, its intuitive interface makes the process of arranging the song structure or changing several note values simultaneously much easier. Creating an account on AudioSauna will enable to record all your projects and export them as audio files that can be uploaded to SoundCloud or any other audio distribution platform. AudioSauna is a perfect tool for skilled producers who want to create their music online.
4. Soundtrap
Price: Free trial available, subscription plans start at $3.99 per month

Image from Internet
Soundtrap offers a long list of features that enable professional musicians to create their music online. All you have to do is create an account and you will get access to the Sountrap’s studio that let you create new beat patterns, use a synthesizer or even invite friends to make music together. The platform also offers the possibility to connect your own instruments to the Soundtrap’s studio, so that you can record your music as you play it. This online platform also has an Education section where you can share your knowledge with others or learn valuable music lessons.
5. PatternSketch
Price: Free
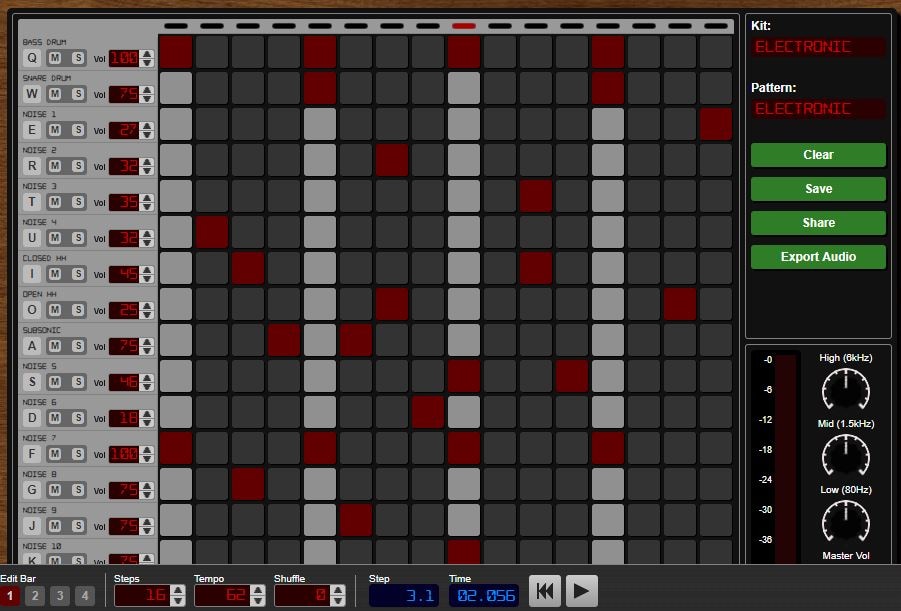
Image from Internet
This basic and yet effective drum machine can help you generate amazing beats for the songs you’re working on. Once you sign up, you will be able to choose from a number of different kits and patterns that are fully customizable or create your own original beats. After you create a pattern you like, you can save it with a single click or send it to your friends via email. Optionally, you can export all of your creations from PatternSketch and save them as wav, mp3 or ogg files, although in some cases mp3 audio files may not loop properly.
6. Soundation
Price: Free version available, pricing plans start at $1.99 per month

Image from Internet
If you choose to create music with the free version of Soundation, you’ll be able to work on up to ten projects, try out over 700 audio effects and loops, and export all your music in low quality. Purchasing the Intro pricing plan will enable you to work on an unlimited number of projects, make live audio recordings, import audio files smaller than 100MB or use an external midi controller. Moreover, opting for any of the annual or monthly subscription plans will allow you to export entire projects and audio files in high resolution from Soundation.
7. Text to Speech
Price: Free

online-music-maker-Text to Speech.jpg
Vocals are often overlooked in contemporary electronic music, but there are so many ways they can be used creatively. The platform lets you turn up to 50000 characters into speech at once, and it also offers several different voices you can choose from. Before you create an audio file you can determine how fast the text is going to be vocalized, so you should try different options and see which one fits your project the best. Text to Speech platform can be used during the process of creating a new song, but the tools it offers are not enough to make an entire song.
8. Looplabs
Price: Free
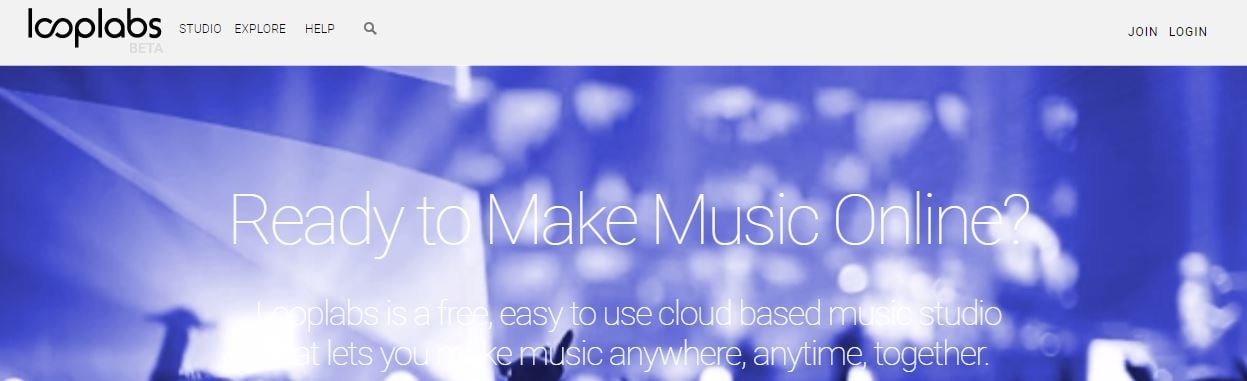
Music enthusiasts who would like to produce different genres of music online should definitely get familiar with Looplabs, as this online music maker lets its users remix songs or make music from scratch. Besides being one of the best places on the Internet to record music, Looplabs is also a community where you can meet people who like your music or discover artists whose work you admire. The Looplab’s studio features samples for a broad range of music genres and musical instruments, and you can use it to make Electro or Funk music equally effectively.
9. Online Sequencer
Price: Free
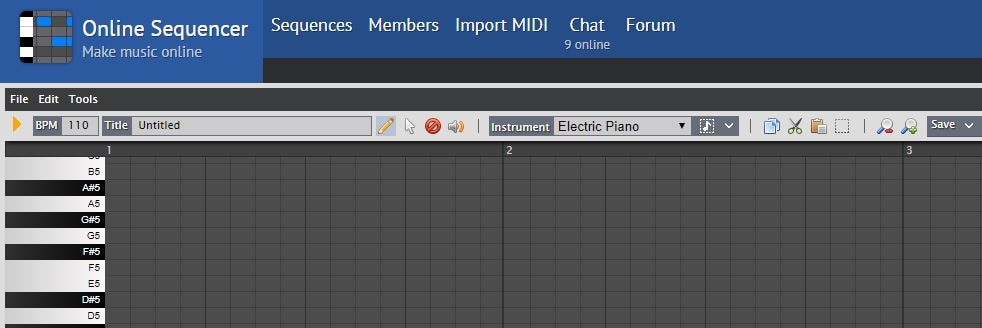
This is a perfect tool for developing an idea for a song, as you can create a sequence in just a few minutes. You can choose from Piano, Drums and Guitar categories of instruments or browse through a huge collection of fully customizable preset sequences that is updated on a daily basis. The platform also lets you import MIDI files and work on projects you’ve already started developing or you can export your sequences as MIDI files from the Online Sequencer and edit them with your DAW. Even though Online Sequencer is a useful tool for making music, the features it offers can’t really be compared with those on Soundation or AudioSauna.
10. Autochords
Price: Free
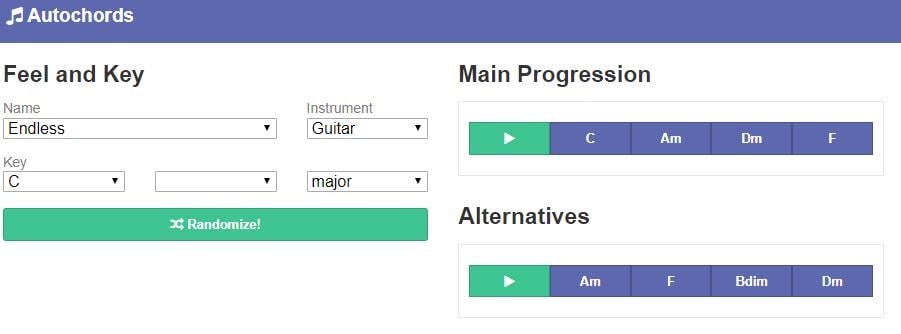
Finding new ideas for songs is often more difficult than it sounds, and if you ever face a creative block you should simply head over to Autochords. This platform suggests chord progressions based on the parameters you set, so you just have to select an instrument and the name of the song to set the feel, and the platform will show you the main progression and its alternatives. Rather than being an online music maker, Autochords is more a tool that helps piano and guitar players understand chord progressions better. iPhone and iPad users can download the Autochords app from the App Store for free.
Read More to Get : Best Free DAW for Windows and Mac for Beginners >>
Conclusion
You don’t have to be a professional musician in order to start making music online, you just have to love music, and an online music maker of your choice will take care of the rest. Do you use online music makers for entertainment or to express your creativity? Leave a comment below and share your opinions with us.
Benjamin Arango
Benjamin Arango is a writer and a lover of all things video.
Follow @Benjamin Arango
Benjamin Arango
Apr 26, 2024• Proven solutions
Expressing ideas through music was never easy, and even today in the age of powerful digital audio stations like Ableton Live or FruityLoops , producing original music requires a certain set of skills. However, online content producers often need music for their videos, but they neither have the time or the budget to hire a professional musician to create a soundtrack for their project in studio conditions. If you are looking for a quick way to make your own music online, then you should keep reading, because in this article we are going to take you through the ten best online music makers you should check out in 2021.
10 Best Online Music Makers in 2021
The music-making platforms that are currently available online are still not as nearly as powerful as professional software products for music producers. Nonetheless, this doesn’t mean that you can’t use them to create the music you like or just have fun with them. Here are the ten best online music makers in 2019.
1. Typeatone
Price: Free
Image from Internet
Have you ever wondered what your words would sound like if they were turned into music? Head over to the Typeatone platform if you want to find out since all you have to do in order to start creating your own music is type in the text. As you type, the platform will automatically start playing your words and once you’re done, you’ll be able to hear your new song. You can also choose between different instruments to make the process of creating music with Typeatone even more entertaining. You can share all of your creations with your friends on social media.
![]()
A cross-platform for making videos anywhere for all creators
Why your video editing isn’t good enough? How about some creative inspo?
- 100 Million+ Users
- 150+ Countries and Regions
- 4 Million+ Social Media Followers
- 5 Million+ Stock Media for Use
* Secure Download
2. Audiotool
Price: Free
Image from Internet
Electronic music producers who often use synthesizers like Roland TB-303 or Roland TR-909 are going to love the features this online collaborative platform offers. Audiotool hosts a huge music library, you can explore even if you are not a registered user. In order to access the platform’s music studio, you first have to create an account and make sure that you are signed in. Audiotool is also a community of like-minded people where you can meet artists whose work you appreciate or hear what others think about your work. The only downside is that Audiotool’s abundance of features can be overwhelming for the newcomers to the world of electronic music production.
3. AudioSauna
Price: Free
Image from Internet
AudioSauna seems to offer everything its users need to create inspiring music because it is equipped with frequency modulation synth, virtual analog synth and a sampler that provides layering features. Moreover, its intuitive interface makes the process of arranging the song structure or changing several note values simultaneously much easier. Creating an account on AudioSauna will enable to record all your projects and export them as audio files that can be uploaded to SoundCloud or any other audio distribution platform. AudioSauna is a perfect tool for skilled producers who want to create their music online.
4. Soundtrap
Price: Free trial available, subscription plans start at $3.99 per month
Image from Internet
Soundtrap offers a long list of features that enable professional musicians to create their music online. All you have to do is create an account and you will get access to the Sountrap’s studio that let you create new beat patterns, use a synthesizer or even invite friends to make music together. The platform also offers the possibility to connect your own instruments to the Soundtrap’s studio, so that you can record your music as you play it. This online platform also has an Education section where you can share your knowledge with others or learn valuable music lessons.
5. PatternSketch
Price: Free
Image from Internet
This basic and yet effective drum machine can help you generate amazing beats for the songs you’re working on. Once you sign up, you will be able to choose from a number of different kits and patterns that are fully customizable or create your own original beats. After you create a pattern you like, you can save it with a single click or send it to your friends via email. Optionally, you can export all of your creations from PatternSketch and save them as wav, mp3 or ogg files, although in some cases mp3 audio files may not loop properly.
6. Soundation
Price: Free version available, pricing plans start at $1.99 per month
Image from Internet
If you choose to create music with the free version of Soundation, you’ll be able to work on up to ten projects, try out over 700 audio effects and loops, and export all your music in low quality. Purchasing the Intro pricing plan will enable you to work on an unlimited number of projects, make live audio recordings, import audio files smaller than 100MB or use an external midi controller. Moreover, opting for any of the annual or monthly subscription plans will allow you to export entire projects and audio files in high resolution from Soundation.
7. Text to Speech
Price: Free

online-music-maker-Text to Speech.jpg
Vocals are often overlooked in contemporary electronic music, but there are so many ways they can be used creatively. The platform lets you turn up to 50000 characters into speech at once, and it also offers several different voices you can choose from. Before you create an audio file you can determine how fast the text is going to be vocalized, so you should try different options and see which one fits your project the best. Text to Speech platform can be used during the process of creating a new song, but the tools it offers are not enough to make an entire song.
8. Looplabs
Price: Free
Music enthusiasts who would like to produce different genres of music online should definitely get familiar with Looplabs, as this online music maker lets its users remix songs or make music from scratch. Besides being one of the best places on the Internet to record music, Looplabs is also a community where you can meet people who like your music or discover artists whose work you admire. The Looplab’s studio features samples for a broad range of music genres and musical instruments, and you can use it to make Electro or Funk music equally effectively.
9. Online Sequencer
Price: Free
This is a perfect tool for developing an idea for a song, as you can create a sequence in just a few minutes. You can choose from Piano, Drums and Guitar categories of instruments or browse through a huge collection of fully customizable preset sequences that is updated on a daily basis. The platform also lets you import MIDI files and work on projects you’ve already started developing or you can export your sequences as MIDI files from the Online Sequencer and edit them with your DAW. Even though Online Sequencer is a useful tool for making music, the features it offers can’t really be compared with those on Soundation or AudioSauna.
10. Autochords
Price: Free
Finding new ideas for songs is often more difficult than it sounds, and if you ever face a creative block you should simply head over to Autochords. This platform suggests chord progressions based on the parameters you set, so you just have to select an instrument and the name of the song to set the feel, and the platform will show you the main progression and its alternatives. Rather than being an online music maker, Autochords is more a tool that helps piano and guitar players understand chord progressions better. iPhone and iPad users can download the Autochords app from the App Store for free.
Read More to Get : Best Free DAW for Windows and Mac for Beginners >>
Conclusion
You don’t have to be a professional musician in order to start making music online, you just have to love music, and an online music maker of your choice will take care of the rest. Do you use online music makers for entertainment or to express your creativity? Leave a comment below and share your opinions with us.
Benjamin Arango
Benjamin Arango is a writer and a lover of all things video.
Follow @Benjamin Arango
Transform Your Mac Into an Audio Recorder: Top Tips From Industry Experts
Mac offers a smooth workflow compared to Windows, which is why people prefer its usage. If your work revolves around music production, podcasts, recorded lectures in a classroom, and audio mixing, it is important to have workable audio recording software for Mac. To record Mac audio through an easy set of procedures, follow the write-up.
We shall also introduce five voice recorders, Mac. So, let us begin!
In this article
01 How to Record Audio on Mac?
02 5 Best Voice Recorder Software for Mac
Part 1: How to Record Audio on Mac?
If you are a Mac user, this sub-section has been designed for you. If you are taking a voice class or an influencer interview, you need to know Mac how to record audio. The two strategies would be covered to record voice on Mac. Let us start!
Via Voice Memos
Voice Memos is an in-built app on most Apple devices. The guidelines to record sound on Mac through Voice Memos are as given below:
Step 1: Visiting Voice Memos
Launch Voice Memos from your Mac. As the interface appears, the user would be welcomed with the “Red” record button. Tap on it, and the recording would start without any prompt.

Step 2: Pausing the Recording
The lower-left corner displays the pause button. Click on it once you are done. Essentially, you can have a little preview of what you have covered so far.

Step 3: Saving Process
Click on “Done,” located in the bottom right corner. Rename the file and get done with the process.

Via QuickTime Player
QuickTime Player is the default program in Mac that acts as both media player and voice recorder. To know how to record internal audio Mac, let us walk you through the multiple steps. You’ll surely get something good out of it!
Step 1: Starting the Recording
For starters, launch QuickTime Player and navigate to the “File” located in the top panel. Select “New Audio Recording” from there. Click on the “Red” button to initiate the recording.

Step 2: Stopping the Recording
Once you are done with the recording, click on the grey square to stop the recording. There is no option to pause the recording temporarily.

Step 3: Saving the Recording
Navigate to the “File” tab again and click on “Save.” Choose the name of the recording and the output folder source.

Part 2: 5 Best Voice Recorder Software for Mac
Now that you have an idea of the procedure to record an internal audio recorder Mac let us shift our focus to audio recording software for Mac. The choice of the tool helps the user be productive at the workplace. Therefore, we have sketched out five MacBook voice recorders with their key features. Let us have a peek!
Apple GarageBand
As a digital audio workstation, Apple GarageBand has to be your first choice for music production. It is a fully-fledged audio recorder with an easy-to-use interface. The sound and loop library allows you to edit your tracks. Moreover, the interactive interface makes its usage easy for beginners.

Are you impressed with the tool? Following are some features of this audio recording software for Mac:
- Apple GarageBand comes up with a drag and drop process to make recording easy.
- Offering an extensive range of effects and virtual amps, Apple GarageBand supports MIDI recording and editing.
- The tool offers a professional environment for all music and audio recording services, free of cost.
Audacity
Another software to record system audio Mac is Audacity creating a healthy addition to the media fraternity. Acting as a multi-track editor, Audacity supports 24, 16, and 32 bit sound qualities for a better editing system. It is a free audio recording program with great sound quality and tons of effects. The advanced effects include voice generation, noise removal, and track-based management.

Quite good, right? The additional features of Audacity are as given below:
- Audacity works like a charm for pitch correction.
- There are enhanced highly customizable editing tools.
- You can also visualize selected frequencies and offers effective plugins.
WavePad
Changing the narrative of voice recorders in the market and ensuring high-quality audio, WavePad has got you all covered. The sound editing tools comprise cutting, copying, inserting, silencing, auto-trimming, pitch shifting, and much more. Moreover, this audio recording software for Mac has DirectX and Virtual Studio Technology (VST) plugin support to bring more advancement to the process.

Following are some extraordinary characteristics of WavePad. You will be surprised!
- The audio enhancing compatibilities include amplification and effects added.
- WavePad gives the user a certain control over their work domain.
- With an easy-to-use interface, the advanced tools include spectral analysis (FTT), speech synthesis, and voice changer.
MixPad
Allow me to introduce you to another voice recorder Mac that also handles multi-track mixing like a pro. An exclusive beat maker, music library, and supports VST plugin, MixPad can be relied upon for adding different audio effects. The effects include equalization, compression, and reverb. More importantly, it has a low latency rate and supports cloud storage impeccably.

Following are some detailed key features of MixPad audio recording software for Mac. See the best out of it!
- The multiple or single track can be processed simultaneously, thus enhancing the user experience and productivity at the workplace.
- The program works effectively with all formats, which makes importing easy and free of complications.
- The MIDI Editor is presented, and the audio output can be uploaded to YouTube, Soundcloud, Dropbox, and Google Drive.
Ocenaudio
Bringing innovation in business and acting as a voice recorder and editor, Ocenaudio needs no introduction. The users prefer this tool to record Mac audio while editing and analyzing the audio files like an expert. The real-time preview of effects helps you decide easily without getting confused in the process. Ocenaudio is your last resort for the standardization of audio files.

To have a quick peek at the exceptional features of Ocenaudio, follow our lead. You won’t be disappointed!
- The Ocen framework is integrated with Ocenaudio to have access to enhanced capabilities.
- The auto-trim and voice recording controls help beginners and professionals work more confidently.
- The software offers a waveform view without any restriction on the audio size.
The Bottom Line
The article did an impeccable job explaining five popular audio recording software for Mac that record Mac audio like a pro. Their key traits were also described to help the stakeholders make a conscious decision. The procedure to record voice on Mac was also provided through two strategies. Got the point, right?
Wondershare Filmora is the right choice when it comes to audio editing. The functions and features it offers make the process frictionless and effortless. For instance, you can add effects and music to the audio without any hesitation. The “Adjust Audio” functionality helps adjust the audio’s volume. You can also get rid of the background noise through “Audio Denoise.”
Moreover, the “Audio Ducking” feature lowers the background volume so that the dialogues can be heard more perfectly. The “Split Audio” splits the audio into different sections. You can also use the “Audio Mixer” to fine-tune the audio of your project easily. Review the different features and invest in the right software to have all required features under one platform.
Versatile Video Editor - Wondershare Filmora
An easy yet powerful editor
Numerous effects to choose from
Detailed tutorials provided by the official channel
02 5 Best Voice Recorder Software for Mac
Part 1: How to Record Audio on Mac?
If you are a Mac user, this sub-section has been designed for you. If you are taking a voice class or an influencer interview, you need to know Mac how to record audio. The two strategies would be covered to record voice on Mac. Let us start!
Via Voice Memos
Voice Memos is an in-built app on most Apple devices. The guidelines to record sound on Mac through Voice Memos are as given below:
Step 1: Visiting Voice Memos
Launch Voice Memos from your Mac. As the interface appears, the user would be welcomed with the “Red” record button. Tap on it, and the recording would start without any prompt.
Step 2: Pausing the Recording
The lower-left corner displays the pause button. Click on it once you are done. Essentially, you can have a little preview of what you have covered so far.
Step 3: Saving Process
Click on “Done,” located in the bottom right corner. Rename the file and get done with the process.
Via QuickTime Player
QuickTime Player is the default program in Mac that acts as both media player and voice recorder. To know how to record internal audio Mac, let us walk you through the multiple steps. You’ll surely get something good out of it!
Step 1: Starting the Recording
For starters, launch QuickTime Player and navigate to the “File” located in the top panel. Select “New Audio Recording” from there. Click on the “Red” button to initiate the recording.
Step 2: Stopping the Recording
Once you are done with the recording, click on the grey square to stop the recording. There is no option to pause the recording temporarily.
Step 3: Saving the Recording
Navigate to the “File” tab again and click on “Save.” Choose the name of the recording and the output folder source.
Part 2: 5 Best Voice Recorder Software for Mac
Now that you have an idea of the procedure to record an internal audio recorder Mac let us shift our focus to audio recording software for Mac. The choice of the tool helps the user be productive at the workplace. Therefore, we have sketched out five MacBook voice recorders with their key features. Let us have a peek!
Apple GarageBand
As a digital audio workstation, Apple GarageBand has to be your first choice for music production. It is a fully-fledged audio recorder with an easy-to-use interface. The sound and loop library allows you to edit your tracks. Moreover, the interactive interface makes its usage easy for beginners.
Are you impressed with the tool? Following are some features of this audio recording software for Mac:
- Apple GarageBand comes up with a drag and drop process to make recording easy.
- Offering an extensive range of effects and virtual amps, Apple GarageBand supports MIDI recording and editing.
- The tool offers a professional environment for all music and audio recording services, free of cost.
Audacity
Another software to record system audio Mac is Audacity creating a healthy addition to the media fraternity. Acting as a multi-track editor, Audacity supports 24, 16, and 32 bit sound qualities for a better editing system. It is a free audio recording program with great sound quality and tons of effects. The advanced effects include voice generation, noise removal, and track-based management.
Quite good, right? The additional features of Audacity are as given below:
- Audacity works like a charm for pitch correction.
- There are enhanced highly customizable editing tools.
- You can also visualize selected frequencies and offers effective plugins.
WavePad
Changing the narrative of voice recorders in the market and ensuring high-quality audio, WavePad has got you all covered. The sound editing tools comprise cutting, copying, inserting, silencing, auto-trimming, pitch shifting, and much more. Moreover, this audio recording software for Mac has DirectX and Virtual Studio Technology (VST) plugin support to bring more advancement to the process.
Following are some extraordinary characteristics of WavePad. You will be surprised!
- The audio enhancing compatibilities include amplification and effects added.
- WavePad gives the user a certain control over their work domain.
- With an easy-to-use interface, the advanced tools include spectral analysis (FTT), speech synthesis, and voice changer.
MixPad
Allow me to introduce you to another voice recorder Mac that also handles multi-track mixing like a pro. An exclusive beat maker, music library, and supports VST plugin, MixPad can be relied upon for adding different audio effects. The effects include equalization, compression, and reverb. More importantly, it has a low latency rate and supports cloud storage impeccably.
Following are some detailed key features of MixPad audio recording software for Mac. See the best out of it!
- The multiple or single track can be processed simultaneously, thus enhancing the user experience and productivity at the workplace.
- The program works effectively with all formats, which makes importing easy and free of complications.
- The MIDI Editor is presented, and the audio output can be uploaded to YouTube, Soundcloud, Dropbox, and Google Drive.
Ocenaudio
Bringing innovation in business and acting as a voice recorder and editor, Ocenaudio needs no introduction. The users prefer this tool to record Mac audio while editing and analyzing the audio files like an expert. The real-time preview of effects helps you decide easily without getting confused in the process. Ocenaudio is your last resort for the standardization of audio files.
To have a quick peek at the exceptional features of Ocenaudio, follow our lead. You won’t be disappointed!
- The Ocen framework is integrated with Ocenaudio to have access to enhanced capabilities.
- The auto-trim and voice recording controls help beginners and professionals work more confidently.
- The software offers a waveform view without any restriction on the audio size.
The Bottom Line
The article did an impeccable job explaining five popular audio recording software for Mac that record Mac audio like a pro. Their key traits were also described to help the stakeholders make a conscious decision. The procedure to record voice on Mac was also provided through two strategies. Got the point, right?
Wondershare Filmora is the right choice when it comes to audio editing. The functions and features it offers make the process frictionless and effortless. For instance, you can add effects and music to the audio without any hesitation. The “Adjust Audio” functionality helps adjust the audio’s volume. You can also get rid of the background noise through “Audio Denoise.”
Moreover, the “Audio Ducking” feature lowers the background volume so that the dialogues can be heard more perfectly. The “Split Audio” splits the audio into different sections. You can also use the “Audio Mixer” to fine-tune the audio of your project easily. Review the different features and invest in the right software to have all required features under one platform.
Versatile Video Editor - Wondershare Filmora
An easy yet powerful editor
Numerous effects to choose from
Detailed tutorials provided by the official channel
Also read:
- Securing Your Google Voice Chats Phone & Desktop Recording Techniques Explained
- 2024 Approved Mastering iPhone Audio Recordings A Detailed Tutorial
- New The Sound Experts Choice 7 Innovative Free Transitions to Revolutionize Your Work
- Updated 2024 Approved The Pro Guide to Silencing Ambient Music in Audacity for Pristine Recordings
- 2024 Approved Key Audio Archives to Enhance Your Quiet Space with Gentle Melodies
- New Best Online MP3 Cutter And Joiner
- Updated In 2024, Omegle Uncovered Delving Into Internet-Based Social Sessions Security Landscape
- 2024 Approved Pure Sound Protocols Methods to Minimize Distractions in Digital Videos
- In 2024, MP3 Cutter for Mac - Which Is the Best MP3 Cutter on Mac?
- New In 2024, The Beat Goes On Finding Song Titles Using Your iOS Devices Audio Cues
- New The Step-by-Step Guide to Personalizing Mobile Notifications for 2024
- Updated 2024 Approved Unlocking Vocal Transformations in Audacity Through Autotune Use
- Updated Top 5 Digital Audio Editors for Optimal Sound Quality
- Tips to Add Audio to Video in Premiere Pro for 2024
- Updated Guide to Disassembling Beat Elements in Digital Music Files for 2024
- 2024 Approved The Art of Timbre Control Lowering Song Intensity Preserving Pitch Integrity
- New Curated Classical Repertoire for Romantic Film Scenes in the Year 2024
- Introduction to Jazz Fundamental Concepts and Techniques for 2024
- 2024 Approved Isolating Shattered Pane Resonance
- 2024 Approved Premier 8 Voice Recognition Tools Windows, macOS & Cloud Solutions Roundup
- New In 2024, Unraveling the Podcast Puzzle A Step-by-Step Approach to Download, Store, and Manage Auditory Media on Computers
- Updated Unveiling Key Features A Deep Dive Into TwistedWave Audio Processor
- Updated 2024 Approved Harmony in Transition 15 Masterful Scores Enhancing Diverse Video Styles
- New 2024 Approved Essential Websites for Obtaining Free and Unlicensed Outro Tracks
- Updated 2024 Approved The Sounds of Silence No More Three Fresh Strategies for Adding Audio to Videos
- 2024 Approved Skype Voice Changer 5 Useful Tools to Change Voice for Skype
- Updated In 2024, Top 10 Mobile Tools for Mastering Melodies IOS Vs. Android Edition
- Updated 2024 Approved How to Download and Install Lame for Audacity
- Enhancing Video Soundtracks Overcoming the Challenges of Auditory Aberrations
- Top 7 Digital Tools for Seamless Audio Cutting and Editing
- Top 10 Music Tracker You Cant Ignore for 2024
- 2024 Approved Go Beyond Audacity The Most Innovative Audio Apps for Android Devices
- New Voice-Activated Data Collection on iOS Ranking the Top 10 Apps for 2024
- Updated Compilation of Websites Offering Feline-Inspired MP3 Sounds for 2024
- Updated Audio Editing Essentials Crafting High-Quality Podcasts with Audacity for 2024
- Updated Expert Recommendations for High-Quality Music Video Designs
- New In 2024, Full Spectrum Insight Into Nero AudioWaveEditor
- Updated 2024 Approved The Complete Guide to Professional Audio Editing with Sony Vegas
- Updated Revolutionize Phone Calls with These 6 Premier Voice-Altering Apps for Android & iOS Devices
- 2024 Approved Fighting the Frenzy of Wind Vibration in Multimedia Capture Across OSes and Devices
- Updated How to Record on GarageBand? Step by Step Guide for 2024
- Updated Mastering Gaming The 8 Best Sound Effects Available Without a Price Tag
- New In 2024, Preferred 6 Web-Linked Audiophone Extraction Devices
- Updated How to Remove Audio From a Video in iMovie, In 2024
- In 2024, How to Transfer Contacts from Nubia Red Magic 9 Pro+ to Other Android Devices Using Bluetooth? | Dr.fone
- New The Ultimate List 10 Best Intro Maker Tools Online (Free & Paid) for 2024
- New Make a Heartfelt Video Montage with Pictures and Songs for 2024
- New Beginners Luck 15 Free Video Editing Programs to Get You Started for 2024
- Updated Merge Videos Without Watermarks 7 Top Picks for 2024
- How to get back lost contacts from Samsung Galaxy A05.
- Updated The Ultimate Guide to Video Editing on Mac
- 2024 Approved The Ultimate Image Ratio Calculator Tips and Tricks
- New Make Time-Lapse Video on MacBook Complete Guide
- How to recover deleted photos from Android Gallery without backup on Oppo Reno 9A
- New In 2024, How To Create Video From Text Easily Step-by-Step
- How to Come up With the Best Pokemon Team On Poco X5? | Dr.fone
- Tecno Camon 20 Premier 5G Stuck on Screen – Finding Solutions For Stuck on Boot | Dr.fone
- Simple and Effective Ways to Change Your Country on YouTube App Of your Nubia Red Magic 9 Pro | Dr.fone
- Factory Reset iPhone 8 | Dr.fone
- How To Check if Your Realme Narzo 60 Pro 5G Is Unlocked
- How to Watch Hulu Outside US On Infinix Hot 40i | Dr.fone
- In 2024, Easy Guide How To Bypass Lava Blaze 2 Pro FRP Android 10/11/12/13
- In 2024, How to Unlock Poco C55 Phone without PIN
- How to use iSpoofer on Honor Magic V2? | Dr.fone
- The Best iSpoofer Alternative to Try On Vivo X Fold 2 | Dr.fone
- How to Detect and Stop mSpy from Spying on Your Nubia Red Magic 9 Pro | Dr.fone
- Prank Your Friends! Easy Ways to Fake and Share Google Maps Location On Motorola Defy 2 | Dr.fone
- 2 Ways to Transfer Text Messages from Motorola Edge 40 to iPhone 15/14/13/12/11/X/8/ | Dr.fone
- Title: Updated Mastering Sound Manipulation The Application of Clownfish Voice Modification Tools on Discord, Fortnite, and Skype
- Author: Jacob
- Created at : 2024-05-20 00:04:15
- Updated at : 2024-05-21 00:04:15
- Link: https://audio-shaping.techidaily.com/updated-mastering-sound-manipulation-the-application-of-clownfish-voice-modification-tools-on-discord-fortnite-and-skype/
- License: This work is licensed under CC BY-NC-SA 4.0.
