
:max_bytes(150000):strip_icc():format(webp)/Lifewire_Windows_Update_2624595-9da08302ecc44539b8f0fa484a81227e.jpg)
Updated Mastering GarageBand Recording Your Step-by-Step Tutorial
Mastering GarageBand Recording: Your Step-by-Step Tutorial
Apple GarageBand is an in-built tool in Mac that lets you make incredible music with or without an instrument. The software acts as a music creation tool that enables you to record, mix, and master the music world. GarageBand recording has become popular due to a diverse range of editing functions. Essentially, do you want to know how to record on GarageBand? Be our guest! We have covered your basis.
In this article
01 What is GarageBand Recording Software?
02 How to Download and Install GarageBand Recording Software?
03 Tutorial for How to Record on GarageBand
Part 1: What is GarageBand Recording Software?
GarageBand for podcasting and GarageBand voice recording is the two phenomenal usages of Apple GarageBand . The Mac users have access to a sound library constituting synths, loops, and instrument presets. The user can add a song, start a track, and develop a musical career effortlessly.
The app is free for iOS, macOS, and iPadOS; sharing and creating music is effortless. Additionally, the Apple iCloud integration plays a pivotal role in adding tracks across devices. The workability is as easy as it can get. Willing to know how to record on GarageBand? Keep following us!
As far as the interface is concerned, it has been designed to make music easier and compatible with beginners. The “Quick Help” function can be enabled to get useful hints every time you have to hover over the cursor. The music artist can also get creative with Transform Pad Smart Control. It helps produce morph and tweak sounds as you deem necessary.

Along with this, there is a great collection of lessons for piano and guitar. It makes the user get right into the feels. One can also get instant feedback on your playing to hone the skills flawlessly.
So, are you with us? Let us begin! Now that we have established the performance of Apple GarageBand, let us look at its features.
Groove Track Feature
The Groove Track feature is considered a spell checker for rhythm. It adjusts and synchronizes the timing of the chosen track to the groove under action.
Smart Controls
The smart controls are designed to shape any sound in the library with a customized set of buttons, sliders, and knobs—the look of the smart control changes with each instrument.
Logic Remote
The logic remote helps navigate the song to browse the Sound Library and access smart controls. One can also use the tool by using multi-touch gestures.
Drummer Feature
The “Drummer” plays a pivotal role in adding the virtual session drummer and producing beats. There are around 33 players from genres, including Hip Hop, Rock, and EDM. The different groove and fill combinations make the process effortless.
Amps and Stompboxes
The Bass Amp designer helps dial-up modern and classic tones. One can also build their guitar rig via 25 legendary amps and cabinets. Moreover, there are 35 creative and fun stompbox effects.
Are you willing to know how to record voice on GarageBand? Should we? Let us first understand the procedure to download and install Apple GarageBand.
Part 2: How to Download and Install GarageBand Recording Software?
Do you need to make a GarageBand podcast? Before getting done with the process, ensure that your Mac computer completes the minimum system requirements. The Mac computer requires MacOS 11.0 or later. Apple GarageBand covers the size of 783.1 MB; therefore, you should have this storage.

Image alt: install apple garageband
MacOS 11 requires at least 20GB of free hard drive storage to handle the installation process. A 4GB RAM and 1.1 GHz processor are also system requirements to download Apple GarageBand . The software comes in-built with the macOS computer. However, if you don’t find it, install it through the following procedure:
Step 1: Launching App Store
To begin, launch App Store from your macOS computer. After that, go to the search bar and type “GarageBand.”
Step 2: Installing GarageBand
Click on Apple GarageBand from there. The “Get” option appears. Click on it and get done with the process.
Part 3: Tutorial for How to Record on GarageBand
Want to know how to record on GarageBand? Do you have a concern about how to record voice on GarageBand? Worry no more! We are here at your disposal!
Apple GarageBand may offer ease of use for musicians and artists. However, understanding how it works is mandatory. The section of the article reflects upon the complete procedure to record on Apple GarageBand to conclude the process. Henceforth, let us not wait any longer! Time to dive in!
Step 1: Initiating the Project
Tempo and time signature can also be tailored as per need. Launch Apple GarageBand from your Mac computer and then plug in your external microphone. As soon as the interface pops up, click on “Voice.” Expand the “Details” menu located in the bottom left corner of the project selection box. Tap “Input Device” and choose the microphone from your list. Moving on, click on “Choose” in the bottom right corner.

Step 2: Adding the New Track
Moving on, you are expected to add a new track. To do this, click on the button with (+), located in the top left corner of the tracks panel. GarageBand offers four tracks. Pick one as you deem necessary. Tap the “Audio” option and then plug in the external microphone or guitar. Hit the “Input” dropdown and choose the list. Click on “Create” afterward.

Step 3: Recording the Sound
Now, it is time to record the sound. Pick the track that you will be recording by clicking on the track panel. Use the square bottom to stop it. Hit red circle to begin recording.

Step 4: Recording the Multiple Tracks
Moreover, you can record multiple tracks as well. To begin, choose the track where the first track was recorded through the track header. Navigate the play head to the start of the original take. Tap the red circle to initiate the recording process. Now, click on the number in the recorded segment in the top left corner. Pick the take you have to keep and then “Delete Unused Takes to get rid of other takes.

Step 5: Exporting the File
After you are done, it is time to export the finished project. Navigate to the top bar and click on “Share.” Choose “ Export Song to Disk “ from the context menu that appears, choose “Export Song to Disk.” A dialogue box appears.

Step 6: Saving Process
Rename the file, enter the file location, format, and sound quality—hit “Export” when you are done. The project can be saved in MP3 , WAV, and AIFF.

Wrapping Up
There is a diverse range of voice recorders and music-creating software in the business, creating chaos. Apple GarageBand recording is one such Mac recording studio doing wonders in the market. With advanced features and multiple functions, one can count on the tool to create magic in the music fraternity. The users are expected to test the features first before making the call.
02 How to Download and Install GarageBand Recording Software?
03 Tutorial for How to Record on GarageBand
Part 1: What is GarageBand Recording Software?
GarageBand for podcasting and GarageBand voice recording is the two phenomenal usages of Apple GarageBand . The Mac users have access to a sound library constituting synths, loops, and instrument presets. The user can add a song, start a track, and develop a musical career effortlessly.
The app is free for iOS, macOS, and iPadOS; sharing and creating music is effortless. Additionally, the Apple iCloud integration plays a pivotal role in adding tracks across devices. The workability is as easy as it can get. Willing to know how to record on GarageBand? Keep following us!
As far as the interface is concerned, it has been designed to make music easier and compatible with beginners. The “Quick Help” function can be enabled to get useful hints every time you have to hover over the cursor. The music artist can also get creative with Transform Pad Smart Control. It helps produce morph and tweak sounds as you deem necessary.
Along with this, there is a great collection of lessons for piano and guitar. It makes the user get right into the feels. One can also get instant feedback on your playing to hone the skills flawlessly.
So, are you with us? Let us begin! Now that we have established the performance of Apple GarageBand, let us look at its features.
Groove Track Feature
The Groove Track feature is considered a spell checker for rhythm. It adjusts and synchronizes the timing of the chosen track to the groove under action.
Smart Controls
The smart controls are designed to shape any sound in the library with a customized set of buttons, sliders, and knobs—the look of the smart control changes with each instrument.
Logic Remote
The logic remote helps navigate the song to browse the Sound Library and access smart controls. One can also use the tool by using multi-touch gestures.
Drummer Feature
The “Drummer” plays a pivotal role in adding the virtual session drummer and producing beats. There are around 33 players from genres, including Hip Hop, Rock, and EDM. The different groove and fill combinations make the process effortless.
Amps and Stompboxes
The Bass Amp designer helps dial-up modern and classic tones. One can also build their guitar rig via 25 legendary amps and cabinets. Moreover, there are 35 creative and fun stompbox effects.
Are you willing to know how to record voice on GarageBand? Should we? Let us first understand the procedure to download and install Apple GarageBand.
Part 2: How to Download and Install GarageBand Recording Software?
Do you need to make a GarageBand podcast? Before getting done with the process, ensure that your Mac computer completes the minimum system requirements. The Mac computer requires MacOS 11.0 or later. Apple GarageBand covers the size of 783.1 MB; therefore, you should have this storage.
Image alt: install apple garageband
MacOS 11 requires at least 20GB of free hard drive storage to handle the installation process. A 4GB RAM and 1.1 GHz processor are also system requirements to download Apple GarageBand . The software comes in-built with the macOS computer. However, if you don’t find it, install it through the following procedure:
Step 1: Launching App Store
To begin, launch App Store from your macOS computer. After that, go to the search bar and type “GarageBand.”
Step 2: Installing GarageBand
Click on Apple GarageBand from there. The “Get” option appears. Click on it and get done with the process.
Part 3: Tutorial for How to Record on GarageBand
Want to know how to record on GarageBand? Do you have a concern about how to record voice on GarageBand? Worry no more! We are here at your disposal!
Apple GarageBand may offer ease of use for musicians and artists. However, understanding how it works is mandatory. The section of the article reflects upon the complete procedure to record on Apple GarageBand to conclude the process. Henceforth, let us not wait any longer! Time to dive in!
Step 1: Initiating the Project
Tempo and time signature can also be tailored as per need. Launch Apple GarageBand from your Mac computer and then plug in your external microphone. As soon as the interface pops up, click on “Voice.” Expand the “Details” menu located in the bottom left corner of the project selection box. Tap “Input Device” and choose the microphone from your list. Moving on, click on “Choose” in the bottom right corner.
Step 2: Adding the New Track
Moving on, you are expected to add a new track. To do this, click on the button with (+), located in the top left corner of the tracks panel. GarageBand offers four tracks. Pick one as you deem necessary. Tap the “Audio” option and then plug in the external microphone or guitar. Hit the “Input” dropdown and choose the list. Click on “Create” afterward.
Step 3: Recording the Sound
Now, it is time to record the sound. Pick the track that you will be recording by clicking on the track panel. Use the square bottom to stop it. Hit red circle to begin recording.
Step 4: Recording the Multiple Tracks
Moreover, you can record multiple tracks as well. To begin, choose the track where the first track was recorded through the track header. Navigate the play head to the start of the original take. Tap the red circle to initiate the recording process. Now, click on the number in the recorded segment in the top left corner. Pick the take you have to keep and then “Delete Unused Takes to get rid of other takes.
Step 5: Exporting the File
After you are done, it is time to export the finished project. Navigate to the top bar and click on “Share.” Choose “ Export Song to Disk “ from the context menu that appears, choose “Export Song to Disk.” A dialogue box appears.
Step 6: Saving Process
Rename the file, enter the file location, format, and sound quality—hit “Export” when you are done. The project can be saved in MP3 , WAV, and AIFF.
Wrapping Up
There is a diverse range of voice recorders and music-creating software in the business, creating chaos. Apple GarageBand recording is one such Mac recording studio doing wonders in the market. With advanced features and multiple functions, one can count on the tool to create magic in the music fraternity. The users are expected to test the features first before making the call.
“Voice Easy: A Curated List of Software for Simplified Vocal Recordings “
Top 10 Audio Recording Software to Capture Your Voice Easily

Shanoon Cox
Mar 27, 2024• Proven solutions
Whether professional or for amateur purposes, the audio recording software programs are very important. These programs allow manipulating the audio so that it matches the need for a specific project.
The best audio recording software has a variety of tools embedded to polish the audio recorded, in which this article we are going to review the best of them for you.
What is Audio Recording Software?
As the name suggests, the audio recording software is used to record audio using a unique technology. This allows the users to capture their own or the voice they want and transfer it wherever they want. The software also adds effects to the voice and makes it professional to use wherever the user wants to.
What Does a Sound Recorder Use for?
There are several uses of audio recording software program. Some are listed as under:
- In the music field, this software is of great use. It can be used for multitrack recording. The mixing of the sound is then done using the same or different tools.
- The audio recorded can be edited with ease. This includes enhancing and adding effects to it with perfection.
- With microphone use, the recording software can be integrated to make sure that the voice of the user is also recorded if required.
- Some audio recording software programs also come with screen recording, and therefore, these foster multitasking.
List of Top 10 Audio Recording Software Programs
The audio recording software for PC that would make your life easy is mentioned as under.
1.Wondershare DemoCreator
This is by far the best and the most used software program when it comes to audio recording. It is highly reliable and comes with a GUI. The user interface is easy to understand, and so are the functionalities.
With the best and the most advanced controls recording audio has never been this easy. It also acts as Mac audio recording software, and therefore it is highly recommended for all platforms. The frequent updates make this program even easier to use.
Features
- The interface of the program is very easy to use and stress-free.
- The high definition audio can be recorded with ease.
- The program supports 50+ formats to import audio, video, and other files to the system.
- There are highly advanced options for professional audio recording.
- The program can record endless video and audio as far as there is space on your disk.
Pros
- It is one of the programs that support professional audio editing.
- The program is very easy to use as it has a graphical interface.
Cons
- The program is flash software-based, which can slow down the system.
- It does not offer highly advanced audio editing at all.
Supported Platforms
The program can be used with both Windows and Mac.
Go ahead to download and have a try now!
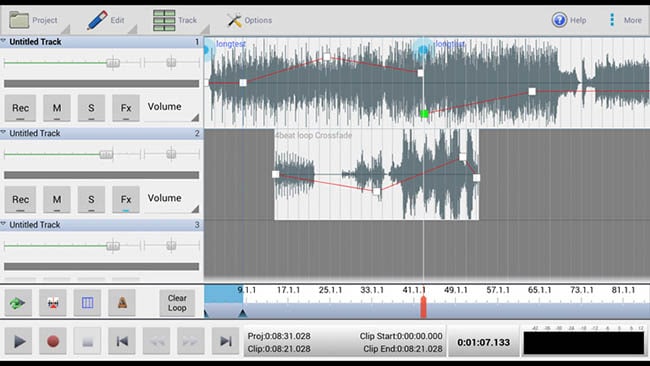
2.WavePad
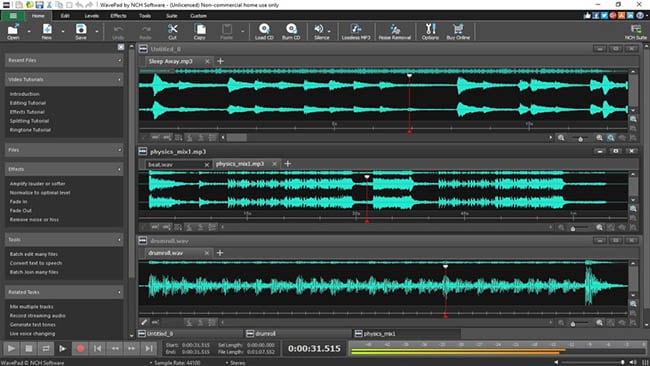
It is one of the best and most used programs to make sure that the audio is recorded with perfection. This program is compatible with most of the audio formats, and therefore it is highly recommended. The overall rating of the program is high as it is used by professionals and, therefore, highly rated as well.
Features
- It has several audio enhancing capabilities, which include amplification and effect addition.
- The audio can be edited, trimmed, and cropped with this program.
- The professional-quality sound recording is used by this program to enhance the capabilities.
Pros
- The best part of this program is its quality of end product that is very high.
- It is a wave editor that gives the users more control over the end product.
Cons
- The mp3 editor of this program does not offer top quality work.
- The program cannot work with multiple files efficiently.
Supported Platforms
It can be installed over Mac, Windows, Android, and iOS.
3.Ocenaudio

As a cross-platform program, this one has a lot to offer. The interface is a bit technical, but overall the use of the program is easy once the hands-on is done. The program is also highly intuitive and allows the users to overcome the day to day audio recording and editing tasks.
Features
- The Ocen Framework is also integrated with this platform to enhance its capabilities.
- The program also records screen if required by the users.
- It is one of the programs that have been rated on other high-end platforms.
Pros
- The program uses auto trim and voice recording controls.
- The sound spectral analysis of the program is highly advanced.
Cons
- The program cannot directly load the file from a CD.
- The program cannot be opened in multiple screens, so the work rate is slow.
Supported Platforms
It is compatible with Mac, Windows, and Linux.
4.Adobe Audition

It can be rightfully regarded as one of the best and the most advanced programs. Backed by years of Adobe experience, it is a program that will get the user a step forward. It is highly recommended to all those users that are looking for a professional level of audio recording.
Features
- It includes multitrack, wave editing, and audio restoration tools to give the best results.
- The essential sound panel has been integrated with the program to get the best oomph effect to the audio.
- The music clips can be integrated within the audio recording to make it sound professional.
Pros
- The platform can be used to create awesome podcasts.
- The audio break can be repaired with perfection.
Cons
- It is expensive, so all the users cannot afford it at all.
- The interface is high tech in nature and requires time to learn.
Supported Platforms
It is supported by Windows and Mac.
5.Audacity

It is free software that is used to record audio professionally. This high-performance program makes sure that the audio which is recorded is also shared with different platforms. The built-in panel is upgraded, and therefore it is highly advance.
Features
- It is ad-free and therefore provides hassle-free work.
- The audio editing and recording have never been as easy as it is with audacity.
- Multitrack editing is also possible with this program.
Pros
- The VST plugin support is provided by the program.
- It is a portable program that can be used for pitch correction.
Cons
- The noise reduction tool of this program needs an upgrade.
- The record to tape feature is currently unavailable.
Supported Platforms
It is supported by Mac, Linux, Windows, and BSD.
6.Wavosaur

It is one of the free programs that can be regarded as better than many paid ones. It is all because the qualities of the program are matchless. The processing of files is done with WAV and Mp3 files filter, which makes the process very much easier.
Features
- The program has multiple document interfaces for multiple file handling.
- The editing features such as cut, copy, paste, and edit can be performed in a single window.
- The waveform representation of the program is accurate and highly advanced.
Pros
- The program offers bit depth convert, pitch shift, and DC offset removal.
- The VST effects can be added to the entire batch of sound files.
Cons
- The audio routing and the multichannel support of the program are not efficient.
- The software sampler extraction is a bit slow when it comes to this program.
Supported Platforms
The program can only be installed on Windows.
7.MixPad
The audio processing and mixing have been made very easy with this platform. The program has an interface that is sleek in design and allows the processing of the audio info with care. The program also supports cloud storage, which means that the entire user’s hard work remains safe and secures all the time.
Features
- The program can mix the unlimited number of tracks all at the same time.
- Depending upon the requirement, the multiple or a single track can be processed at the same time.
- The program supports almost every sound format, so any type of sound can be imported with perfection.
Pros
- The audio effects such as EQ, compression, and reverb can be added with perfection.
- The latency rate is very low, and the program also offers ASIO support for accurate processing.
Cons
- The program only offers the export of the sound that is up to 32 bits.
- The sample rates of up to 96 kHz are only supported, which is less than most of the other mixers.
Supported Platforms
The program can be installed on Mac, Windows, Android, iPad, and Kindle Fire.
8.Sound Forge

If a user wants to completely control the audio editing process, then this software is for them. It is highly advanced and makes sure that the work that is done is highly précised. From Red Book CD creation to sound design and mixing, this program provides the users with complete control and authority over the process.
Features
- The multichannel WAV recording and processing is now possible with the new version of the program.
- The VST plugin support is provided by this program with perfection.
- The VST effects can be chained in a virtual rack.
Pros
- The simple digitization and restoration of the audio have been made simple by this program.
- The one-click solutions allow the users to process the audio tracks easily.
Cons
- The program only offers 32 bits of power, which is very low.
- The multiple VST GUI is not supported by this program.
Supported Platforms
The Sound Forge can be installed on Mac and Windows.
9.Spek

The best part of the software is that it is free and allows the users to overcome the problems which the other audio recorders present. The interface is easy to learn, and therefore the overall usage is easy. The lossless quality is something for which the software is known for. It also supports the FFMPEG library.
Features
- The signal processing is ultra-fast as it uses several threads to process audio.
- The drag and drop support of the program is highly efficient, and the program supports common audio formats.
- The program can be accessed in 19 different languages.
Pros
- The spectral density rulers allow the auto fitting of time.
- The spectral density range of the program is also adjustable.
Cons
- The codec names are, and the audio signal parameters cannot be seen.
- The program is licensed under GPLv3, which is now obsolete.
Supported Platforms
The program is compatible with Windows, Linux, and Mac.
10.Audio Highjack

The program, as the name suggests, makes it possible for the users to completely delve deep into the process of audio editing. The interface, as well as the controls, is very easy to understand and use. For novice users, this program is highly recommended as it makes audio editing a fun-filled activity.
Features
- It provides detailed statistics and min, the max value per channel.
- The processed audio can be listened in real-time to get an idea about the end product.
- The waveform generator and frequency impulse train are embedded within the program.
Pros
- The lame encoder support has been embedded within the recorder to export mp3 files.
- The editor’s look is skin able, which can be changed as per the user choice.
Cons
- The processing options are less as compared to the other recorders.
- The audio files cannot be exported as text, so the program cannot be used with PSpice.
Supported Platforms
The program is only available for Mac.
A Roundup of the Best Audio Recording Software Programs
| No. | Tools | Rating | Supported Formats | Price | Processing Power |
|---|---|---|---|---|---|
| 1 | DemoCreator | 4.5 | .mp3, .m4a, .wav, .wma, .ogg, .flac, .aif, .aiff | $29.99 | 64-bit |
| 2 | WavePad | 4.4 | vox, gsm, WMA, real audio, au, aif, FLAC, and Ogg | $69.95 | 64-bit |
| 3 | Ocenaudio | 4.0 | vox, gsm, WMA, wav, .wma, .ogg, and .flac | Free | 32-bit |
| 4 | Adobe Audition | 4.5 | AIF, AIFF, AIFC | $74.99 | 64-bit |
| 5 | Audacity | 3.9 | mp3, wav, AIFF, au, and ogg | Free | 32-bit |
| 6 | Wavosaur | 3.5 | VST plugins, ASIO driver, multichannel wav files, real-time effect processing. | Free | 32-bit |
| 7 | MixPad | 3.2 | wav, mp3, vox, and gsm | $129 | 32-bit |
| 8 | Sound Forge | 4.0 | SWF, RealMedia 9, WMA, AVI , AIFF, AIF, and SND | Free | 32-bit |
| 9 | Spek | 4.4 | vox, gsm, WMA, Wav, WMA, real audio, au, aif, FLAC, and Ogg | Free | 64-bit |
| 10 | Audio Highjack | 4.2 | .mp3, .m4a, .wav, .wma, aif, FLAC, and Ogg | Free | 64-bit |
Conclusion
With the overall specs and ratings by the users, the Wondershare DemoCreator is the best software that should be used for audio recording.
The program is highly compatible with major operating systems, and therefore it is highly recommended. The overall mechanism is easy, and the program also supports multiple formats.
It is highly technical and is constantly upgraded to make sure that it remains in line with modern technologies. It is a one-stop-shop for all the audio recording needs of the users and therefore highly viable.
With this program, the audio that has been worked on can be shared on most popular social media platforms like YouTube and Facebook.


Shanoon Cox
Shanoon Cox is a writer and a lover of all things video.
Follow @Shanoon Cox
Shanoon Cox
Mar 27, 2024• Proven solutions
Whether professional or for amateur purposes, the audio recording software programs are very important. These programs allow manipulating the audio so that it matches the need for a specific project.
The best audio recording software has a variety of tools embedded to polish the audio recorded, in which this article we are going to review the best of them for you.
What is Audio Recording Software?
As the name suggests, the audio recording software is used to record audio using a unique technology. This allows the users to capture their own or the voice they want and transfer it wherever they want. The software also adds effects to the voice and makes it professional to use wherever the user wants to.
What Does a Sound Recorder Use for?
There are several uses of audio recording software program. Some are listed as under:
- In the music field, this software is of great use. It can be used for multitrack recording. The mixing of the sound is then done using the same or different tools.
- The audio recorded can be edited with ease. This includes enhancing and adding effects to it with perfection.
- With microphone use, the recording software can be integrated to make sure that the voice of the user is also recorded if required.
- Some audio recording software programs also come with screen recording, and therefore, these foster multitasking.
List of Top 10 Audio Recording Software Programs
The audio recording software for PC that would make your life easy is mentioned as under.
1.Wondershare DemoCreator
This is by far the best and the most used software program when it comes to audio recording. It is highly reliable and comes with a GUI. The user interface is easy to understand, and so are the functionalities.
With the best and the most advanced controls recording audio has never been this easy. It also acts as Mac audio recording software, and therefore it is highly recommended for all platforms. The frequent updates make this program even easier to use.
Features
- The interface of the program is very easy to use and stress-free.
- The high definition audio can be recorded with ease.
- The program supports 50+ formats to import audio, video, and other files to the system.
- There are highly advanced options for professional audio recording.
- The program can record endless video and audio as far as there is space on your disk.
Pros
- It is one of the programs that support professional audio editing.
- The program is very easy to use as it has a graphical interface.
Cons
- The program is flash software-based, which can slow down the system.
- It does not offer highly advanced audio editing at all.
Supported Platforms
The program can be used with both Windows and Mac.
Go ahead to download and have a try now!
2.WavePad
It is one of the best and most used programs to make sure that the audio is recorded with perfection. This program is compatible with most of the audio formats, and therefore it is highly recommended. The overall rating of the program is high as it is used by professionals and, therefore, highly rated as well.
Features
- It has several audio enhancing capabilities, which include amplification and effect addition.
- The audio can be edited, trimmed, and cropped with this program.
- The professional-quality sound recording is used by this program to enhance the capabilities.
Pros
- The best part of this program is its quality of end product that is very high.
- It is a wave editor that gives the users more control over the end product.
Cons
- The mp3 editor of this program does not offer top quality work.
- The program cannot work with multiple files efficiently.
Supported Platforms
It can be installed over Mac, Windows, Android, and iOS.
3.Ocenaudio
As a cross-platform program, this one has a lot to offer. The interface is a bit technical, but overall the use of the program is easy once the hands-on is done. The program is also highly intuitive and allows the users to overcome the day to day audio recording and editing tasks.
Features
- The Ocen Framework is also integrated with this platform to enhance its capabilities.
- The program also records screen if required by the users.
- It is one of the programs that have been rated on other high-end platforms.
Pros
- The program uses auto trim and voice recording controls.
- The sound spectral analysis of the program is highly advanced.
Cons
- The program cannot directly load the file from a CD.
- The program cannot be opened in multiple screens, so the work rate is slow.
Supported Platforms
It is compatible with Mac, Windows, and Linux.
4.Adobe Audition
It can be rightfully regarded as one of the best and the most advanced programs. Backed by years of Adobe experience, it is a program that will get the user a step forward. It is highly recommended to all those users that are looking for a professional level of audio recording.
Features
- It includes multitrack, wave editing, and audio restoration tools to give the best results.
- The essential sound panel has been integrated with the program to get the best oomph effect to the audio.
- The music clips can be integrated within the audio recording to make it sound professional.
Pros
- The platform can be used to create awesome podcasts.
- The audio break can be repaired with perfection.
Cons
- It is expensive, so all the users cannot afford it at all.
- The interface is high tech in nature and requires time to learn.
Supported Platforms
It is supported by Windows and Mac.
5.Audacity
It is free software that is used to record audio professionally. This high-performance program makes sure that the audio which is recorded is also shared with different platforms. The built-in panel is upgraded, and therefore it is highly advance.
Features
- It is ad-free and therefore provides hassle-free work.
- The audio editing and recording have never been as easy as it is with audacity.
- Multitrack editing is also possible with this program.
Pros
- The VST plugin support is provided by the program.
- It is a portable program that can be used for pitch correction.
Cons
- The noise reduction tool of this program needs an upgrade.
- The record to tape feature is currently unavailable.
Supported Platforms
It is supported by Mac, Linux, Windows, and BSD.
6.Wavosaur
It is one of the free programs that can be regarded as better than many paid ones. It is all because the qualities of the program are matchless. The processing of files is done with WAV and Mp3 files filter, which makes the process very much easier.
Features
- The program has multiple document interfaces for multiple file handling.
- The editing features such as cut, copy, paste, and edit can be performed in a single window.
- The waveform representation of the program is accurate and highly advanced.
Pros
- The program offers bit depth convert, pitch shift, and DC offset removal.
- The VST effects can be added to the entire batch of sound files.
Cons
- The audio routing and the multichannel support of the program are not efficient.
- The software sampler extraction is a bit slow when it comes to this program.
Supported Platforms
The program can only be installed on Windows.
7.MixPad
The audio processing and mixing have been made very easy with this platform. The program has an interface that is sleek in design and allows the processing of the audio info with care. The program also supports cloud storage, which means that the entire user’s hard work remains safe and secures all the time.
Features
- The program can mix the unlimited number of tracks all at the same time.
- Depending upon the requirement, the multiple or a single track can be processed at the same time.
- The program supports almost every sound format, so any type of sound can be imported with perfection.
Pros
- The audio effects such as EQ, compression, and reverb can be added with perfection.
- The latency rate is very low, and the program also offers ASIO support for accurate processing.
Cons
- The program only offers the export of the sound that is up to 32 bits.
- The sample rates of up to 96 kHz are only supported, which is less than most of the other mixers.
Supported Platforms
The program can be installed on Mac, Windows, Android, iPad, and Kindle Fire.
8.Sound Forge
If a user wants to completely control the audio editing process, then this software is for them. It is highly advanced and makes sure that the work that is done is highly précised. From Red Book CD creation to sound design and mixing, this program provides the users with complete control and authority over the process.
Features
- The multichannel WAV recording and processing is now possible with the new version of the program.
- The VST plugin support is provided by this program with perfection.
- The VST effects can be chained in a virtual rack.
Pros
- The simple digitization and restoration of the audio have been made simple by this program.
- The one-click solutions allow the users to process the audio tracks easily.
Cons
- The program only offers 32 bits of power, which is very low.
- The multiple VST GUI is not supported by this program.
Supported Platforms
The Sound Forge can be installed on Mac and Windows.
9.Spek
The best part of the software is that it is free and allows the users to overcome the problems which the other audio recorders present. The interface is easy to learn, and therefore the overall usage is easy. The lossless quality is something for which the software is known for. It also supports the FFMPEG library.
Features
- The signal processing is ultra-fast as it uses several threads to process audio.
- The drag and drop support of the program is highly efficient, and the program supports common audio formats.
- The program can be accessed in 19 different languages.
Pros
- The spectral density rulers allow the auto fitting of time.
- The spectral density range of the program is also adjustable.
Cons
- The codec names are, and the audio signal parameters cannot be seen.
- The program is licensed under GPLv3, which is now obsolete.
Supported Platforms
The program is compatible with Windows, Linux, and Mac.
10.Audio Highjack
The program, as the name suggests, makes it possible for the users to completely delve deep into the process of audio editing. The interface, as well as the controls, is very easy to understand and use. For novice users, this program is highly recommended as it makes audio editing a fun-filled activity.
Features
- It provides detailed statistics and min, the max value per channel.
- The processed audio can be listened in real-time to get an idea about the end product.
- The waveform generator and frequency impulse train are embedded within the program.
Pros
- The lame encoder support has been embedded within the recorder to export mp3 files.
- The editor’s look is skin able, which can be changed as per the user choice.
Cons
- The processing options are less as compared to the other recorders.
- The audio files cannot be exported as text, so the program cannot be used with PSpice.
Supported Platforms
The program is only available for Mac.
A Roundup of the Best Audio Recording Software Programs
| No. | Tools | Rating | Supported Formats | Price | Processing Power |
|---|---|---|---|---|---|
| 1 | DemoCreator | 4.5 | .mp3, .m4a, .wav, .wma, .ogg, .flac, .aif, .aiff | $29.99 | 64-bit |
| 2 | WavePad | 4.4 | vox, gsm, WMA, real audio, au, aif, FLAC, and Ogg | $69.95 | 64-bit |
| 3 | Ocenaudio | 4.0 | vox, gsm, WMA, wav, .wma, .ogg, and .flac | Free | 32-bit |
| 4 | Adobe Audition | 4.5 | AIF, AIFF, AIFC | $74.99 | 64-bit |
| 5 | Audacity | 3.9 | mp3, wav, AIFF, au, and ogg | Free | 32-bit |
| 6 | Wavosaur | 3.5 | VST plugins, ASIO driver, multichannel wav files, real-time effect processing. | Free | 32-bit |
| 7 | MixPad | 3.2 | wav, mp3, vox, and gsm | $129 | 32-bit |
| 8 | Sound Forge | 4.0 | SWF, RealMedia 9, WMA, AVI , AIFF, AIF, and SND | Free | 32-bit |
| 9 | Spek | 4.4 | vox, gsm, WMA, Wav, WMA, real audio, au, aif, FLAC, and Ogg | Free | 64-bit |
| 10 | Audio Highjack | 4.2 | .mp3, .m4a, .wav, .wma, aif, FLAC, and Ogg | Free | 64-bit |
Conclusion
With the overall specs and ratings by the users, the Wondershare DemoCreator is the best software that should be used for audio recording.
The program is highly compatible with major operating systems, and therefore it is highly recommended. The overall mechanism is easy, and the program also supports multiple formats.
It is highly technical and is constantly upgraded to make sure that it remains in line with modern technologies. It is a one-stop-shop for all the audio recording needs of the users and therefore highly viable.
With this program, the audio that has been worked on can be shared on most popular social media platforms like YouTube and Facebook.
Shanoon Cox
Shanoon Cox is a writer and a lover of all things video.
Follow @Shanoon Cox
Mastering Audio Clarity: The Most Effective Noise Reduction Tools Revealed
Background noise is the unwanted sound present in the background while recording audio. It diminishes the overall sound quality of the audio or video. It is not always possible to make a call or record an audio or video from a silent room. Then the noise was made by working machines like a fan, air conditioner, etc., or people talking. It will make it difficult to hear the recording and concentrate on the topic. Quite annoying, right?
Best Audio Editors to Remove Background Noise from Audio
We all know background noise will reduce the overall impression of the video no matter how perfect the video is. Here we will discuss 4 applications that can be used to remove background noise from any audio clip (they are listed in no particular order).
In this article
02 Audacity
Part 1: Wondershare Filmora
Wondershare Filmora is a video editing app with extensive features and options for editing a video or audio. Amateurs, as well as professionals, equally use this application. You can remove background noise by its simple denoise feature in several mins. Let’s see how noise reduction is done using Filmora:
Download Filmora below, and install it on your computer.
For Win 7 or later (64-bit)
For macOS 10.12 or later
Open Filmora, and go to File-Import Media to import your source video to the Media Library.

Add or drag-n-drop the source video to the video track. Then right-click the video on the track, and select Adjust Audio option.

The audio settings panel will pop up. Please enable the Remove background noise option, and then adjust the denoising level to Strong by moving the pointer to the extreme right.

Playback your video on the line and check whether the voice quality has been improved.
Filmora supports various video formats. You can select the format you want and export the video or upload your video to Youtube and Vimeo directly. Once done, click Export to save or export your video.

Tips:
The audio can also be fine-tuned by using the Equalizer feature of Filmora, making the audio sound more natural. Also, the Audio Mixer feature will help you to edit the audio further and save it in MP3 format.
Part 2: Audacity
Audacity is an open platform for audio recording and editing. It is a very simple-to-use application and can be used to record, play, import, and export any audio files of WAV, MP3, AIFF, and OGG. Audacity also offers mixing tracks and applying special effects to the audios.
First, select the “silent” part of the audio, where only the noise can be heard.
Tap on the Effects menu at the top and select Noise Removal.

Tap on the Get Noise Profile option.

Select all the audios from which you wish to remove the background noise.
Now once again, go to the Effects menu and tap on the Noise Removal option.
Adjust the settings if you feel it is necessary and click OK to save the settings.
Listen to the audio clip to ensure the quality has been improved and the noise reduced. And here are the waveforms before and after the noise removal.

Tips:
It is always recommended to reduce the noise before recording audio on Audacity.
Part 3: VSDC Video Editor
VSDC is a top-notch video editor with various high-end editing tools that allow users to enhance their videos easily. It offers screen recording, voice-overs, color correction, and even the green screen effect. To help you refine your videos to the highest quality, you can use the noise removal tool in VSDC.
Here are the easy steps to de-noise audio:
Open the VSDC video editor. Then click on the Editor tab and click on Run Sprite Wizard or Audio.
![]()
Select a file to be imported or drag and drop it to the slides. Click Apply Settings to proceed.

Open the Audio effects drop-down menu, tap on Filters, and finally on Gate.

Now, adjust the threshold level in the right panel by reducing it.

Similarly, adjust the Attack and Release levels to reduce the background noise.

Part 4: Movavi Video Editor
Movavi is a simple video editing application that anyone can use to edit videos based on the time it was taken, for example, wedding videos, birthday videos, etc. it offers a lot of features to edit a video clip based on a specific theme. Here is how noise reduction can be done by using Movavi Video Editor.
Open the Movavi Video editor on your desktop and open an audio/video clip on your timeline.
Click on the audio clip to select it and then tap on the Settings icon on the extreme left.
Then choose the Audio Editing option and tap on the Noise Removal box.

Adjust the Noise Suppression pointer according to the video’s need.
Playback the video on the timeline and check if the sound quality gets better.
Tips:
The Noise Suppression level needs to be adjusted for every video as the noise level will be different for every one of them. Using speakers while playing back the audio after noise suppression is also recommended to check the audio quality.
To sum up
The above are 4 of the best editing applications available in the market in which unwanted background music can be removed. These applications also have a lot of other features that can be useful for audio and video editing.
Versatile Video Editor - Wondershare Filmora
An easy yet powerful editor
Numerous effects to choose from
Detailed tutorials provided by the official channel
Best Audio Editors to Remove Background Noise from Audio
We all know background noise will reduce the overall impression of the video no matter how perfect the video is. Here we will discuss 4 applications that can be used to remove background noise from any audio clip (they are listed in no particular order).
In this article
02 Audacity
Part 1: Wondershare Filmora
Wondershare Filmora is a video editing app with extensive features and options for editing a video or audio. Amateurs, as well as professionals, equally use this application. You can remove background noise by its simple denoise feature in several mins. Let’s see how noise reduction is done using Filmora:
Download Filmora below, and install it on your computer.
For Win 7 or later (64-bit)
For macOS 10.12 or later
Open Filmora, and go to File-Import Media to import your source video to the Media Library.
Add or drag-n-drop the source video to the video track. Then right-click the video on the track, and select Adjust Audio option.
The audio settings panel will pop up. Please enable the Remove background noise option, and then adjust the denoising level to Strong by moving the pointer to the extreme right.
Playback your video on the line and check whether the voice quality has been improved.
Filmora supports various video formats. You can select the format you want and export the video or upload your video to Youtube and Vimeo directly. Once done, click Export to save or export your video.
Tips:
The audio can also be fine-tuned by using the Equalizer feature of Filmora, making the audio sound more natural. Also, the Audio Mixer feature will help you to edit the audio further and save it in MP3 format.
Part 2: Audacity
Audacity is an open platform for audio recording and editing. It is a very simple-to-use application and can be used to record, play, import, and export any audio files of WAV, MP3, AIFF, and OGG. Audacity also offers mixing tracks and applying special effects to the audios.
First, select the “silent” part of the audio, where only the noise can be heard.
Tap on the Effects menu at the top and select Noise Removal.
Tap on the Get Noise Profile option.
Select all the audios from which you wish to remove the background noise.
Now once again, go to the Effects menu and tap on the Noise Removal option.
Adjust the settings if you feel it is necessary and click OK to save the settings.
Listen to the audio clip to ensure the quality has been improved and the noise reduced. And here are the waveforms before and after the noise removal.
Tips:
It is always recommended to reduce the noise before recording audio on Audacity.
Part 3: VSDC Video Editor
VSDC is a top-notch video editor with various high-end editing tools that allow users to enhance their videos easily. It offers screen recording, voice-overs, color correction, and even the green screen effect. To help you refine your videos to the highest quality, you can use the noise removal tool in VSDC.
Here are the easy steps to de-noise audio:
Open the VSDC video editor. Then click on the Editor tab and click on Run Sprite Wizard or Audio.
![]()
Select a file to be imported or drag and drop it to the slides. Click Apply Settings to proceed.
Open the Audio effects drop-down menu, tap on Filters, and finally on Gate.
Now, adjust the threshold level in the right panel by reducing it.
Similarly, adjust the Attack and Release levels to reduce the background noise.
Part 4: Movavi Video Editor
Movavi is a simple video editing application that anyone can use to edit videos based on the time it was taken, for example, wedding videos, birthday videos, etc. it offers a lot of features to edit a video clip based on a specific theme. Here is how noise reduction can be done by using Movavi Video Editor.
Open the Movavi Video editor on your desktop and open an audio/video clip on your timeline.
Click on the audio clip to select it and then tap on the Settings icon on the extreme left.
Then choose the Audio Editing option and tap on the Noise Removal box.
Adjust the Noise Suppression pointer according to the video’s need.
Playback the video on the timeline and check if the sound quality gets better.
Tips:
The Noise Suppression level needs to be adjusted for every video as the noise level will be different for every one of them. Using speakers while playing back the audio after noise suppression is also recommended to check the audio quality.
To sum up
The above are 4 of the best editing applications available in the market in which unwanted background music can be removed. These applications also have a lot of other features that can be useful for audio and video editing.
Versatile Video Editor - Wondershare Filmora
An easy yet powerful editor
Numerous effects to choose from
Detailed tutorials provided by the official channel
Also read:
- Voice Capturing Made Easy An In-Depth Look at Vocaroos Functionality for 2024
- New 2024 Approved Singing Perfection Pro The Ultimate AI-Powered Audio Alteration Suite
- Updated 2024 Approved Auditory Purity Unveiled A Users Blueprint for Cleaning Up Web Soundscape
- New In 2024, 8 Best iOS DAW for iPad and iPhone
- Updated Audiovisual Excellence Mastering the Art of Sound Design in Sony Vegas Pro 2023
- Updated 2024 Approved Something You Should Know About TwistedWave Audio Editor
- Audio Engineering Simplified Utilizing Dynamic Ducking Techniques in Final Cut Pro X for Professional Results
- In 2024, Leveraging the Power of Visuals Essential Knowledge About Pexels.coms Image Catalog
- 2024 Approved Sonic Storytelling Weaving a Tapestry of Sound and Imagery
- Voice Alteration Essentials Utilizing Voice Changer Pro with iOS Devices for 2024
- Navigating the Best Options for Mac MP3 Metadata Editors for 2024
- Updated 2024 Approved Cutting-Edge Editors Toolkit The Definitive List of 10 Reaper Plugins to Enhance Your Workflows
- Procuring Immersive Dragon Roar Soundscape for 2024
- Updated Premier Free Audio Editing Software on Linux A Comprehensive Guide
- New Speak Different, Live Free The Essential Guide to the Leading FREE Voice Modification Tools of 2E 2024
- Updated 2024 Approved Experience Unparalleled Audio Quality on Windows with These 10 Tools
- New 2024 Approved Harmonizing Media Effective Techniques to Combine Multiple Audio Files in Videos
- A Detailed VPNa Fake GPS Location Free Review On Honor X9b | Dr.fone
- How to Cast Nubia Red Magic 9 Pro Screen to PC Using WiFi | Dr.fone
- In 2024, How to Unlock Xiaomi Redmi Note 12 Pro 5G Phone Pattern Lock without Factory Reset
- In 2024, 4 solution to get rid of pokemon fail to detect location On Apple iPhone 13 Pro Max | Dr.fone
- Unlock Your Poco X5 Phone with Ease The 3 Best Lock Screen Removal Tools
- How to Unlock Apple iPhone 15 Plus With an Apple Watch & What to Do if It Doesnt Work | Dr.fone
- OS X Mavericks MP4 Editor Trim, Cut, and Enhance Your Videos
- In 2024, 3 Solutions to Find Your Samsung Galaxy S23 FE Current Location of a Mobile Number | Dr.fone
- In 2024, Why does the pokemon go battle league not available On Google Pixel 8 Pro | Dr.fone
- New Buggy FCPX? Try This A Comprehensive Reset Guide for Troubleshooting for 2024
- Updated In 2024, Easy Video Editing Software for Windows Microsoft Video Editor Review
- Complete Guide to Hard Reset Your Meizu 21 | Dr.fone
- Complete Guide to Hard Reset Your Samsung Galaxy Z Fold 5 | Dr.fone
- Updated Filmora Coupon Code 2022 - 7 Ways to Find(2022 Full List)
- Title: Updated Mastering GarageBand Recording Your Step-by-Step Tutorial
- Author: Jacob
- Created at : 2024-05-20 00:04:15
- Updated at : 2024-05-21 00:04:15
- Link: https://audio-shaping.techidaily.com/updated-mastering-garageband-recording-your-step-by-step-tutorial/
- License: This work is licensed under CC BY-NC-SA 4.0.
