
:max_bytes(150000):strip_icc():format(webp)/Sony-PS5-PlayStation-5-Gaming-Console-7-1434c073922c4bf59bca47a33013a6dd.jpg)
Updated In 2024, Enhancing Your Gaming Experience Incorporating Audio with KineMaster
Enhancing Your Gaming Experience: Incorporating Audio with KineMaster
Versatile Video Editor - Wondershare Filmora
An easy yet powerful editor
Numerous effects to choose from
Detailed tutorials provided by the official channel
Finding the right app to help you edit videos can be a bit of a chore. Finding a video editor that helps you seamlessly on the go can help immensely. If you’re looking for specific functions like how to add music on KineMaster.
The KineMaster app is ideally suited for beginners who have just taken an interest in learning video editing or professionals. It’s perfect if you’re just in it to create a celebratory video for special occasions like birthdays, weddings, anniversaries, or other special events.
It can also help you bring your A-game to the field if you’re a professional video editor looking to do serious work for clients. It’s easier to use than desktop video editing software.
In this article
01 [Basic introduction about KineMaster](#Part 1)
02 [How to add music to KineMaster](#Part 2)
03 [How to add Youtube/Spotify Music to KineMaster](#Part 3)
04 [Besides Adding Music, Here’s What You Can Do With KineMaster ](#Part 4)
Part 1 Basic introduction about KineMaster
KineMaster is a video editing app available for free download. It’s supported on both Android and iOS. It’s packed with many editing features, some commonplace and others advanced. This is why it’s the perfect app to learn how to add music in KineMaster.
You can download the app for free. It comes with a premium subscription that unlocks advanced features and tools. You can use KineMaster on your mobile to arrange scenes, transitions, and tools to cut, trim and edit videos as well as images. You can utilize layer support to create cinematic enhancements for your videos.

You can correct colors with color grading and create vibrant videos bursting with color and life. You can use blending modes, add effects and use graphics directly on the video with customized layers. One thing to note is that the free version of the videos comes with a watermark.
As for audio, it’s a simple matter to learn how to add music to video in KineMaster. Let’s look at how to add music in KineMaster iOS and Android. The Play Store version can help you with how to add music to KineMaster on Chromebook as well.
Part 2 How to add music to KineMaster
Follow these simple steps after downloading the app to your phone. After you enter KineMaster, you’ll be greeted by a home page that offers the chance to start a new project or continue to edit an existing one.
If you want to load an existing video on the app, then go to the media section. This means tapping on the ‘Audio’ icon option. It will allow you to browse your phone for images and videos you want to load on your phone. Tap the checkmark on the right-hand corner to add the video to the project. With the footage chosen, all that’s left is to add music to KineMaster.

Now let’s look at how to add music to a video in KineMaster. The first thing you need to do is decide if you want to choose a custom track or know how to add music to KineMaster without ‘my media.’

KineMaster’s premium edition comes with its library. In the meantime, we’ll have to use the tracks of our preference. So let’s get back to how to add music in KineMaster video.
When choosing a custom track, know what file you’re opting for. It’s simple to do when you know how to add music to video in KineMaster. It can support audio files in mp3, wav, m4v formats.

Once you’ve picked the appropriate file, you can choose the big red ‘Plus’ sign at the end of the file name. This will add audio to the video file. With this, you now know how to add music to a video on KineMaster.

Once you’re done with editing your video file, you can simply tap on the export symbol on the right-hand corner of the app.

Part 3 How to add Youtube/Spotify Music to KineMaster
How To Add Music To A KineMaster Video Using Youtube Audio Library
Now let’s tap into the knowledge for the YouTube edition of how to add music into KineMaster. You can source the free music from YouTube’s creator studio. It offers many options for copyright-free music. In all cases, you must credit the artist, and some artists may request you to contribute in exchange for their art.

YouTube allows users to download the audio file as an mp3. You can then use this mp3 file in KineMaster. To do so you. Once you’ve imported the video file, you can then choose how to add music to KineMaster.
Tap the ‘Media’ button to browse the audio file you want to include. Click on the big red plus encircled by a circle at the end of the file name.
How To Add Music To A KineMaster Video Using Spotify Audio
Unfortunately, all of Spotify’s tracks are exclusively licensed for usage only within the software. It cannot simply import Spotify audio into video editors like KineMaster for additional editing.

However, if you could export the relevant files to your mobile device. We can help you know how you can learn how to add music to KineMaster on iPad or any android device.
● Tap on ‘Media’
● Browse files until you locate the audio track
● Click on the encircled red plus sign.
● Edit track to fit your video
● Export video
That, dear readers, is how to add music to KineMaster.
Part 4 Besides Adding Music, Here’s What You Can Do With KineMaster
KineMaster is the best video editor app available for mobile devices. With extensive availability ranging from iPads to Chromebooks and everything in between. It’s easy to edit on the go.
It’s convenient when you’re editing while traveling or if you hate sitting still to work. It’s powerful to help you perform the tasks you need to while light enough to support on mobile.
Let’s look at some of the features available on KineMaster.
Trim/Split Video
You can customize a single clip from a longer video or trim the video for a highlights reel. Tap on the scissors option to open a window with four options.

The first is to trim to the ‘left of playhead’ (cuts before), trim to ‘right of playhead’ (cuts after), ‘split at playhead’ (splits the video into two). The final option is to ‘split and insert freeze frame.’ These options give you a lot of control over the video.
Video Transitions
You have many transitions ranging from 3D transitions to transitions for text or picture in picture options. Once you’ve selected the transition, tap on the tick mark at the top right corner to apply the effect.

Handwriting
This lets you handwrite messages, doodles, and more as a layer on top of your video. It can add a personal and creative flair to the video. When used in conjunction with the animation effects, you can expand the scope of use. You can enrich your videos with detailed and hand-drawn assists.

Animations
One of the better aspects of the KineMaster app is that you can animate individual elements in your video. Each animation has its layer. There are three types of animation.

For instance, ‘in animation’ guides how the animation enters. The ‘out animation’ can be used at the end of a clip or when characters exit. ‘Overall animations’ are sustained throughout the video. You have the option to customize animations.
Suppose you’re looking for a powerful video editor like KineMaster for your desktop/PC. Look no further thanWondershare Filmora. The software program is a powerful tool for video editing available for both Windows and macOS.
It’s the perfect blend of skill and automation that lets users showcase their talents. Both novices and industry professionals can use Filmora video editing with ease. It boasts a broader range of features and effects to draw on. With advanced video editing capabilities, you can never go wrong when using Wondershare Filmora.
Wondershare Filmora
Get started easily with Filmora’s powerful performance, intuitive interface, and countless effects!
Try It Free Try It Free Try It Free Learn More about Filmora>

Conclusion
KineMaster is among the greatest Android and iPhone video editing apps. This program allows users to edit films with a few basic tricks to look sophisticated. You can learn how to add music to KineMaster easily. With or without experience, everyone can spice up a video with its simple interface and robust capabilities.
Similarly, video editing from your smartphone is another one of the many methods to expand your creative horizons. Another is to use Wondershare Filmora video editing software.
Finding the right app to help you edit videos can be a bit of a chore. Finding a video editor that helps you seamlessly on the go can help immensely. If you’re looking for specific functions like how to add music on KineMaster.
The KineMaster app is ideally suited for beginners who have just taken an interest in learning video editing or professionals. It’s perfect if you’re just in it to create a celebratory video for special occasions like birthdays, weddings, anniversaries, or other special events.
It can also help you bring your A-game to the field if you’re a professional video editor looking to do serious work for clients. It’s easier to use than desktop video editing software.
In this article
01 [Basic introduction about KineMaster](#Part 1)
02 [How to add music to KineMaster](#Part 2)
03 [How to add Youtube/Spotify Music to KineMaster](#Part 3)
04 [Besides Adding Music, Here’s What You Can Do With KineMaster ](#Part 4)
Part 1 Basic introduction about KineMaster
KineMaster is a video editing app available for free download. It’s supported on both Android and iOS. It’s packed with many editing features, some commonplace and others advanced. This is why it’s the perfect app to learn how to add music in KineMaster.
You can download the app for free. It comes with a premium subscription that unlocks advanced features and tools. You can use KineMaster on your mobile to arrange scenes, transitions, and tools to cut, trim and edit videos as well as images. You can utilize layer support to create cinematic enhancements for your videos.
You can correct colors with color grading and create vibrant videos bursting with color and life. You can use blending modes, add effects and use graphics directly on the video with customized layers. One thing to note is that the free version of the videos comes with a watermark.
As for audio, it’s a simple matter to learn how to add music to video in KineMaster. Let’s look at how to add music in KineMaster iOS and Android. The Play Store version can help you with how to add music to KineMaster on Chromebook as well.
Part 2 How to add music to KineMaster
Follow these simple steps after downloading the app to your phone. After you enter KineMaster, you’ll be greeted by a home page that offers the chance to start a new project or continue to edit an existing one.
If you want to load an existing video on the app, then go to the media section. This means tapping on the ‘Audio’ icon option. It will allow you to browse your phone for images and videos you want to load on your phone. Tap the checkmark on the right-hand corner to add the video to the project. With the footage chosen, all that’s left is to add music to KineMaster.
Now let’s look at how to add music to a video in KineMaster. The first thing you need to do is decide if you want to choose a custom track or know how to add music to KineMaster without ‘my media.’
KineMaster’s premium edition comes with its library. In the meantime, we’ll have to use the tracks of our preference. So let’s get back to how to add music in KineMaster video.
When choosing a custom track, know what file you’re opting for. It’s simple to do when you know how to add music to video in KineMaster. It can support audio files in mp3, wav, m4v formats.
Once you’ve picked the appropriate file, you can choose the big red ‘Plus’ sign at the end of the file name. This will add audio to the video file. With this, you now know how to add music to a video on KineMaster.
Once you’re done with editing your video file, you can simply tap on the export symbol on the right-hand corner of the app.
Part 3 How to add Youtube/Spotify Music to KineMaster
How To Add Music To A KineMaster Video Using Youtube Audio Library
Now let’s tap into the knowledge for the YouTube edition of how to add music into KineMaster. You can source the free music from YouTube’s creator studio. It offers many options for copyright-free music. In all cases, you must credit the artist, and some artists may request you to contribute in exchange for their art.
YouTube allows users to download the audio file as an mp3. You can then use this mp3 file in KineMaster. To do so you. Once you’ve imported the video file, you can then choose how to add music to KineMaster.
Tap the ‘Media’ button to browse the audio file you want to include. Click on the big red plus encircled by a circle at the end of the file name.
How To Add Music To A KineMaster Video Using Spotify Audio
Unfortunately, all of Spotify’s tracks are exclusively licensed for usage only within the software. It cannot simply import Spotify audio into video editors like KineMaster for additional editing.
However, if you could export the relevant files to your mobile device. We can help you know how you can learn how to add music to KineMaster on iPad or any android device.
● Tap on ‘Media’
● Browse files until you locate the audio track
● Click on the encircled red plus sign.
● Edit track to fit your video
● Export video
That, dear readers, is how to add music to KineMaster.
Part 4 Besides Adding Music, Here’s What You Can Do With KineMaster
KineMaster is the best video editor app available for mobile devices. With extensive availability ranging from iPads to Chromebooks and everything in between. It’s easy to edit on the go.
It’s convenient when you’re editing while traveling or if you hate sitting still to work. It’s powerful to help you perform the tasks you need to while light enough to support on mobile.
Let’s look at some of the features available on KineMaster.
Trim/Split Video
You can customize a single clip from a longer video or trim the video for a highlights reel. Tap on the scissors option to open a window with four options.
The first is to trim to the ‘left of playhead’ (cuts before), trim to ‘right of playhead’ (cuts after), ‘split at playhead’ (splits the video into two). The final option is to ‘split and insert freeze frame.’ These options give you a lot of control over the video.
Video Transitions
You have many transitions ranging from 3D transitions to transitions for text or picture in picture options. Once you’ve selected the transition, tap on the tick mark at the top right corner to apply the effect.
Handwriting
This lets you handwrite messages, doodles, and more as a layer on top of your video. It can add a personal and creative flair to the video. When used in conjunction with the animation effects, you can expand the scope of use. You can enrich your videos with detailed and hand-drawn assists.
Animations
One of the better aspects of the KineMaster app is that you can animate individual elements in your video. Each animation has its layer. There are three types of animation.
For instance, ‘in animation’ guides how the animation enters. The ‘out animation’ can be used at the end of a clip or when characters exit. ‘Overall animations’ are sustained throughout the video. You have the option to customize animations.
Suppose you’re looking for a powerful video editor like KineMaster for your desktop/PC. Look no further thanWondershare Filmora. The software program is a powerful tool for video editing available for both Windows and macOS.
It’s the perfect blend of skill and automation that lets users showcase their talents. Both novices and industry professionals can use Filmora video editing with ease. It boasts a broader range of features and effects to draw on. With advanced video editing capabilities, you can never go wrong when using Wondershare Filmora.
Wondershare Filmora
Get started easily with Filmora’s powerful performance, intuitive interface, and countless effects!
Try It Free Try It Free Try It Free Learn More about Filmora>
Conclusion
KineMaster is among the greatest Android and iPhone video editing apps. This program allows users to edit films with a few basic tricks to look sophisticated. You can learn how to add music to KineMaster easily. With or without experience, everyone can spice up a video with its simple interface and robust capabilities.
Similarly, video editing from your smartphone is another one of the many methods to expand your creative horizons. Another is to use Wondershare Filmora video editing software.
Controlling Auditory Flow: Windows Edition with Adobe Premiere
The audio ducking technology aids the editors in creating a precise video as per their needs. In this article, you will discuss audio ducking Premiere Pro of Adobe to enhance the video’s audio quality optimally. Audio ducking is a feature that helps the audience to listen to every detail on the video flawlessly.

Here, you will be using Adobe Premiere Pro to establish this audio ducking feature precisely. This functionality is applicable on the Windows platform. To try on the Mac system, you can use the Filmora application to acquire precise results. In this article, you will learn how to use audio ducking concepts on Windows and Mac systems with the help of incredible tools in the digital space.
In this article
02 Use Audio Ducking in Adobe Premiere Pro on Win
03 Alternative ways to use Audio Ducking with Filmora
Part 1: What is audio ducking?
The concept of audio ducking is simple. In a soundtrack, you can find a wide range of music playing in the background. Audio ducking is the process of suppressing one type of audio signal and increasing the other movement simultaneously without causing any issues. Mostly audio ducking is processed for movies or any live sessions that reduce the background music when the characters or person speaks on the screen and increases the speaker’s volume. The scenario happens vice versa when the speaker completes its conversation. Here, the background music increases, and the speaker’s audio is reduced drastically. This type of audio ducking occurs to enhance the audio quality and reach the target audience without any issues.

The automatic changes with the audio volume are triggered by a common control using the audio ducking settings. When you enable this option in your device, this module is programmed to balance the volume settings as per the requirements. The audio ducking process allows the audio files to sound better by improving the quality of the audio signals. The audio parameters are adjusted at the specific track in the audio clippings to enhance the overall quality of the audio file.
You will be able to feel the difference when the audio tracks are played. Use the audio ducking feature optimally to strengthen the crucial audio signals when required. Identify the perfect sound spots at the audio file that requires this ducking feature. Implement this feature at particular spots to enjoy the benefits of this audio ducking functionality. It serves as a boon for sound editors and creates a positive impact on the audio files.
Part 2: Use Audio Ducking in Adobe Premiere Pro on Win
The Adobe Premiere Pro app helps to edit your media files professionally, and you can explore a wide range of settings to enhance the overall performance of the files. In the following content, you will study how to perform audio ducking in Adobe Premiere Pro at Windows space.
Step 1: Import the audio file and assign the audio type to the Essential Sound Panel. Next, auto-match the loudness level at the Essential Sound panel section.

Step 2: Choose the audio clip that requires audio ducking settings and adjusts values for sensitivity, amount of volume reduction, and the duration of fades along with the audio levels. These parameters determine the quality of audio ducking on the selected audio clips. Assign the perfect values as per your needs.

**Step 3: Finally, click Generate Keyframes to save the audio ducking settings on the chosen audio clips.

To modify the audio ducking settings, it is enough if you tap the Generate Keyframes option to create new audio ducking attributes. When you click Generate Keyframe, the older settings are erased and prompt for the new settings to be assigned for the audio ducking feature.
You can use the above instructions to perform the desired audio ducking feature at the selected audio clips.
Part 3: Alternative ways to use Audio Ducking with Filmora
If you are working with the Mac systems, worry not here is an incredible application that assists in performing the audio ducking at audio files in the Mac platform. The Filmora app from Wondershare is a sophisticated tool that carries out professional edits on media files based on your needs. The quality factors of the audio and video signals are retained, and the desired changes are implemented on the files precisely.
Versatile Video Editor - Wondershare Filmora
An easy yet powerful editor
Numerous effects to choose from
Detailed tutorials provided by the official channel
The Filmora application offers powerful features while editing audio files. You can apply audio ducking to enhance the vocals and use 100 audio effects to add flavors to the existing audio files. This app allows you to make any constructive changes to the file without disturbing the original elements set at the time of recording.
The remarkable features of the Filmora
- An exclusive audio file editor and improves the vocals using Audio Ducking strategy
- You can access the 100 audio effects built-in at its working ambiance to enhance your imported media files.
- The simple user interface helps you to discover awesome editing features effortlessly.
- All the changes in the audio signals are embedded without affecting the quality factors.
- The easy export option helps you to move the edited audio files to any storage space flawlessly.
These are the stunning functionalities of the Filmora app concerning audio files. You can perform a wide range of miraculous edits on the media tracks precisely in a professional way.
Here, you will be surfing the discussion about the effective usage of Filmora in implementing audio ducking functionality on the audio files. The Filmora offers an Audio Adjust module to perform the ducking operation efficiently without affecting the audio quality. It helps the audio to sound better and improves the clarity of vocals. The auto-adjust function modifies the volume of the audio files precisely as per the programmed algorithm. You do not have to write any code or perform manual adjustments in embedding this setting to your audio file. Few clicks are enough to enable the ducking functionality at the audio files.

The stepwise procedure to enable the audio ducking feature at Filmora application.
Step 1: Install the app and import the file.
First, download the application from its official webpage based on your system OS. Then, install the app and import the audio files into the working space of Filmora.

Step 2: Set Ducking parameters
Drag it to the timeline and choose the audio track that requires the audio ducking feature. After selecting the audio clip, right-click on it and choose ‘Adjust Audio’ from the pop-up message. The Audio Editor window appears, go to the Ducking menu and turn on ‘Lower the Volume of other clips. You can repeat this step to other audio clippings effortlessly.

Step 3: Save and Export
Next, save the changes by tapping the ‘OK’ button and clicking the Export button to store the edited audio files at any storage space. Filmora will adjust the volume on other audio clips as per the settings and export the file precisely.

The above guidelines help you to establish the audio ducking feature on your audio clips using the Filmora. Perform the appropriate clicks and set the attributes according to your needs to refine the audio ducking feature.
Conclusion
Thus, this article had given valuable insights on **audio ducking Premiere Pro of Adobe. Use Adobe Premiere Pro to perform the desired audio adjustments to enhance the vocal signal on your Windows system. The Filmora application assists in editing the audio clips at the Mac system effortlessly. The above instructions aid you in performing the audio ducking feature successfully. Connect with this article to discover unique editing options on media files to enhance their overall performance. Stay tuned to explore the features of the Filmora application in detail.
02 Use Audio Ducking in Adobe Premiere Pro on Win
03 Alternative ways to use Audio Ducking with Filmora
Part 1: What is audio ducking?
The concept of audio ducking is simple. In a soundtrack, you can find a wide range of music playing in the background. Audio ducking is the process of suppressing one type of audio signal and increasing the other movement simultaneously without causing any issues. Mostly audio ducking is processed for movies or any live sessions that reduce the background music when the characters or person speaks on the screen and increases the speaker’s volume. The scenario happens vice versa when the speaker completes its conversation. Here, the background music increases, and the speaker’s audio is reduced drastically. This type of audio ducking occurs to enhance the audio quality and reach the target audience without any issues.
The automatic changes with the audio volume are triggered by a common control using the audio ducking settings. When you enable this option in your device, this module is programmed to balance the volume settings as per the requirements. The audio ducking process allows the audio files to sound better by improving the quality of the audio signals. The audio parameters are adjusted at the specific track in the audio clippings to enhance the overall quality of the audio file.
You will be able to feel the difference when the audio tracks are played. Use the audio ducking feature optimally to strengthen the crucial audio signals when required. Identify the perfect sound spots at the audio file that requires this ducking feature. Implement this feature at particular spots to enjoy the benefits of this audio ducking functionality. It serves as a boon for sound editors and creates a positive impact on the audio files.
Part 2: Use Audio Ducking in Adobe Premiere Pro on Win
The Adobe Premiere Pro app helps to edit your media files professionally, and you can explore a wide range of settings to enhance the overall performance of the files. In the following content, you will study how to perform audio ducking in Adobe Premiere Pro at Windows space.
Step 1: Import the audio file and assign the audio type to the Essential Sound Panel. Next, auto-match the loudness level at the Essential Sound panel section.
Step 2: Choose the audio clip that requires audio ducking settings and adjusts values for sensitivity, amount of volume reduction, and the duration of fades along with the audio levels. These parameters determine the quality of audio ducking on the selected audio clips. Assign the perfect values as per your needs.
**Step 3: Finally, click Generate Keyframes to save the audio ducking settings on the chosen audio clips.
To modify the audio ducking settings, it is enough if you tap the Generate Keyframes option to create new audio ducking attributes. When you click Generate Keyframe, the older settings are erased and prompt for the new settings to be assigned for the audio ducking feature.
You can use the above instructions to perform the desired audio ducking feature at the selected audio clips.
Part 3: Alternative ways to use Audio Ducking with Filmora
If you are working with the Mac systems, worry not here is an incredible application that assists in performing the audio ducking at audio files in the Mac platform. The Filmora app from Wondershare is a sophisticated tool that carries out professional edits on media files based on your needs. The quality factors of the audio and video signals are retained, and the desired changes are implemented on the files precisely.
Versatile Video Editor - Wondershare Filmora
An easy yet powerful editor
Numerous effects to choose from
Detailed tutorials provided by the official channel
The Filmora application offers powerful features while editing audio files. You can apply audio ducking to enhance the vocals and use 100 audio effects to add flavors to the existing audio files. This app allows you to make any constructive changes to the file without disturbing the original elements set at the time of recording.
The remarkable features of the Filmora
- An exclusive audio file editor and improves the vocals using Audio Ducking strategy
- You can access the 100 audio effects built-in at its working ambiance to enhance your imported media files.
- The simple user interface helps you to discover awesome editing features effortlessly.
- All the changes in the audio signals are embedded without affecting the quality factors.
- The easy export option helps you to move the edited audio files to any storage space flawlessly.
These are the stunning functionalities of the Filmora app concerning audio files. You can perform a wide range of miraculous edits on the media tracks precisely in a professional way.
Here, you will be surfing the discussion about the effective usage of Filmora in implementing audio ducking functionality on the audio files. The Filmora offers an Audio Adjust module to perform the ducking operation efficiently without affecting the audio quality. It helps the audio to sound better and improves the clarity of vocals. The auto-adjust function modifies the volume of the audio files precisely as per the programmed algorithm. You do not have to write any code or perform manual adjustments in embedding this setting to your audio file. Few clicks are enough to enable the ducking functionality at the audio files.
The stepwise procedure to enable the audio ducking feature at Filmora application.
Step 1: Install the app and import the file.
First, download the application from its official webpage based on your system OS. Then, install the app and import the audio files into the working space of Filmora.
Step 2: Set Ducking parameters
Drag it to the timeline and choose the audio track that requires the audio ducking feature. After selecting the audio clip, right-click on it and choose ‘Adjust Audio’ from the pop-up message. The Audio Editor window appears, go to the Ducking menu and turn on ‘Lower the Volume of other clips. You can repeat this step to other audio clippings effortlessly.
Step 3: Save and Export
Next, save the changes by tapping the ‘OK’ button and clicking the Export button to store the edited audio files at any storage space. Filmora will adjust the volume on other audio clips as per the settings and export the file precisely.
The above guidelines help you to establish the audio ducking feature on your audio clips using the Filmora. Perform the appropriate clicks and set the attributes according to your needs to refine the audio ducking feature.
Conclusion
Thus, this article had given valuable insights on **audio ducking Premiere Pro of Adobe. Use Adobe Premiere Pro to perform the desired audio adjustments to enhance the vocal signal on your Windows system. The Filmora application assists in editing the audio clips at the Mac system effortlessly. The above instructions aid you in performing the audio ducking feature successfully. Connect with this article to discover unique editing options on media files to enhance their overall performance. Stay tuned to explore the features of the Filmora application in detail.
“Hear & Save: Discovering the Best Audio Devices for Effortless Voice Recording”
Top 10 Audio Recording Software to Capture Your Voice Easily

Shanoon Cox
Mar 27, 2024• Proven solutions
Whether professional or for amateur purposes, the audio recording software programs are very important. These programs allow manipulating the audio so that it matches the need for a specific project.
The best audio recording software has a variety of tools embedded to polish the audio recorded, in which this article we are going to review the best of them for you.
What is Audio Recording Software?
As the name suggests, the audio recording software is used to record audio using a unique technology. This allows the users to capture their own or the voice they want and transfer it wherever they want. The software also adds effects to the voice and makes it professional to use wherever the user wants to.
What Does a Sound Recorder Use for?
There are several uses of audio recording software program. Some are listed as under:
- In the music field, this software is of great use. It can be used for multitrack recording. The mixing of the sound is then done using the same or different tools.
- The audio recorded can be edited with ease. This includes enhancing and adding effects to it with perfection.
- With microphone use, the recording software can be integrated to make sure that the voice of the user is also recorded if required.
- Some audio recording software programs also come with screen recording, and therefore, these foster multitasking.
List of Top 10 Audio Recording Software Programs
The audio recording software for PC that would make your life easy is mentioned as under.
1.Wondershare DemoCreator
This is by far the best and the most used software program when it comes to audio recording. It is highly reliable and comes with a GUI. The user interface is easy to understand, and so are the functionalities.
With the best and the most advanced controls recording audio has never been this easy. It also acts as Mac audio recording software, and therefore it is highly recommended for all platforms. The frequent updates make this program even easier to use.
Features
- The interface of the program is very easy to use and stress-free.
- The high definition audio can be recorded with ease.
- The program supports 50+ formats to import audio, video, and other files to the system.
- There are highly advanced options for professional audio recording.
- The program can record endless video and audio as far as there is space on your disk.
Pros
- It is one of the programs that support professional audio editing.
- The program is very easy to use as it has a graphical interface.
Cons
- The program is flash software-based, which can slow down the system.
- It does not offer highly advanced audio editing at all.
Supported Platforms
The program can be used with both Windows and Mac.
Go ahead to download and have a try now!
2.WavePad
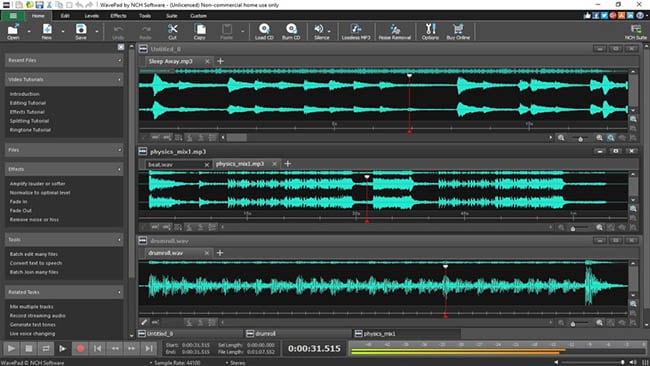
It is one of the best and most used programs to make sure that the audio is recorded with perfection. This program is compatible with most of the audio formats, and therefore it is highly recommended. The overall rating of the program is high as it is used by professionals and, therefore, highly rated as well.
Features
- It has several audio enhancing capabilities, which include amplification and effect addition.
- The audio can be edited, trimmed, and cropped with this program.
- The professional-quality sound recording is used by this program to enhance the capabilities.
Pros
- The best part of this program is its quality of end product that is very high.
- It is a wave editor that gives the users more control over the end product.
Cons
- The mp3 editor of this program does not offer top quality work.
- The program cannot work with multiple files efficiently.
Supported Platforms
It can be installed over Mac, Windows, Android, and iOS.
3.Ocenaudio

As a cross-platform program, this one has a lot to offer. The interface is a bit technical, but overall the use of the program is easy once the hands-on is done. The program is also highly intuitive and allows the users to overcome the day to day audio recording and editing tasks.
Features
- The Ocen Framework is also integrated with this platform to enhance its capabilities.
- The program also records screen if required by the users.
- It is one of the programs that have been rated on other high-end platforms.
Pros
- The program uses auto trim and voice recording controls.
- The sound spectral analysis of the program is highly advanced.
Cons
- The program cannot directly load the file from a CD.
- The program cannot be opened in multiple screens, so the work rate is slow.
Supported Platforms
It is compatible with Mac, Windows, and Linux.
4.Adobe Audition

It can be rightfully regarded as one of the best and the most advanced programs. Backed by years of Adobe experience, it is a program that will get the user a step forward. It is highly recommended to all those users that are looking for a professional level of audio recording.
Features
- It includes multitrack, wave editing, and audio restoration tools to give the best results.
- The essential sound panel has been integrated with the program to get the best oomph effect to the audio.
- The music clips can be integrated within the audio recording to make it sound professional.
Pros
- The platform can be used to create awesome podcasts.
- The audio break can be repaired with perfection.
Cons
- It is expensive, so all the users cannot afford it at all.
- The interface is high tech in nature and requires time to learn.
Supported Platforms
It is supported by Windows and Mac.
5.Audacity

It is free software that is used to record audio professionally. This high-performance program makes sure that the audio which is recorded is also shared with different platforms. The built-in panel is upgraded, and therefore it is highly advance.
Features
- It is ad-free and therefore provides hassle-free work.
- The audio editing and recording have never been as easy as it is with audacity.
- Multitrack editing is also possible with this program.
Pros
- The VST plugin support is provided by the program.
- It is a portable program that can be used for pitch correction.
Cons
- The noise reduction tool of this program needs an upgrade.
- The record to tape feature is currently unavailable.
Supported Platforms
It is supported by Mac, Linux, Windows, and BSD.
6.Wavosaur

It is one of the free programs that can be regarded as better than many paid ones. It is all because the qualities of the program are matchless. The processing of files is done with WAV and Mp3 files filter, which makes the process very much easier.
Features
- The program has multiple document interfaces for multiple file handling.
- The editing features such as cut, copy, paste, and edit can be performed in a single window.
- The waveform representation of the program is accurate and highly advanced.
Pros
- The program offers bit depth convert, pitch shift, and DC offset removal.
- The VST effects can be added to the entire batch of sound files.
Cons
- The audio routing and the multichannel support of the program are not efficient.
- The software sampler extraction is a bit slow when it comes to this program.
Supported Platforms
The program can only be installed on Windows.
7.MixPad
The audio processing and mixing have been made very easy with this platform. The program has an interface that is sleek in design and allows the processing of the audio info with care. The program also supports cloud storage, which means that the entire user’s hard work remains safe and secures all the time.
Features
- The program can mix the unlimited number of tracks all at the same time.
- Depending upon the requirement, the multiple or a single track can be processed at the same time.
- The program supports almost every sound format, so any type of sound can be imported with perfection.
Pros
- The audio effects such as EQ, compression, and reverb can be added with perfection.
- The latency rate is very low, and the program also offers ASIO support for accurate processing.
Cons
- The program only offers the export of the sound that is up to 32 bits.
- The sample rates of up to 96 kHz are only supported, which is less than most of the other mixers.
Supported Platforms
The program can be installed on Mac, Windows, Android, iPad, and Kindle Fire.
8.Sound Forge

If a user wants to completely control the audio editing process, then this software is for them. It is highly advanced and makes sure that the work that is done is highly précised. From Red Book CD creation to sound design and mixing, this program provides the users with complete control and authority over the process.
Features
- The multichannel WAV recording and processing is now possible with the new version of the program.
- The VST plugin support is provided by this program with perfection.
- The VST effects can be chained in a virtual rack.
Pros
- The simple digitization and restoration of the audio have been made simple by this program.
- The one-click solutions allow the users to process the audio tracks easily.
Cons
- The program only offers 32 bits of power, which is very low.
- The multiple VST GUI is not supported by this program.
Supported Platforms
The Sound Forge can be installed on Mac and Windows.
9.Spek

The best part of the software is that it is free and allows the users to overcome the problems which the other audio recorders present. The interface is easy to learn, and therefore the overall usage is easy. The lossless quality is something for which the software is known for. It also supports the FFMPEG library.
Features
- The signal processing is ultra-fast as it uses several threads to process audio.
- The drag and drop support of the program is highly efficient, and the program supports common audio formats.
- The program can be accessed in 19 different languages.
Pros
- The spectral density rulers allow the auto fitting of time.
- The spectral density range of the program is also adjustable.
Cons
- The codec names are, and the audio signal parameters cannot be seen.
- The program is licensed under GPLv3, which is now obsolete.
Supported Platforms
The program is compatible with Windows, Linux, and Mac.
10.Audio Highjack

The program, as the name suggests, makes it possible for the users to completely delve deep into the process of audio editing. The interface, as well as the controls, is very easy to understand and use. For novice users, this program is highly recommended as it makes audio editing a fun-filled activity.
Features
- It provides detailed statistics and min, the max value per channel.
- The processed audio can be listened in real-time to get an idea about the end product.
- The waveform generator and frequency impulse train are embedded within the program.
Pros
- The lame encoder support has been embedded within the recorder to export mp3 files.
- The editor’s look is skin able, which can be changed as per the user choice.
Cons
- The processing options are less as compared to the other recorders.
- The audio files cannot be exported as text, so the program cannot be used with PSpice.
Supported Platforms
The program is only available for Mac.
A Roundup of the Best Audio Recording Software Programs
| No. | Tools | Rating | Supported Formats | Price | Processing Power |
|---|---|---|---|---|---|
| 1 | DemoCreator | 4.5 | .mp3, .m4a, .wav, .wma, .ogg, .flac, .aif, .aiff | $29.99 | 64-bit |
| 2 | WavePad | 4.4 | vox, gsm, WMA, real audio, au, aif, FLAC, and Ogg | $69.95 | 64-bit |
| 3 | Ocenaudio | 4.0 | vox, gsm, WMA, wav, .wma, .ogg, and .flac | Free | 32-bit |
| 4 | Adobe Audition | 4.5 | AIF, AIFF, AIFC | $74.99 | 64-bit |
| 5 | Audacity | 3.9 | mp3, wav, AIFF, au, and ogg | Free | 32-bit |
| 6 | Wavosaur | 3.5 | VST plugins, ASIO driver, multichannel wav files, real-time effect processing. | Free | 32-bit |
| 7 | MixPad | 3.2 | wav, mp3, vox, and gsm | $129 | 32-bit |
| 8 | Sound Forge | 4.0 | SWF, RealMedia 9, WMA, AVI , AIFF, AIF, and SND | Free | 32-bit |
| 9 | Spek | 4.4 | vox, gsm, WMA, Wav, WMA, real audio, au, aif, FLAC, and Ogg | Free | 64-bit |
| 10 | Audio Highjack | 4.2 | .mp3, .m4a, .wav, .wma, aif, FLAC, and Ogg | Free | 64-bit |
Conclusion
With the overall specs and ratings by the users, the Wondershare DemoCreator is the best software that should be used for audio recording.
The program is highly compatible with major operating systems, and therefore it is highly recommended. The overall mechanism is easy, and the program also supports multiple formats.
It is highly technical and is constantly upgraded to make sure that it remains in line with modern technologies. It is a one-stop-shop for all the audio recording needs of the users and therefore highly viable.
With this program, the audio that has been worked on can be shared on most popular social media platforms like YouTube and Facebook.


Shanoon Cox
Shanoon Cox is a writer and a lover of all things video.
Follow @Shanoon Cox
Shanoon Cox
Mar 27, 2024• Proven solutions
Whether professional or for amateur purposes, the audio recording software programs are very important. These programs allow manipulating the audio so that it matches the need for a specific project.
The best audio recording software has a variety of tools embedded to polish the audio recorded, in which this article we are going to review the best of them for you.
What is Audio Recording Software?
As the name suggests, the audio recording software is used to record audio using a unique technology. This allows the users to capture their own or the voice they want and transfer it wherever they want. The software also adds effects to the voice and makes it professional to use wherever the user wants to.
What Does a Sound Recorder Use for?
There are several uses of audio recording software program. Some are listed as under:
- In the music field, this software is of great use. It can be used for multitrack recording. The mixing of the sound is then done using the same or different tools.
- The audio recorded can be edited with ease. This includes enhancing and adding effects to it with perfection.
- With microphone use, the recording software can be integrated to make sure that the voice of the user is also recorded if required.
- Some audio recording software programs also come with screen recording, and therefore, these foster multitasking.
List of Top 10 Audio Recording Software Programs
The audio recording software for PC that would make your life easy is mentioned as under.
1.Wondershare DemoCreator
This is by far the best and the most used software program when it comes to audio recording. It is highly reliable and comes with a GUI. The user interface is easy to understand, and so are the functionalities.
With the best and the most advanced controls recording audio has never been this easy. It also acts as Mac audio recording software, and therefore it is highly recommended for all platforms. The frequent updates make this program even easier to use.
Features
- The interface of the program is very easy to use and stress-free.
- The high definition audio can be recorded with ease.
- The program supports 50+ formats to import audio, video, and other files to the system.
- There are highly advanced options for professional audio recording.
- The program can record endless video and audio as far as there is space on your disk.
Pros
- It is one of the programs that support professional audio editing.
- The program is very easy to use as it has a graphical interface.
Cons
- The program is flash software-based, which can slow down the system.
- It does not offer highly advanced audio editing at all.
Supported Platforms
The program can be used with both Windows and Mac.
Go ahead to download and have a try now!
2.WavePad
It is one of the best and most used programs to make sure that the audio is recorded with perfection. This program is compatible with most of the audio formats, and therefore it is highly recommended. The overall rating of the program is high as it is used by professionals and, therefore, highly rated as well.
Features
- It has several audio enhancing capabilities, which include amplification and effect addition.
- The audio can be edited, trimmed, and cropped with this program.
- The professional-quality sound recording is used by this program to enhance the capabilities.
Pros
- The best part of this program is its quality of end product that is very high.
- It is a wave editor that gives the users more control over the end product.
Cons
- The mp3 editor of this program does not offer top quality work.
- The program cannot work with multiple files efficiently.
Supported Platforms
It can be installed over Mac, Windows, Android, and iOS.
3.Ocenaudio
As a cross-platform program, this one has a lot to offer. The interface is a bit technical, but overall the use of the program is easy once the hands-on is done. The program is also highly intuitive and allows the users to overcome the day to day audio recording and editing tasks.
Features
- The Ocen Framework is also integrated with this platform to enhance its capabilities.
- The program also records screen if required by the users.
- It is one of the programs that have been rated on other high-end platforms.
Pros
- The program uses auto trim and voice recording controls.
- The sound spectral analysis of the program is highly advanced.
Cons
- The program cannot directly load the file from a CD.
- The program cannot be opened in multiple screens, so the work rate is slow.
Supported Platforms
It is compatible with Mac, Windows, and Linux.
4.Adobe Audition
It can be rightfully regarded as one of the best and the most advanced programs. Backed by years of Adobe experience, it is a program that will get the user a step forward. It is highly recommended to all those users that are looking for a professional level of audio recording.
Features
- It includes multitrack, wave editing, and audio restoration tools to give the best results.
- The essential sound panel has been integrated with the program to get the best oomph effect to the audio.
- The music clips can be integrated within the audio recording to make it sound professional.
Pros
- The platform can be used to create awesome podcasts.
- The audio break can be repaired with perfection.
Cons
- It is expensive, so all the users cannot afford it at all.
- The interface is high tech in nature and requires time to learn.
Supported Platforms
It is supported by Windows and Mac.
5.Audacity
It is free software that is used to record audio professionally. This high-performance program makes sure that the audio which is recorded is also shared with different platforms. The built-in panel is upgraded, and therefore it is highly advance.
Features
- It is ad-free and therefore provides hassle-free work.
- The audio editing and recording have never been as easy as it is with audacity.
- Multitrack editing is also possible with this program.
Pros
- The VST plugin support is provided by the program.
- It is a portable program that can be used for pitch correction.
Cons
- The noise reduction tool of this program needs an upgrade.
- The record to tape feature is currently unavailable.
Supported Platforms
It is supported by Mac, Linux, Windows, and BSD.
6.Wavosaur
It is one of the free programs that can be regarded as better than many paid ones. It is all because the qualities of the program are matchless. The processing of files is done with WAV and Mp3 files filter, which makes the process very much easier.
Features
- The program has multiple document interfaces for multiple file handling.
- The editing features such as cut, copy, paste, and edit can be performed in a single window.
- The waveform representation of the program is accurate and highly advanced.
Pros
- The program offers bit depth convert, pitch shift, and DC offset removal.
- The VST effects can be added to the entire batch of sound files.
Cons
- The audio routing and the multichannel support of the program are not efficient.
- The software sampler extraction is a bit slow when it comes to this program.
Supported Platforms
The program can only be installed on Windows.
7.MixPad
The audio processing and mixing have been made very easy with this platform. The program has an interface that is sleek in design and allows the processing of the audio info with care. The program also supports cloud storage, which means that the entire user’s hard work remains safe and secures all the time.
Features
- The program can mix the unlimited number of tracks all at the same time.
- Depending upon the requirement, the multiple or a single track can be processed at the same time.
- The program supports almost every sound format, so any type of sound can be imported with perfection.
Pros
- The audio effects such as EQ, compression, and reverb can be added with perfection.
- The latency rate is very low, and the program also offers ASIO support for accurate processing.
Cons
- The program only offers the export of the sound that is up to 32 bits.
- The sample rates of up to 96 kHz are only supported, which is less than most of the other mixers.
Supported Platforms
The program can be installed on Mac, Windows, Android, iPad, and Kindle Fire.
8.Sound Forge
If a user wants to completely control the audio editing process, then this software is for them. It is highly advanced and makes sure that the work that is done is highly précised. From Red Book CD creation to sound design and mixing, this program provides the users with complete control and authority over the process.
Features
- The multichannel WAV recording and processing is now possible with the new version of the program.
- The VST plugin support is provided by this program with perfection.
- The VST effects can be chained in a virtual rack.
Pros
- The simple digitization and restoration of the audio have been made simple by this program.
- The one-click solutions allow the users to process the audio tracks easily.
Cons
- The program only offers 32 bits of power, which is very low.
- The multiple VST GUI is not supported by this program.
Supported Platforms
The Sound Forge can be installed on Mac and Windows.
9.Spek
The best part of the software is that it is free and allows the users to overcome the problems which the other audio recorders present. The interface is easy to learn, and therefore the overall usage is easy. The lossless quality is something for which the software is known for. It also supports the FFMPEG library.
Features
- The signal processing is ultra-fast as it uses several threads to process audio.
- The drag and drop support of the program is highly efficient, and the program supports common audio formats.
- The program can be accessed in 19 different languages.
Pros
- The spectral density rulers allow the auto fitting of time.
- The spectral density range of the program is also adjustable.
Cons
- The codec names are, and the audio signal parameters cannot be seen.
- The program is licensed under GPLv3, which is now obsolete.
Supported Platforms
The program is compatible with Windows, Linux, and Mac.
10.Audio Highjack
The program, as the name suggests, makes it possible for the users to completely delve deep into the process of audio editing. The interface, as well as the controls, is very easy to understand and use. For novice users, this program is highly recommended as it makes audio editing a fun-filled activity.
Features
- It provides detailed statistics and min, the max value per channel.
- The processed audio can be listened in real-time to get an idea about the end product.
- The waveform generator and frequency impulse train are embedded within the program.
Pros
- The lame encoder support has been embedded within the recorder to export mp3 files.
- The editor’s look is skin able, which can be changed as per the user choice.
Cons
- The processing options are less as compared to the other recorders.
- The audio files cannot be exported as text, so the program cannot be used with PSpice.
Supported Platforms
The program is only available for Mac.
A Roundup of the Best Audio Recording Software Programs
| No. | Tools | Rating | Supported Formats | Price | Processing Power |
|---|---|---|---|---|---|
| 1 | DemoCreator | 4.5 | .mp3, .m4a, .wav, .wma, .ogg, .flac, .aif, .aiff | $29.99 | 64-bit |
| 2 | WavePad | 4.4 | vox, gsm, WMA, real audio, au, aif, FLAC, and Ogg | $69.95 | 64-bit |
| 3 | Ocenaudio | 4.0 | vox, gsm, WMA, wav, .wma, .ogg, and .flac | Free | 32-bit |
| 4 | Adobe Audition | 4.5 | AIF, AIFF, AIFC | $74.99 | 64-bit |
| 5 | Audacity | 3.9 | mp3, wav, AIFF, au, and ogg | Free | 32-bit |
| 6 | Wavosaur | 3.5 | VST plugins, ASIO driver, multichannel wav files, real-time effect processing. | Free | 32-bit |
| 7 | MixPad | 3.2 | wav, mp3, vox, and gsm | $129 | 32-bit |
| 8 | Sound Forge | 4.0 | SWF, RealMedia 9, WMA, AVI , AIFF, AIF, and SND | Free | 32-bit |
| 9 | Spek | 4.4 | vox, gsm, WMA, Wav, WMA, real audio, au, aif, FLAC, and Ogg | Free | 64-bit |
| 10 | Audio Highjack | 4.2 | .mp3, .m4a, .wav, .wma, aif, FLAC, and Ogg | Free | 64-bit |
Conclusion
With the overall specs and ratings by the users, the Wondershare DemoCreator is the best software that should be used for audio recording.
The program is highly compatible with major operating systems, and therefore it is highly recommended. The overall mechanism is easy, and the program also supports multiple formats.
It is highly technical and is constantly upgraded to make sure that it remains in line with modern technologies. It is a one-stop-shop for all the audio recording needs of the users and therefore highly viable.
With this program, the audio that has been worked on can be shared on most popular social media platforms like YouTube and Facebook.
Shanoon Cox
Shanoon Cox is a writer and a lover of all things video.
Follow @Shanoon Cox
Also read:
- Updated Beginners Guide How to Use Voice Changer Plus on Your iPhone for 2024
- New Streamlining Audio Capture on Desktops Expert Tips for Using Audacity
- In 2024, A Guide to Understanding the Nuances of Accompanying Pictures with Soundscape
- New In 2024, Navigating Through the Best 8 Voice Interpretation Programs Across Different OS Platforms
- New In 2024, Locate the Wolf Whistle Ambiance
- Updated Top 5 Essential Linux-Based Audio Capture Tools & Practical Recording Techniques
- Updated In 2024, Unlocking Creativity for Free The Ultimate List of Internet-Based Audio Cutters
- New Premier Android and iPhone Applications for Accurate Speech Conversion to Text for 2024
- Updated 2024 Approved Auditory Purity Unveiled A Users Blueprint for Cleaning Up Web Soundscape
- Updated 2024 Approved Social Strategy Sessions The Top 2023 List of Podcast Episodes for Brands
- Updated VocalTune Hub Deciphering the Technology, Praise From Users, and What Else You Should Explore
- Premier AIFF to MP3 Utility Accelerate File Conversion with Precision
- Updated 2024 Approved Enhance Your Audio Experience A Critical Look at the 5 Premium Voice Recorders for MP3s
- New In 2024, Sonic Resource Hub A Curated List of Premium Websites with a Stockpile of Free Sound Scores
- Updated 2024 Approved A Symphony of Effects Discovering Vendors for Premium Podcast Audio
- In 2024, How to Add Music (Background Music) to Video without Hassle
- Updated In 2024, Top 10 Revolutionary Singing Software for Soloists on the Move
- Harmonizing Sounds with Imagery Professional Strategies to Boost Your Videography
- Exploring the Wilderness on Your Phone 10 Premium Nature Sounds Apps
- New Get Ready to Be Amazed The Best 4K Video Samples Around for 2024
- New Cut AVI Files with Ease Top 16 Video Cutter Software for Windows, MAC, and Android
- 3 Ways to Fake GPS Without Root On Tecno Camon 30 Pro 5G | Dr.fone
- New Before You Learn 3D Animation Things You Should Know
- Want to Uninstall Google Play Service from Vivo X100? Here is How | Dr.fone
- In 2024, Step-by-Step Tutorial How To Bypass Xiaomi 13 Ultra FRP
- In 2024, How to Fake Snapchat Location on Lava Yuva 2 | Dr.fone
- In 2024, Tutorial to Change Motorola Moto G24 IMEI without Root A Comprehensive Guide
- All Must-Knows to Use Fake GPS GO Location Spoofer On Vivo Y27 5G | Dr.fone
- Preparation to Beat Giovani in Pokemon Go For OnePlus Nord CE 3 5G | Dr.fone
- In 2024, Ways to trade pokemon go from far away On Nokia XR21? | Dr.fone
- 9 Mind-Blowing Tricks to Hatch Eggs in Pokemon Go Without Walking On Apple iPhone 7 | Dr.fone
- Updated Online Video Editing Made Easy Trimming with Kapwing
- New In 2024, From Cassette to Smartphone Best VHS Effect Apps for iPhone and Android
- In 2024, 10 Easy-to-Use FRP Bypass Tools for Unlocking Google Accounts On Poco C55
- How to Mirror Infinix Note 30i to Mac? | Dr.fone
- In 2024, Dose Life360 Notify Me When Someone Checks My Location On Vivo V29 Pro? | Dr.fone
- Title: Updated In 2024, Enhancing Your Gaming Experience Incorporating Audio with KineMaster
- Author: Jacob
- Created at : 2024-05-05 03:53:14
- Updated at : 2024-05-06 03:53:14
- Link: https://audio-shaping.techidaily.com/updated-in-2024-enhancing-your-gaming-experience-incorporating-audio-with-kinemaster/
- License: This work is licensed under CC BY-NC-SA 4.0.
