
:max_bytes(150000):strip_icc():format(webp)/Sony-PS5-PlayStation-5-Gaming-Console-7-1434c073922c4bf59bca47a33013a6dd.jpg)
Updated Exclusive Listing of the Top 11 Cost-Free Speech Adjustment Software for iOS & Android Users for 2024
Exclusive Listing of the Top 11 Cost-Free Speech Adjustment Software for iOS & Android Users
Best Voice Changer Apps for iPhone and Android

Benjamin Arango
Mar 27, 2024• Proven solutions
Have you ever wondered what your voice would sound like if you were a cartoon character, a robot, or an older version of yourself? Changing how your voice sounds has never been easier, regardless of the Smartphone model you have, since voice changer apps can be used on both iPhone and Android devices.
Even though there is nothing wrong with modulating your voice to have fun with your friends, using voice changer apps to pull malicious pranks or bully strangers online is far from acceptable. Read on if you would like to find out more about the best voice changer apps for iPhone and Android devices and discover the one you enjoy using the most.
Best Voice Changer Apps for iPhone and Android
Creating a new ringtone, making a voice recording, or having fun with your friends are only a few reasons why so many people choose to try out voice changer apps. The vast majority of these apps feature well-equipped audio effects libraries that enable users to have fun with their friends and hear how they would sound if they were drunk or after inhaling helium. So, let’s take a look at some of the best voice changer apps on the market.


Changing video voice on Windows and Mac with Wondershare Filmora
Do you want to change the voice in video on Windows and Mac and don’t know which software can meet this requirement? Try Filmra video editor , which provides several ways to change voice over, such as changing the voice speed or changing the pitch. Download the trial version below and find out more possibility in video creation with Filmora.
1. Celebrity Voice Changer – Face
Price: Free, but offers in-app purchases
Compatibility: iOS 9.0 or later
User Rating: 4.0
In case you would like to sound like your favorite movie star of TV host, then Celebrity Voice Changer is one of the best choices you can make. Besides the standard set of options, the app also lets you request new voices since its machine learning technology can mimic virtually anyone’s voice. However, Celebrity Voice Changer is currently only available in English and it cannot modulate speech in other languages. In addition, you must make an in-app purchase in order to gain access to all of the app’s features or unlock the unlimited usage of the app.
Pros
- Automatic voice modulation
- Huge selection of voice filters
- The app generates video files that are better adjusted to the audience on social media than audio files
- Excellent impressions of celebrities
Cons
- Unreasonably expensive
- The app’s Deep Learning technology still has a lot of room for improvement
2. Snapchat
Price: Free, but offers in-app purchases
Compatibility: iOS 10.0 or later, Android 4.4 or up
User Rating: 3.8
With more than 203 million daily users, Snapchat is one of the largest messaging platforms on the market. Previously, we’ve shared how to change gender on Snapchat , beside that, the app lets its users capture short moments or the so-called Snaps and share them with friends. In addition to hundreds of video filters , Snapchat also features a broad spectrum of voice changing effects that make Snaps more entertaining. Even so, the audio recording options Snapchat offers are far from ideal, because the app doesn’t allow you to edit the files you create with it. Using Snapchat will drain your battery quickly, which is why you must pay attention to how frequently you use this app.
Pros
- The easy voice modulation process
- Excellent messaging options
- Grants you access to a large community of likeminded people
- Lenses and filters are updated on a daily basis
Cons
- Editing voice changes after you create a Snap is not possible
- Snapchat is not primarily a voice changer app
Check the detailed information about How to Change Voice on Snapchat with 2 Easy Methods >>
3. Voice Changer
Price: Free
Compatibility: Android 4.1 and up
User Rating: 4.3

Changing your voice with this app won’t take more than a few moments of your time. You just have to launch the app and hit the microphone button to record a message or a joke you would like to modulate. Once you’re happy with the audio recording you made, you can proceed to choose from more than twenty voice effects that will make you sound like a dwarf, a robot, or an alien. The app’s file-sharing capabilities enable you to post your audio recordings to any social media platform of your choosing or store your files and use them as many times as you want.
Pros
- Entertaining and easy to use
- The simple three-step voice modulation process
- Good selection of voice filters
- Excellent file sharing options
Cons
- The app displays ads
- No audio editing tools
4. Voicy: Celebrity Voice Changer
**Price:**Free, but offers in-app purchases
Compatibility: iOS 10 or later
User Rating: 4.3

Impersonating your favorite celebrity can be a fun way to prank your friends on social media. Voicy features a broad selection of celebrity voice impersonations you can use to make you sound like a famous actress or TV personality. The app utilizes a machine learning technology that can generate more than forty avatars and allows the users to experiment with different voice effects. The free version of the app offers only limited capabilities, so if you want to gain access to all of the Voicy’s features, you must choose a weekly, monthly or an annual subscription.
Pros
- Equipped with a powerful machine learning technology
- Offers a vast selection of voice avatars
- The quick voice modification process
- A great choice if you want to make a parody
Cons
- More expensive than the competition
- Support only the English language
5. Video Voice Changer – Fun Editor
Price: Free, but offers in-app purchases
Compatibility: iOS 8.0 or later
User Rating: 4.4

Changing the voices in the videos you record with your iPhones or iPads is a straightforward process that takes a minimum amount of effort. You can either use this iOS-based app to capture videos you’re going to dub or import them from the albums in which they are stored. The Video Voice Changer app is a great option if you want to dub videos directly from your phone because it enables you to change the voices in your videos and make them sound like mice, bears or ghosts. There are over thirty voice effects to choose from, so you can easily pick the one that best fits the video you’re editing.
Pros
- Equipped with video recording tools
- Excellent dubbing features
- A rich selection of voice effects
- Allows users to share their creations on Facebook, Instagram, and other social media platforms
Cons
- You must make an in-app purchase to unlock all of the app’s features
- No audio mixing options
6. Video Voice Changer FX
**Price:**Free, but offers in-app purchases
Compatibility: Android 4.1 and up
User Rating: 4.1

This is a simple app, anyone can use to change the voices in a video. Simply upload a video file from an SD card in your phone and choose an audio effect you want to apply. The app’s collection of funny voices includes options like echo, squirrel, space ship or chipmunk. As soon as you select the voice effect you want to add to a video, the app will start generating a new video that will be saved to your phone. Sharing the videos you edit with Video Voice Changer FX to social media directly from the app is not an option.
Pros
- Fun and easy to use
- Great price to performance ratio
- Changing a voice requires just a few taps
- Allows users to switch between effects while the video is playing
Cons
- No audio or video recording capability
- Doesn’t support social media sharing
7. Squeak Voice Changer
**Price:**Free, but offers in-app purchases
Compatibility: Android 4.3 and up
User Rating: 3.9

Every joke you want to share with your online friends is going to be a little funnier if you record it with Squeak Voice Changer. You just have to tap on the Record button and choose one of the available effects. Each voice changing effect this app offers is represented by a character so you should select Jamie the Jolly if you want to make your voice sound like you’re at a party or Bruce the Sentimental Bot if you want your voice to sound artificial. All the recordings you make with Squeak Voice Changer can be easily shared on social media.
Pros
- Equipped with audio recording options
- Cute and memorable characters that represent voice effects
- Inexpensive and fun to use
- Functional app design
Cons
- Poor selection of voice effects
- The AI only recognizes the English language
8. Voice Changer with Effects
**Price:**Free
Compatibility: Android 4.1 and up
User Rating: 4.5
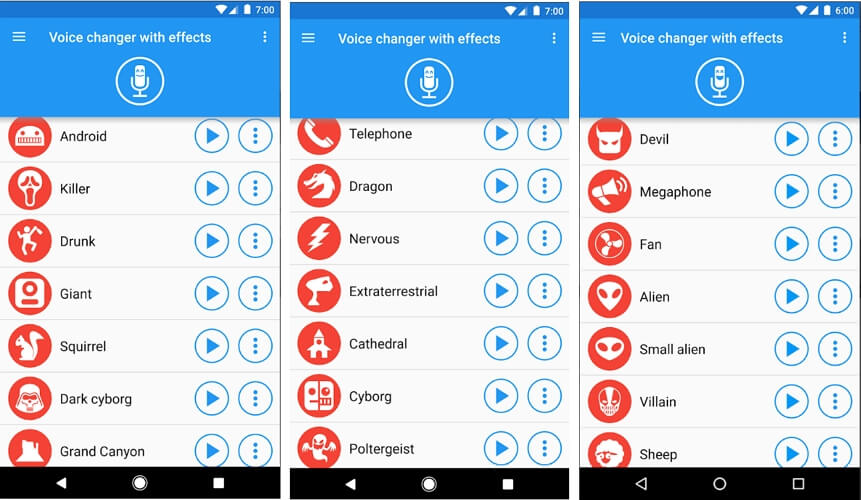
This Android-based app is designed to make fun and easy since voice modulation features enable you to play voice recording backward or change your voice to sound robotic or even alien. Besides recording your voice, the app also lets you modulate pre-recorded sounds and save them to your phone or use them as ringtones or notification sounds. Furthermore, the app lets you add sounds to images and share them to Facebook. The Voice Changer with Effects enables you to share all audio files you process with it to any of the most popular social media platforms.
Pros
- The app has over 50,000,000 installs
- Equipped with a text to voice feature
- Setting a new ringtone with this app is easy
- Supports editing of pre-recorded audio files
Cons
- Contains ads
- No audio or video editing options
9. Voice Changer
**Price:**Free
Compatibility: Android 4.1 and up
User Rating: 4.4

If you are looking for an Android app that lets you modulate your voice quickly and effortlessly, then Voice Changer may be one of the best options you can find on the market. You can record your voice by simply tapping on the microphone and speaking into your phone’s speaker and then apply one of the audio effects this app offers. Optionally, you can import an audio file you already recorded into the app and then apply Martian, Foreigner, Giant or Child effects to your voice recording. The best part is that you can apply each effect to the audio files you’re editing as many times as you want.
Pros
- Loads of funny effects
- Simple audio recording setup
- Intuitive and modernly designed interface
- Enables users to share audio files via Bluetooth or social media platforms
Cons
- No video editing tools
- The quality of output audio files can vary
10. Voice FX
**Price:**Free, but offers in-app purchases
Compatibility: Android 4.0.3 and up
User Rating: 3.8

Modulating voices in all types of audio files is a straightforward and fun process that can be completed in just a few taps. During the audio recording session, you can apply all voice effects to the sound you are recording and stream it live to your web browsers or media players you’re using. Voice FX changes your voice in real time, which enables you to preview your results before deciding if you want to save them. All files you export from this app will be saved in the MP3 format so you can use them as ringtones on your Android device.
Pros
- Allows users to modulate pre-recorded audio files
- Voice effects are applied in real time
- Offers live streaming features
- Exports files in the MP3 format
Cons
- Prone to glitches
- A limited selection of voice effects
11. Voice Changer Plus
**Price:**Free, but offers in-app purchases
Compatibility: iOS 8.0 or later
User Rating: 4.8
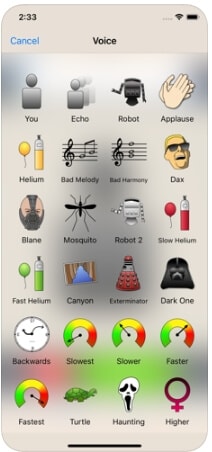
iPhone and iPad owners in need of a voice changer app that grants them complete creative freedom over the modulation of the voices they record, should consider using the Voice Changer Plus. The app features more than fifty voice effects and it provides support for voiceover recordings. Moreover, you can edit all your audio files even after you saved them, enabling you to find new ways to improve your recordings over time. Voice Changer Plus is also equipped with trim controls, so you can remove all parts of your audio files you don’t want to share with your friends on social media.
Pros
- Offers more voice effects than most of its competitors
- Provides voiceover recording options
- Users can trim their audio files
- All audio recordings can be edited after the voice modulation
Cons
- In-app purchase is required in order to unlock all of the app’s features
- Modulating audio in video files is not an option
Below is a quick comparison table among these voice changer apps, hope it will be helpful.
| App | Supported OS | User Rating | Voice Templates |
|---|---|---|---|
| Celebrity Voice Changer - Face | iOS 9.0 or later | 4.0 | Yes |
| Snapchat | iOS 10.0 or later, Android 4.4 or up | 3.8 | No |
| Voice Changer by e3games | Android 4.1 and up | 4.3 | Yes |
| Voicy: Celebrity Voice Changer | iOS 10 or later | 4.3 | Yes |
| Video Voice Changer – Fun Editor | iOS 8.0 or later | 4.4 | Yes |
| Video Voice Changer FX | Android 4.1 and up | 4.1 | Yes |
| Squeak Voice Changer | Android 4.3 and up | 3.9 | Yes |
| Voice Changer with Effects | Android 4.1 and up | 4.5 | Yes |
| Voice Changer | Android 4.1 and up | 4.4 | Yes |
| Voice FX | Android 4.0.3 and up | 3.8 | Yes |
| Voice Changer Plus | iOS 8.0 or later | 4.8 | Yes |
Conclusion
Everybody enjoys a good joke, and the apps we featured in this article enable you to have a lot of fun while experimenting with different voice modulation options. All of the voice effects these apps offer can change a voice automatically, but if you would like to alter the voices in your videos you must choose an app that supports this option. Which of the best voice changer apps for iPhone and Android devices are you going to choose? Leave a comment, and share your opinions with us.
Benjamin Arango
Benjamin Arango is a writer and a lover of all things video.
Follow @Benjamin Arango
Benjamin Arango
Mar 27, 2024• Proven solutions
Have you ever wondered what your voice would sound like if you were a cartoon character, a robot, or an older version of yourself? Changing how your voice sounds has never been easier, regardless of the Smartphone model you have, since voice changer apps can be used on both iPhone and Android devices.
Even though there is nothing wrong with modulating your voice to have fun with your friends, using voice changer apps to pull malicious pranks or bully strangers online is far from acceptable. Read on if you would like to find out more about the best voice changer apps for iPhone and Android devices and discover the one you enjoy using the most.
Best Voice Changer Apps for iPhone and Android
Creating a new ringtone, making a voice recording, or having fun with your friends are only a few reasons why so many people choose to try out voice changer apps. The vast majority of these apps feature well-equipped audio effects libraries that enable users to have fun with their friends and hear how they would sound if they were drunk or after inhaling helium. So, let’s take a look at some of the best voice changer apps on the market.
Changing video voice on Windows and Mac with Wondershare Filmora
Do you want to change the voice in video on Windows and Mac and don’t know which software can meet this requirement? Try Filmra video editor , which provides several ways to change voice over, such as changing the voice speed or changing the pitch. Download the trial version below and find out more possibility in video creation with Filmora.
1. Celebrity Voice Changer – Face
Price: Free, but offers in-app purchases
Compatibility: iOS 9.0 or later
User Rating: 4.0
In case you would like to sound like your favorite movie star of TV host, then Celebrity Voice Changer is one of the best choices you can make. Besides the standard set of options, the app also lets you request new voices since its machine learning technology can mimic virtually anyone’s voice. However, Celebrity Voice Changer is currently only available in English and it cannot modulate speech in other languages. In addition, you must make an in-app purchase in order to gain access to all of the app’s features or unlock the unlimited usage of the app.
Pros
- Automatic voice modulation
- Huge selection of voice filters
- The app generates video files that are better adjusted to the audience on social media than audio files
- Excellent impressions of celebrities
Cons
- Unreasonably expensive
- The app’s Deep Learning technology still has a lot of room for improvement
2. Snapchat
Price: Free, but offers in-app purchases
Compatibility: iOS 10.0 or later, Android 4.4 or up
User Rating: 3.8
With more than 203 million daily users, Snapchat is one of the largest messaging platforms on the market. Previously, we’ve shared how to change gender on Snapchat , beside that, the app lets its users capture short moments or the so-called Snaps and share them with friends. In addition to hundreds of video filters , Snapchat also features a broad spectrum of voice changing effects that make Snaps more entertaining. Even so, the audio recording options Snapchat offers are far from ideal, because the app doesn’t allow you to edit the files you create with it. Using Snapchat will drain your battery quickly, which is why you must pay attention to how frequently you use this app.
Pros
- The easy voice modulation process
- Excellent messaging options
- Grants you access to a large community of likeminded people
- Lenses and filters are updated on a daily basis
Cons
- Editing voice changes after you create a Snap is not possible
- Snapchat is not primarily a voice changer app
Check the detailed information about How to Change Voice on Snapchat with 2 Easy Methods >>
3. Voice Changer
Price: Free
Compatibility: Android 4.1 and up
User Rating: 4.3
Changing your voice with this app won’t take more than a few moments of your time. You just have to launch the app and hit the microphone button to record a message or a joke you would like to modulate. Once you’re happy with the audio recording you made, you can proceed to choose from more than twenty voice effects that will make you sound like a dwarf, a robot, or an alien. The app’s file-sharing capabilities enable you to post your audio recordings to any social media platform of your choosing or store your files and use them as many times as you want.
Pros
- Entertaining and easy to use
- The simple three-step voice modulation process
- Good selection of voice filters
- Excellent file sharing options
Cons
- The app displays ads
- No audio editing tools
4. Voicy: Celebrity Voice Changer
**Price:**Free, but offers in-app purchases
Compatibility: iOS 10 or later
User Rating: 4.3
Impersonating your favorite celebrity can be a fun way to prank your friends on social media. Voicy features a broad selection of celebrity voice impersonations you can use to make you sound like a famous actress or TV personality. The app utilizes a machine learning technology that can generate more than forty avatars and allows the users to experiment with different voice effects. The free version of the app offers only limited capabilities, so if you want to gain access to all of the Voicy’s features, you must choose a weekly, monthly or an annual subscription.
Pros
- Equipped with a powerful machine learning technology
- Offers a vast selection of voice avatars
- The quick voice modification process
- A great choice if you want to make a parody
Cons
- More expensive than the competition
- Support only the English language
5. Video Voice Changer – Fun Editor
Price: Free, but offers in-app purchases
Compatibility: iOS 8.0 or later
User Rating: 4.4
Changing the voices in the videos you record with your iPhones or iPads is a straightforward process that takes a minimum amount of effort. You can either use this iOS-based app to capture videos you’re going to dub or import them from the albums in which they are stored. The Video Voice Changer app is a great option if you want to dub videos directly from your phone because it enables you to change the voices in your videos and make them sound like mice, bears or ghosts. There are over thirty voice effects to choose from, so you can easily pick the one that best fits the video you’re editing.
Pros
- Equipped with video recording tools
- Excellent dubbing features
- A rich selection of voice effects
- Allows users to share their creations on Facebook, Instagram, and other social media platforms
Cons
- You must make an in-app purchase to unlock all of the app’s features
- No audio mixing options
6. Video Voice Changer FX
**Price:**Free, but offers in-app purchases
Compatibility: Android 4.1 and up
User Rating: 4.1
This is a simple app, anyone can use to change the voices in a video. Simply upload a video file from an SD card in your phone and choose an audio effect you want to apply. The app’s collection of funny voices includes options like echo, squirrel, space ship or chipmunk. As soon as you select the voice effect you want to add to a video, the app will start generating a new video that will be saved to your phone. Sharing the videos you edit with Video Voice Changer FX to social media directly from the app is not an option.
Pros
- Fun and easy to use
- Great price to performance ratio
- Changing a voice requires just a few taps
- Allows users to switch between effects while the video is playing
Cons
- No audio or video recording capability
- Doesn’t support social media sharing
7. Squeak Voice Changer
**Price:**Free, but offers in-app purchases
Compatibility: Android 4.3 and up
User Rating: 3.9
Every joke you want to share with your online friends is going to be a little funnier if you record it with Squeak Voice Changer. You just have to tap on the Record button and choose one of the available effects. Each voice changing effect this app offers is represented by a character so you should select Jamie the Jolly if you want to make your voice sound like you’re at a party or Bruce the Sentimental Bot if you want your voice to sound artificial. All the recordings you make with Squeak Voice Changer can be easily shared on social media.
Pros
- Equipped with audio recording options
- Cute and memorable characters that represent voice effects
- Inexpensive and fun to use
- Functional app design
Cons
- Poor selection of voice effects
- The AI only recognizes the English language
8. Voice Changer with Effects
**Price:**Free
Compatibility: Android 4.1 and up
User Rating: 4.5
This Android-based app is designed to make fun and easy since voice modulation features enable you to play voice recording backward or change your voice to sound robotic or even alien. Besides recording your voice, the app also lets you modulate pre-recorded sounds and save them to your phone or use them as ringtones or notification sounds. Furthermore, the app lets you add sounds to images and share them to Facebook. The Voice Changer with Effects enables you to share all audio files you process with it to any of the most popular social media platforms.
Pros
- The app has over 50,000,000 installs
- Equipped with a text to voice feature
- Setting a new ringtone with this app is easy
- Supports editing of pre-recorded audio files
Cons
- Contains ads
- No audio or video editing options
9. Voice Changer
**Price:**Free
Compatibility: Android 4.1 and up
User Rating: 4.4
If you are looking for an Android app that lets you modulate your voice quickly and effortlessly, then Voice Changer may be one of the best options you can find on the market. You can record your voice by simply tapping on the microphone and speaking into your phone’s speaker and then apply one of the audio effects this app offers. Optionally, you can import an audio file you already recorded into the app and then apply Martian, Foreigner, Giant or Child effects to your voice recording. The best part is that you can apply each effect to the audio files you’re editing as many times as you want.
Pros
- Loads of funny effects
- Simple audio recording setup
- Intuitive and modernly designed interface
- Enables users to share audio files via Bluetooth or social media platforms
Cons
- No video editing tools
- The quality of output audio files can vary
10. Voice FX
**Price:**Free, but offers in-app purchases
Compatibility: Android 4.0.3 and up
User Rating: 3.8
Modulating voices in all types of audio files is a straightforward and fun process that can be completed in just a few taps. During the audio recording session, you can apply all voice effects to the sound you are recording and stream it live to your web browsers or media players you’re using. Voice FX changes your voice in real time, which enables you to preview your results before deciding if you want to save them. All files you export from this app will be saved in the MP3 format so you can use them as ringtones on your Android device.
Pros
- Allows users to modulate pre-recorded audio files
- Voice effects are applied in real time
- Offers live streaming features
- Exports files in the MP3 format
Cons
- Prone to glitches
- A limited selection of voice effects
11. Voice Changer Plus
**Price:**Free, but offers in-app purchases
Compatibility: iOS 8.0 or later
User Rating: 4.8
iPhone and iPad owners in need of a voice changer app that grants them complete creative freedom over the modulation of the voices they record, should consider using the Voice Changer Plus. The app features more than fifty voice effects and it provides support for voiceover recordings. Moreover, you can edit all your audio files even after you saved them, enabling you to find new ways to improve your recordings over time. Voice Changer Plus is also equipped with trim controls, so you can remove all parts of your audio files you don’t want to share with your friends on social media.
Pros
- Offers more voice effects than most of its competitors
- Provides voiceover recording options
- Users can trim their audio files
- All audio recordings can be edited after the voice modulation
Cons
- In-app purchase is required in order to unlock all of the app’s features
- Modulating audio in video files is not an option
Below is a quick comparison table among these voice changer apps, hope it will be helpful.
| App | Supported OS | User Rating | Voice Templates |
|---|---|---|---|
| Celebrity Voice Changer - Face | iOS 9.0 or later | 4.0 | Yes |
| Snapchat | iOS 10.0 or later, Android 4.4 or up | 3.8 | No |
| Voice Changer by e3games | Android 4.1 and up | 4.3 | Yes |
| Voicy: Celebrity Voice Changer | iOS 10 or later | 4.3 | Yes |
| Video Voice Changer – Fun Editor | iOS 8.0 or later | 4.4 | Yes |
| Video Voice Changer FX | Android 4.1 and up | 4.1 | Yes |
| Squeak Voice Changer | Android 4.3 and up | 3.9 | Yes |
| Voice Changer with Effects | Android 4.1 and up | 4.5 | Yes |
| Voice Changer | Android 4.1 and up | 4.4 | Yes |
| Voice FX | Android 4.0.3 and up | 3.8 | Yes |
| Voice Changer Plus | iOS 8.0 or later | 4.8 | Yes |
Conclusion
Everybody enjoys a good joke, and the apps we featured in this article enable you to have a lot of fun while experimenting with different voice modulation options. All of the voice effects these apps offer can change a voice automatically, but if you would like to alter the voices in your videos you must choose an app that supports this option. Which of the best voice changer apps for iPhone and Android devices are you going to choose? Leave a comment, and share your opinions with us.
Benjamin Arango
Benjamin Arango is a writer and a lover of all things video.
Follow @Benjamin Arango
The Essential Guide to Achieving Professional-Level Audio on Your Own Setup (2023 Update)
How to Improve Sound Quality on a Home Recorded Video?

Liza Brown
Mar 27, 2024• Proven solutions
It’s all fun when recording and posing for great videos, not until you realize that the quality of the sound is far below your expectations, the joy derived fades off and you seek ways in which to perfect the quality of sound. Whenever you rely on the microphone of your camera, the sound recorded may be similar to that of someone mumbling in a cave. When the sound is of importance to you just like the images are, it is worth investing in an experienced audio producer to help the muffled sounds be much cleaner and clear. Generally, the biggest reason as to why one would want to improve the audio quality is to give presentable videos with clear audios and benefit from them.
Improve sound quality on home-recorded video with Wondershare Filmora
To begin with, get a free trial copy of Wondershare Filmora .
=“” style=”width: 100%; height: 278.438px;”;
For Win 7 or later (64-bit)
 Secure Download
For macOS 10.14 or later
Secure Download
Click here to get Filmora for PC by email
or Try Filmora App for mobile >>>
download filmora app for ios ](https://app.adjust.com/b0k9hf2%5F4bsu85t ) download filmora app for android ](https://app.adjust.com/b0k9hf2%5F4bsu85t )
Step 1: Import video clips into Filmora
Using the software is not a great deal, it’s one of the most basic things that one does, and the first step involves importing videos on Filmora. The import function can easily be seen and it’s pretty easy to use.

Step 2: Cut, trim or split video (optional)
Secondly, you can opt to trim the video; however, this step is very optional. Sometimes the desire to perfect the whole video may be much and thus opt to improve the audio quality of the whole item.
Step 3: Audio denoise
The third step is also the main function of the software, it allows you to remove the background noise (audio denoise) the sounds can also be removed by audio detach and mute. Having done this, you can be sure that the quality of your audio is perfected to what you may have initially desired.

Step 4: Adjust video volume, pitch, etc
With a perfect sound, you have to adjust the pitch, the volume, and other effects of the sound that you were improving; this is set to match your needs and the feeling of the desired groups.
Step 5: Add audio effect with Audio Equalizer
You can also opt to add an effect with Audio Equalizer, like dance, and bass as per your desire.

Step 6: Add background music
With the software, you can elevate the level of your recording by adding some royalty music as the background.

Step 7: Mix audio

Lastly, mixing different tracks into one file with an audio mixer is a crucial last step in perfecting your video. When done, feel free to share the perfected video, you can import it to your desired destination.
FAQs
1. How can I make my sound louder in Filmora?
It is a really easy method that you do not need to go into detailed study to learn how to make the sound louder.
Let us start:
- Open Filmora and import your audio.
- Drag the audio into the timeline in the audio layer.
- Now click on the audio in the timeline, and you will find a blue line inside this layer.
- Drag that blue line up and down, you will find when you go up the volume will become louder and when you drag the audio down the volume will be lower.

2. How can I remove background noise from recordings in Filmora?
Here’s a method to remove the noise from the background of your audio.
Let us start;
- Right-click on the audio in the timeline.
- Go to the Adjust audio option. You will see a few audio settings here.

- First of all, click on the de-noise feature to remove the background noise from the audio.
Usually, when you increase the volume of your audio the noise in the background will also increase so this feature is very important.
- Now click on the auto normalization, this will help to level up the volume of the audio.
While making audio, we have different tones of the volume. Sometimes we speak loud with more energy and sometimes we have low volume and this auto normalization feature will help to adjust the level of the whole audio.
In this latest version of Filmora, we have two more features that are wind removal and hum removal. - Click on the hum removal, it removes the humming noise in the recorded audio.
- Click on the wind removal, it automatically removes the sound of the wind which will make your audio clear.
- Finally, press Ok.


3. How do you change the voice in Filmora?
It is also pretty simple to change the voice of your audio into different characters. So, Let us start:
- Open Filmora video editor and import the audio file you want to change the voice.
- Drag the audio into the timeline. Let us change the audio into an old man’s voice.
- Double-click on the audio file, and the audio settings panel will be opened.
- Move the Pitch level to -4 and slow down the audio speed with the right-click of the mouse while holding down the control.
Now apply an Equaliser to make it better. - Click on the drop-down list and select the Techno.
To change the audio to a Robot voice.- Keep the pitch to -5.
To change the audio to a cartoon character. - Increase the pitch and move the pointer to 8.
You can also change your audio to a woman’s voice.
For that increase the Pitch slightly up to 2. - Change the Equalizer to dance.
WonderShare Filmora is a great program to use in place of other video editor software. It has excellent audio capability and access to captions.

Why choose Wondershare Filmora
However, the best way on which to improve audio quality is by the use of Wondershare Filmora, the software has got a built-in audio editing tool, the tool has the power to enable you to mute, detach or even denoise your audio. In any case, these are usually the most basic uses of any sound software.
Furthermore, there is the newly added feature like Audio Equalizer that has the power to enable you to add more effects like classic, low bass pop, or even other features. The Audio Mixer in the software gives you the power to merge different tracks to enable you to create a new sound for yourself. Compared to the aforementioned two software, we can see that Wondershare Filmora has more than the basics; it is designed in a way in which it will serve more than the basics.
More, the software offers a complete support for a great number of audio formats ranging from AVI, MP4 and MKV. With the software, you can use a great range of functions from the PIP green screen to tilt shift, face off, jump cut and others. It is also possible to upload the video o YouTube, vimeo or facebook, the software is such a great tool to have if you are found of recording videos .
Free Download
For Win 7 or later (64-bit) Secure Download
Free Download
For macOS 10.14 or later Secure Download
Click here to get Filmora for PC by email
or Try Filmora App for mobile >>>
download filmora app for ios ](https://app.adjust.com/b0k9hf2%5F4bsu85t ) download filmora app for android ](https://app.adjust.com/b0k9hf2%5F4bsu85t )
Liza Brown
Liza Brown is a writer and a lover of all things video.
Follow @Liza Brown
Liza Brown
Mar 27, 2024• Proven solutions
It’s all fun when recording and posing for great videos, not until you realize that the quality of the sound is far below your expectations, the joy derived fades off and you seek ways in which to perfect the quality of sound. Whenever you rely on the microphone of your camera, the sound recorded may be similar to that of someone mumbling in a cave. When the sound is of importance to you just like the images are, it is worth investing in an experienced audio producer to help the muffled sounds be much cleaner and clear. Generally, the biggest reason as to why one would want to improve the audio quality is to give presentable videos with clear audios and benefit from them.
Improve sound quality on home-recorded video with Wondershare Filmora
To begin with, get a free trial copy of Wondershare Filmora .
=“” style=”width: 100%; height: 278.438px;”;
For Win 7 or later (64-bit)
Secure Download
For macOS 10.14 or later
Secure Download
Click here to get Filmora for PC by email
or Try Filmora App for mobile >>>
download filmora app for ios ](https://app.adjust.com/b0k9hf2%5F4bsu85t ) download filmora app for android ](https://app.adjust.com/b0k9hf2%5F4bsu85t )
Step 1: Import video clips into Filmora
Using the software is not a great deal, it’s one of the most basic things that one does, and the first step involves importing videos on Filmora. The import function can easily be seen and it’s pretty easy to use.
Step 2: Cut, trim or split video (optional)
Secondly, you can opt to trim the video; however, this step is very optional. Sometimes the desire to perfect the whole video may be much and thus opt to improve the audio quality of the whole item.
Step 3: Audio denoise
The third step is also the main function of the software, it allows you to remove the background noise (audio denoise) the sounds can also be removed by audio detach and mute. Having done this, you can be sure that the quality of your audio is perfected to what you may have initially desired.
Step 4: Adjust video volume, pitch, etc
With a perfect sound, you have to adjust the pitch, the volume, and other effects of the sound that you were improving; this is set to match your needs and the feeling of the desired groups.
Step 5: Add audio effect with Audio Equalizer
You can also opt to add an effect with Audio Equalizer, like dance, and bass as per your desire.
Step 6: Add background music
With the software, you can elevate the level of your recording by adding some royalty music as the background.
Step 7: Mix audio
Lastly, mixing different tracks into one file with an audio mixer is a crucial last step in perfecting your video. When done, feel free to share the perfected video, you can import it to your desired destination.
FAQs
1. How can I make my sound louder in Filmora?
It is a really easy method that you do not need to go into detailed study to learn how to make the sound louder.
Let us start:
- Open Filmora and import your audio.
- Drag the audio into the timeline in the audio layer.
- Now click on the audio in the timeline, and you will find a blue line inside this layer.
- Drag that blue line up and down, you will find when you go up the volume will become louder and when you drag the audio down the volume will be lower.
2. How can I remove background noise from recordings in Filmora?
Here’s a method to remove the noise from the background of your audio.
Let us start;
- Right-click on the audio in the timeline.
- Go to the Adjust audio option. You will see a few audio settings here.
- First of all, click on the de-noise feature to remove the background noise from the audio.
Usually, when you increase the volume of your audio the noise in the background will also increase so this feature is very important.
- Now click on the auto normalization, this will help to level up the volume of the audio.
While making audio, we have different tones of the volume. Sometimes we speak loud with more energy and sometimes we have low volume and this auto normalization feature will help to adjust the level of the whole audio.
In this latest version of Filmora, we have two more features that are wind removal and hum removal. - Click on the hum removal, it removes the humming noise in the recorded audio.
- Click on the wind removal, it automatically removes the sound of the wind which will make your audio clear.
- Finally, press Ok.
3. How do you change the voice in Filmora?
It is also pretty simple to change the voice of your audio into different characters. So, Let us start:
- Open Filmora video editor and import the audio file you want to change the voice.
- Drag the audio into the timeline. Let us change the audio into an old man’s voice.
- Double-click on the audio file, and the audio settings panel will be opened.
- Move the Pitch level to -4 and slow down the audio speed with the right-click of the mouse while holding down the control.
Now apply an Equaliser to make it better. - Click on the drop-down list and select the Techno.
To change the audio to a Robot voice.- Keep the pitch to -5.
To change the audio to a cartoon character. - Increase the pitch and move the pointer to 8.
You can also change your audio to a woman’s voice.
For that increase the Pitch slightly up to 2. - Change the Equalizer to dance.
WonderShare Filmora is a great program to use in place of other video editor software. It has excellent audio capability and access to captions.
Why choose Wondershare Filmora
However, the best way on which to improve audio quality is by the use of Wondershare Filmora, the software has got a built-in audio editing tool, the tool has the power to enable you to mute, detach or even denoise your audio. In any case, these are usually the most basic uses of any sound software.
Furthermore, there is the newly added feature like Audio Equalizer that has the power to enable you to add more effects like classic, low bass pop, or even other features. The Audio Mixer in the software gives you the power to merge different tracks to enable you to create a new sound for yourself. Compared to the aforementioned two software, we can see that Wondershare Filmora has more than the basics; it is designed in a way in which it will serve more than the basics.
More, the software offers a complete support for a great number of audio formats ranging from AVI, MP4 and MKV. With the software, you can use a great range of functions from the PIP green screen to tilt shift, face off, jump cut and others. It is also possible to upload the video o YouTube, vimeo or facebook, the software is such a great tool to have if you are found of recording videos .
Free Download
For Win 7 or later (64-bit) Secure Download
Free Download
For macOS 10.14 or later Secure Download
Click here to get Filmora for PC by email
or Try Filmora App for mobile >>>
download filmora app for ios ](https://app.adjust.com/b0k9hf2%5F4bsu85t ) download filmora app for android ](https://app.adjust.com/b0k9hf2%5F4bsu85t )
Liza Brown
Liza Brown is a writer and a lover of all things video.
Follow @Liza Brown
“Suppress Ambient Sounds and Insert Unique Soundscapes with the Help of Microsoft’s Movie Creator”
How to Mute Audio in Windows Movie Maker?

Shanoon Cox
Mar 27, 2024• Proven solutions
Recording high-quality videos with Smartphones and consumer-level cameras is easy, but unfortunately the same can’t be said for the sound. The camera microphones often record low-quality audio and they pick up background noises that can make the video unwatchable.
In case you were looking for a quick way to mute or remove the audio in your videos, you came to the right place because in this article we are going to show you how you can mute audio in Windows Movie Maker or add new audio files to videos. We’re also going to provide you with an alternative solution that lets you have more control over the audio editing process.
- Part 1: How to Mute Audio in Windows Movie Maker?
- Part 2: Adding a New Audio Clip to a Video
- Part 3: A Better Way to Replace Original Audio on Windows
Part 1: How to Mute Audio in Windows Movie Maker?
Muting the audio in a video clip is simple, regardless of the video editing software you’re using. Windows Movie Maker lets you mute audio in just a few steps, so let’s see how you can mute videos with this video editor.
Step 1: In order to start editing a video, you must first import it into Windows Movie Maker. Click on the Add Videos and Photos icon in the software’s Home tab and proceed to select the clip you’d like to mute.

Click on the Open button in the Add Videos and Photos window and your clip will be imported into the software.
Step 2: After you added a clip to the storyboard you can preview it in order to decide which parts of the video you’d like to mute. Click on the Edit menu in the software’s ribbon, to gain access to the video editing tools Windows Movie Maker has to offer.
If you would like to mute only a portion of a video clip, you should position the playhead on the storyline at the exact location in the video where you want to make the cut and then click on the Split button.
Step 3: Make sure that the clip you want to mute is selected and click on the Video Volume icon on the left side of the Edit tab.

Drag the slider all the way to the left to mute the audio. Click the Play button in the preview window to make sure that video’s sound is muted.
Part 2: Adding a New Audio Clip to a Video
Windows Movie Maker also lets you replace the existing audio clip with a new one. Once again, this process is easy and it can be completed in a few steps.
Step 1: After you’ve muted the audio, click on the Add Music icon, that is located next to the Add Photos and Videos icon in the Home tab.

A drop-down menu will appear offering you to select music from an online source or to import an audio file from your computer. Moreover, you can select the starting point of the song you’re importing so you don’t have to adjust the position of the audio file in your project manually.
In order to do this, you just have to position the playhead at the desired location and select the Add music at the current point option from the drop-down menu. You can change the position of the audio file by dragging it to a new location in the storyboard. Using MP3 or WMA audio file is recommended since other audio file formats may not be compatible with Windows Movie maker.
Step 2: The audio file you imported will be automatically added to the video clip on the Storyboard. Click Play in the preview window to check if you like the result. Head over to the File menu and click on the Save Movie option. Windows Movie Maker will offer you a number of different options and if you’d like to save your video to the computer, you should select the For Computer option.

Part 3: Wondershare Filmora - A Better Way to Replace Audio Files in Videos on Windows OS
Windows Movie Maker has been discontinued a while ago, and its video and audio editing tools only enable you to perform basic video editing tasks. We suggest using Wondershare Filmora if you would like to mute or replace audio files in your videos because it offers more powerful audio and video editing features. Here’s how you can mute or replace audio files in Wondershare Filmora.
Step 1: Import the video clip into the software, by clicking on the Import button and then selecting the Import Media Files option. If you want to replace the audio of the clip you can also select the new audio file from your hard drive and click on the Open button. Filmora offers a rich royalty free music library, you can use if you already don’t have the music you want to add to your video.
Step 2: Drag and drop the video file to the timeline and then right-click on it. Select the Audio Detach option from the context menu. The audio file will appear in the newly created audio track, and you can just click on the Volume icon located at the begging of the audio track to mute that audio track.

For more details, check our guide about How to remove audio from video in Filmora on Windows.
If you want to add a new audio clip to your project and replace the old one, you should select the existing audio file and press the delete button on your keyboard. You can then drag and drop the new audio file to the timeline from the software’s Media Bin, or the Music tab, in case you decide to use songs featured in Filmora’s music library. You can cut, trim or adjust the start and end position of the audio file or use some of the audio effects the software offers. When done, click on the Export button and select the output format that is most suitable for the project you’re working on.
Conclusion
Videos that have poor sound quality won’t impress anyone, but you shouldn’t worry because muting or replacing audio files is a task that requires almost no effort. Windows Movie Maker can be used to quickly mute an audio file, but if you want to have access to more professional audio editing tools using Wondershare Filmora is a much better option. What’s your favorite method of replacing audio files in videos? Leave a comment and let us know.
Shanoon Cox
Shanoon Cox is a writer and a lover of all things video.
Follow @Shanoon Cox
Shanoon Cox
Mar 27, 2024• Proven solutions
Recording high-quality videos with Smartphones and consumer-level cameras is easy, but unfortunately the same can’t be said for the sound. The camera microphones often record low-quality audio and they pick up background noises that can make the video unwatchable.
In case you were looking for a quick way to mute or remove the audio in your videos, you came to the right place because in this article we are going to show you how you can mute audio in Windows Movie Maker or add new audio files to videos. We’re also going to provide you with an alternative solution that lets you have more control over the audio editing process.
- Part 1: How to Mute Audio in Windows Movie Maker?
- Part 2: Adding a New Audio Clip to a Video
- Part 3: A Better Way to Replace Original Audio on Windows
Part 1: How to Mute Audio in Windows Movie Maker?
Muting the audio in a video clip is simple, regardless of the video editing software you’re using. Windows Movie Maker lets you mute audio in just a few steps, so let’s see how you can mute videos with this video editor.
Step 1: In order to start editing a video, you must first import it into Windows Movie Maker. Click on the Add Videos and Photos icon in the software’s Home tab and proceed to select the clip you’d like to mute.
Click on the Open button in the Add Videos and Photos window and your clip will be imported into the software.
Step 2: After you added a clip to the storyboard you can preview it in order to decide which parts of the video you’d like to mute. Click on the Edit menu in the software’s ribbon, to gain access to the video editing tools Windows Movie Maker has to offer.
If you would like to mute only a portion of a video clip, you should position the playhead on the storyline at the exact location in the video where you want to make the cut and then click on the Split button.
Step 3: Make sure that the clip you want to mute is selected and click on the Video Volume icon on the left side of the Edit tab.
Drag the slider all the way to the left to mute the audio. Click the Play button in the preview window to make sure that video’s sound is muted.
Part 2: Adding a New Audio Clip to a Video
Windows Movie Maker also lets you replace the existing audio clip with a new one. Once again, this process is easy and it can be completed in a few steps.
Step 1: After you’ve muted the audio, click on the Add Music icon, that is located next to the Add Photos and Videos icon in the Home tab.
A drop-down menu will appear offering you to select music from an online source or to import an audio file from your computer. Moreover, you can select the starting point of the song you’re importing so you don’t have to adjust the position of the audio file in your project manually.
In order to do this, you just have to position the playhead at the desired location and select the Add music at the current point option from the drop-down menu. You can change the position of the audio file by dragging it to a new location in the storyboard. Using MP3 or WMA audio file is recommended since other audio file formats may not be compatible with Windows Movie maker.
Step 2: The audio file you imported will be automatically added to the video clip on the Storyboard. Click Play in the preview window to check if you like the result. Head over to the File menu and click on the Save Movie option. Windows Movie Maker will offer you a number of different options and if you’d like to save your video to the computer, you should select the For Computer option.
Part 3: Wondershare Filmora - A Better Way to Replace Audio Files in Videos on Windows OS
Windows Movie Maker has been discontinued a while ago, and its video and audio editing tools only enable you to perform basic video editing tasks. We suggest using Wondershare Filmora if you would like to mute or replace audio files in your videos because it offers more powerful audio and video editing features. Here’s how you can mute or replace audio files in Wondershare Filmora.
Step 1: Import the video clip into the software, by clicking on the Import button and then selecting the Import Media Files option. If you want to replace the audio of the clip you can also select the new audio file from your hard drive and click on the Open button. Filmora offers a rich royalty free music library, you can use if you already don’t have the music you want to add to your video.
Step 2: Drag and drop the video file to the timeline and then right-click on it. Select the Audio Detach option from the context menu. The audio file will appear in the newly created audio track, and you can just click on the Volume icon located at the begging of the audio track to mute that audio track.
For more details, check our guide about How to remove audio from video in Filmora on Windows.
If you want to add a new audio clip to your project and replace the old one, you should select the existing audio file and press the delete button on your keyboard. You can then drag and drop the new audio file to the timeline from the software’s Media Bin, or the Music tab, in case you decide to use songs featured in Filmora’s music library. You can cut, trim or adjust the start and end position of the audio file or use some of the audio effects the software offers. When done, click on the Export button and select the output format that is most suitable for the project you’re working on.
Conclusion
Videos that have poor sound quality won’t impress anyone, but you shouldn’t worry because muting or replacing audio files is a task that requires almost no effort. Windows Movie Maker can be used to quickly mute an audio file, but if you want to have access to more professional audio editing tools using Wondershare Filmora is a much better option. What’s your favorite method of replacing audio files in videos? Leave a comment and let us know.
Shanoon Cox
Shanoon Cox is a writer and a lover of all things video.
Follow @Shanoon Cox
Also read:
- New The Professionals Method for Removing Unwanted Sounds From Media Projects Using Premiere Pro
- Updated Tutorial for Creating Mute AVI Video Files Edition
- New Detecting Crystalline Collision Audio for 2024
- Updated In 2024, Free Voice Synthesis Convert Your Written Words Into Audio Speech
- In 2024, The Ultimate Guide to Quieting Down Films and Videos
- New 2024 Approved The Complete Guide to Transforming AIFF Files Into MP3 Format
- New Best Volume Normalizers How to Normalize Audio in Videos?
- In 2024, Intuitive Vocal Modification Mechanisms An Insight Into Operational Aspects, Standards, and Workarounds
- Updated 2024 Approved From Full Spectrum to Focus Extracting Core Rhythms for Multimedia Use
- 2024 Approved Hush the Hubbub Innovative Methods for Diminishing Noise in Microphones
- Sonic Symphony Compendium A Thorough Exploration of Premiere Audio Editing Software, Highlighting Advantages & Shortcomings for 2024
- New Pop Icon Vocal Modification Technology Tools, Techniques and Alternatives for a New Sound for 2024
- New In 2024, The Essential Breakdown Getting Acquainted with LexisSoundCraft
- New Achieving Perfect Ambience Expert Techniques for Gradual Volume Changes with Adobe After Effects
- New 2024 Approved How to Put Music Over a Video?
- 2024 Approved Mastering Volume Transitions Keyframe Techniques in Filmora (Mac)
- New Exploring Archives for Articulated Grunt Effects
- Evaluation Report on Sound Forges Audio Editing Tools
- The One-Stop Shop for Podcast Platforms and Directories for 2024
- New Guide to Achieving Soundless Visual Content for 2024
- New Premier Applications for Audio File Isolation From Visual Content
- Updated Navigating Through the Maze Choosing Top-Tier Audio Formats Explained for 2024
- New In 2024, The Ultimate List Best Royalty-Free Laughter Soundtracks for Your Videos
- New Essential Voice Tweaks A Guide to Androids Top 7 Editing Apps for 2024
- Enhancing Your Computing Experience Bridging AirPods with Personal Computers
- Updated 2024 Approved Discover the Best Fee-Free Musical Backdrops for Chuckle-Filled Projects
- Updated In 2024, The Engineers Dream Set-Up Unveiling the Five Cutting-Edge Audio Ducking Programs
- Digital Resonance A Comprehensive Tutorial for Echo Addition in Windows and Web Audio Applications for 2024
- New Quieting the Cinematic Chaos Techniques for Audio Trimming in iMovie Videos for 2024
- All About the Wave Editor Essential Features, User Experiences, and Learning Modules for 2024
- Updated Acclaimed AI Lyrics Converters and Their Rankings
- New 2024 Approved The Ultimate Ranking Best Online & Physical MP3 Karaoke Tools
- New The Art of Color Consistency Tips and Tricks for Matching Video Clips in Final Cut Pro
- How to Quickly Fix Bluetooth Not Working on Huawei Nova Y91 | Dr.fone
- Easy steps to recover deleted pictures from ZTE Blade A73 5G.
- In 2024, Guide to Mirror Your Oppo Reno 9A to Other Android devices | Dr.fone
- In 2024, How To Remove Flashlight From Apple iPhone XR Lock Screen | Dr.fone
- 6 Solutions to Fix Error 505 in Google Play Store on HTC U23 | Dr.fone
- Reasons why Pokémon GPS does not Work On Tecno Phantom V Flip? | Dr.fone
- Updated 2024 Approved Split WMV Files for Free Top 5 Tools
- Ultimate Guide, How to Transfer Music From Apple iPhone 12 Pro to iPhone | Dr.fone
- Updated Convert YouTube Videos to MP3 with Ease Choosing the Right Tool for 2024
- Full Tutorial to Bypass Your Infinix Hot 30i Face Lock?
- 10 Best Mp3 Visualizers Windows, Mac, Android, iPhone & Online
- In 2024, Full Guide to Fix iToolab AnyGO Not Working On Itel A60s | Dr.fone
- In 2024, How to Bypass Google FRP Lock from Vivo S17t Devices
- Updated How to Find 3D Animation Studio Meeting All Your Inspiring Needs
- In 2024, How and Where to Find a Shiny Stone Pokémon For Vivo Y02T? | Dr.fone
- Updated In 2024, Stream the Hottest Trailers Top 10 iPhone and iPad Movie Apps
- How to Make the Most of Your iPhone 11 Pro Lock Screen with Notifications?
- In 2024, How to Watch Hulu Outside US On Realme GT Neo 5 SE | Dr.fone
- New Want to Play a Video on Loop on Vimeo so that It Plays Again and Again? Here Are All the Different Ways to Loop a Video on Vimeo in Simple Steps
- In 2024, Recommended Best Applications for Mirroring Your Honor Magic V2 Screen | Dr.fone
- New MKV File Trimming Made Simple Top 3 Mac Apps
- How to Unlock Samsung Galaxy A54 5G Bootloader Easily
- Updated 2024 Approved An Ultimate Guide to Edit a Music Video Aspect Ratio and First Cut
- In 2024, List of Pokémon Go Joysticks On Poco X5 | Dr.fone
- New 2024 Approved QuickTime Video Editing for Mac Users A Step-by-Step Tutorial
- In 2024, Lock Your Vivo Y100t Phone in Style The Top 5 Gesture Lock Screen Apps
- Updated 2024 Approved Get Creative with Free Video Invitations The Best Online Makers
- In 2024, Bypass iCloud Activation Lock with IMEI Code From iPhone XS
- How To Fake GPS On Honor Magic 6 For Mobile Legends? | Dr.fone
- In 2024, How to Transfer Data from OnePlus Open to Other Android Devices? | Dr.fone
- Process of Screen Sharing Vivo Y100i Power 5G to PC- Detailed Steps | Dr.fone
- Title: Updated Exclusive Listing of the Top 11 Cost-Free Speech Adjustment Software for iOS & Android Users for 2024
- Author: Jacob
- Created at : 2024-05-05 03:54:03
- Updated at : 2024-05-06 03:54:03
- Link: https://audio-shaping.techidaily.com/updated-exclusive-listing-of-the-top-11-cost-free-speech-adjustment-software-for-ios-and-android-users-for-2024/
- License: This work is licensed under CC BY-NC-SA 4.0.
