
:max_bytes(150000):strip_icc():format(webp)/jens-kreuter-85328-c5ada5fb87224444a49aaa4ad1e16897.jpg)
Updated AMR Audio Converter Complete Guide to AMR Files for 2024
AMR Audio Converter: Complete Guide to AMR Files
AMR Audio Converter: Convert AMR Files Easily

Shanoon Cox
Mar 27, 2024• Proven solutions
AMR is an abbreviation for Adaptive Multi-Rate Audio Codec. It is a technology that utilizes audio compression formats primarily for speech. A typical AMR speech codec will have a multi-rate of eight bitrate values that range from 4.75kb/s to 12.2 kb/s. The structure of AMR allows the creation of a group of 160 twenty millisecond long samples by the codec in one frame. The multi-rate codec available for normal AMR files include ACELP, DTX, CAD and CNG.
In addition to compressing speech, the AMR file format can also be used for the storage of spoken audio using the same codec. There are a number of modern telephones that has the capability to store short audio recordings using the AMR format. There are also other programs, both free and proprietary that can be used to convert files from this format to other various formats and vice versa. However, since AMR file format was initially designed for storing speech or audio recordings, quality is likely to be compromised if other media files are converted into AMR.
How to Open AMR files on PC/Smartphone/Tablet
Though AMR file format was not designed for music and videos, there are certain instances when you might come across them and be confused on how to open them. The fact is that it is still possible to open AMR files with your personal computer, tablet, Smartphone or other devices.
In the case of a PC, the easiest way to open such a file is to simply double-click on it then allow the PC to decide which the most appropriate program to open it is.
If the already installed programs in your computer are unable to open the file, then the other alternative would be to search and download an appropriate AMR player. There are several sources from the internet that you can get such media player for absolutely free. If you prefer this route however, you need to be cautious and ensure that you don’t download a program file that will hurt your computer. Ensure that you download the program from a trusted website. This is the only to avoid downloading viruses, spyware, malware and other malicious programs that might compromise the safety and security of your computer.
Convert the AMR audio file to another Audio format
If you want to save yourself from risking your computer by installing other AMR players, you can simply convert the AMR audio file to other friendly formats whose player you already have. This conversion process is not complicated in any way. There are basically two options for achieving this and they include the following-:
1. Convert AMR file online
The first option is to use various websites that offer such conversion services. There are so many of them offering the services for free and all you have to do is to simply choose the ones that suits you the most. The process will in most cases involve three simple steps: upload the AMR file, choose the format you want it converted to then download the converted file. Some sites will require you to give your email address so that they send to you the converted file to your inbox. It is up to you to choose to whether or not to give your email address.
Download AMR Converter software from http://www.mystikmedia.com/amr%5Fconverter.htm
But the best alternative would be to download the AMR converter from http://www.mystikmedia.com/amr%5Fconverter.htm and install it in your computer so that you can use it whenever you want. This trusted software has been specifically designed for the purposes of converting AMR files to other file formats. It can convert any AMR file or its variation to more than thirty different formats including FLV, MP3, MP4, WMA, WAV, AVI etc.
The software is fairly intuitive with lots of features to enable you have a very good experience with it. It converts faster and can allow you to batch convert. Though it is not available for free, it’s well worth its cost with all the features and flexibility it will give you in converting your AMR files.
2. Desktop AMR to MP3 Converters
There are other converters – both online services and desktop based software programs that you can use to get similar results if you don’t want to use the paid one above. They include but not limited to the following-:
Free AMR to MP3 Converter
Free AMR to MP3 Converter – this is a desktop software program that has been designed to convert AMR files to MP3. It has a simple and intuitive interface and it allows for the conversion of single as well as group conversion of files. Other than slowing down some computers, the converter doesn’t seem to have any other drawbacks.

Wondershare Filmora – this is a full featured video and audio converter. Other than allowing you to convert AMR files to any desired format, it also enables you to edit the file. Converting files with it is as easy as dragging and dropping files from one format to the other. The fact that it is available for both windows and Mac makes it accessible to very many users.


Apowersoft Free Online Audio Converter
Apowersoft Free Online Audio Converter – Apowersoft Free Online Converter is a web based service that lets you convert AMR files to MP3 as well as other formats like WMA, WMV, FLAC, OGG, and RA. It offers an intuitive user interface with a fast conversion process since it does not upload the AMR files to the servers before converting them.

Freestar Free AMR MP3 Converter
Freestar Free AMR MP3 Converter – this is another online service that lets you convert the poor quality AMR files to high quality MP3 files. As opposed to most of the online converters, this particular one allows you to convert multiple files at a time. It also comes with a number of features including certain advanced options to give you the ultimate power to control the whole conversion process so that you get the desired quality.

Shanoon Cox
Shanoon Cox is a writer and a lover of all things video.
Follow @Shanoon Cox
Shanoon Cox
Mar 27, 2024• Proven solutions
AMR is an abbreviation for Adaptive Multi-Rate Audio Codec. It is a technology that utilizes audio compression formats primarily for speech. A typical AMR speech codec will have a multi-rate of eight bitrate values that range from 4.75kb/s to 12.2 kb/s. The structure of AMR allows the creation of a group of 160 twenty millisecond long samples by the codec in one frame. The multi-rate codec available for normal AMR files include ACELP, DTX, CAD and CNG.
In addition to compressing speech, the AMR file format can also be used for the storage of spoken audio using the same codec. There are a number of modern telephones that has the capability to store short audio recordings using the AMR format. There are also other programs, both free and proprietary that can be used to convert files from this format to other various formats and vice versa. However, since AMR file format was initially designed for storing speech or audio recordings, quality is likely to be compromised if other media files are converted into AMR.
How to Open AMR files on PC/Smartphone/Tablet
Though AMR file format was not designed for music and videos, there are certain instances when you might come across them and be confused on how to open them. The fact is that it is still possible to open AMR files with your personal computer, tablet, Smartphone or other devices.
In the case of a PC, the easiest way to open such a file is to simply double-click on it then allow the PC to decide which the most appropriate program to open it is.
If the already installed programs in your computer are unable to open the file, then the other alternative would be to search and download an appropriate AMR player. There are several sources from the internet that you can get such media player for absolutely free. If you prefer this route however, you need to be cautious and ensure that you don’t download a program file that will hurt your computer. Ensure that you download the program from a trusted website. This is the only to avoid downloading viruses, spyware, malware and other malicious programs that might compromise the safety and security of your computer.
Convert the AMR audio file to another Audio format
If you want to save yourself from risking your computer by installing other AMR players, you can simply convert the AMR audio file to other friendly formats whose player you already have. This conversion process is not complicated in any way. There are basically two options for achieving this and they include the following-:
1. Convert AMR file online
The first option is to use various websites that offer such conversion services. There are so many of them offering the services for free and all you have to do is to simply choose the ones that suits you the most. The process will in most cases involve three simple steps: upload the AMR file, choose the format you want it converted to then download the converted file. Some sites will require you to give your email address so that they send to you the converted file to your inbox. It is up to you to choose to whether or not to give your email address.
Download AMR Converter software from http://www.mystikmedia.com/amr%5Fconverter.htm
But the best alternative would be to download the AMR converter from http://www.mystikmedia.com/amr%5Fconverter.htm and install it in your computer so that you can use it whenever you want. This trusted software has been specifically designed for the purposes of converting AMR files to other file formats. It can convert any AMR file or its variation to more than thirty different formats including FLV, MP3, MP4, WMA, WAV, AVI etc.
The software is fairly intuitive with lots of features to enable you have a very good experience with it. It converts faster and can allow you to batch convert. Though it is not available for free, it’s well worth its cost with all the features and flexibility it will give you in converting your AMR files.
2. Desktop AMR to MP3 Converters
There are other converters – both online services and desktop based software programs that you can use to get similar results if you don’t want to use the paid one above. They include but not limited to the following-:
Free AMR to MP3 Converter
Free AMR to MP3 Converter – this is a desktop software program that has been designed to convert AMR files to MP3. It has a simple and intuitive interface and it allows for the conversion of single as well as group conversion of files. Other than slowing down some computers, the converter doesn’t seem to have any other drawbacks.
Wondershare Filmora – this is a full featured video and audio converter. Other than allowing you to convert AMR files to any desired format, it also enables you to edit the file. Converting files with it is as easy as dragging and dropping files from one format to the other. The fact that it is available for both windows and Mac makes it accessible to very many users.
Apowersoft Free Online Audio Converter
Apowersoft Free Online Audio Converter – Apowersoft Free Online Converter is a web based service that lets you convert AMR files to MP3 as well as other formats like WMA, WMV, FLAC, OGG, and RA. It offers an intuitive user interface with a fast conversion process since it does not upload the AMR files to the servers before converting them.
Freestar Free AMR MP3 Converter
Freestar Free AMR MP3 Converter – this is another online service that lets you convert the poor quality AMR files to high quality MP3 files. As opposed to most of the online converters, this particular one allows you to convert multiple files at a time. It also comes with a number of features including certain advanced options to give you the ultimate power to control the whole conversion process so that you get the desired quality.
Shanoon Cox
Shanoon Cox is a writer and a lover of all things video.
Follow @Shanoon Cox
Decoding the Features of Google Podcast Application
Google’s proprietary podcast-listening app, Google Podcast, is one of the few podcast apps on the Play Store, with an audience base of more than 100 million. And for a good reason: Google Podcast does podcasts as YouTube does with videos. It’s simple to use, free to all, and features podcasts on the news, captivating stories, and educational content that resonate with all.
Read on to find answers to questions like what is Google Podcast App? How does Google Podcast work? Its features, interface, and some of the best podcasts are featured on the platform. As a bonus, we will also provide a step-by-step guide on creating your own podcast and submitting it to Google Podcasts.
- Best Podcast on Art & Culture
- Best Tech Podcasts
- Best Talkshow and Interview Podcasts
- Best Health Podcast
- Best History Podcast
- Best Informative Podcast
- Best News & Politics Podcast
- Best Sports Podcasts
- Miscellaneous Podcasts
- Movies, Music, and TV Podcasts
Part 1. What is Google Podcast App?
Google Podcast (formerly Google Play Podcast) is Google’s proprietary podcast-listening app. It comes pre-installed on some Android smartphones and all Pixel editions. Even Apple users can install Google Podcasts via the App Store. It’s free and lets you discover, stream, and download podcasts.
Google Podcast has already hit 100 million downloads, an indication of its rising popularity both among content creators and users. Users prefer it for its navigable, search-aligned, minimalist interface. And prominent podcast creators are focusing on the app to make their episodes accessible to millions of Android users.
Part 2: Google Podcasts Features
Compatible with Android, iOS, macOS, Windows, Blackberry, and ChromeOS, Google Podcast is relatively a novice compared to dedicated podcast services. Still, Google Podcast seamlessly incorporates nearly every feature one needs to listen to podcasts.
Search and Personalized Recommendations
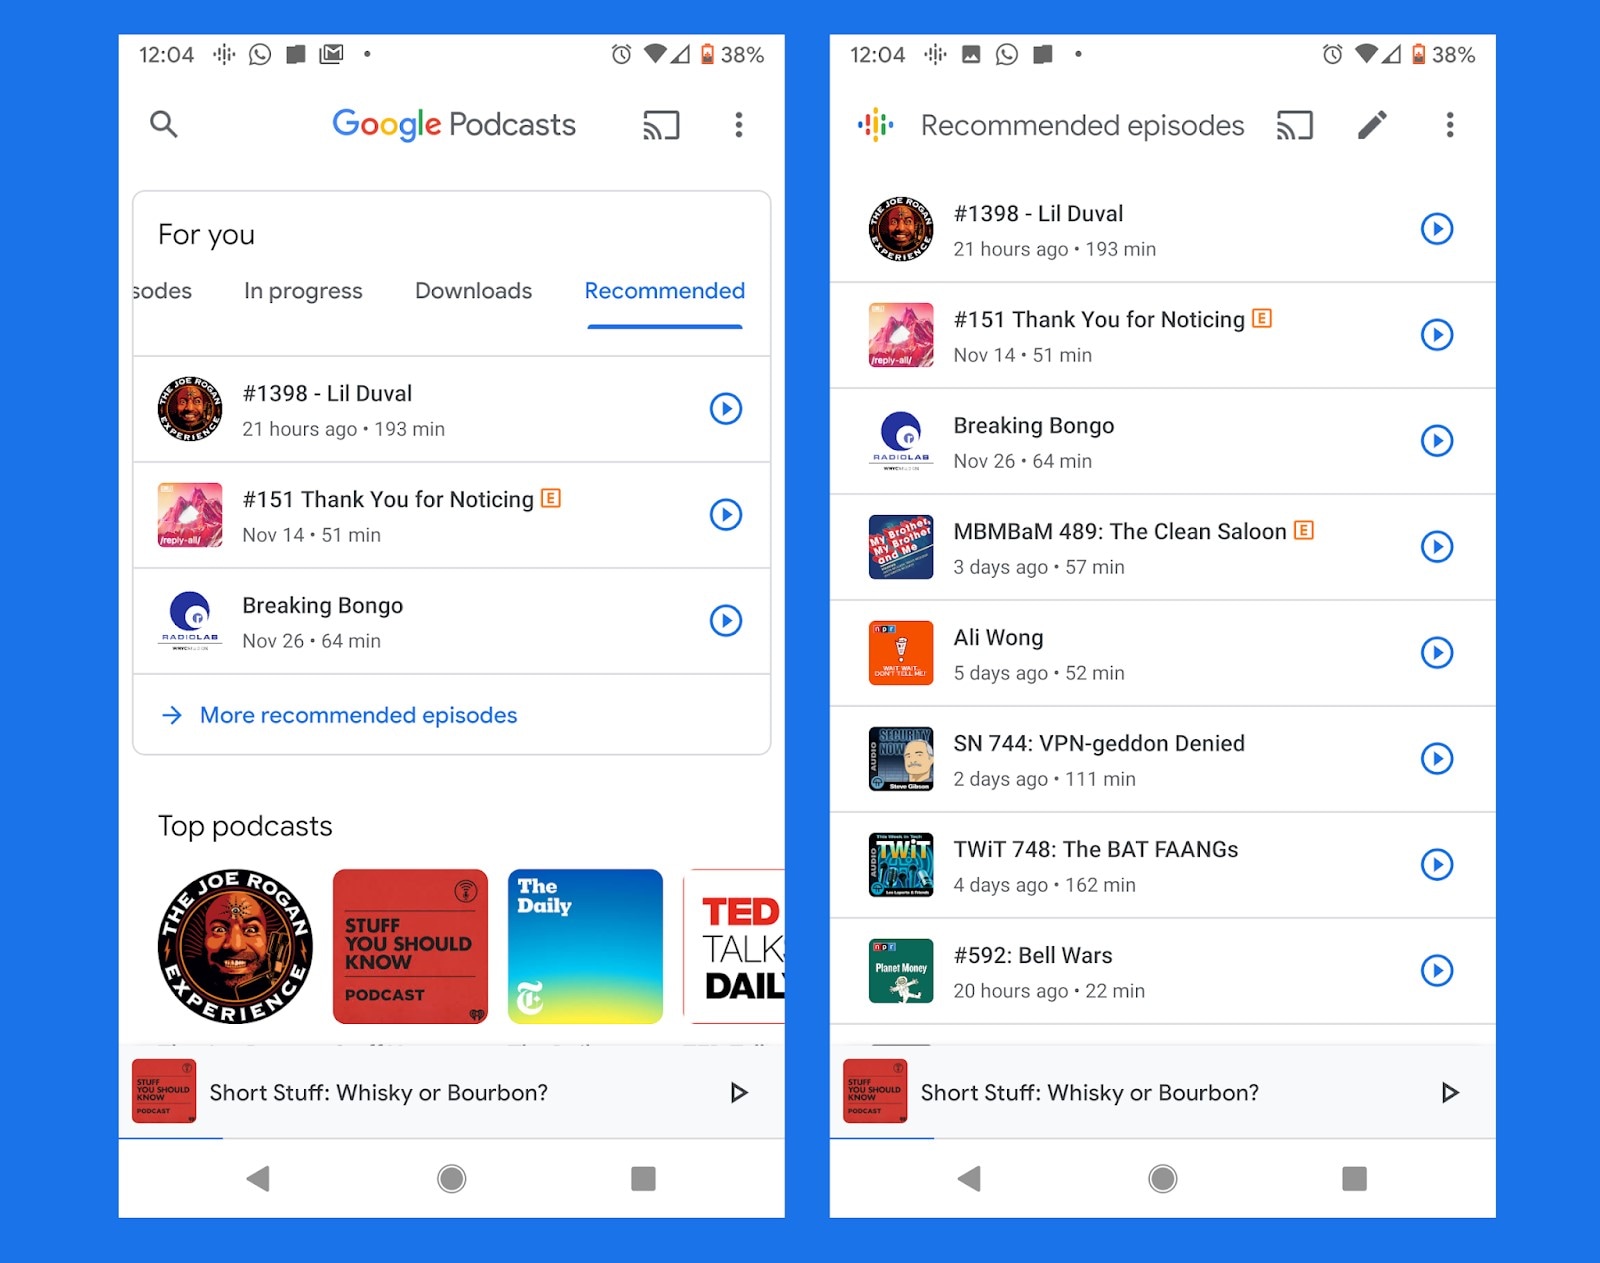
The most significant feature of Google Podcast is its algorithm-based recommendations that connect users with shows that suit their listening habits. As a new user, you might want to explore new topics and taste new concepts, and that’s where Google Podcast will impress you. But even more than that, it will automatically recommend suitable podcasts depending on your interest and previous engagements with the platform.
Google Podcast app covers a plethora of podcasts, so you do not have to switch to other platforms to discover something new or topics you love.
Free and Ad-free Experience
Google Podcast is completely free in a world where podcast platforms demand high charges for an ad-free and high-quality experience. All you need is a Google account to register and listen to anything available on the platform. In addition, podcast creators have to qualify to Google’s standards before submitting the podcast on the forum, ensuring you will listen to the podcast in high quality.
Clean UI
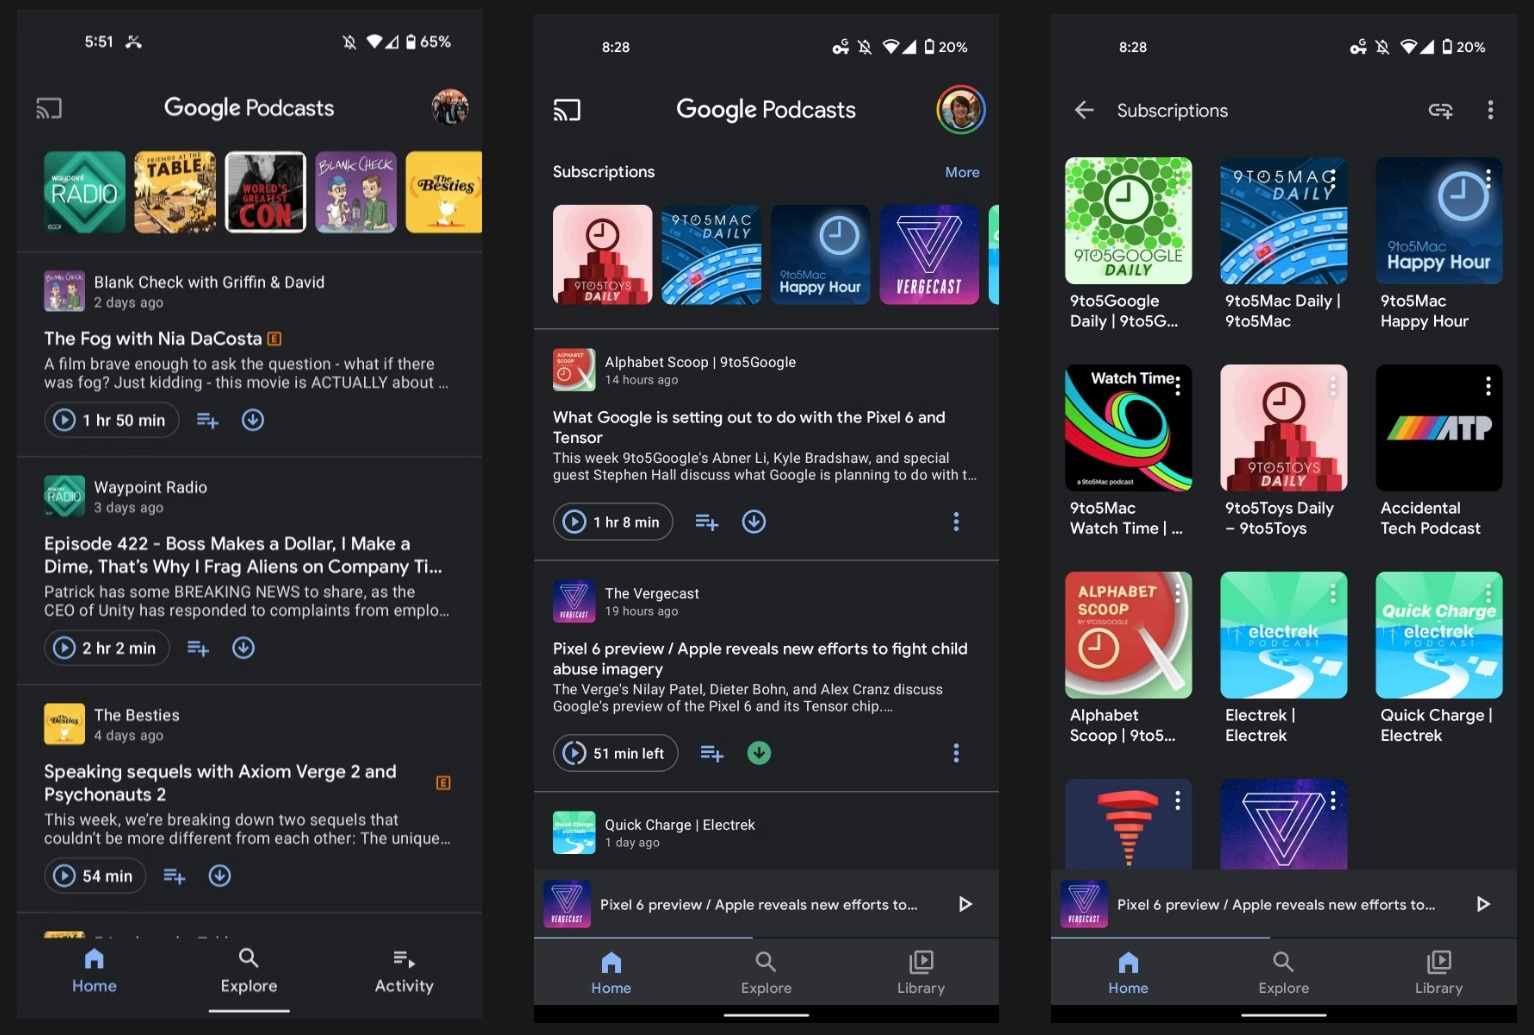
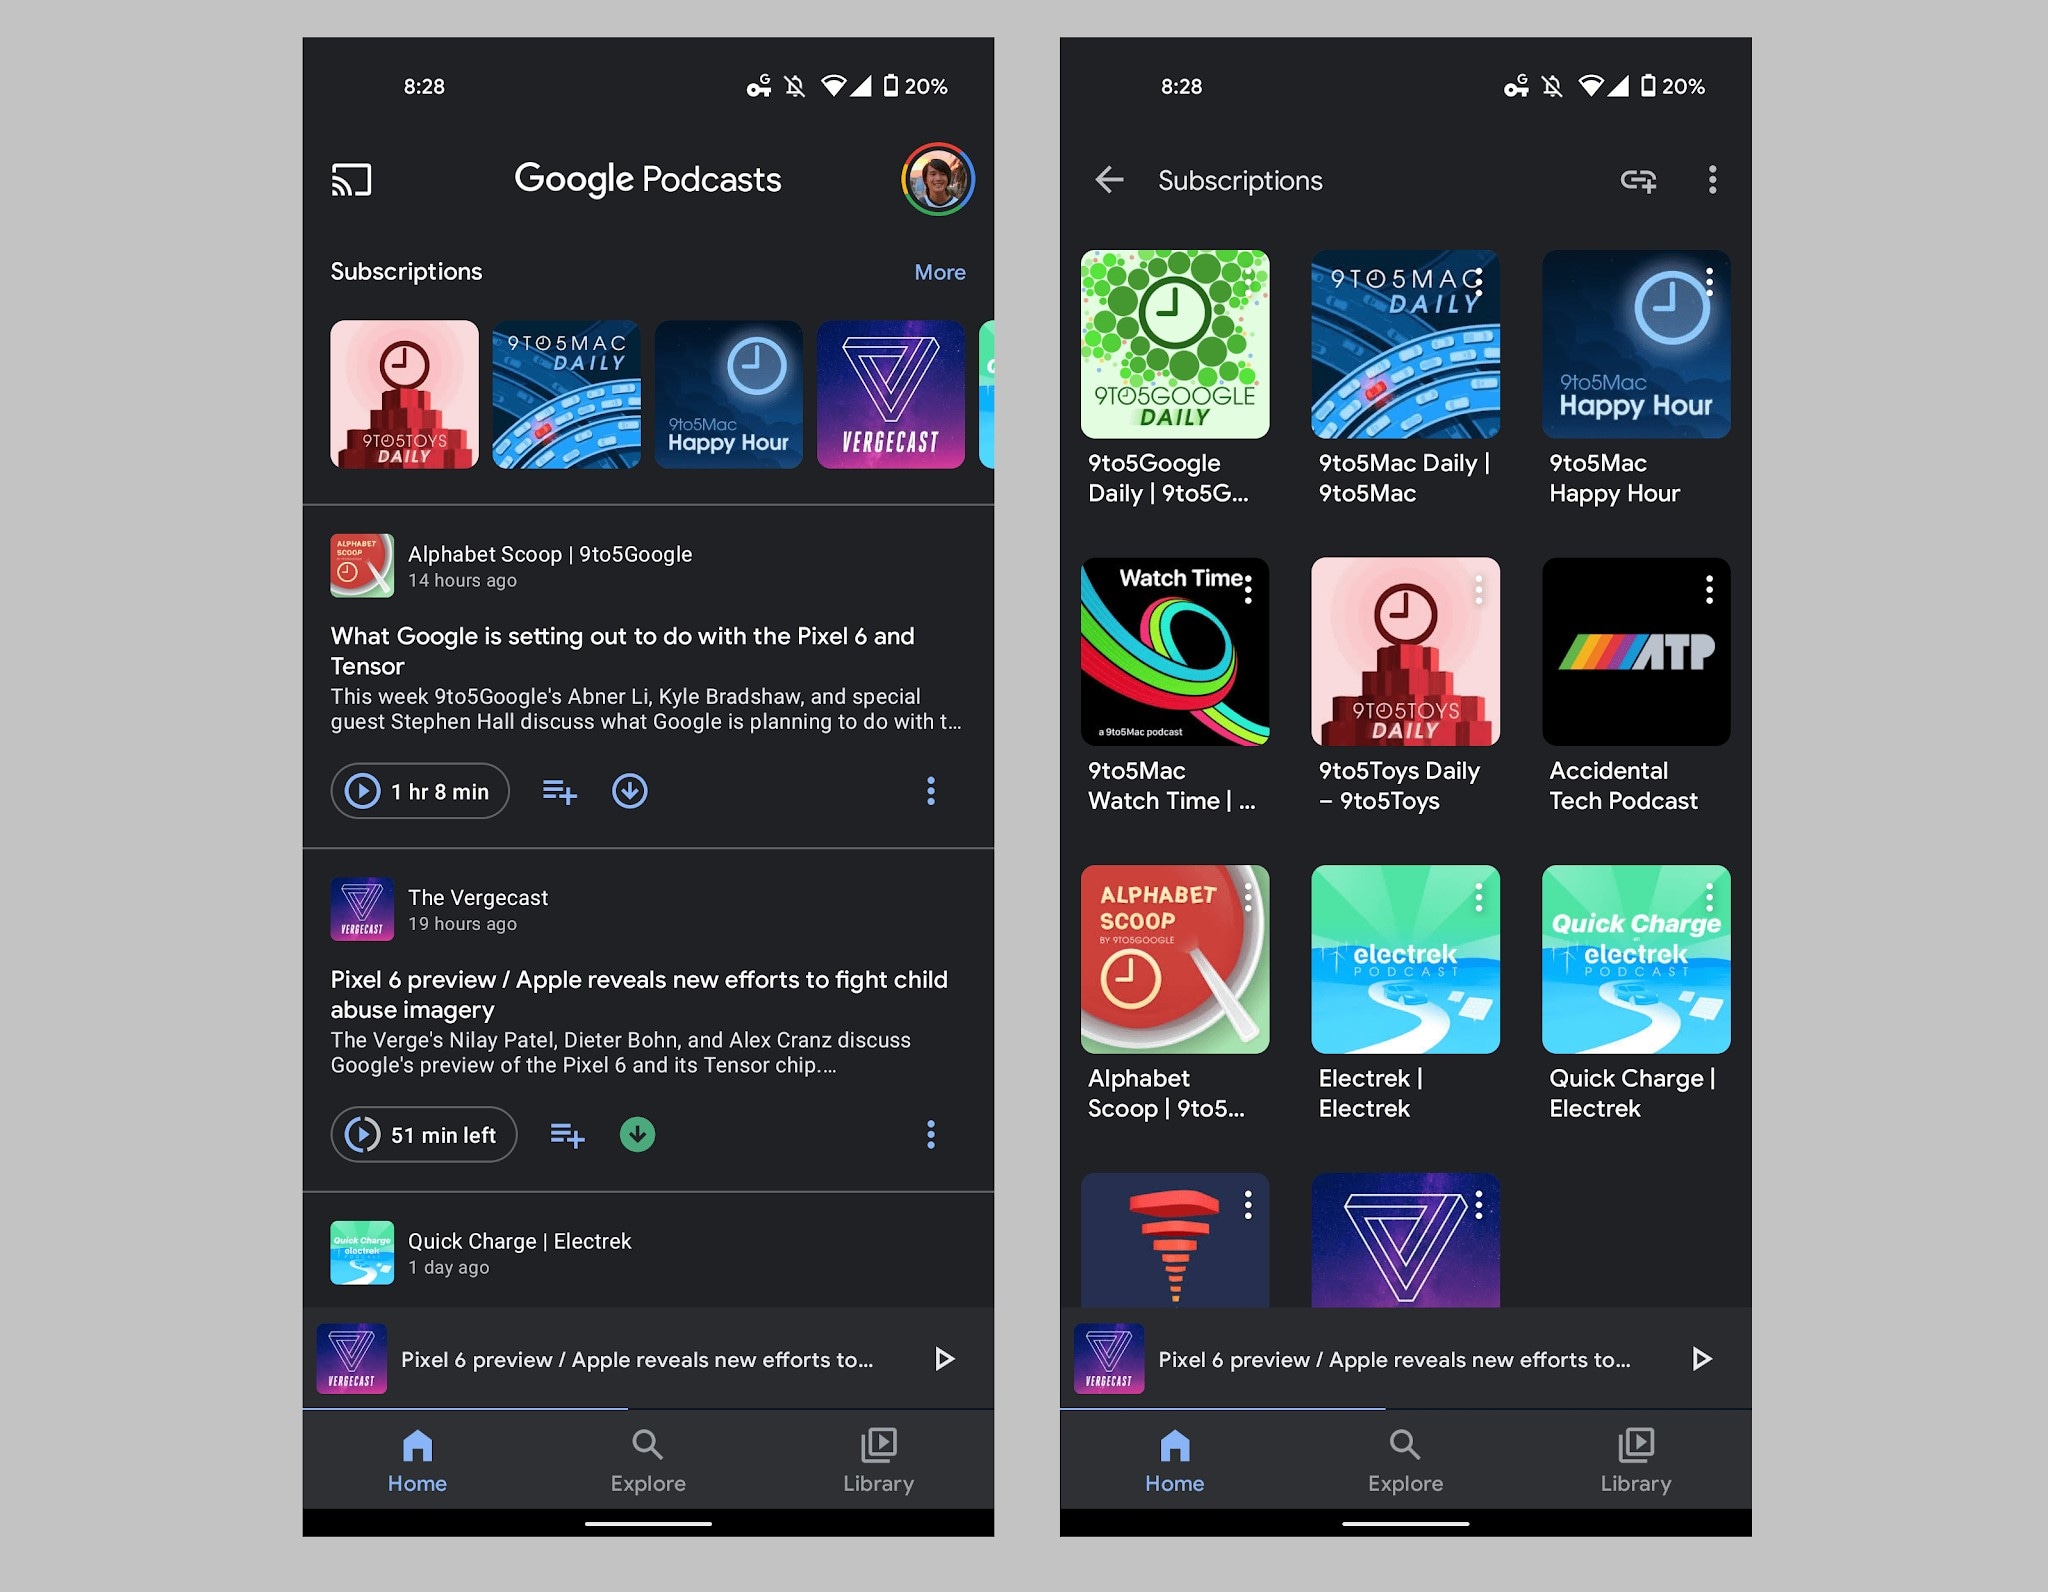
Whether you’ve used a podcast platform before or not, the Google Podcast platform will seem familiar. Once you sign up, the interface will welcome you with podcasts covering all genres arranged neatly in a grid view for convenience.
In line with simplicity, the Settings option in the Google Platform app is as basic as basic gets. Plus, it allows you to conveniently organize your subscriptions and downloads via the Library tab.
One more thing: although Google Podcast is primarily designed for Android users, its counterparts on other OS, like Apple, Web, and macOS, remain simple and easy to use.
Auto-downloads, Sleep Timer, and Seamless Switch Between Devices
Google Podcast automatically downloads the podcasts you love and removes them after you’ve listened to the particular episodes.
Another significant characteristic of the Google Podcast platform is its intuitiveness. For instance, many podcast platforms do not automatically switch to the next episode, but you do not have to worry about such aspects with Google Podcast. You can also put a sleep timer.
Given that it’s available on all primary OS, you can seamlessly switch from one device to another. Not to forget, you can search for the podcasts using Google search or your Voice Assitant.
Part 3: How Does Google Podcast Work?
Now that you know the Google Podcast app and its features, here’s how to use the platform. Assuming you have downloaded the Google Podcast platform on your device and signed in using your Google account, we will now show you how to search and start listening to podcasts on the platform:
Step1 Add Your Favorites
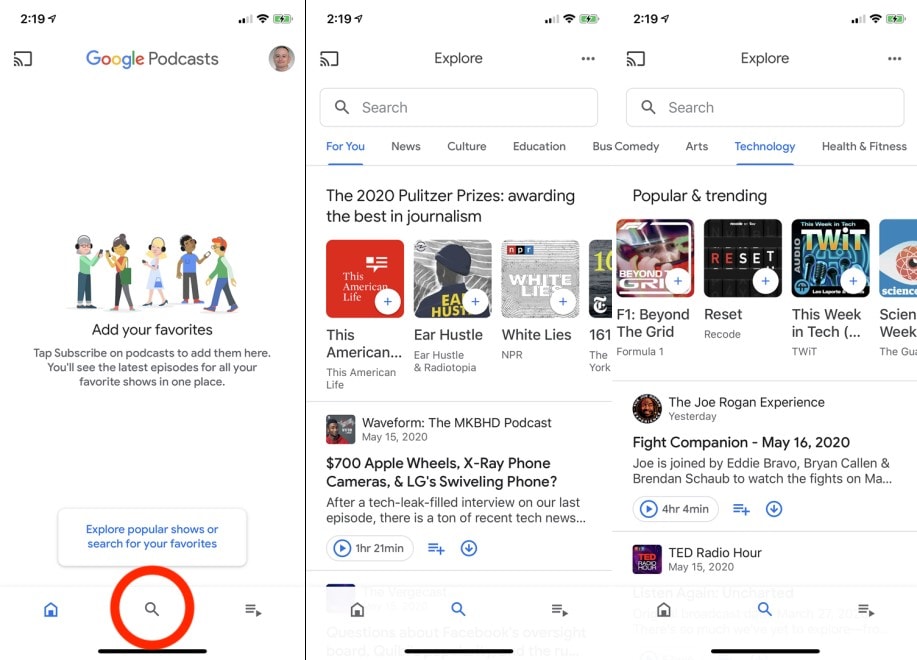
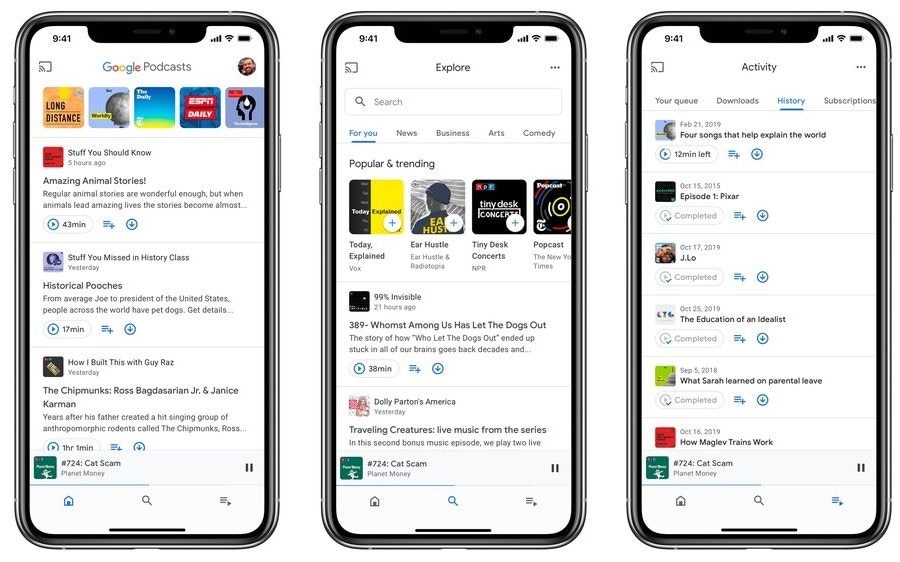
Once you register on the Google Podcast platform, the app will ask you to explore popular shows or search for your favorites. Once you click on the Explore option, a new screen with categories listed will be shown in the top menu, like For You, News, Culture, Education, Comedy, Technology, and more. Tap on the categories to view the features of podcasts in each category.
Step2 Search Podcasts Manually
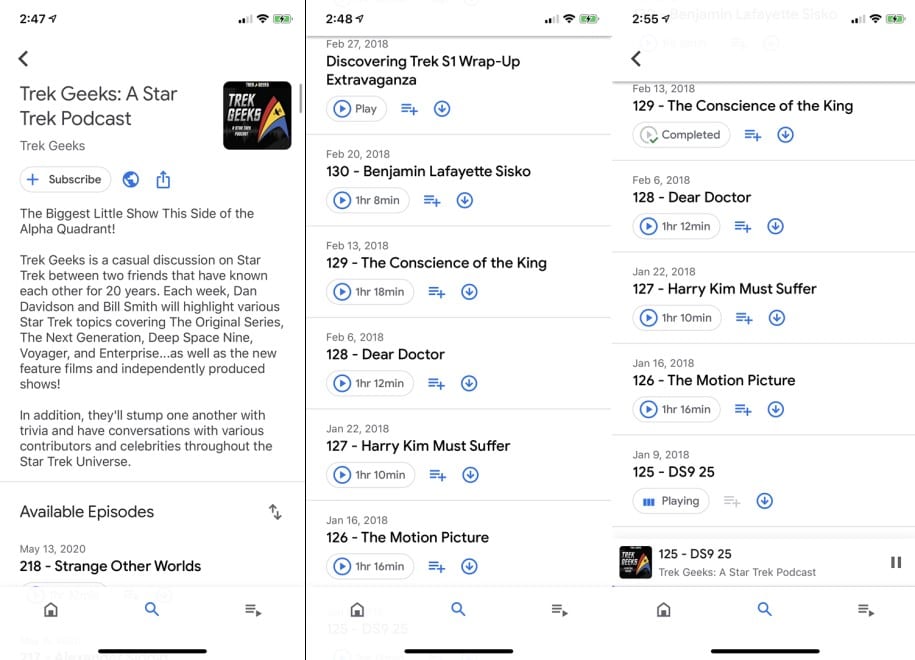
Click on the Search icon and then start typing the name of the podcasts you follow to locate them quickly. Next, tap on the desired podcasts from the search results and scroll down to view individual episodes. Finally, you can click the Subscribe button to follow the channel. The Play icon allows you to listen to the episodes.
Step3 Controls in the Google Podcast app
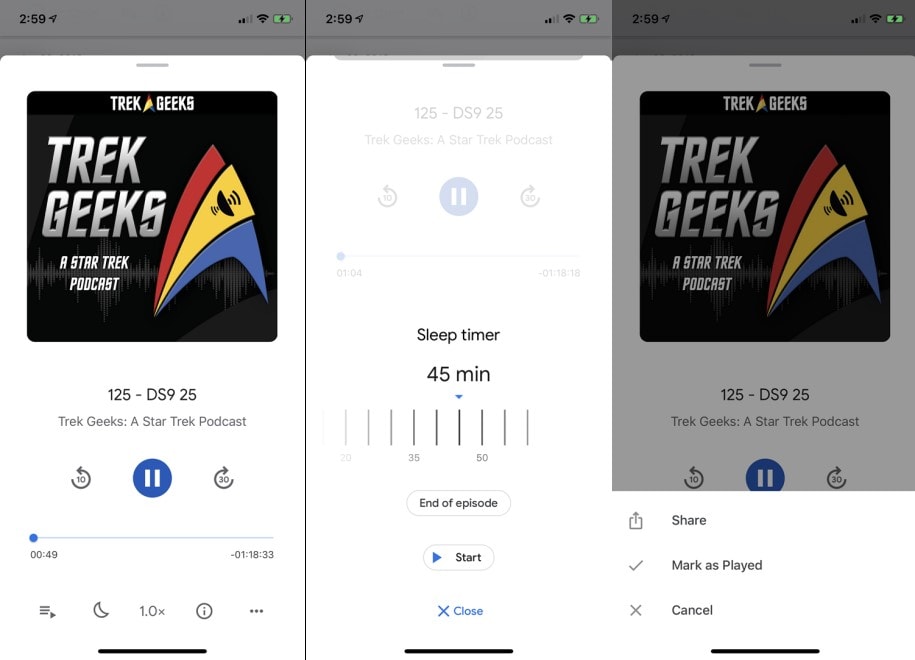
Once you play an episode on the Google Podcast platform, you will be taken to full-view mode. The Pause icon allows you to interrupt the episode. Plus, the 10 seconds rewind button allows you to go back and listen to something again.
Whereas the 30 seconds forward button will enable you to jump 30 seconds ahead in the episode, you can use this icon during the introduction or in-episode ads. The Speed icon lets you change the playback speed from 0.5x to 3x.
The “half-moon” icon allows you to set a sleep timer. And the “Info.” icon allows you to read about the individual podcasts (if published by the creators). The “ellipsis” icon (three dots) enables you to mark the episode as played, so it will not recommend the particular episode again. And the share button allows you to share the episode with others.
Step4 Queues and Downloads menu in the Google Podcast App
Given that the Google Podcast is a free platform, you can download all the episodes and listen to them offline. To download the episodes, click on the Download button. Once downloaded, you can access them via the three-lined icon from the bottom-right of the interface. Within the Library tab, you will also find the History tab, which allows you to access all the episodes you’ve previously listened to.
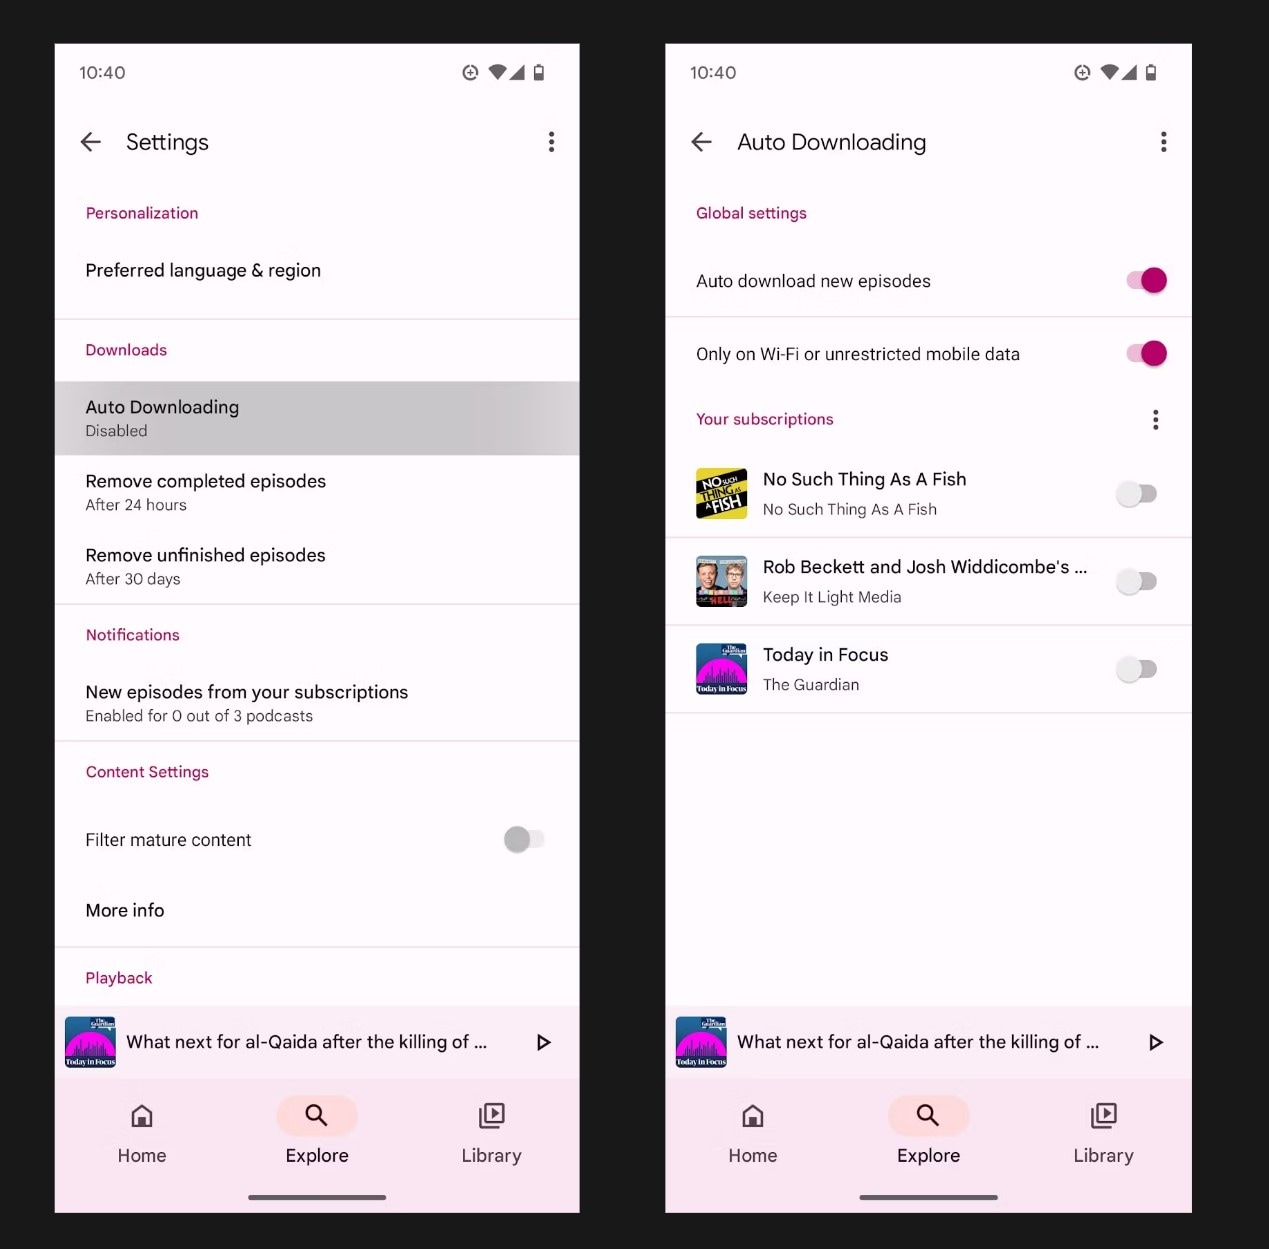
Step5 Settings in the Google Podcast platform
Click on your image at the top-right corner to access the Settings in the Google Podcast app. Under the Google Podcast Settings page, you will find options for Downloads, Notifications, Playback, and more. For instance, Auto-downloads allow you to control the quality of the downloads and when to download (like over mobile data or Wi-Fi).
Plus, you can choose when to auto-delete the episodes, like after a week, and so on. Other options like Playback allow you to decide whether to Auto-play the next episode or not.
Video Tutorial of the Google Podcast App
Here’s a video tutorial 6 Months Later Review Channel: How to Use the New Google Podcasts (2020)
In the video, Josh Teder familiarizes you with Settings, Browse, Library, Subscriptions, and other features of the Google Podcast platform.
Part 4: 10 Popular & Trending Podcasts on Google Podcast App
Now that you have a complete idea about the Google Podcast app, here are some of the best podcasts featured on the platform. Of course, given the popularity of podcasts, the choices are endless. But it is vital to retain that with great options comes great mediocrity.
That is why we asked all our team members to contribute and came up with this short list of best podcasts on the Google Podcast app that covers all genres. So, whether your interests lie in tech, true crime, pop culture, or comedy, you will find something that educates and entertains you.
1. Best Podcast on Art & Culture
Host: Jennifer Dasal
Number of Episodes on ArtCurious: More than 100.
Episodes Duration: 15-25 minutes
Upload Frequency: Weekly

Discussing the unexpected, the slightly odd, and the strangely wonderful in Art History, ArtCurious is nothing like an art class where terminologies are thrown and linear perspective is discussed. Instead, it discusses the juicy stuff!
On ArtCurious, you will find hidden truths about famous artists and creators, like why Van Gogh committed suicide. In addition, you will learn about the strange habits of revolutionary artists. If you are an art enthusiast and want to explore the unseen corners of art history, ArtCurious will fill your thirst.
2. Best Tech Podcasts
Host: Dan Moren and Mikah Sargent + 2 Guests (every week)
Number of Episodes on Clockwise: More than 400.
Episode duration: 30 minutes
Upload Frequency: Weekly

Dan Moren and Mikah Sargent invite two guests each week to discuss tech-related topics to inform, educate, and make aware of the not-so-tech generation. If you struggle with technology, like creating a good password, optimizing screen time, etc. Also, Clockwise is one podcast that can be the cure. It is important to note that Clockwise does not necessarily discuss heavy-tech stuff; instead, it is intended for the tech illiterates to make their life easier.
3. Best Talkshow and Interview Podcasts
Host: Terry Gross
Number of Episodes on Fresh Air: Daily since 1993.
Episodes duration: 45 minutes
Upload Frequency: Daily
Terry Gross, a famed-journalists and talk show host since the 90s, continues to feature weekly episodes covering present-day musicians, actors, producers, athletes, and artists.
On Fresh Air, you will discover exciting stuff about celebrities and find answers like how fame is a challenge in the social sphere and many more unusual things that you won’t find on any other talk show. Terry Gross interviews a single guest for about 45 minutes daily and indulges audiences with what’s happening worldwide.
4. Best Health Podcast
Host: Andrew Huberman
Number of Episodes on Fresh Air: More than 100.
Episode duration: 2 hours to 4 hours.
Upload Frequency: Weekly

Andrew Huberman, Professor of Neurobiology and Ophthalmology at Stanford School of Medicine, discusses the brain and its connection with body control. The episodes of Huberman Lab are long, ranging from 2 to 4 hours. So, if you want to change your habits and learn about nutrition, how to sleep, and more, Huberman Lab is the perfect addition to your Monday schedule.
5. Best History Podcast
The Bowery Boys New York City History
Host: Tom Meyers, Greg Young
Number of Episodes on Fresh Air: More than 400.
Episode duration: 1 to 2 hours.
Upload Frequency: 15 days.

American history is deeply rooted in the streets of New York City. The Underground Railroad, the elevated railroad, and the Hudson River: Host Tom Meyers and Greg Young discuss the 400 years of History of New York City. It discusses the famous leaders, the strange, and the myths created over the years and presents these stories via action-packed episodes.
6. Best Informative Podcast
Host: Stephen J. Dubner
Number of Episodes on Fresh Air: More than 500.
Episode duration: 30 to 60 minutes.
Upload Frequency: Weekly

Hosted by Dr. Stephen J. Dubner, Freakonomics Radio reveals the hidden sides of things. The things you think you know or you think you do not have to know, Freakonomics Radio will introduce topics that are typical for you and tell interesting stuff that amazes you.
It also informs you about things you might ignore and makes you more aware of everything. The best thing is Dubner invites Nobel laureates and provocateurs, intellectuals and entrepreneurs, and even underachievers to learn about things from all perspectives.
7. Best News & Politics Podcast
Host: Nate Silver
Number of Episodes on Fresh Air: More than 500.
Episode duration: 30 to 60 minutes.
Upload Frequency: Weekly

A subsidiary of ABC News, FiveThirtyEight Politics uses data and evidence-based knowledge to inform, educate, and make people aware of the current political situation across the 50 States. It’s suitable for anyone interested in knowing the truth of today’s American politics and the difference between the real truth and the created truth.
8. Best Sports Podcasts
Host: Bill Simmons
Number of Episodes on Fresh Air: More than 100.
Episode duration: 30 to 60 minutes.
Upload Frequency: Monthly
30 for 30 comes from the acclaimed makers of the 30-for-30 film series. Like documentaries, the 30 for 30 podcasts discuss sports legends, their stories, and unheard things about them. Beyond being informative, 30 for 30 also teaches you to explore sports and adventures. Even if you do not like sports or are not a football fan, you will surely enjoy tuning in to 30 for 30 episodes and getting lost in the busy lives of the sports legends.
9. Miscellaneous Podcasts
Host: Dan Schreiber, James Harkin, Andrew Hunter Murray, and Anna Ptaszynski.
Number of Episodes on Fresh Air: More than 400.
Episode duration: 1 hour.
Upload Frequency: Weekly

An award-winning podcast, No Such Thing As a Fish, comes from QI Offices and is about fun topics or something the creators have recently discovered. If you are looking for something fun yet interesting that informs and educates you, No Such Thing As a Fish is a perfect weekly podcast. The episodes are brief yet action-packed. And you will learn just about anything, from gorillas to caterpillars, on the podcast.
10. Movies, Music, and TV Podcasts
Host: Eric Molinsky
Number of Episodes on Fresh Air: More than 400.
Episode duration: 40 minutes.
Upload Frequency: Bi-weekly.

A podcast on science fiction, fantasy, and other genres, Eric Molinsky on Imaginary Worlds invite comic book artists, game designers, novelists, screenwriters, and filmmakers to discuss their crafts. Imaginary Worlds is just about what it sounds like, i.e., creating fictional worlds.
However, instead of just informing, it also guides artists and writers on how to form an imaginary world. A bi-weekly podcast, Imaginary Worlds is perfect for anyone interested in exploring new possibilities and imagining via different lenses.
Part 5: How to Record Your Podcast Show for Google Podcast App?
Google Podcast platform also allows individual creators to upload their podcasts to the platform and share it with the world. Given its popularity and user base, it’s one of the best ways to rise in the podcast realm and get that edge over others.
So, if you are interested in creating podcasts, here’s how to get started. For recording a podcast, you will have to use a third-party tool like Wondershare Filmora. Unlike Apple Podcasts, Google Podcasts does not provide a web studio to create a podcast on the platform.
Google Podcast is a podcasting directory; it does not store any audio files. Instead:
- It would help if you created the podcast somewhere else, like using Wondershare Filmora for recording.
- Upload it or store it in another location, like a Website. Or you can create a podcast-only RSS feed.
- And then submit the RSS feed to the Google Podcast Manager.
So, let’s first learn how to record podcasts using Wondershare Filmora.
Free Download For Win 7 or later(64-bit)
Free Download For macOS 10.14 or later
Wondershare’s Filmora is one of the best platforms to seamlessly record audio and video podcasts. Its straightforward and self-explanatory user interface allows even novices to record podcasts without going through any learning curve.
Besides recording, Filmora also allows you to edit audio and video. For instance, you will find dedicated toggles to limit background interferences, enhance microphone sound, fade in/out effects, and give access to several such features to create podcasts like a professional. You can also export the audio in the format that Google Podcast requires, like M4A, MP3, OGG, and WAV.
Key Features of Wondershare Filmora
- AI-based Silence Detection: remove moments of silence from the podcast with one click.
- Text to speech: transcript your text files into speech for the podcast.
- Speech to Text: transcribe their voice to subtitles in several languages. It increases accessibility, and users worldwide can understand your podcast seamlessly.
- Audio Ducking: Add background music to your podcast and manage the sound levels to create podcasts like professionals.
- Audio Visualizer: enhance your podcast episodes through audio-visualizing effects.
Here’s How to Create Your Own Podcast Using Wondershare Filmora?
Step1 Create a New Project
- Download the Filmora application.
- Choose to Create a New Project from the main interface.
- Import an image or stock footage from the library. (You can later download the podcast in audio format).
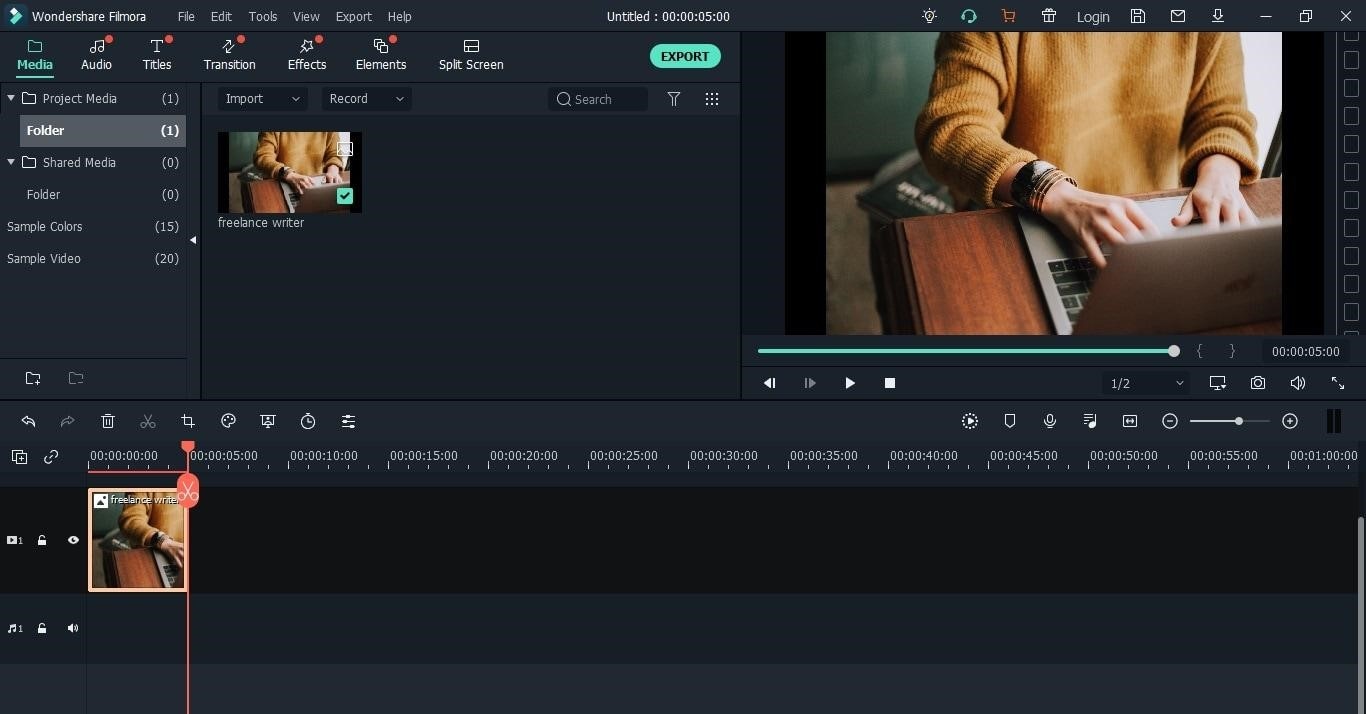
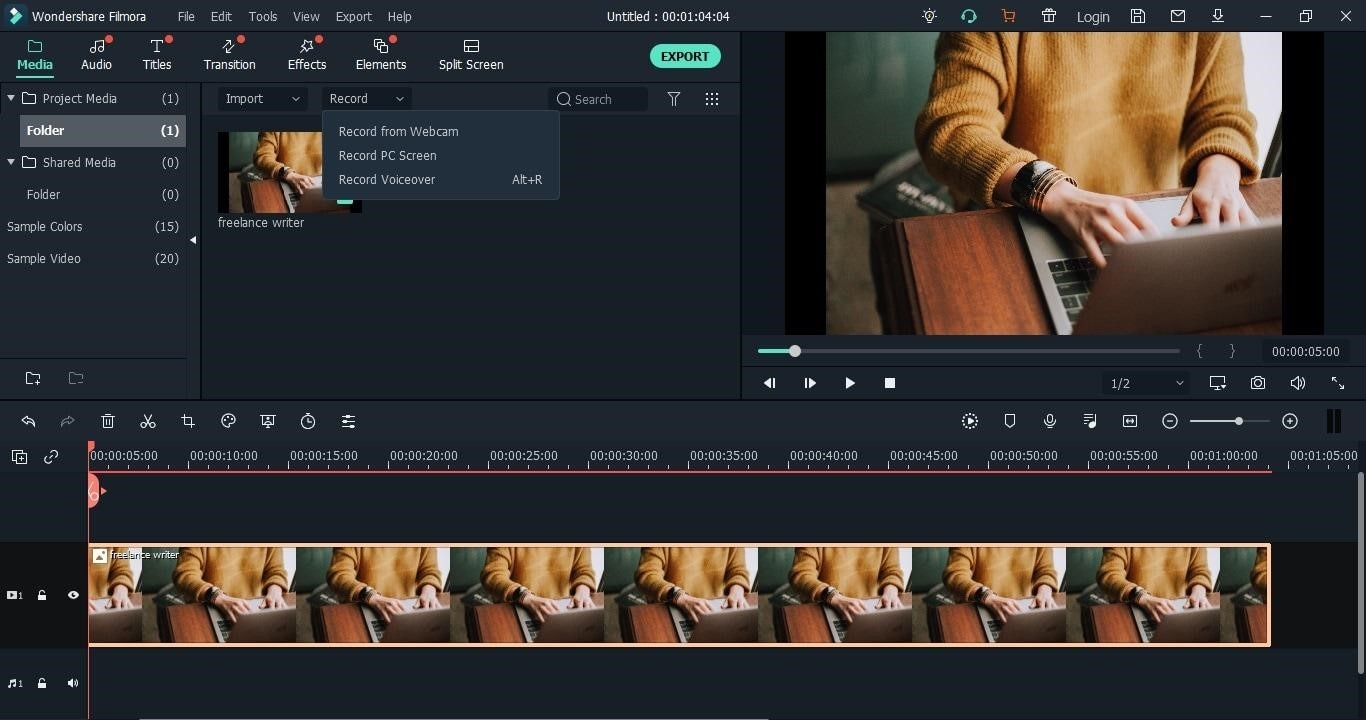
Step2 Start Recording
- Drag the media into the timeline and click the Record button to start recording.
- Click on Record Voiceover from the options.
Step3 Set Microphone
- Connect your Microphone to the computer.
- Select the Microphone device.
- And click on the Red dot button to confirm the Voiceover recording.
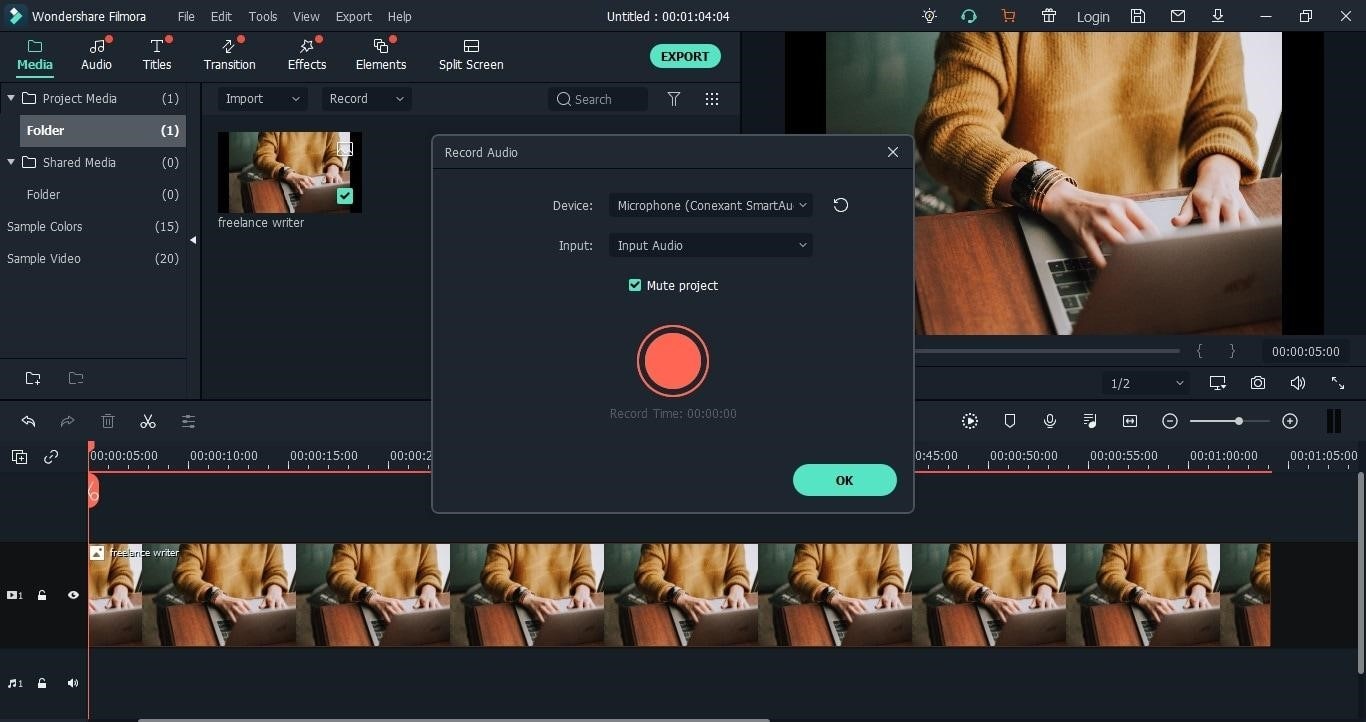
Step4 Record the Podcast
- Click on OK to proceed to record the podcast.
- Go through the outline you’ve prepared and discuss the topics for the podcast episode.

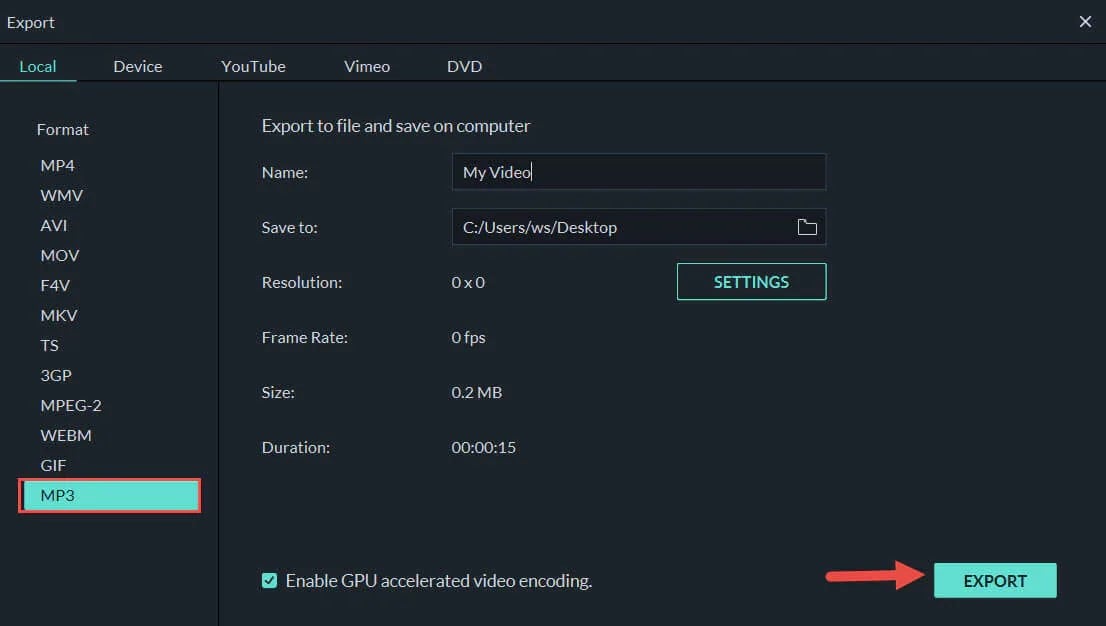
Step5 Export audio
Click on the Export button to download your project from Wondershare Filmora.
Now that you’ve recorded the podcast episode, you must create your podcast’s RSS feed. And submit the podcast RSS feed to Google Podcast Manager.
Hot FAQs on the Google Podcast App
1. Is Google Play the same as Google Podcast?
Earlier, Google featured podcasts on the Google Play platform (hence the name, Google Play Podcast). However, today Google Play does not feature any podcasts. So, you will have to choose Google Podcast
2. Where did Google Music Podcasts go?
Google shut down Google Music on February 24, 2021. However, it allowed users to move their podcasts and music files from Google Music to YouTube before that date. So, there’s a good chance you can find the earlier podcasts available on Google Music on YouTube.
3. Is Google Podcasts Ad-free?
Yes. Google Podcast app is entirely ad-free, and there is no subscription either. So you might see in-episode promotions that individual creators present, but there are no ads in the Google Podcast app.
Final Words
Hopefully, you now know the Google Podcast app and what you will find on the Google Podcast platform. As promised, we have also shown you how to use the Google Podcast app. Retain that you can use the Google Podcast app on all primary OS, including Apple and Android devices. The podcast recommendations in this guide are written to inform users about the great shows that resonate with them.
Another significant aspect of this guide on the Google Podcast app is creating your podcast and submitting it to the platform. Google Podcast, a directory, requires you to create your own podcast and submit the podcasts via RSS feeds. So, even if you want to make your podcast, you can use tools like Filmora and then publish it on Google Podcast to share it with the world.
Part 1. What is Google Podcast App?
Google Podcast (formerly Google Play Podcast) is Google’s proprietary podcast-listening app. It comes pre-installed on some Android smartphones and all Pixel editions. Even Apple users can install Google Podcasts via the App Store. It’s free and lets you discover, stream, and download podcasts.
Google Podcast has already hit 100 million downloads, an indication of its rising popularity both among content creators and users. Users prefer it for its navigable, search-aligned, minimalist interface. And prominent podcast creators are focusing on the app to make their episodes accessible to millions of Android users.
Part 2: Google Podcasts Features
Compatible with Android, iOS, macOS, Windows, Blackberry, and ChromeOS, Google Podcast is relatively a novice compared to dedicated podcast services. Still, Google Podcast seamlessly incorporates nearly every feature one needs to listen to podcasts.
Search and Personalized Recommendations
The most significant feature of Google Podcast is its algorithm-based recommendations that connect users with shows that suit their listening habits. As a new user, you might want to explore new topics and taste new concepts, and that’s where Google Podcast will impress you. But even more than that, it will automatically recommend suitable podcasts depending on your interest and previous engagements with the platform.
Google Podcast app covers a plethora of podcasts, so you do not have to switch to other platforms to discover something new or topics you love.
Free and Ad-free Experience
Google Podcast is completely free in a world where podcast platforms demand high charges for an ad-free and high-quality experience. All you need is a Google account to register and listen to anything available on the platform. In addition, podcast creators have to qualify to Google’s standards before submitting the podcast on the forum, ensuring you will listen to the podcast in high quality.
Clean UI
Whether you’ve used a podcast platform before or not, the Google Podcast platform will seem familiar. Once you sign up, the interface will welcome you with podcasts covering all genres arranged neatly in a grid view for convenience.
In line with simplicity, the Settings option in the Google Platform app is as basic as basic gets. Plus, it allows you to conveniently organize your subscriptions and downloads via the Library tab.
One more thing: although Google Podcast is primarily designed for Android users, its counterparts on other OS, like Apple, Web, and macOS, remain simple and easy to use.
Auto-downloads, Sleep Timer, and Seamless Switch Between Devices
Google Podcast automatically downloads the podcasts you love and removes them after you’ve listened to the particular episodes.
Another significant characteristic of the Google Podcast platform is its intuitiveness. For instance, many podcast platforms do not automatically switch to the next episode, but you do not have to worry about such aspects with Google Podcast. You can also put a sleep timer.
Given that it’s available on all primary OS, you can seamlessly switch from one device to another. Not to forget, you can search for the podcasts using Google search or your Voice Assitant.
Part 3: How Does Google Podcast Work?
Now that you know the Google Podcast app and its features, here’s how to use the platform. Assuming you have downloaded the Google Podcast platform on your device and signed in using your Google account, we will now show you how to search and start listening to podcasts on the platform:
Step1 Add Your Favorites
Once you register on the Google Podcast platform, the app will ask you to explore popular shows or search for your favorites. Once you click on the Explore option, a new screen with categories listed will be shown in the top menu, like For You, News, Culture, Education, Comedy, Technology, and more. Tap on the categories to view the features of podcasts in each category.
Step2 Search Podcasts Manually
Click on the Search icon and then start typing the name of the podcasts you follow to locate them quickly. Next, tap on the desired podcasts from the search results and scroll down to view individual episodes. Finally, you can click the Subscribe button to follow the channel. The Play icon allows you to listen to the episodes.
Step3 Controls in the Google Podcast app
Once you play an episode on the Google Podcast platform, you will be taken to full-view mode. The Pause icon allows you to interrupt the episode. Plus, the 10 seconds rewind button allows you to go back and listen to something again.
Whereas the 30 seconds forward button will enable you to jump 30 seconds ahead in the episode, you can use this icon during the introduction or in-episode ads. The Speed icon lets you change the playback speed from 0.5x to 3x.
The “half-moon” icon allows you to set a sleep timer. And the “Info.” icon allows you to read about the individual podcasts (if published by the creators). The “ellipsis” icon (three dots) enables you to mark the episode as played, so it will not recommend the particular episode again. And the share button allows you to share the episode with others.
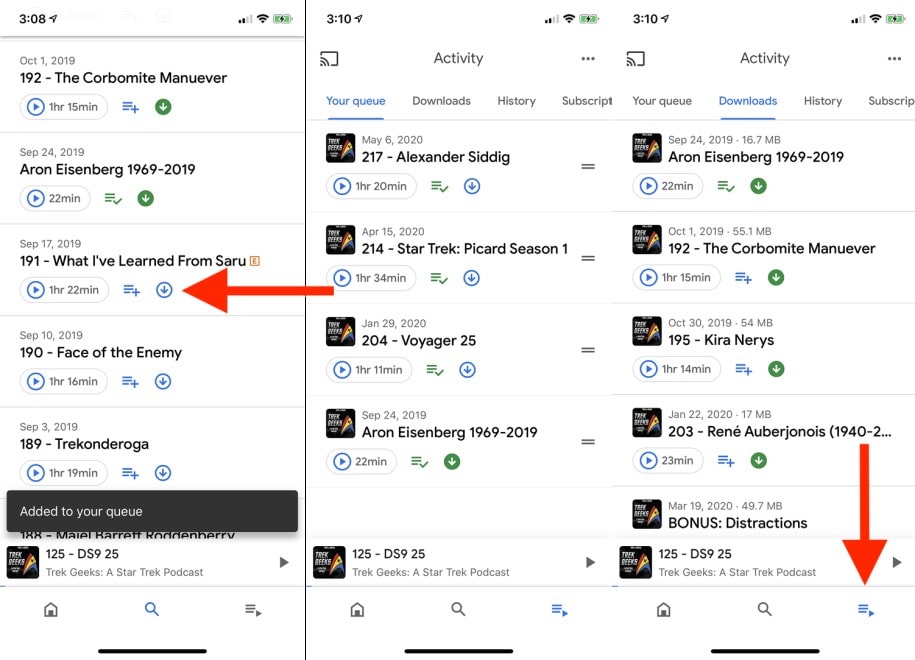
Step4 Queues and Downloads menu in the Google Podcast App
Given that the Google Podcast is a free platform, you can download all the episodes and listen to them offline. To download the episodes, click on the Download button. Once downloaded, you can access them via the three-lined icon from the bottom-right of the interface. Within the Library tab, you will also find the History tab, which allows you to access all the episodes you’ve previously listened to.
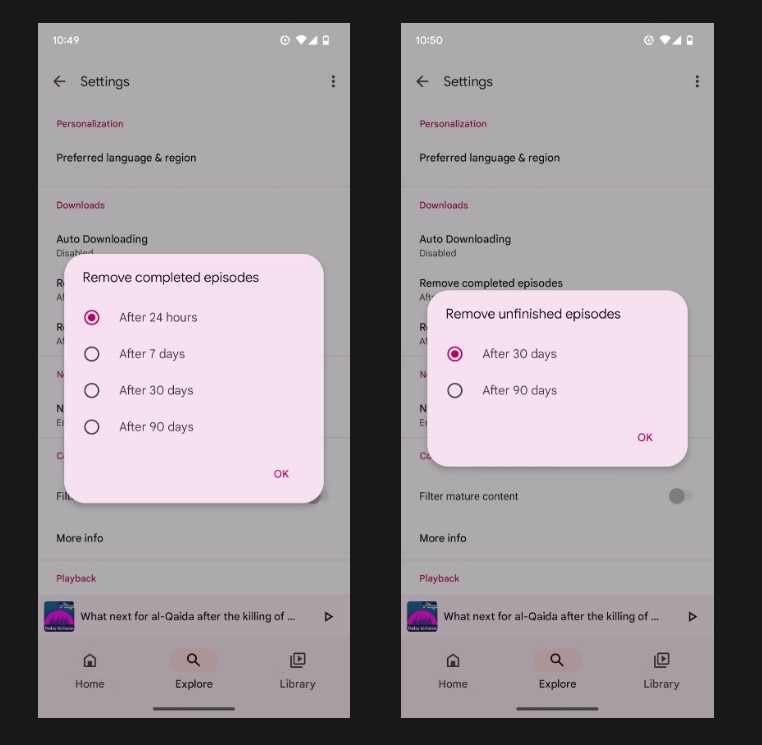
Step5 Settings in the Google Podcast platform
Click on your image at the top-right corner to access the Settings in the Google Podcast app. Under the Google Podcast Settings page, you will find options for Downloads, Notifications, Playback, and more. For instance, Auto-downloads allow you to control the quality of the downloads and when to download (like over mobile data or Wi-Fi).
Plus, you can choose when to auto-delete the episodes, like after a week, and so on. Other options like Playback allow you to decide whether to Auto-play the next episode or not.
Video Tutorial of the Google Podcast App
Here’s a video tutorial 6 Months Later Review Channel: How to Use the New Google Podcasts (2020)
In the video, Josh Teder familiarizes you with Settings, Browse, Library, Subscriptions, and other features of the Google Podcast platform.
Part 4: 10 Popular & Trending Podcasts on Google Podcast App
Now that you have a complete idea about the Google Podcast app, here are some of the best podcasts featured on the platform. Of course, given the popularity of podcasts, the choices are endless. But it is vital to retain that with great options comes great mediocrity.
That is why we asked all our team members to contribute and came up with this short list of best podcasts on the Google Podcast app that covers all genres. So, whether your interests lie in tech, true crime, pop culture, or comedy, you will find something that educates and entertains you.
1. Best Podcast on Art & Culture
Host: Jennifer Dasal
Number of Episodes on ArtCurious: More than 100.
Episodes Duration: 15-25 minutes
Upload Frequency: Weekly
Discussing the unexpected, the slightly odd, and the strangely wonderful in Art History, ArtCurious is nothing like an art class where terminologies are thrown and linear perspective is discussed. Instead, it discusses the juicy stuff!
On ArtCurious, you will find hidden truths about famous artists and creators, like why Van Gogh committed suicide. In addition, you will learn about the strange habits of revolutionary artists. If you are an art enthusiast and want to explore the unseen corners of art history, ArtCurious will fill your thirst.
2. Best Tech Podcasts
Host: Dan Moren and Mikah Sargent + 2 Guests (every week)
Number of Episodes on Clockwise: More than 400.
Episode duration: 30 minutes
Upload Frequency: Weekly
Dan Moren and Mikah Sargent invite two guests each week to discuss tech-related topics to inform, educate, and make aware of the not-so-tech generation. If you struggle with technology, like creating a good password, optimizing screen time, etc. Also, Clockwise is one podcast that can be the cure. It is important to note that Clockwise does not necessarily discuss heavy-tech stuff; instead, it is intended for the tech illiterates to make their life easier.
3. Best Talkshow and Interview Podcasts
Host: Terry Gross
Number of Episodes on Fresh Air: Daily since 1993.
Episodes duration: 45 minutes
Upload Frequency: Daily
Terry Gross, a famed-journalists and talk show host since the 90s, continues to feature weekly episodes covering present-day musicians, actors, producers, athletes, and artists.
On Fresh Air, you will discover exciting stuff about celebrities and find answers like how fame is a challenge in the social sphere and many more unusual things that you won’t find on any other talk show. Terry Gross interviews a single guest for about 45 minutes daily and indulges audiences with what’s happening worldwide.
4. Best Health Podcast
Host: Andrew Huberman
Number of Episodes on Fresh Air: More than 100.
Episode duration: 2 hours to 4 hours.
Upload Frequency: Weekly
Andrew Huberman, Professor of Neurobiology and Ophthalmology at Stanford School of Medicine, discusses the brain and its connection with body control. The episodes of Huberman Lab are long, ranging from 2 to 4 hours. So, if you want to change your habits and learn about nutrition, how to sleep, and more, Huberman Lab is the perfect addition to your Monday schedule.
5. Best History Podcast
The Bowery Boys New York City History
Host: Tom Meyers, Greg Young
Number of Episodes on Fresh Air: More than 400.
Episode duration: 1 to 2 hours.
Upload Frequency: 15 days.
American history is deeply rooted in the streets of New York City. The Underground Railroad, the elevated railroad, and the Hudson River: Host Tom Meyers and Greg Young discuss the 400 years of History of New York City. It discusses the famous leaders, the strange, and the myths created over the years and presents these stories via action-packed episodes.
6. Best Informative Podcast
Host: Stephen J. Dubner
Number of Episodes on Fresh Air: More than 500.
Episode duration: 30 to 60 minutes.
Upload Frequency: Weekly
Hosted by Dr. Stephen J. Dubner, Freakonomics Radio reveals the hidden sides of things. The things you think you know or you think you do not have to know, Freakonomics Radio will introduce topics that are typical for you and tell interesting stuff that amazes you.
It also informs you about things you might ignore and makes you more aware of everything. The best thing is Dubner invites Nobel laureates and provocateurs, intellectuals and entrepreneurs, and even underachievers to learn about things from all perspectives.
7. Best News & Politics Podcast
Host: Nate Silver
Number of Episodes on Fresh Air: More than 500.
Episode duration: 30 to 60 minutes.
Upload Frequency: Weekly
A subsidiary of ABC News, FiveThirtyEight Politics uses data and evidence-based knowledge to inform, educate, and make people aware of the current political situation across the 50 States. It’s suitable for anyone interested in knowing the truth of today’s American politics and the difference between the real truth and the created truth.
8. Best Sports Podcasts
Host: Bill Simmons
Number of Episodes on Fresh Air: More than 100.
Episode duration: 30 to 60 minutes.
Upload Frequency: Monthly
30 for 30 comes from the acclaimed makers of the 30-for-30 film series. Like documentaries, the 30 for 30 podcasts discuss sports legends, their stories, and unheard things about them. Beyond being informative, 30 for 30 also teaches you to explore sports and adventures. Even if you do not like sports or are not a football fan, you will surely enjoy tuning in to 30 for 30 episodes and getting lost in the busy lives of the sports legends.
9. Miscellaneous Podcasts
Host: Dan Schreiber, James Harkin, Andrew Hunter Murray, and Anna Ptaszynski.
Number of Episodes on Fresh Air: More than 400.
Episode duration: 1 hour.
Upload Frequency: Weekly
An award-winning podcast, No Such Thing As a Fish, comes from QI Offices and is about fun topics or something the creators have recently discovered. If you are looking for something fun yet interesting that informs and educates you, No Such Thing As a Fish is a perfect weekly podcast. The episodes are brief yet action-packed. And you will learn just about anything, from gorillas to caterpillars, on the podcast.
10. Movies, Music, and TV Podcasts
Host: Eric Molinsky
Number of Episodes on Fresh Air: More than 400.
Episode duration: 40 minutes.
Upload Frequency: Bi-weekly.
A podcast on science fiction, fantasy, and other genres, Eric Molinsky on Imaginary Worlds invite comic book artists, game designers, novelists, screenwriters, and filmmakers to discuss their crafts. Imaginary Worlds is just about what it sounds like, i.e., creating fictional worlds.
However, instead of just informing, it also guides artists and writers on how to form an imaginary world. A bi-weekly podcast, Imaginary Worlds is perfect for anyone interested in exploring new possibilities and imagining via different lenses.
Part 5: How to Record Your Podcast Show for Google Podcast App?
Google Podcast platform also allows individual creators to upload their podcasts to the platform and share it with the world. Given its popularity and user base, it’s one of the best ways to rise in the podcast realm and get that edge over others.
So, if you are interested in creating podcasts, here’s how to get started. For recording a podcast, you will have to use a third-party tool like Wondershare Filmora. Unlike Apple Podcasts, Google Podcasts does not provide a web studio to create a podcast on the platform.
Google Podcast is a podcasting directory; it does not store any audio files. Instead:
- It would help if you created the podcast somewhere else, like using Wondershare Filmora for recording.
- Upload it or store it in another location, like a Website. Or you can create a podcast-only RSS feed.
- And then submit the RSS feed to the Google Podcast Manager.
So, let’s first learn how to record podcasts using Wondershare Filmora.
Free Download For Win 7 or later(64-bit)
Free Download For macOS 10.14 or later
Wondershare’s Filmora is one of the best platforms to seamlessly record audio and video podcasts. Its straightforward and self-explanatory user interface allows even novices to record podcasts without going through any learning curve.
Besides recording, Filmora also allows you to edit audio and video. For instance, you will find dedicated toggles to limit background interferences, enhance microphone sound, fade in/out effects, and give access to several such features to create podcasts like a professional. You can also export the audio in the format that Google Podcast requires, like M4A, MP3, OGG, and WAV.
Key Features of Wondershare Filmora
- AI-based Silence Detection: remove moments of silence from the podcast with one click.
- Text to speech: transcript your text files into speech for the podcast.
- Speech to Text: transcribe their voice to subtitles in several languages. It increases accessibility, and users worldwide can understand your podcast seamlessly.
- Audio Ducking: Add background music to your podcast and manage the sound levels to create podcasts like professionals.
- Audio Visualizer: enhance your podcast episodes through audio-visualizing effects.
Here’s How to Create Your Own Podcast Using Wondershare Filmora?
Step1 Create a New Project
- Download the Filmora application.
- Choose to Create a New Project from the main interface.
- Import an image or stock footage from the library. (You can later download the podcast in audio format).
Step2 Start Recording
- Drag the media into the timeline and click the Record button to start recording.
- Click on Record Voiceover from the options.
Step3 Set Microphone
- Connect your Microphone to the computer.
- Select the Microphone device.
- And click on the Red dot button to confirm the Voiceover recording.
Step4 Record the Podcast
- Click on OK to proceed to record the podcast.
- Go through the outline you’ve prepared and discuss the topics for the podcast episode.
Step5 Export audio
Click on the Export button to download your project from Wondershare Filmora.
Now that you’ve recorded the podcast episode, you must create your podcast’s RSS feed. And submit the podcast RSS feed to Google Podcast Manager.
Hot FAQs on the Google Podcast App
1. Is Google Play the same as Google Podcast?
Earlier, Google featured podcasts on the Google Play platform (hence the name, Google Play Podcast). However, today Google Play does not feature any podcasts. So, you will have to choose Google Podcast
2. Where did Google Music Podcasts go?
Google shut down Google Music on February 24, 2021. However, it allowed users to move their podcasts and music files from Google Music to YouTube before that date. So, there’s a good chance you can find the earlier podcasts available on Google Music on YouTube.
3. Is Google Podcasts Ad-free?
Yes. Google Podcast app is entirely ad-free, and there is no subscription either. So you might see in-episode promotions that individual creators present, but there are no ads in the Google Podcast app.
Final Words
Hopefully, you now know the Google Podcast app and what you will find on the Google Podcast platform. As promised, we have also shown you how to use the Google Podcast app. Retain that you can use the Google Podcast app on all primary OS, including Apple and Android devices. The podcast recommendations in this guide are written to inform users about the great shows that resonate with them.
Another significant aspect of this guide on the Google Podcast app is creating your podcast and submitting it to the platform. Google Podcast, a directory, requires you to create your own podcast and submit the podcasts via RSS feeds. So, even if you want to make your podcast, you can use tools like Filmora and then publish it on Google Podcast to share it with the world.
Utilizing the Clownfish Vocal Alteration Feature in Online Gaming Platforms and Video Conferencing Apps
Want to do something interesting? Think about using a voice changer. A voice changer is used to change your voice to make your daily interaction more interesting. A voice changer changes the pitch or tone of your voice. People also use it to add voice effects that could be either of a certain type or any random effect that the user likes.
You can use voice changers on your live stream. You can also use it on platforms like Discord and Skype. A voice changer can be used to make the gaming experience better as well. You can also use voice changer on online games like Fortnite. If you want to know about Clownfish Voice Changer, then let’s get started.
In this article
01 What Is Clownfish Voice Changer?
02 Tips to Use Clownfish Voice Changer on Discord and Fortnite?
03 Guidelines to Better Use Clownfish Voice Changer on Skype
04 Solution to Fix Clownfish Voice Changer Not Working
For Win 7 or later (64-bit)
For macOS 10.12 or later
Part 1. What Is Clownfish Voice Changer?
Clownfish is considered a famous voice changer. Clownfish Voice Changer is used to change voices for various purposes. It is installed on the system as it uses the microphone of the system that it is installed on. Clownfish Voice Changer has an attractive and intuitive interface that gives the user the best experience. It has plug-in support for Virtual Sound Technology (VST).

Clownfish voice provides multiple choices for voice after-effects that are available in the built-in library. These voices include male/female voices, robotic sounds, radio voices along with alien voices. Clownfish Voice Changer PC is compatible with Windows 7/8/8.1/10 and 11. It also has a built-in music player that supports various media formats.
Part 2. Tips to Use Clownfish Voice Changer on Discord and Fortnite?
As we have discussed earlier, what clownfish voice changer is and how amazing it is, now let’s move further. The following section of this article will share the tips that will help someone use Clownfish Discord and also Clownfish on Fortnite.
Before we start, you should know how to configure the Clownfish voice changer on your device. For this, you can follow the steps given below. Let’s begin!
Step 1: Setup Clownfish
After you have successfully downloaded and installed Clownfish Voice Changer, it’s time to setup. For this, firstly, locate the voice changer in your systems tray. Then, right-click on the icon, and from the menu list, select the ‘Setup’ option to set clownfish across different applications.

Step 2: Install Microphone
You cannot use the voice changer until you have attached a microphone to your device. For this, you need to install the microphone by hitting the ‘Install’ button next to the microphone.

Step 3: Set Microphone as Default Device
For the microphone to work in Clownfish, it should be selected as the default device. For doing this, select the ‘Recording’ option from the ‘Sounds’ tabs. A list of all the compatible devices will appear on the screen, you have to right-click on your device and hit the ‘Set as the Default Device’ option.

Step 4: Default Device is Set
After that, right-click on the Clownfish icon in the system tray and hit the ‘Hear Microphone’ option. The Clownfish Voice Changer is set to the default option. In case you ever plan to change it, right-click on the Clownfish icon from the system tray and tap on ‘Set Voice Changer.’

Step 5: Select Voice Changer Effects
Once Clownfish has been installed and successfully configured, you now have complete access to all voice changer options. There are dozens of effects that you can select from.

How to use Clownfish on Discord
If you want to use Clownfish on Discord, then you have to select Clownfish voice changer as the input device. For this, open Discord and head to ‘App Settings’ under the ‘User Settings’ option. There, look for the ‘Voice and Video’ option. A category of ‘Input Device’ will appear on the screen; from the drop-down list, switch to ‘Clownfish Voice Changer.’

How to use Clownfish on Fortnite
For using Clownfish on Fortnite, start by selecting the ‘Menu’ icon. There, head to the ‘Settings’ and select the ‘Audio’ option. Now, you have to set the input device; for that, go to the ‘Voice Chat’ option and select Clownfish Voice Changer as your input device under the ‘Voice Chat Input Device’ category.

Part 3. Guidelines to Better Use Clownfish Voice Changer on Skype
You can use voice changers on various platforms according to their compatibility; for instance, Clownfish is compatible with Skype. The question is, do you know how to use Clownfish voice changer on Skype? If ‘no,’ then let us share some helping guidelines to use Clownfish on Skype in a better way.
Step 1: If you want to change voice on Skype with Clownfish, then, first of all, download and install Skype on your PC or laptop and launch it.

Step 2: After Skype has been successfully launched, head over to ‘Settings’ by clicking on the three dots present next to your username.

Step 3: From the Settings screen, you have to look for the ‘Audio & Video’ tab and then select it. Lastly, you have to select the microphone ‘Clownfish Voice Changer’ under the ‘Microphone’ option, and you are all done.

Part 4. Solution to Fix Clownfish Voice Changer Not Working
While using Clownfish Voice Changer, you might also come across some troubles. They might be because either the voice changer is not updated, or maybe the apps you are using are not up to date. Let us share some fixes with you for smooth Clownfish functioning.
Fix 1: Update Clownfish Voice Changer
The most significant reason why you face trouble is that your Clownfish version is outdated. For this, you should update the voice changer to its latest version by following the steps given below:
Step 1: You have to start by opening the ‘Control Panel’ from the ‘Run’ window. For that, press ‘Windows and R’ together and then type ‘Control’ and press ‘Enter.’ Now, look for the ‘Programs’ section, and under that section, click on the ‘Uninstall a Program.’

Step 2: A list of all the installed programs will appear on the screen. From that list, look for ‘Clownfish Voice Changer’ and then left-click on it. Lastly, select the option of ‘Uninstall.’

Step 3: Once this is done successfully, head over to the official website of Clownfish Voice Changer and install the latest version. Restart your computer and open the application to check if the problem has been resolved or not.

Fix 2: Check the Application’s Version
Another reason that might be causing the problem is an incompatible version of the application with Clownfish. Both the voice changer and the application must have compatible versions. You can take assistance from the steps below to check the version of Skype.
Step 1: Start by opening Skype, and then from the left menu pane, click on your Skype profile. Then, from the quick access menu list, look for the ‘Settings’ option.

Step 2: After the ‘Settings’ window opens, click on the ‘Help & Feedback’ option once located from the left pane. As the Help & Feedback screen opens, you will see the Skype logo on the screen, and under the logo, you will see the version of Skype.

Fix 3: Microphone Installation in Clownfish
The Voice changer is of no use if the microphone cannot be used as a microphone is an essential component for using a voice changer. An outdated microphone or wrongly installed microphone can cause an error in using Clownfish voice change.
Step 1: Run Clownfish on the computer and open it from the taskbar icon by right-clicking it. Keep your mouse over ‘Setup’ till the sub-menu opens.
Step 2: From the sub-menu, click on ‘System Integration.’ Then, select the microphone which is working fine, and click on ‘Install,’ which will install the microphone automatically.

Step 3: After the installation of the microphone, reboot the computer. Check whether the microphone error is resolved or not.

Bottom Line
Clownfish voice changer is a famous and known software with many amazing features and functionalities. The article above has shared great details about the voice changer and its use on Skype, Discord, and Fortnite.
Additionally, let’s talk about video editing software. As the videos need editing after they are filmed so, why not use Wondershare Filmora for editing your videos? The software offers some crazy and cool features like cut, trim, split, crop, etc.
You can also color match, do animation keyframing and advanced color tuning with the Filmora video editor . The software also owns a media library with hundreds of distinct titles, elements, transitions, effects, and whatnot.
For Win 7 or later (64-bit)
For macOS 10.12 or later
02 Tips to Use Clownfish Voice Changer on Discord and Fortnite?
03 Guidelines to Better Use Clownfish Voice Changer on Skype
04 Solution to Fix Clownfish Voice Changer Not Working
For Win 7 or later (64-bit)
For macOS 10.12 or later
Part 1. What Is Clownfish Voice Changer?
Clownfish is considered a famous voice changer. Clownfish Voice Changer is used to change voices for various purposes. It is installed on the system as it uses the microphone of the system that it is installed on. Clownfish Voice Changer has an attractive and intuitive interface that gives the user the best experience. It has plug-in support for Virtual Sound Technology (VST).
Clownfish voice provides multiple choices for voice after-effects that are available in the built-in library. These voices include male/female voices, robotic sounds, radio voices along with alien voices. Clownfish Voice Changer PC is compatible with Windows 7/8/8.1/10 and 11. It also has a built-in music player that supports various media formats.
Part 2. Tips to Use Clownfish Voice Changer on Discord and Fortnite?
As we have discussed earlier, what clownfish voice changer is and how amazing it is, now let’s move further. The following section of this article will share the tips that will help someone use Clownfish Discord and also Clownfish on Fortnite.
Before we start, you should know how to configure the Clownfish voice changer on your device. For this, you can follow the steps given below. Let’s begin!
Step 1: Setup Clownfish
After you have successfully downloaded and installed Clownfish Voice Changer, it’s time to setup. For this, firstly, locate the voice changer in your systems tray. Then, right-click on the icon, and from the menu list, select the ‘Setup’ option to set clownfish across different applications.
Step 2: Install Microphone
You cannot use the voice changer until you have attached a microphone to your device. For this, you need to install the microphone by hitting the ‘Install’ button next to the microphone.
Step 3: Set Microphone as Default Device
For the microphone to work in Clownfish, it should be selected as the default device. For doing this, select the ‘Recording’ option from the ‘Sounds’ tabs. A list of all the compatible devices will appear on the screen, you have to right-click on your device and hit the ‘Set as the Default Device’ option.
Step 4: Default Device is Set
After that, right-click on the Clownfish icon in the system tray and hit the ‘Hear Microphone’ option. The Clownfish Voice Changer is set to the default option. In case you ever plan to change it, right-click on the Clownfish icon from the system tray and tap on ‘Set Voice Changer.’
Step 5: Select Voice Changer Effects
Once Clownfish has been installed and successfully configured, you now have complete access to all voice changer options. There are dozens of effects that you can select from.
How to use Clownfish on Discord
If you want to use Clownfish on Discord, then you have to select Clownfish voice changer as the input device. For this, open Discord and head to ‘App Settings’ under the ‘User Settings’ option. There, look for the ‘Voice and Video’ option. A category of ‘Input Device’ will appear on the screen; from the drop-down list, switch to ‘Clownfish Voice Changer.’
How to use Clownfish on Fortnite
For using Clownfish on Fortnite, start by selecting the ‘Menu’ icon. There, head to the ‘Settings’ and select the ‘Audio’ option. Now, you have to set the input device; for that, go to the ‘Voice Chat’ option and select Clownfish Voice Changer as your input device under the ‘Voice Chat Input Device’ category.
Part 3. Guidelines to Better Use Clownfish Voice Changer on Skype
You can use voice changers on various platforms according to their compatibility; for instance, Clownfish is compatible with Skype. The question is, do you know how to use Clownfish voice changer on Skype? If ‘no,’ then let us share some helping guidelines to use Clownfish on Skype in a better way.
Step 1: If you want to change voice on Skype with Clownfish, then, first of all, download and install Skype on your PC or laptop and launch it.
Step 2: After Skype has been successfully launched, head over to ‘Settings’ by clicking on the three dots present next to your username.
Step 3: From the Settings screen, you have to look for the ‘Audio & Video’ tab and then select it. Lastly, you have to select the microphone ‘Clownfish Voice Changer’ under the ‘Microphone’ option, and you are all done.
Part 4. Solution to Fix Clownfish Voice Changer Not Working
While using Clownfish Voice Changer, you might also come across some troubles. They might be because either the voice changer is not updated, or maybe the apps you are using are not up to date. Let us share some fixes with you for smooth Clownfish functioning.
Fix 1: Update Clownfish Voice Changer
The most significant reason why you face trouble is that your Clownfish version is outdated. For this, you should update the voice changer to its latest version by following the steps given below:
Step 1: You have to start by opening the ‘Control Panel’ from the ‘Run’ window. For that, press ‘Windows and R’ together and then type ‘Control’ and press ‘Enter.’ Now, look for the ‘Programs’ section, and under that section, click on the ‘Uninstall a Program.’
Step 2: A list of all the installed programs will appear on the screen. From that list, look for ‘Clownfish Voice Changer’ and then left-click on it. Lastly, select the option of ‘Uninstall.’
Step 3: Once this is done successfully, head over to the official website of Clownfish Voice Changer and install the latest version. Restart your computer and open the application to check if the problem has been resolved or not.
Fix 2: Check the Application’s Version
Another reason that might be causing the problem is an incompatible version of the application with Clownfish. Both the voice changer and the application must have compatible versions. You can take assistance from the steps below to check the version of Skype.
Step 1: Start by opening Skype, and then from the left menu pane, click on your Skype profile. Then, from the quick access menu list, look for the ‘Settings’ option.
Step 2: After the ‘Settings’ window opens, click on the ‘Help & Feedback’ option once located from the left pane. As the Help & Feedback screen opens, you will see the Skype logo on the screen, and under the logo, you will see the version of Skype.
Fix 3: Microphone Installation in Clownfish
The Voice changer is of no use if the microphone cannot be used as a microphone is an essential component for using a voice changer. An outdated microphone or wrongly installed microphone can cause an error in using Clownfish voice change.
Step 1: Run Clownfish on the computer and open it from the taskbar icon by right-clicking it. Keep your mouse over ‘Setup’ till the sub-menu opens.
Step 2: From the sub-menu, click on ‘System Integration.’ Then, select the microphone which is working fine, and click on ‘Install,’ which will install the microphone automatically.
Step 3: After the installation of the microphone, reboot the computer. Check whether the microphone error is resolved or not.
Bottom Line
Clownfish voice changer is a famous and known software with many amazing features and functionalities. The article above has shared great details about the voice changer and its use on Skype, Discord, and Fortnite.
Additionally, let’s talk about video editing software. As the videos need editing after they are filmed so, why not use Wondershare Filmora for editing your videos? The software offers some crazy and cool features like cut, trim, split, crop, etc.
You can also color match, do animation keyframing and advanced color tuning with the Filmora video editor . The software also owns a media library with hundreds of distinct titles, elements, transitions, effects, and whatnot.
For Win 7 or later (64-bit)
For macOS 10.12 or later
Also read:
- Updated Step-By-Step Instructions for Capturing High-Quality Sounds on GarageBand for 2024
- Updated Discovering Dynamic Dry Brush Audio Layers for Productions
- Updated In 2024, Expert Tips on Muting Audios From Visual Sources for Enhanced Focus
- Updated Pioneering Audio-Visual Synergy A Comprehensive Guide to Adding Soundtracks in Premiere Pro
- New The Art of Smooth Transitions Between Film Cuts
- New How to Add Music/ Audio to a GIF on Mac?
- Auditory Decline Trends in Adobe Rush Update 2023 for 2024
- 2024 Approved Should I Apply Pitch Correction to Elevate Speech Sounds?
- Voice Creation Simplified A Selection of 9 Free Tools for Textual to Auditory Conversion
- New Exploring the Finest Free, Web-Integrated Digital Audio Workstations for 2024
- New 2024 Approved Leading MP3 Encoders Windows & Mac Edition Rankings
- Updated 2024 Approved AVS Soundscape Suite Unveiled An In-Depth Review of Features, User Reviews, and Alternate Audio Editors
- New 2024 Approved Clubhouse Decoded Delving Into Its Mission, Community Dynamics, and Evolving Landscape
- Updated Mastering Silence A Comprehensive Tutorial on Stripping Audio From iOS Videos
- New 2024 Approved Essential Auditory Alteration Tools Top 5 Best Audio Editor Apps for Android
- Updated Sonic Design Lab Pioneering Audio Manipulation in Sony Vegas Pro
- New Useful Tips How Can You Use Voxal Voice Changer on Discord, In 2024
- New Audacity Made Simple An Easy Installation & Uninstall Guide S Ubuntu Users for 2024
- New The Complete Guide to Audio Manipulation in Avidemux
- Updated 2024 Approved The Freeloading Musicians Handbook Streaming and Downloading for FREE
- The Ultimate Compilation of Best No-Price-Tag Podcast Recording Programs
- 2024 Approved How to Combine Photography and Audio for a Cohesive Experience
- New In 2024, Harnessing Spotifys Melodies Practical Steps for Digitally Capturing Playlists and Songs
- Updated 2024 Approved The Premier Software Choices for Capturing the Essence of Your Strumming
- New 2024 Approved Symphony of Screens The Best Music Pairings for Every Type of Video Content
- Updated 2024 Approved 2023S Premier Free Sound Engineering Tools The Ultimate Top 10 List
- Updated Tracking Down Simulated Acoustics From Steel Percussion Devices for 2024
- 2024 Approved Exploring the Best Free HD Online Resources for Wallpapers and Video Backgrounds
- 2024 Approved Mastering Audio Conversion with Audacity and Lame Codec
- New In 2024, Auditory Tranquility Techniques to Achieve Gentle Sound Reduction
- Optimize M4A Playback on Android Devices with These Strategies for 2024
- Essential Listings for Authentic Copyright-Free Comic Audio Music Streams for 2024
- In 2024, How to Detach Audio in Premiere Pro? Step by Step Guide
- In 2024, Quietude Quest A Complete Users Guide to Online Auditory Sanitization
- New Discovering Websites with Free Gaming Ambient Sounds for 2024
- How to Acquire Explosive Glass Break Effects in Post-Production
- Updated TwistedWaves Latest Enhancements A Comprehensive Guide to Its Core Capabilities for 2024
- Updated In 2024, Enhancing Viewing Experience 3 Leading Applications for Boosting Audio Volume
- Updated In 2024, Orchestrating Artificial Intelligence Spotlight on Future Musical Innovators
- The Soundtrack for Aspiring Reporters A 15 Piece Selection of News-Centric Melodies
- 2024 Approved Exploring the Sonic Signature of an Aggravated Poochs Howl
- New Best Auto Music Mixer for Mac for 2024
- Updated In 2024, Premium Online MP3 Customization Suite
- New 2024 Approved Perfecting Audio Transitions in Live Streaming The OBS Guide to Equalizing Sounds
- Free Online DAW Options Ranking the Most Convenient and Cost-Effective Tools
- In 2024, Discovering the Ultimate Voice Overhaul Mobile Tools
- In 2024, 3 Ways for Android Pokemon Go Spoofing On Google Pixel Fold | Dr.fone
- How to Remove Activation Lock On the Apple iPhone 15 Pro Without Previous Owner?
- In 2024, Here are Some of the Best Pokemon Discord Servers to Join On Motorola Edge 40 Pro | Dr.fone
- No-Cost Video Upgrades Top 9 Online Enhancement Options
- In 2024, Tips and Tricks for Setting Up your Realme 11 Pro+ Phone Pattern Lock
- How to Downgrade iPhone XR without Losing Any Content? | Dr.fone
- Overview of Perfect Moody LUTs for VN Editor for 2024
- In 2024, How to Change Google Play Location On ZTE Nubia Z60 Ultra | Dr.fone
- Top 9 Vivo S17t Monitoring Apps for Parental Controls | Dr.fone
- How to Remove a Previously Synced Google Account from Your Realme Note 50
- In 2024, How Does the YouTube AI Algorithm Work - AI EXPLAINED
- Solved Excel 2016 Spreadsheet Disappears after Opening
- Lava Agni 2 5G Video Recovery - Recover Deleted Videos from Lava Agni 2 5G
- Apply These Techniques to Improve How to Detect Fake GPS Location On Oppo Reno 11 Pro 5G | Dr.fone
- New Best Photo Video Makers for Stunning Visual Stories for 2024
- Updated Pro Audio Editing Essentials Top 8 Software for Industry Experts
- 5 Photoshop Alternatives to Animate Your Logo
- Full Guide on Mirroring Your Oppo Reno 8T to Your PC/Mac | Dr.fone
- Title: Updated AMR Audio Converter Complete Guide to AMR Files for 2024
- Author: Jacob
- Created at : 2024-05-05 03:46:04
- Updated at : 2024-05-06 03:46:04
- Link: https://audio-shaping.techidaily.com/updated-amr-audio-converter-complete-guide-to-amr-files-for-2024/
- License: This work is licensed under CC BY-NC-SA 4.0.
