
:max_bytes(150000):strip_icc():format(webp)/sony-ps5-d3975e63d2ff47e6ac4e81768b79801c.jpg)
Updated 2024 Approved Smoother Soundscapes Advanced Techniques for Noise Reduction in Adobe Premiere Pro Videos
“Smoother Soundscapes: Advanced Techniques for Noise Reduction in Adobe Premiere Pro Videos”
It is impossible to eliminate background noises from the environment we shoot in. However, you can always remove them from recordings using different tools. These tools analyze the audio waves and detect unwanted noises for removal. They use spectral separation, filtering, and other adjustments to fine-tune audio. Some tools like noise reduction in Premiere Pro offer audio enhancements afterward.
In this article, the center of the discussion is background noise remove Premiere Pro. It is a professional video editor offering multiple functionalities with AI support. Besides Premiere Pro background noise reduction, users will find some other tools. Most of these tools use web and internet support to carry out the process. In the end, users will discover a desktop alternative to Premiere Pro for noise removal.
AI Noise Reducer A cross-platform for facilitating your video editing process by offering valuable benefits!
Free Download Free Download Learn More

Part 1: What Are the Potential Benefits of Using Noise Reduction Tools for Video Editing?
There are a handful of advantages of using noise reduction tools for video editing. These tools, including noise reduction Adobe Premiere, elevate overall video. The removal of unnecessary voices and noise brings clarity to the content. Viewers can focus on what is important instead of being irritated by noise. There are many potential benefits of noise removal tools discussed as follows:
1. Refined Audio Quality
Once you listen to a video after recording, you realize the number of unwanted noises. Such noises can irritate viewers and may decrease your content’s worth. Using noise reduction tools will assist you in dealing with such issues. You can remove unwanted audio elements like hisses, hums, or background voices. Reducing insignificant sounds will ultimately elevate the original sound quality.
2. Builds Production Value
One of the indications of high-quality content or production is its ability to manage audio. Audio management like background, wind, and hum removal counts in productions. Hence, employing such tools contributes to higher production value. They help in clarifying audio, which helps with increased audience engagement.
3. Maintains Audience Engagement
In today’s fast-paced lifestyle, hooking an audience to the screen is a fundamental task. One of the ways to achieve it is through high-quality sound. A professional video creator removes the unwanted yet distracting noises from videos. Even in outdoor shoots, using such tools can enhance the maximum sound damage. This extraction of background sounds maintains the audience’s attention and engages them.
4. Consistency Throughout the Scenes
In videos at a larger scale, combining multiple clips can cause noise havoc. Using these noise reduction tools for the overall film or separate clips brings consistency. This way, they retain the audio quality and engagement through the videos.
5. Creativity and Accessibility
Using background noise removal tools can increase the chance of creativity. A high-quality video sound without distracting noises is easy to edit. In addition, users can apply different audio drive effects to elevate content. Moreover, enhanced audio quality enhances the content reach and comprehension. It helps those who rely on something other than subtitles to understand dialogues.
Part 2: Reducing or Removing Background Noise in Premiere Pro: A Guide
Who isn’t familiar with noise reduction Adobe Premiere Pro, a professional editor? It serves as both video and audio editing software with AI abilities. Creators can bring precision to their content using its editing and trimming tools. The software assists in upgrading video visuals via transitions, effects, and titles. With its custom features, you can infuse your videos with your unique style.
Amongst its multifunctionalities, one is the Premiere Pro audio noise reduction. It is about making a few right clicks in Adobe to achieve audio clarity. Users can boost the audio by reducing unwanted and distractive sounds. It helps sharpen elements like dialogues, music, sound effects, and ambiance. Moreover, you can add depth to audio using the Reverb option and control everything.
Different Ways To Remove Background Noise in Premiere Pro
Adobe Premiere Pro is a versatile tool to denoise audio in multiple scenarios. This section emphasizes general noise reduction and some specific ones. Users can follow the step-by-step guides below to denoise audio Premiere Pro:
1. Reduce Noise
Employing noise reduction in Premiere Pro will eliminate the overall background noises. This will elevate the overall audio quality of your video. Here are the steps to perform noise reduction in Adobe Premiere Pro:
Step 1: After importing your unedited video in Adobe, navigate towards the top toolbar. From the many options there, locate and select the “Audio” option.

Step 2: An “Essential Sound” panel will appear on the right side of the preview section. From the four major audio elements appearing on this panel, select “Dialogue.”

Step 3: Further, go to the “Edit” tab, and under the “Repair” section, enable the box for “Reduce Noise.” Then, change the position of this slider to the right for maximized results. It is advised that you should not move the slider towards the right, as it can distort your own voice. Keep the slider between somewhere in the middle.

2. Reduce Rumble
When shooting outdoors, it is not uncommon to face high wind noise. This sound can be both distracting and annoying. So, if you want to free your audio of wind noise, follow the given steps:
Step 1: Upon importing the media with wind noise, move towards the upper tool panel. Select the clip in the timeline, which will feature a settings panel at the right.

Step 2: Navigate towards the right-side panel using your cursor and select the “Dialogue” option.

Step 3: Then select the “Edit” tab and locate the “Repair” segment under it. In there, enable the “Reduce Rumble” option. Then, adjust the position of its slider according to your preference.

3. Reduce Reverb
Recording in some places can cause an echo in your voice, but Premiere Pro can manage it. It has the Reverb option to manage the depth of your voice. Follow the steps given below to remove noise Premiere:
Instruction: Under the “Edit > Repair” tab, trace and activate the “Reduce Reverb” option. Further, experiment with the position of the reverb slider to adjust it.

4. Enhance Vocals
Employing any of the above actions may impact the vocal quality in videos. However, noise Premiere Pro gives you the option to adjust that as well. The next section discusses the step-by-step guide to enhance vocals:
Step 1: After setting the above options, scroll down into the “Edit” tab in the right panel. Locate and activate the “Clarity” option and adjust its slider.

Step 2: Then move towards the “Preset” section and click on the Downward Arrow icon. From the dropdown menu, choose the “Vocal Presence” option. You can also choose the “Podcast” voice to bring back vocal clarity.

Step 3: Below the “Preset” section, locate and enable the “Enhance Speech” option. Further, you can select between “High Tone” and “Low Tone” options.

5. Manual Audio Effects
An alternative method to remove audio noise in Premiere Pro is to use audio effects. These effects will improve the clarity of content to make it engaging. If you choose to use this method, here are the steps for you to follow:
Step 1: Select your media in the timeline, and from the left side of the window, locate and select “Effects.”

Step 2: In the search bar, add the name of the specific effect you are looking for. You can look for denoise, reverb, and other options. For instance, you have searched and selected the “Denoise” effect.

Step 3: Navigate towards the “Effects Control Center” and go to the “Denoise” section. Then, select the “Edit” button in this section.

Step 4: From the new window, expand the “Preset” option and choose from high or low settings. You can also play with the slider’s position to adjust it. In a similar way, you can add as many audio effects as possible and adjust their settings.

Part 3: Other Noise Reduction Tools You Can Look Out For (Online)
Although we discussed noise reduction in Premiere Pro, it can be confusing for some. It is understandable as it was designed to assist professionals. Locating and adjusting effects in its extensive editing interface can be difficult. This section mentions some online alternatives for removing noise in Premiere Pro:
1. Media.io
Media.io is a versatile tool and a substitute to reduce audio noise Premiere Pro. It has a clear-cut user interface that only requires you to upload the video. The tool uses AI assistance to remove noise from your music videos, vlogs, and more. It can remove 6 types of background noises and has a built-in audio enhancer. It covers denoise, speech enhancement, wind, reverb, hiss, and click noise.
Moreover, Media.io supports diverse audio formats, including MP3, MOV, and more. It is compatible across a wide range of devices and ensures synchronized working. Users can access it anywhere, on any device, and denoise audio with security. The AI-backed technology performs noise reduction from videos rapidly.

2. Kapwing
Does noise reduction in Premiere Pro feel like too much of a learning curve? We have brought another alternative with a minimal yet modern editing interface. The tool has AI-backed algorithms to remove background noise with precision. The AI detects and eliminates unnecessary sounds and enhances vocals. Its noise-reducer AI is free to use and only requires you to log in.
After enhancing your video’s audio, you can edit it afterward with Kapwing’s built-in resources. The fact that it operates online helps you to access it from anywhere. With its synchronization option, you can experience a streamlined workflow.

3. VEED.io
Noise reduction in Premiere Pro was manual, but this AI noise remover speeds up the task. If you must clean up noise from a voiceover or podcast, this is the tool. In addition to removing noise, you can embed music within this tool. The AI can detect wind, rain, traffic, clock ticking, and humming noises.
Moreover, you can enhance the audio quality of your Zoom and other recording by removing noise from such recorders. The tool supports all popular media formats like MP4, MOV, and more. Editing videos afterward, like adding effects or trimming in VEED.io, is an option.

4. Podcastle AI
This is another easy-to-access alternative to removing noise Adobe Premiere. It can auto-eliminate those background conversations and static noises. With this tool’s existence, record your videos without worrying about noise. You can also record voiceover within this tool and remove background noise.
In addition, the tool has built-in audio and video editing features and enhancements. Upon removing noise, you can use its effects and animations to uplift the video.

Bonus Part: Controlling the Vocals with A Fine-Tuned Video Editor: Wondershare Filmora 13
With the increasing trend of vlogs and blogs, creator’s attention shifted to such tools. Removing background noise can sometimes result in decreased vocal quality. For audio clarity through denoising and enhancing, you can use Wondershare Filmora . This is an AI-driven desktop alternative to noise reduction in Premiere Pro. Filmora is a reliable tool for enhancing both your video and audio content.
Free Download For Win 7 or later(64-bit)
Free Download For macOS 10.14 or later
It has AI-backed algorithms that keep updating according to modern needs. Recently, Filmora has launched its V13 version for efficient editing. The software can assist through text-based video editing and copilot editing. In addition to these, it introduced the AI Vocal Remover tool as an audio editing aid. Users can employ this feature to separate their vocals and background noises.
One of the applications of this tool is to assist in removing vocals from songs. Removing vocals doesn’t damage the quality of the audio. This helps you with inserting vocals as voiceovers for tutorial or explainer videos.
Steps to Employ AI Vocal Remover Tool
Since maintaining vocals is an important part of video content, Filmora offers it. Its AI vocal remover is amongst the leading tools in the market. You do not need to waste hours on understanding it since we have its user guide here:
Step 1: Initiate Filmora and Import Media
Upon downloading Filmora’s latest version from its website, launch it. Once you access its main display, click the “New Project” button. Upon entering its editing interface, click “Import” to import files. Then, use the drag-and-drop technique to bring them to the timeline.

Step 2: Access the Vocal Remover Tool
Now, select the video you added to the timeline and right-click on it. From the options panel appears, locate and select the “AI Vocal Remover” option. This will feature the AI Vocal Remover pop-up on the screen and show progress.

Step 3: Export the Vocals
Once the process is completed, you’ll see two different audios in the timeline. One is the background audio, and the other is your video’s vocals. You can export the vocals by clicking the “Export” button in Filmora. Afterward, you can use them as a voiceover for your videos, vlog, or blogs.

Conclusion
In conclusion, you are now aware of noise reduction in Premiere Pro and its features. The article shed light on different methods of removing background noise in it. It familiarized readers with some online alternatives to Adobe Premiere Pro. As a final point, we discussed a professional and multifunctional desktop tool.
Wondershare Filmora has all the options to denoise audio or save a video’s vocals. Its AI-backed features boost the productivity of editors and creators. The more you use it, the more you discover about this amazing editor. For more information, you can visit its official site and download it to explore.
Free Download For Win 7 or later(64-bit)
Free Download For macOS 10.14 or later
Free Download Free Download Learn More
Part 1: What Are the Potential Benefits of Using Noise Reduction Tools for Video Editing?
There are a handful of advantages of using noise reduction tools for video editing. These tools, including noise reduction Adobe Premiere, elevate overall video. The removal of unnecessary voices and noise brings clarity to the content. Viewers can focus on what is important instead of being irritated by noise. There are many potential benefits of noise removal tools discussed as follows:
1. Refined Audio Quality
Once you listen to a video after recording, you realize the number of unwanted noises. Such noises can irritate viewers and may decrease your content’s worth. Using noise reduction tools will assist you in dealing with such issues. You can remove unwanted audio elements like hisses, hums, or background voices. Reducing insignificant sounds will ultimately elevate the original sound quality.
2. Builds Production Value
One of the indications of high-quality content or production is its ability to manage audio. Audio management like background, wind, and hum removal counts in productions. Hence, employing such tools contributes to higher production value. They help in clarifying audio, which helps with increased audience engagement.
3. Maintains Audience Engagement
In today’s fast-paced lifestyle, hooking an audience to the screen is a fundamental task. One of the ways to achieve it is through high-quality sound. A professional video creator removes the unwanted yet distracting noises from videos. Even in outdoor shoots, using such tools can enhance the maximum sound damage. This extraction of background sounds maintains the audience’s attention and engages them.
4. Consistency Throughout the Scenes
In videos at a larger scale, combining multiple clips can cause noise havoc. Using these noise reduction tools for the overall film or separate clips brings consistency. This way, they retain the audio quality and engagement through the videos.
5. Creativity and Accessibility
Using background noise removal tools can increase the chance of creativity. A high-quality video sound without distracting noises is easy to edit. In addition, users can apply different audio drive effects to elevate content. Moreover, enhanced audio quality enhances the content reach and comprehension. It helps those who rely on something other than subtitles to understand dialogues.
Part 2: Reducing or Removing Background Noise in Premiere Pro: A Guide
Who isn’t familiar with noise reduction Adobe Premiere Pro, a professional editor? It serves as both video and audio editing software with AI abilities. Creators can bring precision to their content using its editing and trimming tools. The software assists in upgrading video visuals via transitions, effects, and titles. With its custom features, you can infuse your videos with your unique style.
Amongst its multifunctionalities, one is the Premiere Pro audio noise reduction. It is about making a few right clicks in Adobe to achieve audio clarity. Users can boost the audio by reducing unwanted and distractive sounds. It helps sharpen elements like dialogues, music, sound effects, and ambiance. Moreover, you can add depth to audio using the Reverb option and control everything.
Different Ways To Remove Background Noise in Premiere Pro
Adobe Premiere Pro is a versatile tool to denoise audio in multiple scenarios. This section emphasizes general noise reduction and some specific ones. Users can follow the step-by-step guides below to denoise audio Premiere Pro:
1. Reduce Noise
Employing noise reduction in Premiere Pro will eliminate the overall background noises. This will elevate the overall audio quality of your video. Here are the steps to perform noise reduction in Adobe Premiere Pro:
Step 1: After importing your unedited video in Adobe, navigate towards the top toolbar. From the many options there, locate and select the “Audio” option.
Step 2: An “Essential Sound” panel will appear on the right side of the preview section. From the four major audio elements appearing on this panel, select “Dialogue.”
Step 3: Further, go to the “Edit” tab, and under the “Repair” section, enable the box for “Reduce Noise.” Then, change the position of this slider to the right for maximized results. It is advised that you should not move the slider towards the right, as it can distort your own voice. Keep the slider between somewhere in the middle.
2. Reduce Rumble
When shooting outdoors, it is not uncommon to face high wind noise. This sound can be both distracting and annoying. So, if you want to free your audio of wind noise, follow the given steps:
Step 1: Upon importing the media with wind noise, move towards the upper tool panel. Select the clip in the timeline, which will feature a settings panel at the right.
Step 2: Navigate towards the right-side panel using your cursor and select the “Dialogue” option.
Step 3: Then select the “Edit” tab and locate the “Repair” segment under it. In there, enable the “Reduce Rumble” option. Then, adjust the position of its slider according to your preference.
3. Reduce Reverb
Recording in some places can cause an echo in your voice, but Premiere Pro can manage it. It has the Reverb option to manage the depth of your voice. Follow the steps given below to remove noise Premiere:
Instruction: Under the “Edit > Repair” tab, trace and activate the “Reduce Reverb” option. Further, experiment with the position of the reverb slider to adjust it.
4. Enhance Vocals
Employing any of the above actions may impact the vocal quality in videos. However, noise Premiere Pro gives you the option to adjust that as well. The next section discusses the step-by-step guide to enhance vocals:
Step 1: After setting the above options, scroll down into the “Edit” tab in the right panel. Locate and activate the “Clarity” option and adjust its slider.
Step 2: Then move towards the “Preset” section and click on the Downward Arrow icon. From the dropdown menu, choose the “Vocal Presence” option. You can also choose the “Podcast” voice to bring back vocal clarity.
Step 3: Below the “Preset” section, locate and enable the “Enhance Speech” option. Further, you can select between “High Tone” and “Low Tone” options.
5. Manual Audio Effects
An alternative method to remove audio noise in Premiere Pro is to use audio effects. These effects will improve the clarity of content to make it engaging. If you choose to use this method, here are the steps for you to follow:
Step 1: Select your media in the timeline, and from the left side of the window, locate and select “Effects.”
Step 2: In the search bar, add the name of the specific effect you are looking for. You can look for denoise, reverb, and other options. For instance, you have searched and selected the “Denoise” effect.
Step 3: Navigate towards the “Effects Control Center” and go to the “Denoise” section. Then, select the “Edit” button in this section.
Step 4: From the new window, expand the “Preset” option and choose from high or low settings. You can also play with the slider’s position to adjust it. In a similar way, you can add as many audio effects as possible and adjust their settings.
Part 3: Other Noise Reduction Tools You Can Look Out For (Online)
Although we discussed noise reduction in Premiere Pro, it can be confusing for some. It is understandable as it was designed to assist professionals. Locating and adjusting effects in its extensive editing interface can be difficult. This section mentions some online alternatives for removing noise in Premiere Pro:
1. Media.io
Media.io is a versatile tool and a substitute to reduce audio noise Premiere Pro. It has a clear-cut user interface that only requires you to upload the video. The tool uses AI assistance to remove noise from your music videos, vlogs, and more. It can remove 6 types of background noises and has a built-in audio enhancer. It covers denoise, speech enhancement, wind, reverb, hiss, and click noise.
Moreover, Media.io supports diverse audio formats, including MP3, MOV, and more. It is compatible across a wide range of devices and ensures synchronized working. Users can access it anywhere, on any device, and denoise audio with security. The AI-backed technology performs noise reduction from videos rapidly.
2. Kapwing
Does noise reduction in Premiere Pro feel like too much of a learning curve? We have brought another alternative with a minimal yet modern editing interface. The tool has AI-backed algorithms to remove background noise with precision. The AI detects and eliminates unnecessary sounds and enhances vocals. Its noise-reducer AI is free to use and only requires you to log in.
After enhancing your video’s audio, you can edit it afterward with Kapwing’s built-in resources. The fact that it operates online helps you to access it from anywhere. With its synchronization option, you can experience a streamlined workflow.
3. VEED.io
Noise reduction in Premiere Pro was manual, but this AI noise remover speeds up the task. If you must clean up noise from a voiceover or podcast, this is the tool. In addition to removing noise, you can embed music within this tool. The AI can detect wind, rain, traffic, clock ticking, and humming noises.
Moreover, you can enhance the audio quality of your Zoom and other recording by removing noise from such recorders. The tool supports all popular media formats like MP4, MOV, and more. Editing videos afterward, like adding effects or trimming in VEED.io, is an option.
4. Podcastle AI
This is another easy-to-access alternative to removing noise Adobe Premiere. It can auto-eliminate those background conversations and static noises. With this tool’s existence, record your videos without worrying about noise. You can also record voiceover within this tool and remove background noise.
In addition, the tool has built-in audio and video editing features and enhancements. Upon removing noise, you can use its effects and animations to uplift the video.
Bonus Part: Controlling the Vocals with A Fine-Tuned Video Editor: Wondershare Filmora 13
With the increasing trend of vlogs and blogs, creator’s attention shifted to such tools. Removing background noise can sometimes result in decreased vocal quality. For audio clarity through denoising and enhancing, you can use Wondershare Filmora . This is an AI-driven desktop alternative to noise reduction in Premiere Pro. Filmora is a reliable tool for enhancing both your video and audio content.
Free Download For Win 7 or later(64-bit)
Free Download For macOS 10.14 or later
It has AI-backed algorithms that keep updating according to modern needs. Recently, Filmora has launched its V13 version for efficient editing. The software can assist through text-based video editing and copilot editing. In addition to these, it introduced the AI Vocal Remover tool as an audio editing aid. Users can employ this feature to separate their vocals and background noises.
One of the applications of this tool is to assist in removing vocals from songs. Removing vocals doesn’t damage the quality of the audio. This helps you with inserting vocals as voiceovers for tutorial or explainer videos.
Steps to Employ AI Vocal Remover Tool
Since maintaining vocals is an important part of video content, Filmora offers it. Its AI vocal remover is amongst the leading tools in the market. You do not need to waste hours on understanding it since we have its user guide here:
Step 1: Initiate Filmora and Import Media
Upon downloading Filmora’s latest version from its website, launch it. Once you access its main display, click the “New Project” button. Upon entering its editing interface, click “Import” to import files. Then, use the drag-and-drop technique to bring them to the timeline.
Step 2: Access the Vocal Remover Tool
Now, select the video you added to the timeline and right-click on it. From the options panel appears, locate and select the “AI Vocal Remover” option. This will feature the AI Vocal Remover pop-up on the screen and show progress.
Step 3: Export the Vocals
Once the process is completed, you’ll see two different audios in the timeline. One is the background audio, and the other is your video’s vocals. You can export the vocals by clicking the “Export” button in Filmora. Afterward, you can use them as a voiceover for your videos, vlog, or blogs.
Conclusion
In conclusion, you are now aware of noise reduction in Premiere Pro and its features. The article shed light on different methods of removing background noise in it. It familiarized readers with some online alternatives to Adobe Premiere Pro. As a final point, we discussed a professional and multifunctional desktop tool.
Wondershare Filmora has all the options to denoise audio or save a video’s vocals. Its AI-backed features boost the productivity of editors and creators. The more you use it, the more you discover about this amazing editor. For more information, you can visit its official site and download it to explore.
Free Download For Win 7 or later(64-bit)
Free Download For macOS 10.14 or later
Podcast Editing 101: How to Edit a Podcast
Podcast Editing 101: How to Edit a Podcast

Benjamin Arango
Mar 27, 2024• Proven solutions
We are glad that you took the first steps to create your podcast episodes. We’d also like to know how far you have reached. Well, most probably, you are at the podcast editing stage as per your search query. So, you are in the right place if this is your concern. We have structured this entire post on how to edit podcasts, especially for the newbies. You can continue reading the article if you have already created a podcast episode and level up the steps with better podcast editing. Remember that editing can either make or break the game! So, don’t take any chances in editing a podcast right from the beginners’ level.

Without further ado, let’s get started with the following editing basics a podcaster should keep in mind.
- Part 1: Editing Basics that Beginners’ Should Keep in Mind
- Part 2: Which DAW should you use?
- Part 3: Advanced Editing Tips to Spice Up Your Podcasts
- Part 4: Edit Podcast with Video Editor
Editing Basics that Beginners’ Should Keep in Mind
Well, it is all dependent upon the approach you follow regarding the podcast audio editing. There are various podcast editing services, and styles worth consider. The list below is the critical podcast editing basics a beginner should follow before publishing the podcast. Overall, it would be awesome if you learn new skills instead of outsourcing the whole stuff. That’s fantastic as well!
Firstly, import the audio.
The editing process starts with importing the audio track. The audio material in the sequence must be at the primary place. Always place the audio track in the first position even if you are importing multiple audio tracks. You can leave the track underneath for editing purposes. After adding this first audio file, you can add sound effects, music, and other secondary audio files for further editing.
Listen again
Don’t proceed before re-listening your added audio! This manner will let you think for different sections, and you can further decide what to keep and what to preserve. Remove any computer noise, background hiss, and unwanted audio areas. Here, you can help with different noise reduction tools available or go for the reliable podcast editing software, specifically the audio ducking feature for noise removal.
Make it consistent throughout
The next step is to make the volume consistent at every stage of the podcast. After removing all the unwanted noises, take the necessary action to normalize the audio levels and specifically select -2.0 for peak amplitude. Amplify the tranquil areas.
Sound Designing and Mixing
Then, you are required to do sound designing and mixing for the podcast. Take it lightly and only especially when you are a beginner. Add the sound effects as per the message of the podcast. Always keep in mind to use significant sound effects that effectively evoke the emotion and ultimately save the audience engaged. The mixing part comes when you compress, equalize, and process the audio to adjust accordingly in the different sections.
Preview and Post
Once your podcast is edited and ready, preview it ensure everything is in place, especially if it is your first time. It would be best to post a clear, concise, and to the point audio/video. Finally, post your podcast, either for free or using one of the software available online on your desired blog/online media.
Which DAW should you use?
You can’t miss using Digital Audio Workstation (DAW) for podcast editing at any cost. It is an audio editing program with all the facilities right from recording the podcast to editing it. To start with, you must consider using among the following three DAWs.
Audacity

Audacity is the most common program providing free podcast editing services. The foremost reason for its popularity is the free and open-source availability. Secondly, the primary user interface makes it the best option for beginners. You can right away start recording with Audacity.
Alitu

Alitu is another recommended tool to make your podcast episodes easily. However, you have to pay to get the podcast editing services of Alitu. It can incredibly do the podcast editing for raw audios and provide you with different options of adding music, transitions, and segments, etc. It also contains the facility to publish your podcast.
Reaper

Reaper is another best podcast editing DAW with the availability of 60 days free trial. Despite a bit high learning curve in Reaper, you will ultimately feel like an artist working upon it. Moreover, it comes with lots of new updates and features for better outcomes. It is compatible with AU, VST, and JS plugins as well.
Advanced Editing Tips to Spice Up Your Podcasts
Don’t miss out on this portion if you want to upgrade your podcasting skills like professionals! Learn some advanced formulas of podcast audio editing as follows.
Trim the Ends
It’s better if you trim the ends before editing the podcast. And, make sure there are no blanks at the beginning or end of the podcast. You can also add fade-in or fade-out effects to avoid unprofessional vibes.
Work on your planning and presentation skills
Focus on having a time-saving podcast editing by working upon your planning and presentation skills. Don’t be that guy who tries to edit every verbal crutch. Instead, focus on being confident while presenting the podcast so that you will need to have significantly fewer editing issues or may not need editing at all. Think upon changing the approach of podcast recording as well.
Provide margin and look for transitions
Offer a little margin and say that thing smoothly again if you have misread or misspell the statement while recording the podcast. Thus, you must not squeeze the information that doesn’t provide a better room for podcast editing. The provided margin will make it a breeze to cut out the messy audio portion.
Then, you have to look for transitions precisely when you are recording in multiple tracks, co-hosting, or taking a long space while recording your podcast. These transitions could be like pointless babbles, awkward silences, cross talks, etc., that need careful watch at both the beginning and the end. Most of the editing will improve by considering and editing these kinds of transitions.
Eliminate awkward silences
Sometimes a podcast is full of awkward silences that look crap at all. Well, you don’t have to remove every silence taken at the end of a talk or something like that. Eliminate only long, awkward silences or reduce their duration. Different plugins are available within the DAWs to remove these background noises and long duration silences.
Adjust the volume of the podcast
It may be a bit tricky to edit the podcast when one person or interviewee is a lot quieter. First of all, check if their microphone signals and settings are strong enough to provide you with audio. Then, you can increase the gain of their speaker before podcast editing. Normalize the voice or add some compression to increase the loudness ultimately.
Save podcast to the right format
Finally, you must be careful while exporting your podcast to the correct format to ensure the best quality. Go to the export settings and find MP3 extension and 192kbps bitrate.
Edit Podcast with Video Editor
Are you recording a video podcast? If yes, you must make very little room for editing while considering the best recording equipment and settings. Secondly, you can look for a high-tech video editor that can do the task of both video editing and podcast editing. The Wondershare Filmora X is one such famous name in the world of video editing. But, the point is to check its features for podcast editing. Are they worth it or not? That is what we’d like to tell you by highlighting the podcast editing services of Filmora.


Video Podcast Editing Services of Wondershare Filmora X
- The very thing needed while podcast editing is the shortcut key commands to save time. The Wondershare Filmora X consists of several such hotkey commands for quick editing.
- You can use Audio Ducking to eliminate background noises and unwanted awkward silences recorded while making the podcast.
- Inject beautiful animations in your video podcast using the keyframing tool of Wondershare Filmora X.
- Use 1000+ Video Effects, including filters, transitions, motion elements, titles, etc., exclusively provided on Filmora.
- Use the Split Screen and showcase multiple screens to make an eye-catchy video podcast appearance.
Conclusion
Now, we are going to end our discussion on podcast editing basics as well as advanced concepts. Try following every tip and suggestion, especially when you are a beginner. Make up your mind to create eye-catchy content that well engages the audience while also providing useful information. Using the best video editor with stunning effects, as mentioned above, won’t make your content look boring at all.
Benjamin Arango
Benjamin Arango is a writer and a lover of all things video.
Follow @Benjamin Arango
Benjamin Arango
Mar 27, 2024• Proven solutions
We are glad that you took the first steps to create your podcast episodes. We’d also like to know how far you have reached. Well, most probably, you are at the podcast editing stage as per your search query. So, you are in the right place if this is your concern. We have structured this entire post on how to edit podcasts, especially for the newbies. You can continue reading the article if you have already created a podcast episode and level up the steps with better podcast editing. Remember that editing can either make or break the game! So, don’t take any chances in editing a podcast right from the beginners’ level.
Without further ado, let’s get started with the following editing basics a podcaster should keep in mind.
- Part 1: Editing Basics that Beginners’ Should Keep in Mind
- Part 2: Which DAW should you use?
- Part 3: Advanced Editing Tips to Spice Up Your Podcasts
- Part 4: Edit Podcast with Video Editor
Editing Basics that Beginners’ Should Keep in Mind
Well, it is all dependent upon the approach you follow regarding the podcast audio editing. There are various podcast editing services, and styles worth consider. The list below is the critical podcast editing basics a beginner should follow before publishing the podcast. Overall, it would be awesome if you learn new skills instead of outsourcing the whole stuff. That’s fantastic as well!
Firstly, import the audio.
The editing process starts with importing the audio track. The audio material in the sequence must be at the primary place. Always place the audio track in the first position even if you are importing multiple audio tracks. You can leave the track underneath for editing purposes. After adding this first audio file, you can add sound effects, music, and other secondary audio files for further editing.
Listen again
Don’t proceed before re-listening your added audio! This manner will let you think for different sections, and you can further decide what to keep and what to preserve. Remove any computer noise, background hiss, and unwanted audio areas. Here, you can help with different noise reduction tools available or go for the reliable podcast editing software, specifically the audio ducking feature for noise removal.
Make it consistent throughout
The next step is to make the volume consistent at every stage of the podcast. After removing all the unwanted noises, take the necessary action to normalize the audio levels and specifically select -2.0 for peak amplitude. Amplify the tranquil areas.
Sound Designing and Mixing
Then, you are required to do sound designing and mixing for the podcast. Take it lightly and only especially when you are a beginner. Add the sound effects as per the message of the podcast. Always keep in mind to use significant sound effects that effectively evoke the emotion and ultimately save the audience engaged. The mixing part comes when you compress, equalize, and process the audio to adjust accordingly in the different sections.
Preview and Post
Once your podcast is edited and ready, preview it ensure everything is in place, especially if it is your first time. It would be best to post a clear, concise, and to the point audio/video. Finally, post your podcast, either for free or using one of the software available online on your desired blog/online media.
Which DAW should you use?
You can’t miss using Digital Audio Workstation (DAW) for podcast editing at any cost. It is an audio editing program with all the facilities right from recording the podcast to editing it. To start with, you must consider using among the following three DAWs.
Audacity
Audacity is the most common program providing free podcast editing services. The foremost reason for its popularity is the free and open-source availability. Secondly, the primary user interface makes it the best option for beginners. You can right away start recording with Audacity.
Alitu
Alitu is another recommended tool to make your podcast episodes easily. However, you have to pay to get the podcast editing services of Alitu. It can incredibly do the podcast editing for raw audios and provide you with different options of adding music, transitions, and segments, etc. It also contains the facility to publish your podcast.
Reaper
Reaper is another best podcast editing DAW with the availability of 60 days free trial. Despite a bit high learning curve in Reaper, you will ultimately feel like an artist working upon it. Moreover, it comes with lots of new updates and features for better outcomes. It is compatible with AU, VST, and JS plugins as well.
Advanced Editing Tips to Spice Up Your Podcasts
Don’t miss out on this portion if you want to upgrade your podcasting skills like professionals! Learn some advanced formulas of podcast audio editing as follows.
Trim the Ends
It’s better if you trim the ends before editing the podcast. And, make sure there are no blanks at the beginning or end of the podcast. You can also add fade-in or fade-out effects to avoid unprofessional vibes.
Work on your planning and presentation skills
Focus on having a time-saving podcast editing by working upon your planning and presentation skills. Don’t be that guy who tries to edit every verbal crutch. Instead, focus on being confident while presenting the podcast so that you will need to have significantly fewer editing issues or may not need editing at all. Think upon changing the approach of podcast recording as well.
Provide margin and look for transitions
Offer a little margin and say that thing smoothly again if you have misread or misspell the statement while recording the podcast. Thus, you must not squeeze the information that doesn’t provide a better room for podcast editing. The provided margin will make it a breeze to cut out the messy audio portion.
Then, you have to look for transitions precisely when you are recording in multiple tracks, co-hosting, or taking a long space while recording your podcast. These transitions could be like pointless babbles, awkward silences, cross talks, etc., that need careful watch at both the beginning and the end. Most of the editing will improve by considering and editing these kinds of transitions.
Eliminate awkward silences
Sometimes a podcast is full of awkward silences that look crap at all. Well, you don’t have to remove every silence taken at the end of a talk or something like that. Eliminate only long, awkward silences or reduce their duration. Different plugins are available within the DAWs to remove these background noises and long duration silences.
Adjust the volume of the podcast
It may be a bit tricky to edit the podcast when one person or interviewee is a lot quieter. First of all, check if their microphone signals and settings are strong enough to provide you with audio. Then, you can increase the gain of their speaker before podcast editing. Normalize the voice or add some compression to increase the loudness ultimately.
Save podcast to the right format
Finally, you must be careful while exporting your podcast to the correct format to ensure the best quality. Go to the export settings and find MP3 extension and 192kbps bitrate.
Edit Podcast with Video Editor
Are you recording a video podcast? If yes, you must make very little room for editing while considering the best recording equipment and settings. Secondly, you can look for a high-tech video editor that can do the task of both video editing and podcast editing. The Wondershare Filmora X is one such famous name in the world of video editing. But, the point is to check its features for podcast editing. Are they worth it or not? That is what we’d like to tell you by highlighting the podcast editing services of Filmora.
Video Podcast Editing Services of Wondershare Filmora X
- The very thing needed while podcast editing is the shortcut key commands to save time. The Wondershare Filmora X consists of several such hotkey commands for quick editing.
- You can use Audio Ducking to eliminate background noises and unwanted awkward silences recorded while making the podcast.
- Inject beautiful animations in your video podcast using the keyframing tool of Wondershare Filmora X.
- Use 1000+ Video Effects, including filters, transitions, motion elements, titles, etc., exclusively provided on Filmora.
- Use the Split Screen and showcase multiple screens to make an eye-catchy video podcast appearance.
Conclusion
Now, we are going to end our discussion on podcast editing basics as well as advanced concepts. Try following every tip and suggestion, especially when you are a beginner. Make up your mind to create eye-catchy content that well engages the audience while also providing useful information. Using the best video editor with stunning effects, as mentioned above, won’t make your content look boring at all.
Benjamin Arango
Benjamin Arango is a writer and a lover of all things video.
Follow @Benjamin Arango
“Comprehensive Guide to Accessible, No-Cost Speech Recognition Apps and Services”
10+ Free Online Audio to Text Converters

Shanoon Cox
Mar 27, 2024• Proven solutions
An audio-to-text converter is a tool that can convert audio files to texts or even record any audio and produce the text of it simultaneously. Audio files are one of the most used methods of storing information. From online classes and long lectures to big business meetings and product information, audio is being shared a lot across the world.
But accessing information from a long audio file can be difficult and time-consuming, which is why there is a need to convert audio to text. Information in the form of text can easily be fully or partly accessed and edited whenever needed. And texts can also easily be shared with whomever you want.
So let’s have a look at some of the best audio-to-text converters that might be of use to you.
10+ Free Online Audio to Text Converters
There is number of audio text converters available in the online market that can help you while studying, researching, or even in your business. Some of these recorders can convert any audio file to texts while some others can record and convert to text at the same time. Here we will talk about the top 11 free applications that can be used to convert audio to text.
| 1 - Filmora | 2 - Audext | 3 - Sonix.ai |
|---|---|---|
| 4 - Virtualspeech.com | 5 - Speechnotes | 6 - SpeechTexter |
| 7 - Textfromtospeech.com | 8 - Dictation.io | 9 - Voice Note |
| 10 - Voice Notebook | 11 - NaturalReaders |
1. Wondershare Filmora
Filmora’s Speech To Text (STT) function allows you to transcript audio/voice to subtitles/text in one click. it can save your plenty of time on transcribing subtitles and boost your editing efficiency by applying speech-to-text.
What you need to do is download the software and subsribe for its plan.
Features
- Built-in function to transcribe subtitles and captions for your video
- High accuracy in generating text, allows you to edit text by yourself
- Supports up to 26 languages of transcription to engage more users all around the world
- Offers various tools for editing your videos and audio
2. Audext
Audext is a free online application that can help you to save a lot of time while transcribing any audio to text. The transcription to text is done with the use of an advanced AI and hence produces faster and more accurate results.
Audext is used by people from different sectors like education, marketing, media, consulting, healthcare, etc. for their work purposes.

Features
- An inbuilt editor for editing the text while transcribing
- Identifies the speaker easily
- Supports a variety of audio and video formats like MP3, WAV, MP4, etc.
- Offers an option of easy upload and export of files
Pricing
- Free
- Transcription costs for one hour are $12
- Or with the subscription $5
3. Sonix.ai
Sonix is a fast and accurate application that can be used to convert audio to text for any purpose. This application offers a 30-minute free transcription after which an affordable amount may be charged.
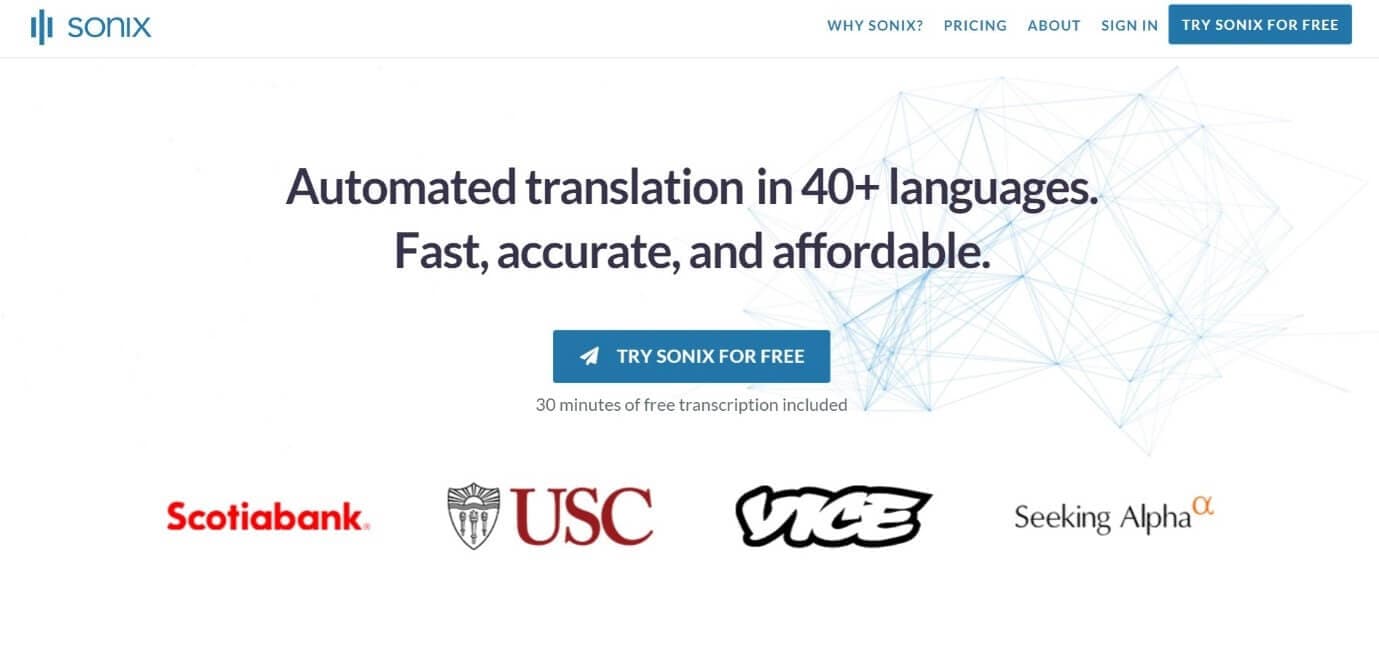
Features
- Automatic transcription of files and accessibility of these files from any device
- Advanced translation of these devices into 30 different languages
- Addition of subtitles into any video for easy understanding
- A Sonix media player that allows to share and publish files easily
Pricing
- Free
- Standard subscription - $10 per hour
- Premium subscription - $5 per hour, and an addition of $22 per month
4. Virtualspeech.com
Virtualspeech is an online tool that can transcribe audio to text free. It is a very simple application that allows fats conversion of audio files to texts. After conversion, the file will be emailed to the user from where it can be downloaded and saved.
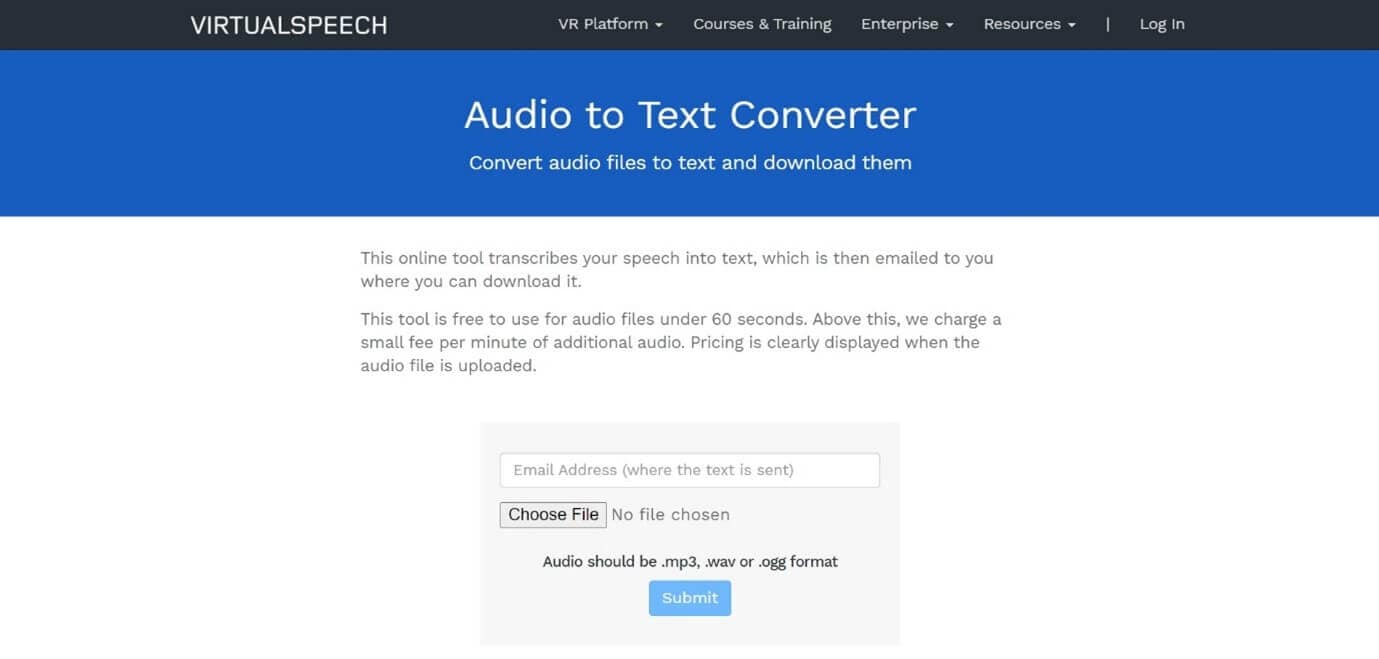
Features
- Free conversion of any audio files under 1 minute.
- Conversion of audio files of formats Mp3, Wav, or Ogg.
- Provides security as the no files are stored on the server and the site is secured with a b SSL
- Speech to text converter within the site
Pricing
- $0.50 per minute after the free minute

Filmora Audio to Text Converter
Filmora - Audio to Text Converter
• Enables you to convert video speech to text in one click
• Extremely accurate in video speech recognition
• Cross-platform supported - (Windows, Mac, iOS, Android)
Transcribe Audio to Text Free Transcribe Audio to Text Free Transcribe Audio to Text Free Learn More >
5. Speechnotes
Speechnotes is a powerful online notepad that can easily convert audio to text. This tool has implemented an efficient and clean design that makes conversion and editing very easy.
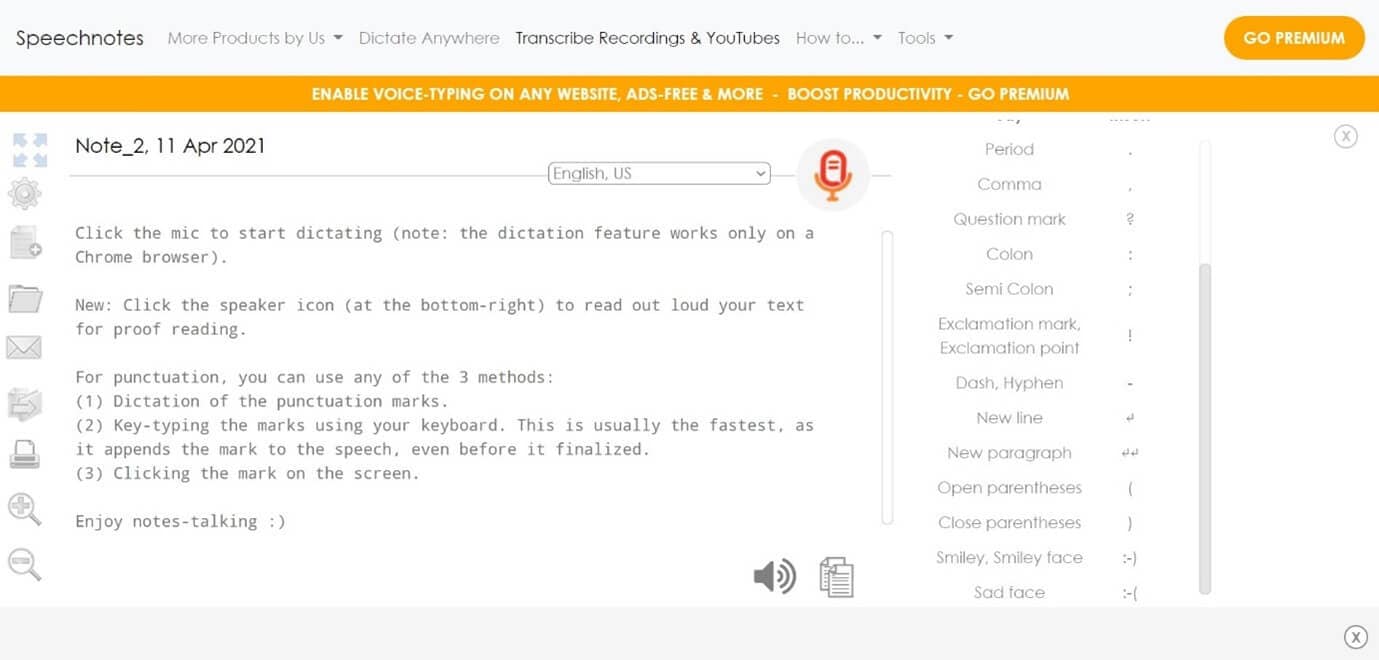
Features
- Best results with an advanced speech recognition technology
- Built-in tools that allow easy editing and correction of the converted text
- Fast working on any web browser and no installation apps required
- Autosave feature that ensures that your data is not lost
- Export to Google Drive option for easy accessibility from any device
Pricing
- Free
- Premium version with the addition of some extra features
6. SpeechTexter
SpeechTexter is a multilingual application that can help you transcribe any type of book, document, blog posts, etc. by using your audio. This tool has a custom dictionary that allows adding short commands for adding frequently used data like phone numbers, punctuation marks, addresses, etc.

Features
- Offers accuracy rate of 90 to 95% percent
- Can be used to increase your fluency in English
- Offers powerful real-time speech recognition
- Easy creation of emails, text notes, blog posts, etc.
- A custom dictionary that can be customized according to the individual use
- Supports more than 60 languages
- Available on both chrome browser and android
Pricing
- Free
7. Textfromtospeech.com
Textfromtospeech is a free online tool that allows you to easily convert audio to text without the need for registration downloading or installation. It has a very simple interface that can record and convert your speech into text with a single click.
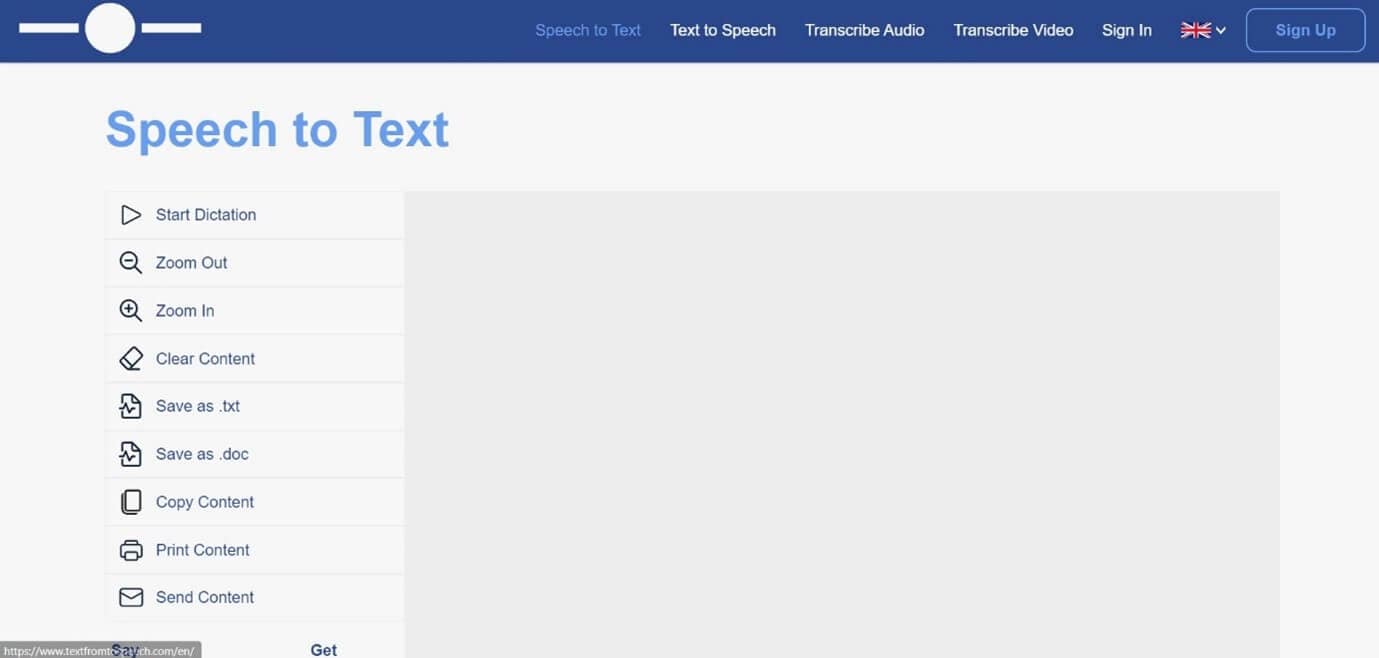
Features
- Free and online text recognition and transcription
- Supports many languages
- Pause and record option while converting large files
- Can use voice commands for insertion of symbols like “comma”, “full stop”, etc.
- Smart capitalization
- Easy saving, copying, and sharing of the dictated text
- Available on mobile devices, tablet, and computer
Pricing
- Free
![]()
A cross-platform for making videos anywhere for all creators

Why your video editing isn’t good enough? How about some creative inspo?
- 100 Million+ Users
- 150+ Countries and Regions
- 4 Million+ Social Media Followers
- 5 Million+ Stock Media for Use
* Secure Download

8. Dictation.io
Dictation is a free and simple tool that offers fast conversion of audio to text. Its interface is like that of a very simple notepad and allows the conversion of audio to text for a number of languages including English, Español, Français, Italiano, Português, and more.

Features
- Advanced speech recognition
- Easy editing within the notes
- Easy sharing to mail, tweets, etc.
- No storing of any data and hence offers the necessary security
Pricing
- Free
9. Voice Note
Voice Note is an online speech recognition tool that can automatically record and type anything including speech, interview, etc. This tool can convert any audio file into text format which can easily be opened in Microsoft Word.
Features
- No saving of data in any servers
- Customizable options for audio and text
- A number of languages to choose from while converting audio to text
- Easy copying and exporting options
- Direct Print option from the site
Price
- Free
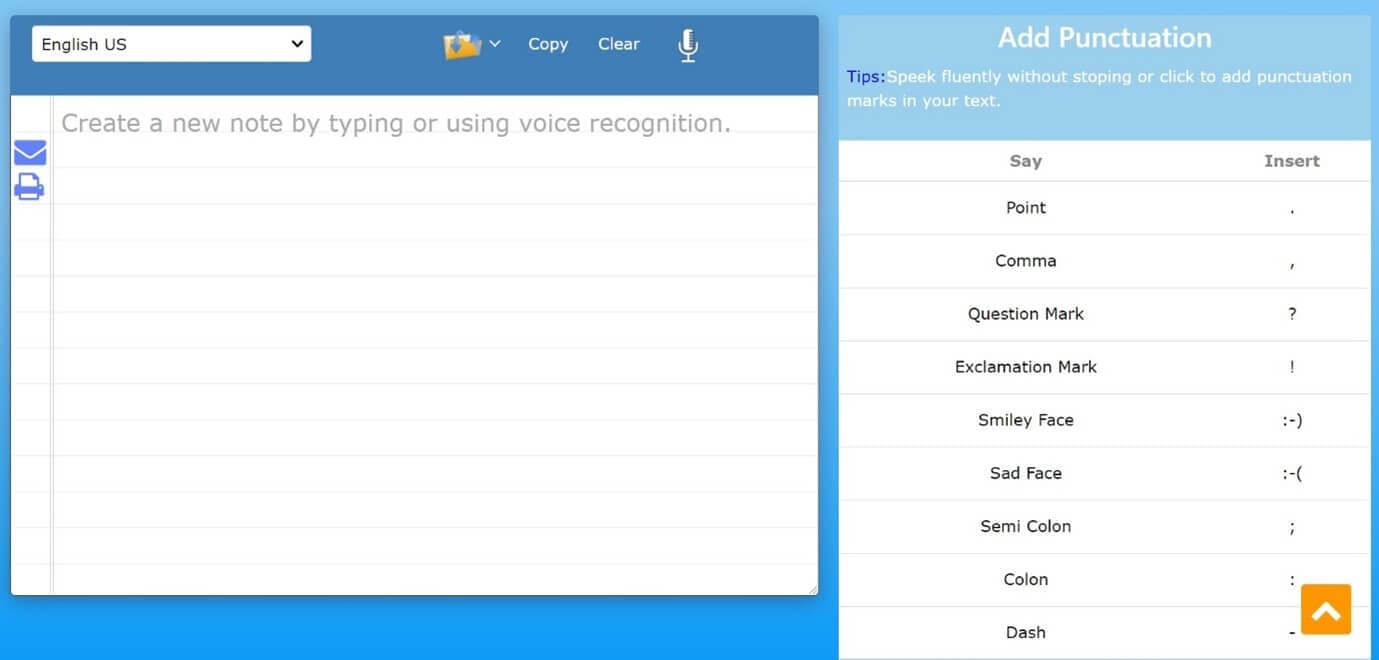
10. Voice Notebook
Voice Notebook is a speech recognition app that can also convert audio files to text. This application is compatible with a wide range of devices like Mac, Windows, Linux OS, Android, and iOS.
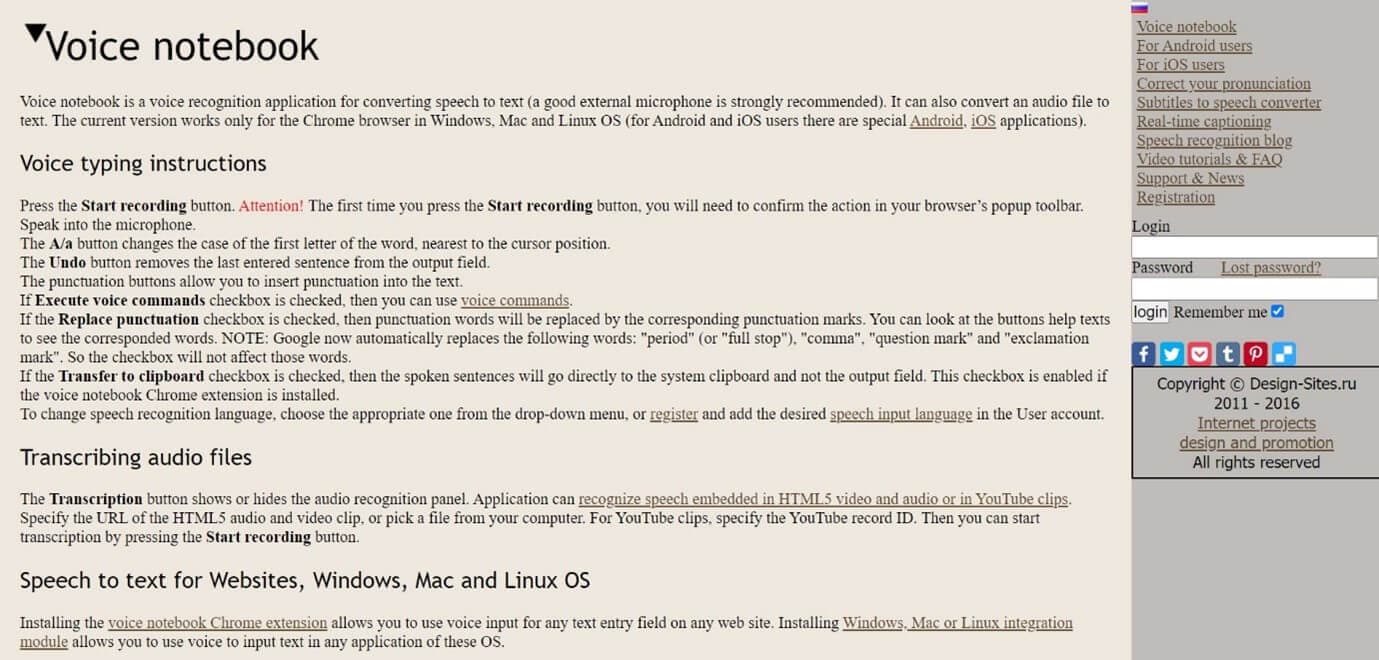
Features
- Voice commands are available when you transcribe audio to text
- Has the ability to recognize any speech embedded in YouTube clips or HTML5 audio or video
- Simple interface and easy editing of text
- An option to download into TXT format is available
Price
- Free
11. NaturalReaders
Natural Readers is a professional program that can convert any text into spoken words. This program offers a lot of features like adjusting the speed of audio, conversion into mp3, selection of voice, etc.
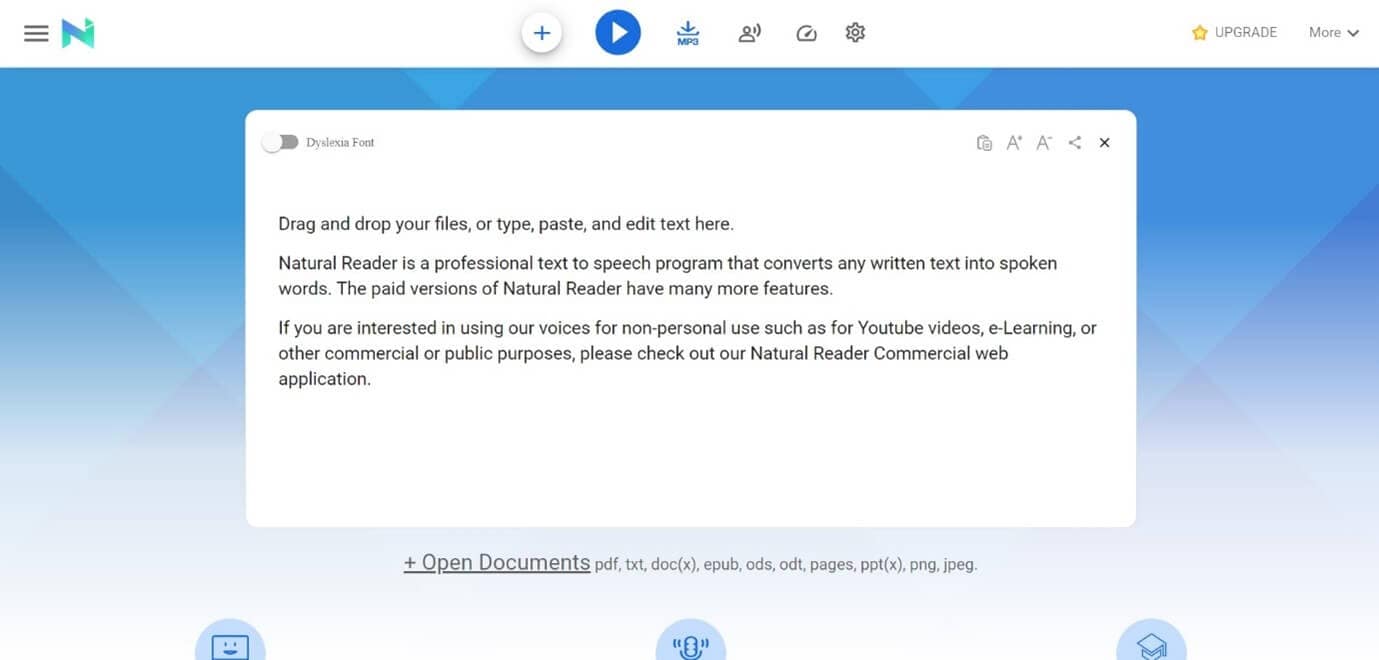
Features
- A font option available for dyslexic people
- Supports formats like pdf, txt, docs, epub, ods, ppt, png, jpeg
- App versions of this online tool are available both for android and apple devices
Pricing
- Free
- Premium plan - $9.99 per month, $59.88 per year
- Plus plan - $19.00 per month, $110.00 per year
Filmora Audio to Text Converter
Filmora - Audio to Text Converter
• Enables you to convert video speech to text in one click
• Extremely accurate in video speech recognition
• Cross-platform supported - (Windows, Mac, iOS, Android)
Transcribe Audio to Text Free Transcribe Audio to Text Free Transcribe Audio to Text Free Learn More >
Conclusion
We have listed above the top 11 tools that can be used to convert audio to text on any device using a browser. Converting audio to text allows you to easily access the required information, edit it, or even share it fully or partially with anyone you wish,
The applications we have listed are free and some of them might charge for the extra features they provide. So no matter what your profession is if you are looking for an app to convert audio to text or record and produce the text of the recordings, choose any one of the listed above applications.
We hope our suggestions help you reduce effort and save time. Please leave your valuable feedback in the comment box below, thank you.
Transform Long Videos into Short Ones Instantly
Turn long videos into viral clips. Effortlessly transform lengthy videos into engaging, shareable clips.

Shanoon Cox
Shanoon Cox is a writer and a lover of all things video.
Follow @Shanoon Cox
Shanoon Cox
Mar 27, 2024• Proven solutions
An audio-to-text converter is a tool that can convert audio files to texts or even record any audio and produce the text of it simultaneously. Audio files are one of the most used methods of storing information. From online classes and long lectures to big business meetings and product information, audio is being shared a lot across the world.
But accessing information from a long audio file can be difficult and time-consuming, which is why there is a need to convert audio to text. Information in the form of text can easily be fully or partly accessed and edited whenever needed. And texts can also easily be shared with whomever you want.
So let’s have a look at some of the best audio-to-text converters that might be of use to you.
10+ Free Online Audio to Text Converters
There is number of audio text converters available in the online market that can help you while studying, researching, or even in your business. Some of these recorders can convert any audio file to texts while some others can record and convert to text at the same time. Here we will talk about the top 11 free applications that can be used to convert audio to text.
| 1 - Filmora | 2 - Audext | 3 - Sonix.ai |
|---|---|---|
| 4 - Virtualspeech.com | 5 - Speechnotes | 6 - SpeechTexter |
| 7 - Textfromtospeech.com | 8 - Dictation.io | 9 - Voice Note |
| 10 - Voice Notebook | 11 - NaturalReaders |
1. Wondershare Filmora
Filmora’s Speech To Text (STT) function allows you to transcript audio/voice to subtitles/text in one click. it can save your plenty of time on transcribing subtitles and boost your editing efficiency by applying speech-to-text.
What you need to do is download the software and subsribe for its plan.
Features
- Built-in function to transcribe subtitles and captions for your video
- High accuracy in generating text, allows you to edit text by yourself
- Supports up to 26 languages of transcription to engage more users all around the world
- Offers various tools for editing your videos and audio
2. Audext
Audext is a free online application that can help you to save a lot of time while transcribing any audio to text. The transcription to text is done with the use of an advanced AI and hence produces faster and more accurate results.
Audext is used by people from different sectors like education, marketing, media, consulting, healthcare, etc. for their work purposes.
Features
- An inbuilt editor for editing the text while transcribing
- Identifies the speaker easily
- Supports a variety of audio and video formats like MP3, WAV, MP4, etc.
- Offers an option of easy upload and export of files
Pricing
- Free
- Transcription costs for one hour are $12
- Or with the subscription $5
3. Sonix.ai
Sonix is a fast and accurate application that can be used to convert audio to text for any purpose. This application offers a 30-minute free transcription after which an affordable amount may be charged.
Features
- Automatic transcription of files and accessibility of these files from any device
- Advanced translation of these devices into 30 different languages
- Addition of subtitles into any video for easy understanding
- A Sonix media player that allows to share and publish files easily
Pricing
- Free
- Standard subscription - $10 per hour
- Premium subscription - $5 per hour, and an addition of $22 per month
4. Virtualspeech.com
Virtualspeech is an online tool that can transcribe audio to text free. It is a very simple application that allows fats conversion of audio files to texts. After conversion, the file will be emailed to the user from where it can be downloaded and saved.
Features
- Free conversion of any audio files under 1 minute.
- Conversion of audio files of formats Mp3, Wav, or Ogg.
- Provides security as the no files are stored on the server and the site is secured with a b SSL
- Speech to text converter within the site
Pricing
- $0.50 per minute after the free minute
Filmora Audio to Text Converter
Filmora - Audio to Text Converter
• Enables you to convert video speech to text in one click
• Extremely accurate in video speech recognition
• Cross-platform supported - (Windows, Mac, iOS, Android)
Transcribe Audio to Text Free Transcribe Audio to Text Free Transcribe Audio to Text Free Learn More >
5. Speechnotes
Speechnotes is a powerful online notepad that can easily convert audio to text. This tool has implemented an efficient and clean design that makes conversion and editing very easy.
Features
- Best results with an advanced speech recognition technology
- Built-in tools that allow easy editing and correction of the converted text
- Fast working on any web browser and no installation apps required
- Autosave feature that ensures that your data is not lost
- Export to Google Drive option for easy accessibility from any device
Pricing
- Free
- Premium version with the addition of some extra features
6. SpeechTexter
SpeechTexter is a multilingual application that can help you transcribe any type of book, document, blog posts, etc. by using your audio. This tool has a custom dictionary that allows adding short commands for adding frequently used data like phone numbers, punctuation marks, addresses, etc.
Features
- Offers accuracy rate of 90 to 95% percent
- Can be used to increase your fluency in English
- Offers powerful real-time speech recognition
- Easy creation of emails, text notes, blog posts, etc.
- A custom dictionary that can be customized according to the individual use
- Supports more than 60 languages
- Available on both chrome browser and android
Pricing
- Free
7. Textfromtospeech.com
Textfromtospeech is a free online tool that allows you to easily convert audio to text without the need for registration downloading or installation. It has a very simple interface that can record and convert your speech into text with a single click.
Features
- Free and online text recognition and transcription
- Supports many languages
- Pause and record option while converting large files
- Can use voice commands for insertion of symbols like “comma”, “full stop”, etc.
- Smart capitalization
- Easy saving, copying, and sharing of the dictated text
- Available on mobile devices, tablet, and computer
Pricing
- Free
![]()
A cross-platform for making videos anywhere for all creators
Why your video editing isn’t good enough? How about some creative inspo?
- 100 Million+ Users
- 150+ Countries and Regions
- 4 Million+ Social Media Followers
- 5 Million+ Stock Media for Use
* Secure Download
8. Dictation.io
Dictation is a free and simple tool that offers fast conversion of audio to text. Its interface is like that of a very simple notepad and allows the conversion of audio to text for a number of languages including English, Español, Français, Italiano, Português, and more.
Features
- Advanced speech recognition
- Easy editing within the notes
- Easy sharing to mail, tweets, etc.
- No storing of any data and hence offers the necessary security
Pricing
- Free
9. Voice Note
Voice Note is an online speech recognition tool that can automatically record and type anything including speech, interview, etc. This tool can convert any audio file into text format which can easily be opened in Microsoft Word.
Features
- No saving of data in any servers
- Customizable options for audio and text
- A number of languages to choose from while converting audio to text
- Easy copying and exporting options
- Direct Print option from the site
Price
- Free
10. Voice Notebook
Voice Notebook is a speech recognition app that can also convert audio files to text. This application is compatible with a wide range of devices like Mac, Windows, Linux OS, Android, and iOS.
Features
- Voice commands are available when you transcribe audio to text
- Has the ability to recognize any speech embedded in YouTube clips or HTML5 audio or video
- Simple interface and easy editing of text
- An option to download into TXT format is available
Price
- Free
11. NaturalReaders
Natural Readers is a professional program that can convert any text into spoken words. This program offers a lot of features like adjusting the speed of audio, conversion into mp3, selection of voice, etc.
Features
- A font option available for dyslexic people
- Supports formats like pdf, txt, docs, epub, ods, ppt, png, jpeg
- App versions of this online tool are available both for android and apple devices
Pricing
- Free
- Premium plan - $9.99 per month, $59.88 per year
- Plus plan - $19.00 per month, $110.00 per year
Filmora Audio to Text Converter
Filmora - Audio to Text Converter
• Enables you to convert video speech to text in one click
• Extremely accurate in video speech recognition
• Cross-platform supported - (Windows, Mac, iOS, Android)
Transcribe Audio to Text Free Transcribe Audio to Text Free Transcribe Audio to Text Free Learn More >
Conclusion
We have listed above the top 11 tools that can be used to convert audio to text on any device using a browser. Converting audio to text allows you to easily access the required information, edit it, or even share it fully or partially with anyone you wish,
The applications we have listed are free and some of them might charge for the extra features they provide. So no matter what your profession is if you are looking for an app to convert audio to text or record and produce the text of the recordings, choose any one of the listed above applications.
We hope our suggestions help you reduce effort and save time. Please leave your valuable feedback in the comment box below, thank you.
Transform Long Videos into Short Ones Instantly
Turn long videos into viral clips. Effortlessly transform lengthy videos into engaging, shareable clips.
Shanoon Cox
Shanoon Cox is a writer and a lover of all things video.
Follow @Shanoon Cox
Also read:
- Updated In 2024, Top 10 Online Platforms for Sourcing Professional-Quality Montage Tracks
- New 2024 Approved Learn How to Mute Video Audio on Windows 10 Naturally and Economically
- New In 2024, Leading Audio Processors for Cutting the Clutter of Unwanted Echoes
- Mastering the Art of Audio Detachment Top Software Picks for Video Files
- Updated In 2024, Multi-Platform Speech-to-MP3 Technology for Everyday Use
- Updated Sound Silence Strategies How to Get Cleaner Videos without Lossy Audio Removal for 2024
- New 2024 Approved Sourcing Realistic Bristle-Based Sound Effects for Media Projects
- New 2024 Approved Go Beyond Audacity The Most Innovative Audio Apps for Android Devices
- 2024 Approved Top 6 Introduction-Level Digital Audio Workstation Applications
- Infusing Auditory Experience in Visual Storytelling
- In 2024, Audacity on Your Chrome OS Complete Installation and Deletion Processes
- New Discover a World of Free Guitar Inspiration Imagery & Music Downloads
- In 2024, Delving Into Crickets Vocalizations and Echoes
- Speedy Sound Alteration Techniques for Audio Files
- Updated Free Online DAW Options Ranking the Most Convenient and Cost-Effective Tools for 2024
- Updated Skys Acoustics - A Selection of Bird Songs for Digital Listening
- In 2024, Techniques for Converting Audacity Projects Into MP3 Format
- New In 2024, The Secret Weapon of Gamers Vocal Charisma Mastering Morphvox Techniques for In-Game Broadcasts
- 2024 Approved The Ultimate List of the Most Accessible, No-Cost DAW Programs for Emerging Producers
- Unveiling the Best Music Production Software How Does MAGIX Samplitude Stack Up for 2024
- New Video Editors Best Picks 10 Innovative Reaper Extraction Solutions You Cant Ignore for 2024
- Updated 2024 Approved Podcasting Made Simple Your Step-by-Step Guide to Effortless Production
- In 2024, Systematic Review of Sound Forges Audio Enhancement Techniques
- Updated In 2024, Vocal Visions Utilizing Your iPhone as an Audio Identifier Tool
- Ultimate MP3 Generation Suite Seamless Free Conversion of MPA Audio Archives to MP3 Format for 2024
- In 2024, Professional Microphone Management Eradicating Unwanted Ambient Sounds Effectively
- New Mastering Sound with These Top 10 Audio Editors Compatible with Windows and Mac
- Updated Exploring Premium Voice Alteration Software Without Pay Mastering Sound Changes in Filmora Videos for 2024
- Updated 2024 Approved Methods for Detaching Musical Elements From a Video Clip
- 3 Methods to Mirror Infinix Smart 8 HD to Roku | Dr.fone
- How to Lock Apps on Xiaomi to Protect Your Individual Information
- How To Install the Latest iOS/iPadOS Beta Version on iPhone 7? | Dr.fone
- In 2024, How to Track WhatsApp Messages on Apple iPhone 14 Pro Without Them Knowing? | Dr.fone
- How to Fake Snapchat Location on Vivo Y100t | Dr.fone
- Nokia 130 Music Stuck on Screen – Finding Solutions For Stuck on Boot | Dr.fone
- How to retrieve erased videos from Meizu 21
- In 2024, Ways To Find Unlocking Codes For OnePlus 11 5G Phones
- Does Airplane Mode Turn off GPS Location On Realme 11X 5G? | Dr.fone
- Proven Ways in How To Hide Location on Life360 For Motorola Moto E13 | Dr.fone
- What is Fake GPS Location Pro and Is It Good On Xiaomi Redmi 12 5G? | Dr.fone
- New Final Cut Pro Color Correction for Film and Video Professionals for 2024
- How Can I Unlock My iPhone 8 Plus After Forgetting my PIN Code? | Dr.fone
- Updated How to Do Perfect Match Paint 100 the Easy Way for 2024
- In 2024, How to Track a Lost Asus ROG Phone 8 for Free? | Dr.fone
- In 2024, Hassle-Free Ways to Remove FRP Lock on Samsung Galaxy A05 Phones with/without a PC
- In 2024, Is pgsharp legal when you are playing pokemon On Realme C51? | Dr.fone
- Full Solutions to Fix Error Code 920 In Google Play on Honor X9a | Dr.fone
- Best Android Data Recovery - Retrieve Lost Pictures from Honor 90.
- How To Restore Missing Music Files from Vivo Y36i
- How to Simulate GPS Movement in AR games On Vivo V29 Pro? | Dr.fone
- New The Complete Guide to GIF for Discord Profile for 2024
- How to Change Location on TikTok to See More Content On your Itel P55 5G | Dr.fone
- In 2024, Does find my friends work on OnePlus Ace 2V | Dr.fone
- How To Repair iOS System of Apple iPhone XS? | Dr.fone
- Title: Updated 2024 Approved Smoother Soundscapes Advanced Techniques for Noise Reduction in Adobe Premiere Pro Videos
- Author: Jacob
- Created at : 2024-05-05 04:05:18
- Updated at : 2024-05-06 04:05:18
- Link: https://audio-shaping.techidaily.com/updated-2024-approved-smoother-soundscapes-advanced-techniques-for-noise-reduction-in-adobe-premiere-pro-videos/
- License: This work is licensed under CC BY-NC-SA 4.0.
