
:max_bytes(150000):strip_icc():format(webp)/001_the-16-best-shows-to-watch-on-discovery-plus-right-now-5116795-b17411d87cfd4bd690fda5be50ea188c.jpg)
Top 10 Audio Recording Software to Capture Your Voice Easily
Top 10 Audio Recording Software to Capture Your Voice Easily
Top 10 Audio Recording Software to Capture Your Voice Easily

Shanoon Cox
Mar 27, 2024• Proven solutions
Whether professional or for amateur purposes, the audio recording software programs are very important. These programs allow manipulating the audio so that it matches the need for a specific project.
The best audio recording software has a variety of tools embedded to polish the audio recorded, in which this article we are going to review the best of them for you.
What is Audio Recording Software?
As the name suggests, the audio recording software is used to record audio using a unique technology. This allows the users to capture their own or the voice they want and transfer it wherever they want. The software also adds effects to the voice and makes it professional to use wherever the user wants to.
What Does a Sound Recorder Use for?
There are several uses of audio recording software program. Some are listed as under:
- In the music field, this software is of great use. It can be used for multitrack recording. The mixing of the sound is then done using the same or different tools.
- The audio recorded can be edited with ease. This includes enhancing and adding effects to it with perfection.
- With microphone use, the recording software can be integrated to make sure that the voice of the user is also recorded if required.
- Some audio recording software programs also come with screen recording, and therefore, these foster multitasking.
List of Top 10 Audio Recording Software Programs
The audio recording software for PC that would make your life easy is mentioned as under.
1.Wondershare DemoCreator
This is by far the best and the most used software program when it comes to audio recording. It is highly reliable and comes with a GUI. The user interface is easy to understand, and so are the functionalities.
With the best and the most advanced controls recording audio has never been this easy. It also acts as Mac audio recording software, and therefore it is highly recommended for all platforms. The frequent updates make this program even easier to use.
Features
- The interface of the program is very easy to use and stress-free.
- The high definition audio can be recorded with ease.
- The program supports 50+ formats to import audio, video, and other files to the system.
- There are highly advanced options for professional audio recording.
- The program can record endless video and audio as far as there is space on your disk.
Pros
- It is one of the programs that support professional audio editing.
- The program is very easy to use as it has a graphical interface.
Cons
- The program is flash software-based, which can slow down the system.
- It does not offer highly advanced audio editing at all.
Supported Platforms
The program can be used with both Windows and Mac.
Go ahead to download and have a try now!
2.WavePad
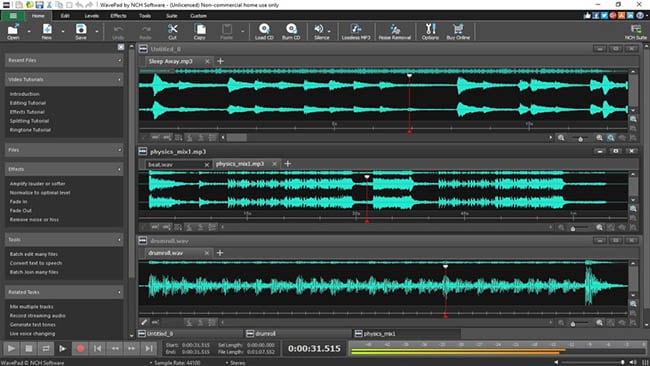
It is one of the best and most used programs to make sure that the audio is recorded with perfection. This program is compatible with most of the audio formats, and therefore it is highly recommended. The overall rating of the program is high as it is used by professionals and, therefore, highly rated as well.
Features
- It has several audio enhancing capabilities, which include amplification and effect addition.
- The audio can be edited, trimmed, and cropped with this program.
- The professional-quality sound recording is used by this program to enhance the capabilities.
Pros
- The best part of this program is its quality of end product that is very high.
- It is a wave editor that gives the users more control over the end product.
Cons
- The mp3 editor of this program does not offer top quality work.
- The program cannot work with multiple files efficiently.
Supported Platforms
It can be installed over Mac, Windows, Android, and iOS.
3.Ocenaudio

As a cross-platform program, this one has a lot to offer. The interface is a bit technical, but overall the use of the program is easy once the hands-on is done. The program is also highly intuitive and allows the users to overcome the day to day audio recording and editing tasks.
Features
- The Ocen Framework is also integrated with this platform to enhance its capabilities.
- The program also records screen if required by the users.
- It is one of the programs that have been rated on other high-end platforms.
Pros
- The program uses auto trim and voice recording controls.
- The sound spectral analysis of the program is highly advanced.
Cons
- The program cannot directly load the file from a CD.
- The program cannot be opened in multiple screens, so the work rate is slow.
Supported Platforms
It is compatible with Mac, Windows, and Linux.
4.Adobe Audition

It can be rightfully regarded as one of the best and the most advanced programs. Backed by years of Adobe experience, it is a program that will get the user a step forward. It is highly recommended to all those users that are looking for a professional level of audio recording.
Features
- It includes multitrack, wave editing, and audio restoration tools to give the best results.
- The essential sound panel has been integrated with the program to get the best oomph effect to the audio.
- The music clips can be integrated within the audio recording to make it sound professional.
Pros
- The platform can be used to create awesome podcasts.
- The audio break can be repaired with perfection.
Cons
- It is expensive, so all the users cannot afford it at all.
- The interface is high tech in nature and requires time to learn.
Supported Platforms
It is supported by Windows and Mac.
5.Audacity

It is free software that is used to record audio professionally. This high-performance program makes sure that the audio which is recorded is also shared with different platforms. The built-in panel is upgraded, and therefore it is highly advance.
Features
- It is ad-free and therefore provides hassle-free work.
- The audio editing and recording have never been as easy as it is with audacity.
- Multitrack editing is also possible with this program.
Pros
- The VST plugin support is provided by the program.
- It is a portable program that can be used for pitch correction.
Cons
- The noise reduction tool of this program needs an upgrade.
- The record to tape feature is currently unavailable.
Supported Platforms
It is supported by Mac, Linux, Windows, and BSD.
6.Wavosaur

It is one of the free programs that can be regarded as better than many paid ones. It is all because the qualities of the program are matchless. The processing of files is done with WAV and Mp3 files filter, which makes the process very much easier.
Features
- The program has multiple document interfaces for multiple file handling.
- The editing features such as cut, copy, paste, and edit can be performed in a single window.
- The waveform representation of the program is accurate and highly advanced.
Pros
- The program offers bit depth convert, pitch shift, and DC offset removal.
- The VST effects can be added to the entire batch of sound files.
Cons
- The audio routing and the multichannel support of the program are not efficient.
- The software sampler extraction is a bit slow when it comes to this program.
Supported Platforms
The program can only be installed on Windows.
7.MixPad
The audio processing and mixing have been made very easy with this platform. The program has an interface that is sleek in design and allows the processing of the audio info with care. The program also supports cloud storage, which means that the entire user’s hard work remains safe and secures all the time.
Features
- The program can mix the unlimited number of tracks all at the same time.
- Depending upon the requirement, the multiple or a single track can be processed at the same time.
- The program supports almost every sound format, so any type of sound can be imported with perfection.
Pros
- The audio effects such as EQ, compression, and reverb can be added with perfection.
- The latency rate is very low, and the program also offers ASIO support for accurate processing.
Cons
- The program only offers the export of the sound that is up to 32 bits.
- The sample rates of up to 96 kHz are only supported, which is less than most of the other mixers.
Supported Platforms
The program can be installed on Mac, Windows, Android, iPad, and Kindle Fire.
8.Sound Forge

If a user wants to completely control the audio editing process, then this software is for them. It is highly advanced and makes sure that the work that is done is highly précised. From Red Book CD creation to sound design and mixing, this program provides the users with complete control and authority over the process.
Features
- The multichannel WAV recording and processing is now possible with the new version of the program.
- The VST plugin support is provided by this program with perfection.
- The VST effects can be chained in a virtual rack.
Pros
- The simple digitization and restoration of the audio have been made simple by this program.
- The one-click solutions allow the users to process the audio tracks easily.
Cons
- The program only offers 32 bits of power, which is very low.
- The multiple VST GUI is not supported by this program.
Supported Platforms
The Sound Forge can be installed on Mac and Windows.
9.Spek

The best part of the software is that it is free and allows the users to overcome the problems which the other audio recorders present. The interface is easy to learn, and therefore the overall usage is easy. The lossless quality is something for which the software is known for. It also supports the FFMPEG library.
Features
- The signal processing is ultra-fast as it uses several threads to process audio.
- The drag and drop support of the program is highly efficient, and the program supports common audio formats.
- The program can be accessed in 19 different languages.
Pros
- The spectral density rulers allow the auto fitting of time.
- The spectral density range of the program is also adjustable.
Cons
- The codec names are, and the audio signal parameters cannot be seen.
- The program is licensed under GPLv3, which is now obsolete.
Supported Platforms
The program is compatible with Windows, Linux, and Mac.
10.Audio Highjack

The program, as the name suggests, makes it possible for the users to completely delve deep into the process of audio editing. The interface, as well as the controls, is very easy to understand and use. For novice users, this program is highly recommended as it makes audio editing a fun-filled activity.
Features
- It provides detailed statistics and min, the max value per channel.
- The processed audio can be listened in real-time to get an idea about the end product.
- The waveform generator and frequency impulse train are embedded within the program.
Pros
- The lame encoder support has been embedded within the recorder to export mp3 files.
- The editor’s look is skin able, which can be changed as per the user choice.
Cons
- The processing options are less as compared to the other recorders.
- The audio files cannot be exported as text, so the program cannot be used with PSpice.
Supported Platforms
The program is only available for Mac.
A Roundup of the Best Audio Recording Software Programs
| No. | Tools | Rating | Supported Formats | Price | Processing Power |
|---|---|---|---|---|---|
| 1 | DemoCreator | 4.5 | .mp3, .m4a, .wav, .wma, .ogg, .flac, .aif, .aiff | $29.99 | 64-bit |
| 2 | WavePad | 4.4 | vox, gsm, WMA, real audio, au, aif, FLAC, and Ogg | $69.95 | 64-bit |
| 3 | Ocenaudio | 4.0 | vox, gsm, WMA, wav, .wma, .ogg, and .flac | Free | 32-bit |
| 4 | Adobe Audition | 4.5 | AIF, AIFF, AIFC | $74.99 | 64-bit |
| 5 | Audacity | 3.9 | mp3, wav, AIFF, au, and ogg | Free | 32-bit |
| 6 | Wavosaur | 3.5 | VST plugins, ASIO driver, multichannel wav files, real-time effect processing. | Free | 32-bit |
| 7 | MixPad | 3.2 | wav, mp3, vox, and gsm | $129 | 32-bit |
| 8 | Sound Forge | 4.0 | SWF, RealMedia 9, WMA, AVI , AIFF, AIF, and SND | Free | 32-bit |
| 9 | Spek | 4.4 | vox, gsm, WMA, Wav, WMA, real audio, au, aif, FLAC, and Ogg | Free | 64-bit |
| 10 | Audio Highjack | 4.2 | .mp3, .m4a, .wav, .wma, aif, FLAC, and Ogg | Free | 64-bit |
Conclusion
With the overall specs and ratings by the users, the Wondershare DemoCreator is the best software that should be used for audio recording.
The program is highly compatible with major operating systems, and therefore it is highly recommended. The overall mechanism is easy, and the program also supports multiple formats.
It is highly technical and is constantly upgraded to make sure that it remains in line with modern technologies. It is a one-stop-shop for all the audio recording needs of the users and therefore highly viable.
With this program, the audio that has been worked on can be shared on most popular social media platforms like YouTube and Facebook.


Shanoon Cox
Shanoon Cox is a writer and a lover of all things video.
Follow @Shanoon Cox
Shanoon Cox
Mar 27, 2024• Proven solutions
Whether professional or for amateur purposes, the audio recording software programs are very important. These programs allow manipulating the audio so that it matches the need for a specific project.
The best audio recording software has a variety of tools embedded to polish the audio recorded, in which this article we are going to review the best of them for you.
What is Audio Recording Software?
As the name suggests, the audio recording software is used to record audio using a unique technology. This allows the users to capture their own or the voice they want and transfer it wherever they want. The software also adds effects to the voice and makes it professional to use wherever the user wants to.
What Does a Sound Recorder Use for?
There are several uses of audio recording software program. Some are listed as under:
- In the music field, this software is of great use. It can be used for multitrack recording. The mixing of the sound is then done using the same or different tools.
- The audio recorded can be edited with ease. This includes enhancing and adding effects to it with perfection.
- With microphone use, the recording software can be integrated to make sure that the voice of the user is also recorded if required.
- Some audio recording software programs also come with screen recording, and therefore, these foster multitasking.
List of Top 10 Audio Recording Software Programs
The audio recording software for PC that would make your life easy is mentioned as under.
1.Wondershare DemoCreator
This is by far the best and the most used software program when it comes to audio recording. It is highly reliable and comes with a GUI. The user interface is easy to understand, and so are the functionalities.
With the best and the most advanced controls recording audio has never been this easy. It also acts as Mac audio recording software, and therefore it is highly recommended for all platforms. The frequent updates make this program even easier to use.
Features
- The interface of the program is very easy to use and stress-free.
- The high definition audio can be recorded with ease.
- The program supports 50+ formats to import audio, video, and other files to the system.
- There are highly advanced options for professional audio recording.
- The program can record endless video and audio as far as there is space on your disk.
Pros
- It is one of the programs that support professional audio editing.
- The program is very easy to use as it has a graphical interface.
Cons
- The program is flash software-based, which can slow down the system.
- It does not offer highly advanced audio editing at all.
Supported Platforms
The program can be used with both Windows and Mac.
Go ahead to download and have a try now!
2.WavePad
It is one of the best and most used programs to make sure that the audio is recorded with perfection. This program is compatible with most of the audio formats, and therefore it is highly recommended. The overall rating of the program is high as it is used by professionals and, therefore, highly rated as well.
Features
- It has several audio enhancing capabilities, which include amplification and effect addition.
- The audio can be edited, trimmed, and cropped with this program.
- The professional-quality sound recording is used by this program to enhance the capabilities.
Pros
- The best part of this program is its quality of end product that is very high.
- It is a wave editor that gives the users more control over the end product.
Cons
- The mp3 editor of this program does not offer top quality work.
- The program cannot work with multiple files efficiently.
Supported Platforms
It can be installed over Mac, Windows, Android, and iOS.
3.Ocenaudio
As a cross-platform program, this one has a lot to offer. The interface is a bit technical, but overall the use of the program is easy once the hands-on is done. The program is also highly intuitive and allows the users to overcome the day to day audio recording and editing tasks.
Features
- The Ocen Framework is also integrated with this platform to enhance its capabilities.
- The program also records screen if required by the users.
- It is one of the programs that have been rated on other high-end platforms.
Pros
- The program uses auto trim and voice recording controls.
- The sound spectral analysis of the program is highly advanced.
Cons
- The program cannot directly load the file from a CD.
- The program cannot be opened in multiple screens, so the work rate is slow.
Supported Platforms
It is compatible with Mac, Windows, and Linux.
4.Adobe Audition
It can be rightfully regarded as one of the best and the most advanced programs. Backed by years of Adobe experience, it is a program that will get the user a step forward. It is highly recommended to all those users that are looking for a professional level of audio recording.
Features
- It includes multitrack, wave editing, and audio restoration tools to give the best results.
- The essential sound panel has been integrated with the program to get the best oomph effect to the audio.
- The music clips can be integrated within the audio recording to make it sound professional.
Pros
- The platform can be used to create awesome podcasts.
- The audio break can be repaired with perfection.
Cons
- It is expensive, so all the users cannot afford it at all.
- The interface is high tech in nature and requires time to learn.
Supported Platforms
It is supported by Windows and Mac.
5.Audacity
It is free software that is used to record audio professionally. This high-performance program makes sure that the audio which is recorded is also shared with different platforms. The built-in panel is upgraded, and therefore it is highly advance.
Features
- It is ad-free and therefore provides hassle-free work.
- The audio editing and recording have never been as easy as it is with audacity.
- Multitrack editing is also possible with this program.
Pros
- The VST plugin support is provided by the program.
- It is a portable program that can be used for pitch correction.
Cons
- The noise reduction tool of this program needs an upgrade.
- The record to tape feature is currently unavailable.
Supported Platforms
It is supported by Mac, Linux, Windows, and BSD.
6.Wavosaur
It is one of the free programs that can be regarded as better than many paid ones. It is all because the qualities of the program are matchless. The processing of files is done with WAV and Mp3 files filter, which makes the process very much easier.
Features
- The program has multiple document interfaces for multiple file handling.
- The editing features such as cut, copy, paste, and edit can be performed in a single window.
- The waveform representation of the program is accurate and highly advanced.
Pros
- The program offers bit depth convert, pitch shift, and DC offset removal.
- The VST effects can be added to the entire batch of sound files.
Cons
- The audio routing and the multichannel support of the program are not efficient.
- The software sampler extraction is a bit slow when it comes to this program.
Supported Platforms
The program can only be installed on Windows.
7.MixPad
The audio processing and mixing have been made very easy with this platform. The program has an interface that is sleek in design and allows the processing of the audio info with care. The program also supports cloud storage, which means that the entire user’s hard work remains safe and secures all the time.
Features
- The program can mix the unlimited number of tracks all at the same time.
- Depending upon the requirement, the multiple or a single track can be processed at the same time.
- The program supports almost every sound format, so any type of sound can be imported with perfection.
Pros
- The audio effects such as EQ, compression, and reverb can be added with perfection.
- The latency rate is very low, and the program also offers ASIO support for accurate processing.
Cons
- The program only offers the export of the sound that is up to 32 bits.
- The sample rates of up to 96 kHz are only supported, which is less than most of the other mixers.
Supported Platforms
The program can be installed on Mac, Windows, Android, iPad, and Kindle Fire.
8.Sound Forge
If a user wants to completely control the audio editing process, then this software is for them. It is highly advanced and makes sure that the work that is done is highly précised. From Red Book CD creation to sound design and mixing, this program provides the users with complete control and authority over the process.
Features
- The multichannel WAV recording and processing is now possible with the new version of the program.
- The VST plugin support is provided by this program with perfection.
- The VST effects can be chained in a virtual rack.
Pros
- The simple digitization and restoration of the audio have been made simple by this program.
- The one-click solutions allow the users to process the audio tracks easily.
Cons
- The program only offers 32 bits of power, which is very low.
- The multiple VST GUI is not supported by this program.
Supported Platforms
The Sound Forge can be installed on Mac and Windows.
9.Spek
The best part of the software is that it is free and allows the users to overcome the problems which the other audio recorders present. The interface is easy to learn, and therefore the overall usage is easy. The lossless quality is something for which the software is known for. It also supports the FFMPEG library.
Features
- The signal processing is ultra-fast as it uses several threads to process audio.
- The drag and drop support of the program is highly efficient, and the program supports common audio formats.
- The program can be accessed in 19 different languages.
Pros
- The spectral density rulers allow the auto fitting of time.
- The spectral density range of the program is also adjustable.
Cons
- The codec names are, and the audio signal parameters cannot be seen.
- The program is licensed under GPLv3, which is now obsolete.
Supported Platforms
The program is compatible with Windows, Linux, and Mac.
10.Audio Highjack
The program, as the name suggests, makes it possible for the users to completely delve deep into the process of audio editing. The interface, as well as the controls, is very easy to understand and use. For novice users, this program is highly recommended as it makes audio editing a fun-filled activity.
Features
- It provides detailed statistics and min, the max value per channel.
- The processed audio can be listened in real-time to get an idea about the end product.
- The waveform generator and frequency impulse train are embedded within the program.
Pros
- The lame encoder support has been embedded within the recorder to export mp3 files.
- The editor’s look is skin able, which can be changed as per the user choice.
Cons
- The processing options are less as compared to the other recorders.
- The audio files cannot be exported as text, so the program cannot be used with PSpice.
Supported Platforms
The program is only available for Mac.
A Roundup of the Best Audio Recording Software Programs
| No. | Tools | Rating | Supported Formats | Price | Processing Power |
|---|---|---|---|---|---|
| 1 | DemoCreator | 4.5 | .mp3, .m4a, .wav, .wma, .ogg, .flac, .aif, .aiff | $29.99 | 64-bit |
| 2 | WavePad | 4.4 | vox, gsm, WMA, real audio, au, aif, FLAC, and Ogg | $69.95 | 64-bit |
| 3 | Ocenaudio | 4.0 | vox, gsm, WMA, wav, .wma, .ogg, and .flac | Free | 32-bit |
| 4 | Adobe Audition | 4.5 | AIF, AIFF, AIFC | $74.99 | 64-bit |
| 5 | Audacity | 3.9 | mp3, wav, AIFF, au, and ogg | Free | 32-bit |
| 6 | Wavosaur | 3.5 | VST plugins, ASIO driver, multichannel wav files, real-time effect processing. | Free | 32-bit |
| 7 | MixPad | 3.2 | wav, mp3, vox, and gsm | $129 | 32-bit |
| 8 | Sound Forge | 4.0 | SWF, RealMedia 9, WMA, AVI , AIFF, AIF, and SND | Free | 32-bit |
| 9 | Spek | 4.4 | vox, gsm, WMA, Wav, WMA, real audio, au, aif, FLAC, and Ogg | Free | 64-bit |
| 10 | Audio Highjack | 4.2 | .mp3, .m4a, .wav, .wma, aif, FLAC, and Ogg | Free | 64-bit |
Conclusion
With the overall specs and ratings by the users, the Wondershare DemoCreator is the best software that should be used for audio recording.
The program is highly compatible with major operating systems, and therefore it is highly recommended. The overall mechanism is easy, and the program also supports multiple formats.
It is highly technical and is constantly upgraded to make sure that it remains in line with modern technologies. It is a one-stop-shop for all the audio recording needs of the users and therefore highly viable.
With this program, the audio that has been worked on can be shared on most popular social media platforms like YouTube and Facebook.
Shanoon Cox
Shanoon Cox is a writer and a lover of all things video.
Follow @Shanoon Cox
Perfect Harmony in Post-Production: Innovative iMovie Audio Techniques for Seamless Soundscape Integration
All You Need to Know About iMovie Audio Editing

Marion Dubois
Oct 26, 2023• Proven solutions
iMovie offers a fantastic platform for video editing where you can merge multiple video clips to create something very phenomenal. Plus, it’s simply here to navigate between different scenes, edit video clips and save results directly to the digital format without making any videotape transformations.
It provides lots of things to beginners and professionals with its easy-to-use interface without any quality loss for your results even after adding lots of transitions, changes, and effects.
However, it is not accessible to master software, precisely when you’re not familiar with it, or you’re not its professional user. So today, we’d like to explore or pay attention to iMovie’s audio editing steps, tips, and tricks to help you become an iMovie master quickly.
What’s more, a practical yet professional iMovie alternative software is also advisable in this guide. So when the iMovie cannot fulfil your editing requirements, why don’t you hop on an iMovie alternative software?
Now, let’s get started!
Part 1: How to Edit Audio Clips in iMovie?
To learn how to edit audio clips in iMovie, you can use actions in the menu along with the quick shortcuts to make adjustments to your audio clips in iMovie on Mac. It’s a tip for your convenience!
Trim Audio Clips
There are a couple of options to trim an audio clip in iMovie.
#1. Trim to Playhead
You can place the playhead in your timeline. Now, trim an audio clip to that exact spot. Next, start moving the playhead and do one from the following.
- Select Modify > Trim to Playhead option in the menu bar.
- Right-click the audio clip and select the option of Trim to Playhead in the shortcut menu.
#2. Use the Clip Trimmer
You can use the Clip Trimmer to trim an exact section of the clip.
Step 1. Right-click the audio clip and select Show Clip Trimmer in the shortcut menu.
Step 2. After the Clip Trimmer shows, select a section you wish to trim by dragging the arrows right and left while holding the white lines. The area within those lines is what will get entirely deleted.
Move the entire clip but keep the trim area in place if arrows turn to a film strip icon.
Step 3. Click Close Clip Trimmer after you finish this section.
Shorten or Lengthen Audio Clips
You can easily shorten or lengthen an audio clip in iMovie. Just choose the pin in the timeline and drag one of its edges. The duration of the clip change will change as you carry. And a new course will be displayed after you finish in the upper left menu.
You can also set the clip’s duration to an exact time. Select the clip in the timeline and hit the Clip Information (small letter “i”) tab located above the Viewer. Put the value of the time you want in seconds in the Duration box on the right.
Change the Speed of an Audio Clip
You may want to speed up or slow down an audio clip while editing music in iMovie. So, here’s what you need to do!
Method 1. Click the Speed button above the Viewer. Next, select Custom in the Speed drop-down box and enter a percentage next to it. You can also set a different speed in that box if you prefer.
Method 2. Right-click the clip and select Show Speed Editor from the shortcut menu. A slider will then display at the top of the clip that you can move to change the speed.
Adjust the Volume of an Audio Clip
You can set the audio clip’s volume at higher or lower, or even mute it. Just select the clip and then do one of the following.
- Select the Volume tab above the Viewer option and move the slider to the percentage of volume. Hit the Mute button to mute the audio clip.
- Tap inside the clip, and when the two-sided arrow appears, drag up or down to adjust the volume.
Fade an Audio Clip
While editing audio in iMovie, you can also fade in or out the clip. Choose a clip in the timeline and then drag the fade handle (small circle) at either the ending or the beginning of the clip to make a fade-out or a fade-in effect.
As you drag, you will see the arcs displaying the shadow for the clips fade in or fade out.
How to Edit Audio Clips in iMovie on iOS?
The iMovie timeline is where you sort or organize all your audio clips, such as the special effects and background music. Audio clips are always present below the video clips in the timeline. To edit audio clips in iMovie on your iPhones or iPads, you can follow the guide belo
Move an Audio Clip
You can transfer the whole audio clip, except the background music, to another location.
- Touch and hold the purple or blue audio clip with your project open in the timeline until it comes over the timeline bar.
- Drag the clip to another place and release.
Adjust the Audio Clip’s Duration
Step 1. While the project is launched in the timeline, tap the audio clip (in blue or purple) or the background music clip you wish to adjust.
Step 2. Now, you can see the display of yellow trim handles. Drag them either at the end of the clip to the points where you wish the audio to start and end. If a trim handle won’t move left or right, it simply indicates there is no additional audio to work with on that clip’s end.
Step 3. Tap outside the audio clip and let the trim handles disappear.
Split an Audio Clip
There are around two options to split audio clips in iMovie. You can remove unwanted parts or adjust each section’s duration, volume, or speed while you split a clip.
Step 1. With your launched project in the timeline, scroll the timeline to the playhead’s position where you want to split the audio.
Step 2. Click the audio clip to display the inspector at the screen’s bottom.
Step 3. Now, click the Actions button, and select the Split tab.
Or, you can tap the clip (it becomes outlined in yellow), then swipe above the playhead as if you were placing your finger to slide over it.
Detach the Audio Part from a Video
You can detach the video clip’s audio to remove or edit it as a separate video clip.
Step 1. When the project is open in the timeline, select a video clip and display the inspector at the screen’s bottom.
Step 2. Tap the Actions button, then tap Detach.
Step 3. A new blue-colored audio clip will then appear below the video project. You can now move, edit, or delete the audio clip separately from its parent video clip.
Move Audio to the Foreground or Background
To ensure the sound in your video clips can listen above the background music, iMovie implies audio “ducking”. Ducking lowers the background music clips’ volume whenever there’s a video clip whose sound is playing simultaneously.
You can select which audio clips are in the foreground or the background.
Step 1. Select the timeline’s audio clip to display the inspector at the screen’s bottom.
Step 2. Hit the Actions tab and proceed with selecting the Foreground or Background.
The clip color changes to indicate whether it’s the background music (green) or foreground audio (blue or purple).
Part 2: An Easier Way to Edit Audio Clips
Windows users might be wandering for an alternative to iMovie as this software tool is only compatible with Mac and iOS devices. You will be thrilled to know that Wondershare Filmora can serve you with all synonymous and extra features more than the iMovie, and it works significantly in the Windows environment.
This latest software tool also assists users with easy video editing tricks and the intuitive interface that best serves quality editing to beginners and professionals.
Despite the basic video editing features, such as trimming, splitting, merging, cutting, and cropping, Filmora also offers various advanced editing elements that are far better than iMovie. And, with its video editing features, you can make a green screen effect, stabilize your video footage, reverse your video clip, and more.
Moreover, you can enjoy royalty-free music tracks for different themes, such as Young and Bright, Tender and Sentimental, Rock, Folk, Electronic Rock, and Hipster Folk, for selection.
All this will be available with a single program called Wondershare Filmora to take advantage of them for free. You do not have to search the background music files like a needle in a haystack. The program has nicely organized the music themes into six different folders. You can apply it for your video and make advanced editing, such as split/trim the clip, adjust the playback speed, pitch, volume, etc.
How to Edit Audio with Wondershare Filmora?
In Wondershare Filmora, you can insert background music and other files from the audio library or your computer. You can even record your voiceover using it.
Add Background Music
Filmora provides a royalty-free music library you can access or import your music within the program. You can select a song from the royalty-free audio library and use it for free.
The audio library has categorized into: YOUNG & BRIGHT, TENDER & SENTIMENTAL, ROCK, FOLK, and ELECTRONIC. The different kinds of sound effects are also available under the Sound Effects tab.
Once you find a sound effect or a song, either right-click on it and go with the Apply or drag and drop it into an audio track in the timeline.
Or, you can click the Import button above the Media Library panel to browse for audio files in your PC system. Then, select and import it into the Media Library when you find the song or other audio files you wish to add.
Once you place the song in the timeline, double-click to edit it in the Audio editing panel. You can apply fade-in or fade-out effects or adjust the pitch and volume. Filmora lets you add up to 100 audio tracks.
Split Audio Clips
Choose your audio clip and place the playhead where you want to split it, then right-click on the clip and choose the Split tab or click the Split icon right above on the toolbar.
Adjust Audio Settings
Double click on the audio clip to make adjustments to your audio. Open a panel with adjustment sliders in the timeline for pitch and volume.
Another element that you’ll find in this panel is Denoise, which is a feature that can remove background noise from your audio clips.
For a more professional audio editing experience, you can also access the Audio Equalizer from this panel. Select from presets or make manual adjustments by hitting the Customize tab.
Play it when you are done and, if you’re not happy with the results, tap the Reset button to start over.
Audio Equalizer (EQ)
All videos have plenty of sounds like speech, music, or sound effects. Changing the strength of sound waves will help you to mix these sounds within a coherent soundtrack.
Locate your audio clip in an audio track and double-click on it to open the Audio settings menu window. A drop-down menu next to the Equalizer feature will display presets such as Classic, Default, Rock’n’Roll, Techno, Sparkle, Bass, Hard Rock, Pop, Ska, Blues, Folk, Acoustic, Custom, or Country. Choose the preset that best fits your current needs and hit the OK tab to apply it.
Now, hit the Customize tab next to the drop-down bar to adjust the Audio Equalizer manually. Drag the sliders up or down and make the adjustments until you find their ideal value. Finally, hit OK and save your settings.
Besides the included music tracks and sound effects in Filmora initially, you can also find more audio files from Filmora’s effects store – Filmstock, and even get some free music and sound.
Part 3: iMovie Audio Editing Tips & Tricks
iMovie is a great video editor for Mac computers. After understanding the best alternative of iMovie sound editin g, let’s check out some tips on editing audio in iMovie best.
The explanations and screenshots below are for iMovie 10 only. However, the steps are a bit similar to older versions.
So, here we go!
1. Use Waveforms to See What You Hear
To properly edit the audio track in iMovie, you need a good pair of headphones and speakers to hear the sound, but you also need to check the sound.
You can check the sound in iMovie by considering the waveforms on each clip. If the waveforms can’t be seen, go to the View drop-down menu and choose the Show Waveforms option. The clip size for your project can also adjust to get an even better appearance for each video clip.
The waveforms will display the volume level of a clip and give you a good idea of what sections will require to turn up or down. You can also check how the levels of different clips compare to one another.
2. Audio Adjustments
With the help of Adjust tab in the top right, you can access some basic audio editing tools for changing your selected clip’s volume or changing the volume of other relative clips in the project.
The adjustment window of audio also provides basic audio equalization and noise reduction tools, along with a range of effects - from echo to robot - that will change the way people in your video sound.
3. Edit Audio with the Timeline
iMovie assists you in adjusting the audio within the clips themselves. Each pin has a volume bar, moving up and down to decrease or increase the audio level. The clips also contain Fade In and Fade Out tabs at the beginning and end, dragging to adjust the fade’s length.
By adding a short fade effect, whether in or out, the sound becomes relatively smoother and less conflicting to the ear when a new clip begins.
4. Detach the Audio
By default, iMovie keeps the video and audio sections of clips together for convenience. Yet, you want to use the video and audio sections of a clip separately sometimes.
For this purpose, choose your clip in the timeline, visit the Modify drop-down menu, and hit the Detach Audio button. You’ll now have two clips - one with the images and another with the sound.
A lot you can do with the detached audio. For instance, you could extend the audio clip to begin before the video plays, or so that it plays for a few seconds even after the video fades out. You could also cut out pieces from the audio’s middle portion while leaving the video intact.
Conclusion
Coming towards the end of the discussion, after understanding iMovie audio editingand going through an elaborated alternative of iMovie application, we decided that Wondershare Filmora sounds the best out of it. It allows you to flawlessly edit video and audio files on your desktop, with various inbuilt royalty-free music tracks to select from that can further improve your project’s presence.
Marion Dubois
Marion Dubois is a writer and a lover of all things video.
Follow @Marion Dubois
Marion Dubois
Oct 26, 2023• Proven solutions
iMovie offers a fantastic platform for video editing where you can merge multiple video clips to create something very phenomenal. Plus, it’s simply here to navigate between different scenes, edit video clips and save results directly to the digital format without making any videotape transformations.
It provides lots of things to beginners and professionals with its easy-to-use interface without any quality loss for your results even after adding lots of transitions, changes, and effects.
However, it is not accessible to master software, precisely when you’re not familiar with it, or you’re not its professional user. So today, we’d like to explore or pay attention to iMovie’s audio editing steps, tips, and tricks to help you become an iMovie master quickly.
What’s more, a practical yet professional iMovie alternative software is also advisable in this guide. So when the iMovie cannot fulfil your editing requirements, why don’t you hop on an iMovie alternative software?
Now, let’s get started!
Part 1: How to Edit Audio Clips in iMovie?
To learn how to edit audio clips in iMovie, you can use actions in the menu along with the quick shortcuts to make adjustments to your audio clips in iMovie on Mac. It’s a tip for your convenience!
Trim Audio Clips
There are a couple of options to trim an audio clip in iMovie.
#1. Trim to Playhead
You can place the playhead in your timeline. Now, trim an audio clip to that exact spot. Next, start moving the playhead and do one from the following.
- Select Modify > Trim to Playhead option in the menu bar.
- Right-click the audio clip and select the option of Trim to Playhead in the shortcut menu.
#2. Use the Clip Trimmer
You can use the Clip Trimmer to trim an exact section of the clip.
Step 1. Right-click the audio clip and select Show Clip Trimmer in the shortcut menu.
Step 2. After the Clip Trimmer shows, select a section you wish to trim by dragging the arrows right and left while holding the white lines. The area within those lines is what will get entirely deleted.
Move the entire clip but keep the trim area in place if arrows turn to a film strip icon.
Step 3. Click Close Clip Trimmer after you finish this section.
Shorten or Lengthen Audio Clips
You can easily shorten or lengthen an audio clip in iMovie. Just choose the pin in the timeline and drag one of its edges. The duration of the clip change will change as you carry. And a new course will be displayed after you finish in the upper left menu.
You can also set the clip’s duration to an exact time. Select the clip in the timeline and hit the Clip Information (small letter “i”) tab located above the Viewer. Put the value of the time you want in seconds in the Duration box on the right.
Change the Speed of an Audio Clip
You may want to speed up or slow down an audio clip while editing music in iMovie. So, here’s what you need to do!
Method 1. Click the Speed button above the Viewer. Next, select Custom in the Speed drop-down box and enter a percentage next to it. You can also set a different speed in that box if you prefer.
Method 2. Right-click the clip and select Show Speed Editor from the shortcut menu. A slider will then display at the top of the clip that you can move to change the speed.
Adjust the Volume of an Audio Clip
You can set the audio clip’s volume at higher or lower, or even mute it. Just select the clip and then do one of the following.
- Select the Volume tab above the Viewer option and move the slider to the percentage of volume. Hit the Mute button to mute the audio clip.
- Tap inside the clip, and when the two-sided arrow appears, drag up or down to adjust the volume.
Fade an Audio Clip
While editing audio in iMovie, you can also fade in or out the clip. Choose a clip in the timeline and then drag the fade handle (small circle) at either the ending or the beginning of the clip to make a fade-out or a fade-in effect.
As you drag, you will see the arcs displaying the shadow for the clips fade in or fade out.
How to Edit Audio Clips in iMovie on iOS?
The iMovie timeline is where you sort or organize all your audio clips, such as the special effects and background music. Audio clips are always present below the video clips in the timeline. To edit audio clips in iMovie on your iPhones or iPads, you can follow the guide belo
Move an Audio Clip
You can transfer the whole audio clip, except the background music, to another location.
- Touch and hold the purple or blue audio clip with your project open in the timeline until it comes over the timeline bar.
- Drag the clip to another place and release.
Adjust the Audio Clip’s Duration
Step 1. While the project is launched in the timeline, tap the audio clip (in blue or purple) or the background music clip you wish to adjust.
Step 2. Now, you can see the display of yellow trim handles. Drag them either at the end of the clip to the points where you wish the audio to start and end. If a trim handle won’t move left or right, it simply indicates there is no additional audio to work with on that clip’s end.
Step 3. Tap outside the audio clip and let the trim handles disappear.
Split an Audio Clip
There are around two options to split audio clips in iMovie. You can remove unwanted parts or adjust each section’s duration, volume, or speed while you split a clip.
Step 1. With your launched project in the timeline, scroll the timeline to the playhead’s position where you want to split the audio.
Step 2. Click the audio clip to display the inspector at the screen’s bottom.
Step 3. Now, click the Actions button, and select the Split tab.
Or, you can tap the clip (it becomes outlined in yellow), then swipe above the playhead as if you were placing your finger to slide over it.
Detach the Audio Part from a Video
You can detach the video clip’s audio to remove or edit it as a separate video clip.
Step 1. When the project is open in the timeline, select a video clip and display the inspector at the screen’s bottom.
Step 2. Tap the Actions button, then tap Detach.
Step 3. A new blue-colored audio clip will then appear below the video project. You can now move, edit, or delete the audio clip separately from its parent video clip.
Move Audio to the Foreground or Background
To ensure the sound in your video clips can listen above the background music, iMovie implies audio “ducking”. Ducking lowers the background music clips’ volume whenever there’s a video clip whose sound is playing simultaneously.
You can select which audio clips are in the foreground or the background.
Step 1. Select the timeline’s audio clip to display the inspector at the screen’s bottom.
Step 2. Hit the Actions tab and proceed with selecting the Foreground or Background.
The clip color changes to indicate whether it’s the background music (green) or foreground audio (blue or purple).
Part 2: An Easier Way to Edit Audio Clips
Windows users might be wandering for an alternative to iMovie as this software tool is only compatible with Mac and iOS devices. You will be thrilled to know that Wondershare Filmora can serve you with all synonymous and extra features more than the iMovie, and it works significantly in the Windows environment.
This latest software tool also assists users with easy video editing tricks and the intuitive interface that best serves quality editing to beginners and professionals.
Despite the basic video editing features, such as trimming, splitting, merging, cutting, and cropping, Filmora also offers various advanced editing elements that are far better than iMovie. And, with its video editing features, you can make a green screen effect, stabilize your video footage, reverse your video clip, and more.
Moreover, you can enjoy royalty-free music tracks for different themes, such as Young and Bright, Tender and Sentimental, Rock, Folk, Electronic Rock, and Hipster Folk, for selection.
All this will be available with a single program called Wondershare Filmora to take advantage of them for free. You do not have to search the background music files like a needle in a haystack. The program has nicely organized the music themes into six different folders. You can apply it for your video and make advanced editing, such as split/trim the clip, adjust the playback speed, pitch, volume, etc.
How to Edit Audio with Wondershare Filmora?
In Wondershare Filmora, you can insert background music and other files from the audio library or your computer. You can even record your voiceover using it.
Add Background Music
Filmora provides a royalty-free music library you can access or import your music within the program. You can select a song from the royalty-free audio library and use it for free.
The audio library has categorized into: YOUNG & BRIGHT, TENDER & SENTIMENTAL, ROCK, FOLK, and ELECTRONIC. The different kinds of sound effects are also available under the Sound Effects tab.
Once you find a sound effect or a song, either right-click on it and go with the Apply or drag and drop it into an audio track in the timeline.
Or, you can click the Import button above the Media Library panel to browse for audio files in your PC system. Then, select and import it into the Media Library when you find the song or other audio files you wish to add.
Once you place the song in the timeline, double-click to edit it in the Audio editing panel. You can apply fade-in or fade-out effects or adjust the pitch and volume. Filmora lets you add up to 100 audio tracks.
Split Audio Clips
Choose your audio clip and place the playhead where you want to split it, then right-click on the clip and choose the Split tab or click the Split icon right above on the toolbar.
Adjust Audio Settings
Double click on the audio clip to make adjustments to your audio. Open a panel with adjustment sliders in the timeline for pitch and volume.
Another element that you’ll find in this panel is Denoise, which is a feature that can remove background noise from your audio clips.
For a more professional audio editing experience, you can also access the Audio Equalizer from this panel. Select from presets or make manual adjustments by hitting the Customize tab.
Play it when you are done and, if you’re not happy with the results, tap the Reset button to start over.
Audio Equalizer (EQ)
All videos have plenty of sounds like speech, music, or sound effects. Changing the strength of sound waves will help you to mix these sounds within a coherent soundtrack.
Locate your audio clip in an audio track and double-click on it to open the Audio settings menu window. A drop-down menu next to the Equalizer feature will display presets such as Classic, Default, Rock’n’Roll, Techno, Sparkle, Bass, Hard Rock, Pop, Ska, Blues, Folk, Acoustic, Custom, or Country. Choose the preset that best fits your current needs and hit the OK tab to apply it.
Now, hit the Customize tab next to the drop-down bar to adjust the Audio Equalizer manually. Drag the sliders up or down and make the adjustments until you find their ideal value. Finally, hit OK and save your settings.
Besides the included music tracks and sound effects in Filmora initially, you can also find more audio files from Filmora’s effects store – Filmstock, and even get some free music and sound.
Part 3: iMovie Audio Editing Tips & Tricks
iMovie is a great video editor for Mac computers. After understanding the best alternative of iMovie sound editin g, let’s check out some tips on editing audio in iMovie best.
The explanations and screenshots below are for iMovie 10 only. However, the steps are a bit similar to older versions.
So, here we go!
1. Use Waveforms to See What You Hear
To properly edit the audio track in iMovie, you need a good pair of headphones and speakers to hear the sound, but you also need to check the sound.
You can check the sound in iMovie by considering the waveforms on each clip. If the waveforms can’t be seen, go to the View drop-down menu and choose the Show Waveforms option. The clip size for your project can also adjust to get an even better appearance for each video clip.
The waveforms will display the volume level of a clip and give you a good idea of what sections will require to turn up or down. You can also check how the levels of different clips compare to one another.
2. Audio Adjustments
With the help of Adjust tab in the top right, you can access some basic audio editing tools for changing your selected clip’s volume or changing the volume of other relative clips in the project.
The adjustment window of audio also provides basic audio equalization and noise reduction tools, along with a range of effects - from echo to robot - that will change the way people in your video sound.
3. Edit Audio with the Timeline
iMovie assists you in adjusting the audio within the clips themselves. Each pin has a volume bar, moving up and down to decrease or increase the audio level. The clips also contain Fade In and Fade Out tabs at the beginning and end, dragging to adjust the fade’s length.
By adding a short fade effect, whether in or out, the sound becomes relatively smoother and less conflicting to the ear when a new clip begins.
4. Detach the Audio
By default, iMovie keeps the video and audio sections of clips together for convenience. Yet, you want to use the video and audio sections of a clip separately sometimes.
For this purpose, choose your clip in the timeline, visit the Modify drop-down menu, and hit the Detach Audio button. You’ll now have two clips - one with the images and another with the sound.
A lot you can do with the detached audio. For instance, you could extend the audio clip to begin before the video plays, or so that it plays for a few seconds even after the video fades out. You could also cut out pieces from the audio’s middle portion while leaving the video intact.
Conclusion
Coming towards the end of the discussion, after understanding iMovie audio editingand going through an elaborated alternative of iMovie application, we decided that Wondershare Filmora sounds the best out of it. It allows you to flawlessly edit video and audio files on your desktop, with various inbuilt royalty-free music tracks to select from that can further improve your project’s presence.
Marion Dubois
Marion Dubois is a writer and a lover of all things video.
Follow @Marion Dubois
“Audio Precision – The Foremost 4 Music Editors for Mac (2024 Edition)”
A good music editor for your Mac can do everything you need: record voiceover files, cut, delete, insert audio clips, add voice effects, add sound effects, perform a spectrographic analysis, and much more. And why do you need to do those things with a music editor? Some of the most common music editor projects include:
- Find music online and edit to share to phone and other devices
- Trim audio and music files
- Create custom ringtones
- Create and share custom music and audio files
- Add music and sound effects to video files
So how do you choose a music editor for Mac that can do everything you want? In this article, we will share with you some music editors that you can use on Mac computer. Let’s move on.
Section 1. Free Music Editors for Mac
Free-to-use is great, especially when you get all the performance and features you need in a music editor. Two free music and audio editors for Mac we recommend are:
1. Audio Editor: OcenAudio
OcenAudio has a very extensive toolkit of audio editing capabilities and tools. Still, one of its best features is that it’s easy on your memory: you can edit even very large files without requiring external memory resources.
OcenAudio supports MP3, WAV, FLAC, WMA, and many other audio formats.

2. MP3 Editor: Audacity
Audacity is free and also has to go for it, a simple and intuitive interface that is easy for beginners. It also has a surprisingly extensive list of features, options, and effects, including spectrographic analysis, undo/redo function, and more.
Audacity supports many formats, including WAV, AIFF, FLAC, MP2, MP3, and OGG.

Section 2. Professional Quality Music Editors for Mac
Pay music editing programs for Mac offer a serious boost in performance and an increased number of supported formats and output options.
Two pay music and audio editors for Mac we recommend are:
3. Music Editor: Wondershare Filmora Video & Audio Editor for Mac [Free]
Wondershare Filmora Video & Audio Editor for Mac is often aimed at users who want to edit videos, but this program also offers professional quality performance for editing music and audio. Novice users will appreciate the price and the intuitive interface that allows a gentle learning curve.
Advanced users will like the extensive features and supported formats, including a music library feature. It has slightly fewer features and supported formats than Adobe Audition, but if you don’t need those extra bells and whistles, this is the music editor for Mac for you.
For Win 7 or later (64-bit)
For macOS 10.12 or later
If you are using a windows, check this tutorial instead: Windows Video Editing Software .
4. Sound Editor: Adobe Audition
Adobe Audition comes with a high price at $20/mo. However, users who demand the best will find the cost worth it for a license. It has the most extensive audio and music editing toolset, and it supports the widest range of formats.
A complete range of tutorials also supports adobe Audition to help you get the most from your investment. The fact it takes a while to work through the tutorials and get up to speed might be the only drawback.

Section 3. How to choose Music Editor for Mac users?
Choosing a music editor for Mac, including the ability to edit and output to MP3 and MP4 formats, depends entirely on your needs. If your needs are modest and limited features or functionality work for you, several free-to-use options will get the job done. If you need more robust functionality and professional quality, a pay program will offer more satisfying performance. Keep in mind the following questions when making your choice:
- How often do I need to edit music and audio?
- Do I need simple trim and edit features, or also audio effects?
- What formats are my source files, and what formats do I want to output to?
- What is my budget, and how can I balance performance and price?
With Filmora, you can edit music and audio files with ease. Besides basic cutting features, you can apply fade-in and fade-out effects, adjust the audio volume. What’s more, you can remove the background noise in the audio to get a clear sound.
Versatile Video Editor - Wondershare Filmora
An easy yet powerful editor
Numerous effects to choose from
Detailed tutorials provided by the official channel

So how do you choose a music editor for Mac that can do everything you want? In this article, we will share with you some music editors that you can use on Mac computer. Let’s move on.
Section 1. Free Music Editors for Mac
Free-to-use is great, especially when you get all the performance and features you need in a music editor. Two free music and audio editors for Mac we recommend are:
1. Audio Editor: OcenAudio
OcenAudio has a very extensive toolkit of audio editing capabilities and tools. Still, one of its best features is that it’s easy on your memory: you can edit even very large files without requiring external memory resources.
OcenAudio supports MP3, WAV, FLAC, WMA, and many other audio formats.
2. MP3 Editor: Audacity
Audacity is free and also has to go for it, a simple and intuitive interface that is easy for beginners. It also has a surprisingly extensive list of features, options, and effects, including spectrographic analysis, undo/redo function, and more.
Audacity supports many formats, including WAV, AIFF, FLAC, MP2, MP3, and OGG.
Section 2. Professional Quality Music Editors for Mac
Pay music editing programs for Mac offer a serious boost in performance and an increased number of supported formats and output options.
Two pay music and audio editors for Mac we recommend are:
3. Music Editor: Wondershare Filmora Video & Audio Editor for Mac [Free]
Wondershare Filmora Video & Audio Editor for Mac is often aimed at users who want to edit videos, but this program also offers professional quality performance for editing music and audio. Novice users will appreciate the price and the intuitive interface that allows a gentle learning curve.
Advanced users will like the extensive features and supported formats, including a music library feature. It has slightly fewer features and supported formats than Adobe Audition, but if you don’t need those extra bells and whistles, this is the music editor for Mac for you.
For Win 7 or later (64-bit)
For macOS 10.12 or later
If you are using a windows, check this tutorial instead: Windows Video Editing Software .
4. Sound Editor: Adobe Audition
Adobe Audition comes with a high price at $20/mo. However, users who demand the best will find the cost worth it for a license. It has the most extensive audio and music editing toolset, and it supports the widest range of formats.
A complete range of tutorials also supports adobe Audition to help you get the most from your investment. The fact it takes a while to work through the tutorials and get up to speed might be the only drawback.
Section 3. How to choose Music Editor for Mac users?
Choosing a music editor for Mac, including the ability to edit and output to MP3 and MP4 formats, depends entirely on your needs. If your needs are modest and limited features or functionality work for you, several free-to-use options will get the job done. If you need more robust functionality and professional quality, a pay program will offer more satisfying performance. Keep in mind the following questions when making your choice:
- How often do I need to edit music and audio?
- Do I need simple trim and edit features, or also audio effects?
- What formats are my source files, and what formats do I want to output to?
- What is my budget, and how can I balance performance and price?
With Filmora, you can edit music and audio files with ease. Besides basic cutting features, you can apply fade-in and fade-out effects, adjust the audio volume. What’s more, you can remove the background noise in the audio to get a clear sound.
Versatile Video Editor - Wondershare Filmora
An easy yet powerful editor
Numerous effects to choose from
Detailed tutorials provided by the official channel
Also read:
- New 2024 Approved Remove Background Noise From Video Online Useful Guideline
- New Pioneering Poetic Presentations in Motion Graphics
- New Finding Audio Tapes with Real Glass Break Sounds
- Updated 2024 Approved Audio Edits Unleashed Navigating the Tools of Avidemux for Professional Results
- In 2024, The Premier A-Tunes for Mobile Musicians Worldwide
- New 7 Most Popular Voice Editing Apps for Android Users
- Updated Add Music to Photo for Free PC & Mobile
- Updated What Is Audio Ducking and How to Use It in Filmora for 2024
- Updated Digital Tutorial Series Your Comprehensive Guide
- New In 2024, The Important Aspects of Leveraging YouTubes Sound Selection
- New Unlock the Potential of AMR WAVES Detailed Guide to Their Conversion and Manipulation for 2024
- Updated In 2024, Where Can I Find Bruh Sound Effect?
- New Top YouTube Audio Gems for Daily Listening
- New Navigating the Best FREE Browser-Based DAW Platforms for Enhanced Audio Creation - 2023 Edition for 2024
- New In 2024, 5 Best Free MP3 Volume Normalizer
- The Singers Guide to Cinematic Vocal Projection Using Filmora for 2024
- New 2024 Approved Clubhouse Decoded Delving Into Its Mission, Community Dynamics, and Evolving Landscape
- New Effective Ways to Shrink Large Scale Digital Media Downscale for 2024
- Navigating the Path to Customized Sound Audacity for Voice Modification for 2024
- New Elite Group 3 Audio Level Augmentation Tools for Digital Tunes
- New Unlock Your Creative Potential Best Free Software to Produce Music on PC & Mac, 2023 Edition
- 2024 Approved How to Enhance Your MKV-2023 File with Audio Content
- New In 2024, Mastering the Art of Auditory File Partitioning
- Updated In 2024, Mastering the Art of Downloading Podcast Episodes on Laptops and Desktops
- New Unleashing Your Vocal Potential The Best Free Online Tools to Transform Your Voice
- Updated In 2024, Elite Audio-Synchronized Cinematic Crafting Applications of the Year
- 2024 Approved The Ultimate List of Audio Editing Tools Comparable to Audacity for All Platforms
- Essential Audio Workstation Applications on Chrome OS for Aspiring Musicians for 2024
- Updated 2024 Approved Zero-Cost Strategy Stripping Out Sound From Your Windows 10 Media Files
- 2024 Approved Soundtracking Fear Ranking Websites Specializing in Scary Sounds and Effects
- New 2024 Approved Top Audio Extraction Solutions Navigating the 2023 Landscape for Clearer Sounds From Videos
- Updated In 2024, Best Free Online Montage Track Collections
- New The Ultimate List of 8 Mobile Audio Workstations for Enhanced Producing
- Strumming Success A Comprehensive Look at the Top 5 Guitar Recorders for 2024
- 2024 Approved Exploring Advanced Audio Cleanup Techniques in Adobe Audition
- Updated The Ultimate Guide to Free Mobile Applications Transforming Audio Into Captivating Visuals for iOS & Android Users
- 2024 Approved No Spending, No Sweat The Ultimate List of Six Video to Audio Conversion Hacks
- Updated Mastering Audio Normalization with DaVinci Resolve An In-Depth Tutorial
- Updated In 2024, 50 Best Film Scores An Assortment for Every Video Format and Theme
- Acquiring Hidden Gems of Quiet Music for an Undisturbed Atmosphere for 2024
- In 2024, Top-Tier Tempo Tune Videography Tools
- New In 2024, Exploring the Capabilities of Adobe Audition for Professional Audio Editing
- New Easy-to-Use Vocal Modification Tools Overview of Functions, Rules, and Substitutes
- In 2024, How to Record Audio on Windows 10 5 Easy Steps
- In 2024, Here Are Some Reliable Ways to Get Pokemon Go Friend Codes For Oppo A78 5G | Dr.fone
- New Fixed Final Cut Pro X Crash Issues for 2024
- In 2024, Discover the Best Free Video Editing Tools for Gamers
- Forgot iPhone 11 Pro Password? – Here are the Best Solutions | Stellar
- 2024 Approved User-Friendly Video Editing Solutions
- Updated 2024 Approved Shooting Up Expert Advice for Creating Vertical Content on Your Phone
- 8 Quick Fixes Unfortunately, Snapchat has Stopped on Xiaomi 13 Ultra | Dr.fone
- Easily Unlock Your Xiaomi Civi 3 Device SIM
- What You Want To Know About Two-Factor Authentication for iCloud On your iPhone 13 mini
- New In 2024, The Recommended Natural AI Hindi Voice Generator
- In 2024, How to Transfer Data from Vivo S17e to Other Android Devices? | Dr.fone
- New 2024 Approved Android App Store Favorites Top Downloads and Reviews
- How To Transfer Data From Apple iPhone 15 Pro Max To Other iPhone 12 devices? | Dr.fone
- How to Cast Motorola G24 Power to Computer for iPhone and Android? | Dr.fone
- New Slow and Steady Wins the Race Top 10 Video Editing Software
- In 2024, Top 12 Prominent Motorola G24 Power Fingerprint Not Working Solutions
- In 2024, Planning to Use a Pokemon Go Joystick on Realme Narzo N53? | Dr.fone
- In 2024, How to Unlock Oppo Reno 11 Pro 5G Phone Pattern Lock without Factory Reset
- Disable screen lock on Realme C67 4G
- Aspect Ratio Made Easy Top Calculators for Designers for 2024
- 4 Methods to Turn off Life 360 On Apple iPhone 11 Pro without Anyone Knowing | Dr.fone
- In 2024, 5 Techniques to Transfer Data from Sony Xperia 1 V to iPhone 15/14/13/12 | Dr.fone
- How to Upgrade iPhone 8 to the Latest iOS Version? | Dr.fone
- Windows 8 FLV Editor A User-Friendly Video Editing Solution
- In 2024, What is the best Pokemon for pokemon pvp ranking On Oppo A58 4G? | Dr.fone
- In 2024, What Legendaries Are In Pokemon Platinum On Vivo X100 Pro? | Dr.fone
- Pokémon Go Cooldown Chart On Poco C55 | Dr.fone
- Is GSM Flasher ADB Legit? Full Review To Bypass Your Vivo X100FRP Lock
- In 2024, 15 Best Strongest Pokémon To Use in Pokémon GO PvP Leagues For Nokia XR21 | Dr.fone
- 4 Feasible Ways to Fake Location on Facebook For your Motorola Moto G Stylus (2023) | Dr.fone
- New MP3 Conversion Made Easy The Best Mac Software Solutions for 2024
- 2024 Approved Creating Collages on Canva Is Simple and Quick. The Tool Lets You Create some Amazing Customized Collages as Needed. So, Get Ready to Explore the World of Canva Collages
- Motorola G54 5G Camera Not Working Unexpected Error? Fix It Now | Dr.fone
- Updated 2024 Approved How to Change Frame Rate in Premiere Pro
- In 2024, Full Guide to Unlock iPhone XS Max with iTunes | Dr.fone
- 6 Proven Ways to Unlock Vivo Phone When You Forget the Password
- Updated TikTok Video Size and Aspect Ratio Everything You Need to Know for 2024
- In 2024, How to use Pokemon Go Joystick on Apple iPhone 11 Pro Max? | Dr.fone
- New In 2024, YouTube to MP3 Made Easy Best Converter Tools and Tips
- Updated 2024 Approved How to Add Expression in After Effects
- In 2024, How To Stream Anything From Honor 70 Lite 5G to Apple TV | Dr.fone
- How to Factory Reset iPhone 15 Pro Max and iPad Without Apple ID | Stellar
- The Magnificent Art of Pokemon Go Streaming On Nokia 105 Classic? | Dr.fone
- Title: Top 10 Audio Recording Software to Capture Your Voice Easily
- Author: Jacob
- Created at : 2024-05-20 00:03:41
- Updated at : 2024-05-21 00:03:41
- Link: https://audio-shaping.techidaily.com/top-10-audio-recording-software-to-capture-your-voice-easily/
- License: This work is licensed under CC BY-NC-SA 4.0.
