
:max_bytes(150000):strip_icc():format(webp)/relaxing-while-getting-his-studies-done-495857099-5a1ed8c5ec2f640037e369f4.jpg)
New Precision in Perception Eliminating Background Buzz with Audacitys Tools for 2024
Precision in Perception: Eliminating Background Buzz with Audacity’s Tools
Noise reduction is a global issue, and it is not going anywhere any soon. In such times, being a creator can be tough, as audiences prefer noise-free content. The presence of unnecessary noises diminishes the identity of content and its creator. To eliminate such sounds from your videos, developers launched noise reducers. Audacity removal noise is among those leading noise reducers with proficient features.
The key concept of this article is to remove background noise from audio in Audacity. Readers will find a detailed knowledge of reducing background noise Audacity. In addition, users will learn why removing noise is necessary and ways to avoid it. Moreover, we will discuss a valid and versatile alternative to it.
AI Vocal Remover A cross-platform for facilitating your video editing process by offering valuable benefits!
Free Download Free Download Learn More

Part 1: Why Is It Necessary to Get Rid of Background Noise in Videos and Audios?
You might wonder, if no one can avoid background noises, why remove them? However, there are many reasons why removing them is significant. Along with achieving high-quality videos, they have many advantages. This section of the Audacity noise cancellation article will discuss the reasons below:
1. Effective Communication
If you’re a creator, professional, or marketer, audience communication is important. Digital platforms have eased this through videos and online streamlining platforms. You bring clarity to your speech for effective communication via noise reduction. A video without distractions hooks the viewers to the screen, and they focus better.
2. Reflects Professionalism
Creators with international reach and vast audiences never compromise on audio quality. They post videos with zero background noises and audio enhancement effects. This is because such videos convey a professional brand or creator’s image. No one likes a video with distracting traffic noises, wind noises, and others.
3. High Production Value
Video without background noises builds a premium and consistent brand image. They convey a message that the brand cares for its audience’s preferences. In addition, the production of such videos speaks for itself. The stakeholders also invest in such brands that care for brand image.
4. Consistent Storytelling
With background noises out of the image, the storyline stays consistent. There are no unnecessary distractions that keep the audience off your videos. Those who create learning tutorials and explainer videos can benefit from this.
5. Audience Accessibility
When creating content, you should keep your horizons vast and diverse. There are people who cannot listen properly and use hearing aids. The removal of background noises makes content accessible for those with disabilities. In addition, some people prefer to watch movies and videos without captions. Background noises will force them to stick to subtitles, which can be a turn-off.
Part 2: How to Remove Background Noise Using Audacity? A Step-by-Step Guide
Audacity is an editing tool for enhancing audio with its advanced functionalities. This is a professional-grade tool that can cut, trim, copy, and mix audio. In addition, you can record audio through a microphone and other sources. With the Audacity denoise feature , you can remove unwanted noises from your videos. It assists in removing background noises, echoes, and other forms of noise through it.
Steps to Remove Background Noises in Audacity
In this section, you can learn to employ Audacity’s noise remover function. Read the following guide to Audacity filter background noise here:
Step 1
Once you import and bring media into Audacity’s timeline, select it.

Step 2
Further, navigate towards the upper toolbar and locate the “Effect” tab. From the Effects dropdown menu, continue to “Noise Removal and Repair” and select the “Noise Reduction” option.

Step 3
A “Noise Reduction” window will appear on the screen. From there, click the “Get Noise Profile,” adjust the slider value, and press “OK.”

Step 4
Afterwards, Audacity will store the noise reduction settings, and you can access it. Then, go to the “File” tab and click “Save Project” to save it on your device.

Part 3: Ways to Prevent Background Noise While Recording Audios or Videos
Editors like Audacity background noise removers help in achieving content perfection. In addition to these tools, creators can take some steps prior to recording. These will help them avoid maximum noise distractions before editing. It will also help the tool in generating efficient results and maximum productivity. This section will elaborate on the ways of preventing background noises:
1. Selecting a Quiet Environment
Before creating videos, ensure that there is minimum sound in the surroundings. Don’t shoot in areas with heavy traffic or heavy machine sounds. Choose peaceful places that can add to your video’s audio as well as visual quality.
2. Setting a Qualitied Microphone
When it comes to recording, quality equipment plays a crucial role in its quality. Make sure that the microphone is of a reliable company. In addition, position the microphone closer to your lips for clear audio. This will help in capturing high-quality audio signals and reduce background noise.
3. Acoustic Set-Up
If you want to record professional-grade videos, you can also build an artificial environment. Users can achieve such an environment via soundproofing the recording room. This will make audio free of outside distractions and reverbs echo.
4. Disable Noisy or Electrical Machinery
Another way of reducing sound is to minimize the presence of noisy tech in the surroundings. This includes turning off any electrical equipment near the recorder. Machinery like refrigerators, fans, and air conditioners. This is because sometimes the human ear cannot detect a sound, but microphones can.
5. Track and Maintain Audio Levels
This is a post-editing technique that involves the use of statistics to maintain audio. Many editing or recording tools feature audio levels. This will help in monitoring any high or low frequencies in videos. Later, they can manage noise by observing the audio levels.
Bonus Part: Make Audio Editing Easy with Best-in-Class Audio Management Functionality - Wondershare Filmora
No doubt, the Audacity denoise feature is available for use, but it is difficult to access. Someone with primary editing skills cannot operate this software. Hence, we recommend Wondershare Filmora for denoising audio and elevating content. You can employ two of its features to remove background noises. With its Audio Denoise feature, you can decrease various types of noise.
It can assist in audio enhancement and denoising wind noise, echoes, and hums. With its AI Vocal Remover feature, you can separate vocals from background noise. Both these features use AI technology to improve audio accuracy. Hence, it is your perfect replacement for Audacity background noise.
Prominent Audio Editing Features of Wondershare Filmora
Along with denoise and vocal remover, this Audacity denoise alternative has more. With its AI audio editing features, users can uplift other aspects of their audio. In this section, we’ll discuss some exclusive audio editing features of Filmora:
- AI Audio Stretch: When it comes to aligning audio with video duration, you can employ audio stretch. This feature uses drag and adjusts techniques to match audio and video. You can apply stunning audio effects or music without worrying about duration.
- Silence Detection: With its silence detection AI, you don’t need to worry about silent pauses. It can analyze and eliminate the seconds without any speech duration. This will remove unnecessary minutes or seconds from your videos.
- Audio Ducking: Lowering the audio levels of one track while increasing the other is complex. However, this feature eases the process for you without any technicalities. It can auto-detect when someone is speaking and lowers the music levels.
- Audio Visualizer: Adding audio effects to music videos enhances their visuals. With Filmora’s audio visualizer, you can do this as well. You can find diverse audio effects with a range of colors and styles. They align with the beat of your audio and uplift the visuals.
Free Download For Win 7 or later(64-bit)
Free Download For macOS 10.14 or later
Conclusion
In conclusion, let’s review everything we have discussed in the article. Users have unlocked the knowledge of Audacity remove noise feature. In addition, the tool mentioned the significance and ways of noise reduction. We recommend Wondershare Filmora as an alternative solution to Audacity denoise. It has other audio editing features that can enhance your video and audio quality.
Free Download Free Download Learn More
Part 1: Why Is It Necessary to Get Rid of Background Noise in Videos and Audios?
You might wonder, if no one can avoid background noises, why remove them? However, there are many reasons why removing them is significant. Along with achieving high-quality videos, they have many advantages. This section of the Audacity noise cancellation article will discuss the reasons below:
1. Effective Communication
If you’re a creator, professional, or marketer, audience communication is important. Digital platforms have eased this through videos and online streamlining platforms. You bring clarity to your speech for effective communication via noise reduction. A video without distractions hooks the viewers to the screen, and they focus better.
2. Reflects Professionalism
Creators with international reach and vast audiences never compromise on audio quality. They post videos with zero background noises and audio enhancement effects. This is because such videos convey a professional brand or creator’s image. No one likes a video with distracting traffic noises, wind noises, and others.
3. High Production Value
Video without background noises builds a premium and consistent brand image. They convey a message that the brand cares for its audience’s preferences. In addition, the production of such videos speaks for itself. The stakeholders also invest in such brands that care for brand image.
4. Consistent Storytelling
With background noises out of the image, the storyline stays consistent. There are no unnecessary distractions that keep the audience off your videos. Those who create learning tutorials and explainer videos can benefit from this.
5. Audience Accessibility
When creating content, you should keep your horizons vast and diverse. There are people who cannot listen properly and use hearing aids. The removal of background noises makes content accessible for those with disabilities. In addition, some people prefer to watch movies and videos without captions. Background noises will force them to stick to subtitles, which can be a turn-off.
Part 2: How to Remove Background Noise Using Audacity? A Step-by-Step Guide
Audacity is an editing tool for enhancing audio with its advanced functionalities. This is a professional-grade tool that can cut, trim, copy, and mix audio. In addition, you can record audio through a microphone and other sources. With the Audacity denoise feature , you can remove unwanted noises from your videos. It assists in removing background noises, echoes, and other forms of noise through it.
Steps to Remove Background Noises in Audacity
In this section, you can learn to employ Audacity’s noise remover function. Read the following guide to Audacity filter background noise here:
Step 1
Once you import and bring media into Audacity’s timeline, select it.
Step 2
Further, navigate towards the upper toolbar and locate the “Effect” tab. From the Effects dropdown menu, continue to “Noise Removal and Repair” and select the “Noise Reduction” option.
Step 3
A “Noise Reduction” window will appear on the screen. From there, click the “Get Noise Profile,” adjust the slider value, and press “OK.”
Step 4
Afterwards, Audacity will store the noise reduction settings, and you can access it. Then, go to the “File” tab and click “Save Project” to save it on your device.
Part 3: Ways to Prevent Background Noise While Recording Audios or Videos
Editors like Audacity background noise removers help in achieving content perfection. In addition to these tools, creators can take some steps prior to recording. These will help them avoid maximum noise distractions before editing. It will also help the tool in generating efficient results and maximum productivity. This section will elaborate on the ways of preventing background noises:
1. Selecting a Quiet Environment
Before creating videos, ensure that there is minimum sound in the surroundings. Don’t shoot in areas with heavy traffic or heavy machine sounds. Choose peaceful places that can add to your video’s audio as well as visual quality.
2. Setting a Qualitied Microphone
When it comes to recording, quality equipment plays a crucial role in its quality. Make sure that the microphone is of a reliable company. In addition, position the microphone closer to your lips for clear audio. This will help in capturing high-quality audio signals and reduce background noise.
3. Acoustic Set-Up
If you want to record professional-grade videos, you can also build an artificial environment. Users can achieve such an environment via soundproofing the recording room. This will make audio free of outside distractions and reverbs echo.
4. Disable Noisy or Electrical Machinery
Another way of reducing sound is to minimize the presence of noisy tech in the surroundings. This includes turning off any electrical equipment near the recorder. Machinery like refrigerators, fans, and air conditioners. This is because sometimes the human ear cannot detect a sound, but microphones can.
5. Track and Maintain Audio Levels
This is a post-editing technique that involves the use of statistics to maintain audio. Many editing or recording tools feature audio levels. This will help in monitoring any high or low frequencies in videos. Later, they can manage noise by observing the audio levels.
Bonus Part: Make Audio Editing Easy with Best-in-Class Audio Management Functionality - Wondershare Filmora
No doubt, the Audacity denoise feature is available for use, but it is difficult to access. Someone with primary editing skills cannot operate this software. Hence, we recommend Wondershare Filmora for denoising audio and elevating content. You can employ two of its features to remove background noises. With its Audio Denoise feature, you can decrease various types of noise.
It can assist in audio enhancement and denoising wind noise, echoes, and hums. With its AI Vocal Remover feature, you can separate vocals from background noise. Both these features use AI technology to improve audio accuracy. Hence, it is your perfect replacement for Audacity background noise.
Prominent Audio Editing Features of Wondershare Filmora
Along with denoise and vocal remover, this Audacity denoise alternative has more. With its AI audio editing features, users can uplift other aspects of their audio. In this section, we’ll discuss some exclusive audio editing features of Filmora:
- AI Audio Stretch: When it comes to aligning audio with video duration, you can employ audio stretch. This feature uses drag and adjusts techniques to match audio and video. You can apply stunning audio effects or music without worrying about duration.
- Silence Detection: With its silence detection AI, you don’t need to worry about silent pauses. It can analyze and eliminate the seconds without any speech duration. This will remove unnecessary minutes or seconds from your videos.
- Audio Ducking: Lowering the audio levels of one track while increasing the other is complex. However, this feature eases the process for you without any technicalities. It can auto-detect when someone is speaking and lowers the music levels.
- Audio Visualizer: Adding audio effects to music videos enhances their visuals. With Filmora’s audio visualizer, you can do this as well. You can find diverse audio effects with a range of colors and styles. They align with the beat of your audio and uplift the visuals.
Free Download For Win 7 or later(64-bit)
Free Download For macOS 10.14 or later
Conclusion
In conclusion, let’s review everything we have discussed in the article. Users have unlocked the knowledge of Audacity remove noise feature. In addition, the tool mentioned the significance and ways of noise reduction. We recommend Wondershare Filmora as an alternative solution to Audacity denoise. It has other audio editing features that can enhance your video and audio quality.
“10 Ultimate Methods: Extracting Audio From Videos Without Cost “
If you have the footage in which only the sound has all the meat, you might want to remove the visuals from the clip and keep only the audio track to save some space on your storage media. Because the videos nowadays are usually in MP4 format, and the most commonly used audio type is MP3, it becomes imperative to learn how to convert MP4 to MP3.
It is also important to know which tools are best for such kind of conversion and what benefits and downsides they come with if installed on your PC.
That said, here, you will learn how to convert video to audio using six extremely popular and widely used programs.
| 1 - Filmora | 2 - VLC media player | 3 - Audacity |
|---|---|---|
| 4 - QuickTime | 5 - Media Converter | 6 - Video to MP3 Converter |
Watch a Video First to Take a Quick View of These Programs
For Win 7 or later (64-bit)
For macOS 10.14 or later


1 Filmora - [Windows, Mac, iPhone & Android]
A product by Wondershare that is one of the most versatile development organizations, Filmora , is available for Windows and Mac platforms. The tool is a full-fledged post-production program that many professionals use because it is lightweight and due to its simple UI and not-so-steep learning curve.
The instructions given below explain how to convert video to audio with Filmora:
Step 1: Import Source Media
Launch Wondershare Filmora (a Windows computer here used here), click anywhere inside the Media window present at the upper-left section, and select and import a source video file to the program.
For Win 7 or later (64-bit)
For macOS 10.14 or later

Step 2: Add Media to Timeline
Drag the imported footage to the Timeline at the bottom of the window. Optionally, right-click the media in the Timeline itself, and click Detach Audio to separate the audio track from the video. Trim off the unwanted sections from the clip if need be.

Step 3: Convert Video to Audio
Click EXPORT from the top-center of the window, go to the Video tab on the Export box, select MP3 from the bottom of the Format list in the left pane, choose other preferences by clicking the SETTINGS button from the right, and click EXPORT from the bottom-right corner.

Benefits of Using Filmora
Some of the advantages of using Filmora to convert video clips to audio are:
- Easy audio separation from the video
- Ability to export videos directly to audio
- Ability to adjust the audio and remove the background noise
- Ability to record voice and integrate it into the audio clip
Disadvantages: Doesn’t have many audio formats for exporting.
Supported Audio Formats: At the time of this writing, Filmora supports only MP3 audio format while exporting directly.
For Win 7 or later (64-bit)
For macOS 10.14 or later
2 VLC Media Player [Windows, Mac & Linux]
A well-known application that supports almost all media formats and is available for Windows, Mac, and Linux platforms, the VLC media player has its built-in Converter that can transcode your video clips to audio for free.
The steps given below explain how to convert video to audio with VLC media player:
Step 1: Import Source Video

Launch VLC media player, click Media from the menu bar at the top, and click Convert / Save from the menu. Make sure that the File tab is selected on the Open Media box, click Add from the right side of the File Selection field, and click Convert / Save from the bottom.

Step 2: Select Output Format and Preferences
On the Convert box, make sure that the Convert radio button is selected, choose an audio format from the Profile drop-down list, optionally click the Settings (Wrench) icon present next to the drop-down list itself, choose other output preferences for the audio and click Save to get back to the Convert box.
Step 3: Choose Output Folder and Convert

Click Browse from the Destination section to select an output folder, enter a name for the exported file in the Destination file field, and click Start to convert audio to video with VLC media player.
Benefits of Using VLC media player
Some advantages that VLC offers include:
- Doesn’t require any other application to be installed for conversion
- Makes the process quite simple and absolutely free
Disadvantages: Doesn’t have editing tools to manipulate the clips before converting.
Supported Audio Formats: VLC media player supports OGG (Vorbis), MP3, and FLAC format while exporting.
3 Audacity [Windows, Mac & Linux]
Audacity is yet another cross-platform tool that is specifically dedicated to audio formats and is also used by many professionals to produce industry-standard audio clips. Even though Audacity is an open-source and free program, some new users may find it challenging to understand the interface.
The steps are given below explain the process of converting video to audio with Audacity:
Step 1: Install Supported Tools
Assuming that Audacity is already installed on your PC, to import video files to the program, go to https://lame.buanzo.org/#lamewindl and download and install ffmpeg for Windows for Audacity if it is not already installed. You can do a quick online search for other platforms and see if your copy of Audacity needs the tools or plugins required to import the videos.
Step 2: Import Source Video
Go to file> Open from the menu bar and select and import the video that you want to convert to audio.
Step 3: Convert Video to Audio

Make the required manipulations to the audio, go to file> Export, and choose your preferred audio format from the list. Choose a destination folder and other output preferences on the Export Audio box, and click Save to convert video to audio with Audacity.
Benefits of Using Audacity
Some benefits that Audacity offers include:
- Granular editing and fine-tuning of audio tracks
- Wide range of output preferences
- Ability to produce industry-standard outputs
- Offers plethora of options and tools to add various effects to the sounds
Disadvantages: Some new users may find it challenging to understand the interface. Audacity also needs additional tools to be installed to support video files as inputs.
Supported Audio Formats: Audacity supports almost all major audio formats including MP3, OGG, WAV, etc.
4 QuickTime [Mac]
QuickTime is the default media player that comes along with macOS and is installed automatically. Being a proprietary of Apple Inc., QuickTime natively supports all the formats developed by the company, along with some other most popular file types such as MP4, MP3, etc.
To convert a video file to audio with QuickTime on Mac, you can follow the instructions given below:
Step 1: Import Source Video
Launch QuickTime on your Mac computer, go to file from the menu bar, click Open File, use the box that opens to locate and select the video that you want to convert, and click Open from the bottom-right corner.
Step 2: Convert to Audio

Click file again, go to Export this time, and then click audio Only from the sub menu that appears. On the next box, enter a name for the output file in the Export As field, choose a destination folder from the Where drop-down list, optionally click the drop-down button from the right side of the Where field to configure other preferences, and click Save to convert video to audio with QuickTime.
Benefits of Using QuickTime
Some advantages of using QuickTime to convert video to audio include:
- Mac users don’t need to install any third-party conversion tool or additional plugin
- Conversion process is easy and almost seamless
Disadvantages: Doesn’t give any option to choose an output format and doesn’t allow editing the clips either.
Supported Audio Formats: By default, QuickTime player converts videos files to M4A audio format.
5 Media Converter – video to mp3 [iPhone]
Among several iOS apps that have been developed for video to audio conversion, Media Converter – video to mp3 is one of those that has decent star ratings and user reviews. The app is around 66MB in size and can be obtained from the App Store.
The process on how to convert video to audio with Media Converter is explained below:
- Launch Media Converter
- Import the source video to the app
- Choose Extract Audio from the Conversion Type menu
- Select your preferred output audio format
- Begin the conversion process

Benefits of Using Media Converter
A couple of advantages of using Media Converter to convert video to audio are listed below:
- Eliminates the use of PC or laptop
- Can be obtained easily
- Can be used even while moving
Disadvantages: Doesn’t have the flexibility of granular editing as it is there when using a computer program.
Supported Audio Formats: The audio formats that Media Converter supports include MP3, M4A, OGG, WAV, FLAC, etc.
6 Video to MP3 Converter [Android]
With around 4.5-star rating on Play Store, Video to MP3 Converter is another app that can convert your video files to audio right on your Android smartphone. In addition, the app also allows basic video trimming that may come in handy while making the entire clip more informative by removing unwanted sections from it.

You can learn how to convert video to audio with Video to MP3 Converter by following the instructions given below:
- Launch Video to MP3 Converter
- Import the source video clip from your Android smart device’s storage
- Trim the footage to keep only the important part
- Set output preferences
- Extract the audio from the video
Benefits of Using Video to MP3 Converter
Some advantages of using Video to MP3 Converter include:
- It supports every popular video format such as MP4, 3GP, WMV, etc.
- Has simple UI
- Offers various audio bitrates to choose from while exporting
- Allows basic trimming
Disadvantages: Doesn’t have many editing options thus, no granular manipulations can be done to the media files while using the app.
Supported Audio Formats: Video to MP3 Converter supports MP3 formats at this writing.
Conclusion
Learning how to convert MP4 to MP3 is a simple process, and as long as you have a decent computer or an iOS or Android smartphone, you can extract the audio in the format of your choice from the video clips almost instantly. Furthermore, if you are a professional and want to prepare media clips for the clients or your channel, using advanced tools like Wondershare Filmora or Audacity would give you the best conversion experience.
For Win 7 or later (64-bit)
For macOS 10.14 or later
Watch a Video First to Take a Quick View of These Programs
For Win 7 or later (64-bit)
For macOS 10.14 or later
1 Filmora - [Windows, Mac, iPhone & Android]
A product by Wondershare that is one of the most versatile development organizations, Filmora , is available for Windows and Mac platforms. The tool is a full-fledged post-production program that many professionals use because it is lightweight and due to its simple UI and not-so-steep learning curve.
The instructions given below explain how to convert video to audio with Filmora:
Step 1: Import Source Media
Launch Wondershare Filmora (a Windows computer here used here), click anywhere inside the Media window present at the upper-left section, and select and import a source video file to the program.
For Win 7 or later (64-bit)
For macOS 10.14 or later
Step 2: Add Media to Timeline
Drag the imported footage to the Timeline at the bottom of the window. Optionally, right-click the media in the Timeline itself, and click Detach Audio to separate the audio track from the video. Trim off the unwanted sections from the clip if need be.
Step 3: Convert Video to Audio
Click EXPORT from the top-center of the window, go to the Video tab on the Export box, select MP3 from the bottom of the Format list in the left pane, choose other preferences by clicking the SETTINGS button from the right, and click EXPORT from the bottom-right corner.
Benefits of Using Filmora
Some of the advantages of using Filmora to convert video clips to audio are:
- Easy audio separation from the video
- Ability to export videos directly to audio
- Ability to adjust the audio and remove the background noise
- Ability to record voice and integrate it into the audio clip
Disadvantages: Doesn’t have many audio formats for exporting.
Supported Audio Formats: At the time of this writing, Filmora supports only MP3 audio format while exporting directly.
For Win 7 or later (64-bit)
For macOS 10.14 or later
2 VLC Media Player [Windows, Mac & Linux]
A well-known application that supports almost all media formats and is available for Windows, Mac, and Linux platforms, the VLC media player has its built-in Converter that can transcode your video clips to audio for free.
The steps given below explain how to convert video to audio with VLC media player:
Step 1: Import Source Video
Launch VLC media player, click Media from the menu bar at the top, and click Convert / Save from the menu. Make sure that the File tab is selected on the Open Media box, click Add from the right side of the File Selection field, and click Convert / Save from the bottom.
Step 2: Select Output Format and Preferences
On the Convert box, make sure that the Convert radio button is selected, choose an audio format from the Profile drop-down list, optionally click the Settings (Wrench) icon present next to the drop-down list itself, choose other output preferences for the audio and click Save to get back to the Convert box.
Step 3: Choose Output Folder and Convert
Click Browse from the Destination section to select an output folder, enter a name for the exported file in the Destination file field, and click Start to convert audio to video with VLC media player.
Benefits of Using VLC media player
Some advantages that VLC offers include:
- Doesn’t require any other application to be installed for conversion
- Makes the process quite simple and absolutely free
Disadvantages: Doesn’t have editing tools to manipulate the clips before converting.
Supported Audio Formats: VLC media player supports OGG (Vorbis), MP3, and FLAC format while exporting.
3 Audacity [Windows, Mac & Linux]
Audacity is yet another cross-platform tool that is specifically dedicated to audio formats and is also used by many professionals to produce industry-standard audio clips. Even though Audacity is an open-source and free program, some new users may find it challenging to understand the interface.
The steps are given below explain the process of converting video to audio with Audacity:
Step 1: Install Supported Tools
Assuming that Audacity is already installed on your PC, to import video files to the program, go to https://lame.buanzo.org/#lamewindl and download and install ffmpeg for Windows for Audacity if it is not already installed. You can do a quick online search for other platforms and see if your copy of Audacity needs the tools or plugins required to import the videos.
Step 2: Import Source Video
Go to file> Open from the menu bar and select and import the video that you want to convert to audio.
Step 3: Convert Video to Audio
Make the required manipulations to the audio, go to file> Export, and choose your preferred audio format from the list. Choose a destination folder and other output preferences on the Export Audio box, and click Save to convert video to audio with Audacity.
Benefits of Using Audacity
Some benefits that Audacity offers include:
- Granular editing and fine-tuning of audio tracks
- Wide range of output preferences
- Ability to produce industry-standard outputs
- Offers plethora of options and tools to add various effects to the sounds
Disadvantages: Some new users may find it challenging to understand the interface. Audacity also needs additional tools to be installed to support video files as inputs.
Supported Audio Formats: Audacity supports almost all major audio formats including MP3, OGG, WAV, etc.
4 QuickTime [Mac]
QuickTime is the default media player that comes along with macOS and is installed automatically. Being a proprietary of Apple Inc., QuickTime natively supports all the formats developed by the company, along with some other most popular file types such as MP4, MP3, etc.
To convert a video file to audio with QuickTime on Mac, you can follow the instructions given below:
Step 1: Import Source Video
Launch QuickTime on your Mac computer, go to file from the menu bar, click Open File, use the box that opens to locate and select the video that you want to convert, and click Open from the bottom-right corner.
Step 2: Convert to Audio
Click file again, go to Export this time, and then click audio Only from the sub menu that appears. On the next box, enter a name for the output file in the Export As field, choose a destination folder from the Where drop-down list, optionally click the drop-down button from the right side of the Where field to configure other preferences, and click Save to convert video to audio with QuickTime.
Benefits of Using QuickTime
Some advantages of using QuickTime to convert video to audio include:
- Mac users don’t need to install any third-party conversion tool or additional plugin
- Conversion process is easy and almost seamless
Disadvantages: Doesn’t give any option to choose an output format and doesn’t allow editing the clips either.
Supported Audio Formats: By default, QuickTime player converts videos files to M4A audio format.
5 Media Converter – video to mp3 [iPhone]
Among several iOS apps that have been developed for video to audio conversion, Media Converter – video to mp3 is one of those that has decent star ratings and user reviews. The app is around 66MB in size and can be obtained from the App Store.
The process on how to convert video to audio with Media Converter is explained below:
- Launch Media Converter
- Import the source video to the app
- Choose Extract Audio from the Conversion Type menu
- Select your preferred output audio format
- Begin the conversion process
Benefits of Using Media Converter
A couple of advantages of using Media Converter to convert video to audio are listed below:
- Eliminates the use of PC or laptop
- Can be obtained easily
- Can be used even while moving
Disadvantages: Doesn’t have the flexibility of granular editing as it is there when using a computer program.
Supported Audio Formats: The audio formats that Media Converter supports include MP3, M4A, OGG, WAV, FLAC, etc.
6 Video to MP3 Converter [Android]
With around 4.5-star rating on Play Store, Video to MP3 Converter is another app that can convert your video files to audio right on your Android smartphone. In addition, the app also allows basic video trimming that may come in handy while making the entire clip more informative by removing unwanted sections from it.
You can learn how to convert video to audio with Video to MP3 Converter by following the instructions given below:
- Launch Video to MP3 Converter
- Import the source video clip from your Android smart device’s storage
- Trim the footage to keep only the important part
- Set output preferences
- Extract the audio from the video
Benefits of Using Video to MP3 Converter
Some advantages of using Video to MP3 Converter include:
- It supports every popular video format such as MP4, 3GP, WMV, etc.
- Has simple UI
- Offers various audio bitrates to choose from while exporting
- Allows basic trimming
Disadvantages: Doesn’t have many editing options thus, no granular manipulations can be done to the media files while using the app.
Supported Audio Formats: Video to MP3 Converter supports MP3 formats at this writing.
Conclusion
Learning how to convert MP4 to MP3 is a simple process, and as long as you have a decent computer or an iOS or Android smartphone, you can extract the audio in the format of your choice from the video clips almost instantly. Furthermore, if you are a professional and want to prepare media clips for the clients or your channel, using advanced tools like Wondershare Filmora or Audacity would give you the best conversion experience.
For Win 7 or later (64-bit)
For macOS 10.14 or later
Guide to Selecting High-Quality MP3 to Text Converters
An MP3 to text converter allows you to change mp3 files to text files. This program assists in the transcription of interviews, lectures, sermons, conferences, and even music. Mp3 to text converters are everywhere on the internet today. They provide the most convenient method for converting mp3 to text. Companies, individuals, conference organizers, and agents benefit from such technologies. Modern mp3 to text online converters with superior hi-tech features and capabilities have emerged.
If you’re searching for free software to convert audio to text, think about how well it works and how accurate the converted text is. In other words, choose a tool that can quickly produce accurate and editable transcriptions. Many converters on the internet may provide these functions, but which one should you pick? Today, we’ll show you the finest MP3 to text converters that are completely free or premium.
- 14 Best MP3 to Text Converter Online
- VEED.IO
- Flixier
- Happyscribe
- Go Transcribe
- Rev
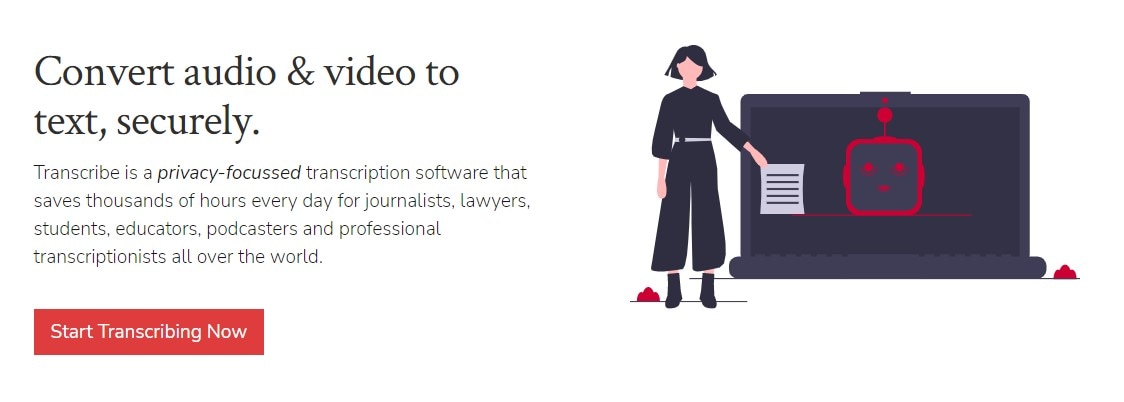
- Transcribe
- Vocalmatic
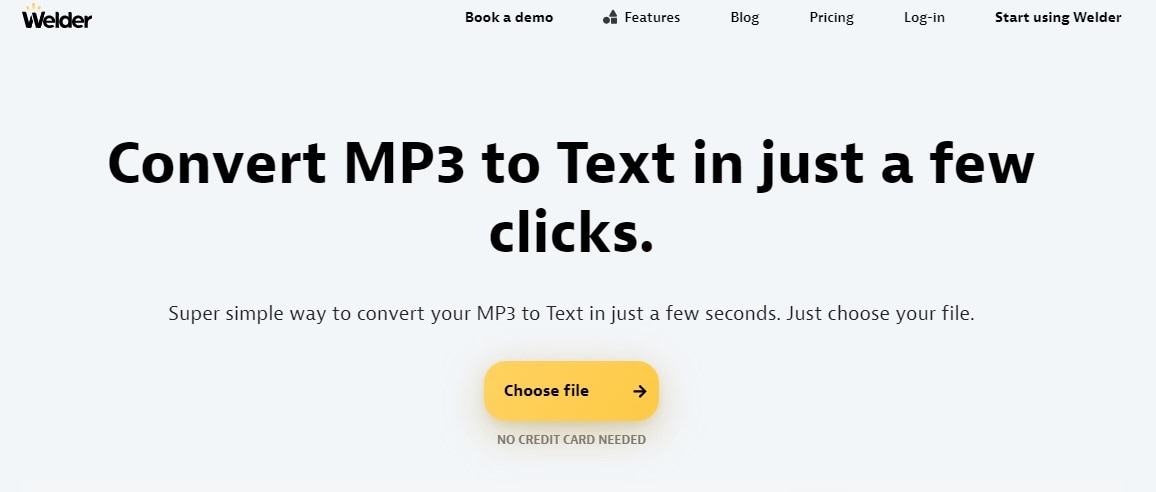
- Getwelder
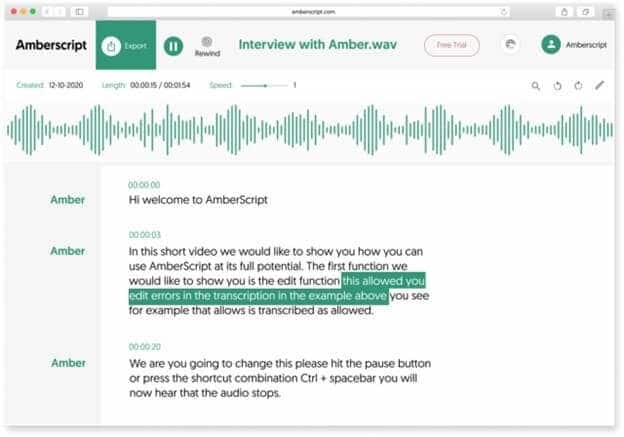
- Amberscript
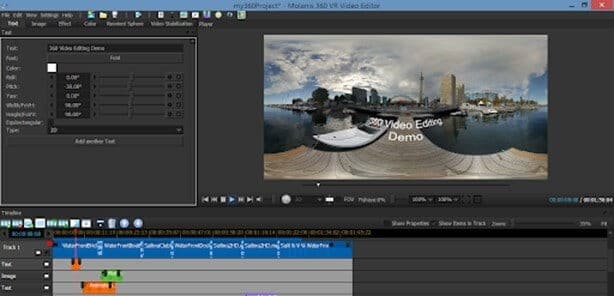
- 360 Converter
- Virtual Speech
- Sonix
- Audext
- Bear File Converter
Why You Should Use MP3 to Text Converter?
Any audio can be converted to text using an MP3 to text converter. It’s an excellent approach to transcribe conferences or presentations accurately. Transcribing audio takes a long time, as we all know. Depending on the size of your MP3 files, an MP3 to text converter can correctly auto-transcribe them into text in minutes. This means you can begin correcting and polishing your transcriptions immediately, thus, cutting down on time spent on the task!
7 Best MP3 To Text Converter for Windows/Mac
1. Filmora
Although Wondershare Filmora Video Editor is well recognized for its broader video editing operations, it also has a large library of other features, such as mp3 to text conversion, that you can utilize to make your projects handy. It’s a Freemium program, like most other products we’ve discussed. However, the advantage here is that you can get mp3 to text software and all of Filmora’s other tools and features, providing you more bang for your money.
Platform: Windows/Mac
Price:$4.99/Month
Features
- Mp3 to text conversion
- Support upload audio files
Pros
- Very easy to use
- Simple interface that requires few clicks
- Pre-built text templates
2.Office 365/Word
Microsoft Word provides various useful built-in features for transcribing audio files. Word can instantly transcribe straight from your audio files, eliminating the need to place a speaker up to your PC microphone and play it. Of course, you’ll need an Office 365 or Office license for this to operate (though there are various hacks for getting Office to work for free, at least temporarily). Sign in to Office 365 on your browser and create a new Word document to transcribe.

Platform: Windows
**Price:**Free
Features
- Directly record in Word.
- Voice instructions may be uploaded as an audio file.
Pros
- It allows you to capture audio from your device’s microphone, as well as recognize and transcribe noises from the speakers in real-time.
Cons
- It is compatible with Windows devices only.
3. Google Docs
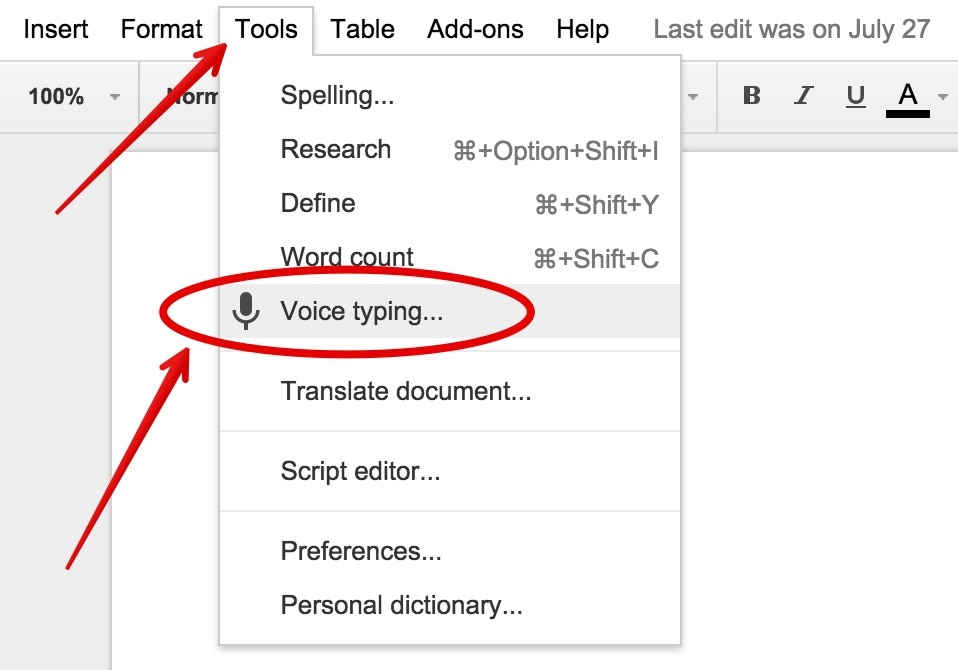
Google Docs has become an indispensable tool for most content creators., especially if you’re already using Google services. It allows you to write with your voice and access over 100 view commands for altering and formatting your documents in any manner you like. Making bullet points, altering the text style, and shifting the pointer to other document places are all examples. Consider Google Docs or Google Slides with Google’s Voice Typing tool for Google products like Gmail and Google Drive and require an in-built, powerful, but free dictation tool.
Platform: Windows/Mac
**Price:**Free
Features
- Voice typing and commands
- Transcribe in real-time
Pros
- Compatible with any device
- Very accurate
- It’s quick, particularly for real-time typing, since no prepared audio files are required
Cons
- It can only function in real-time, not with previously recorded data
4. Speech to Text converter
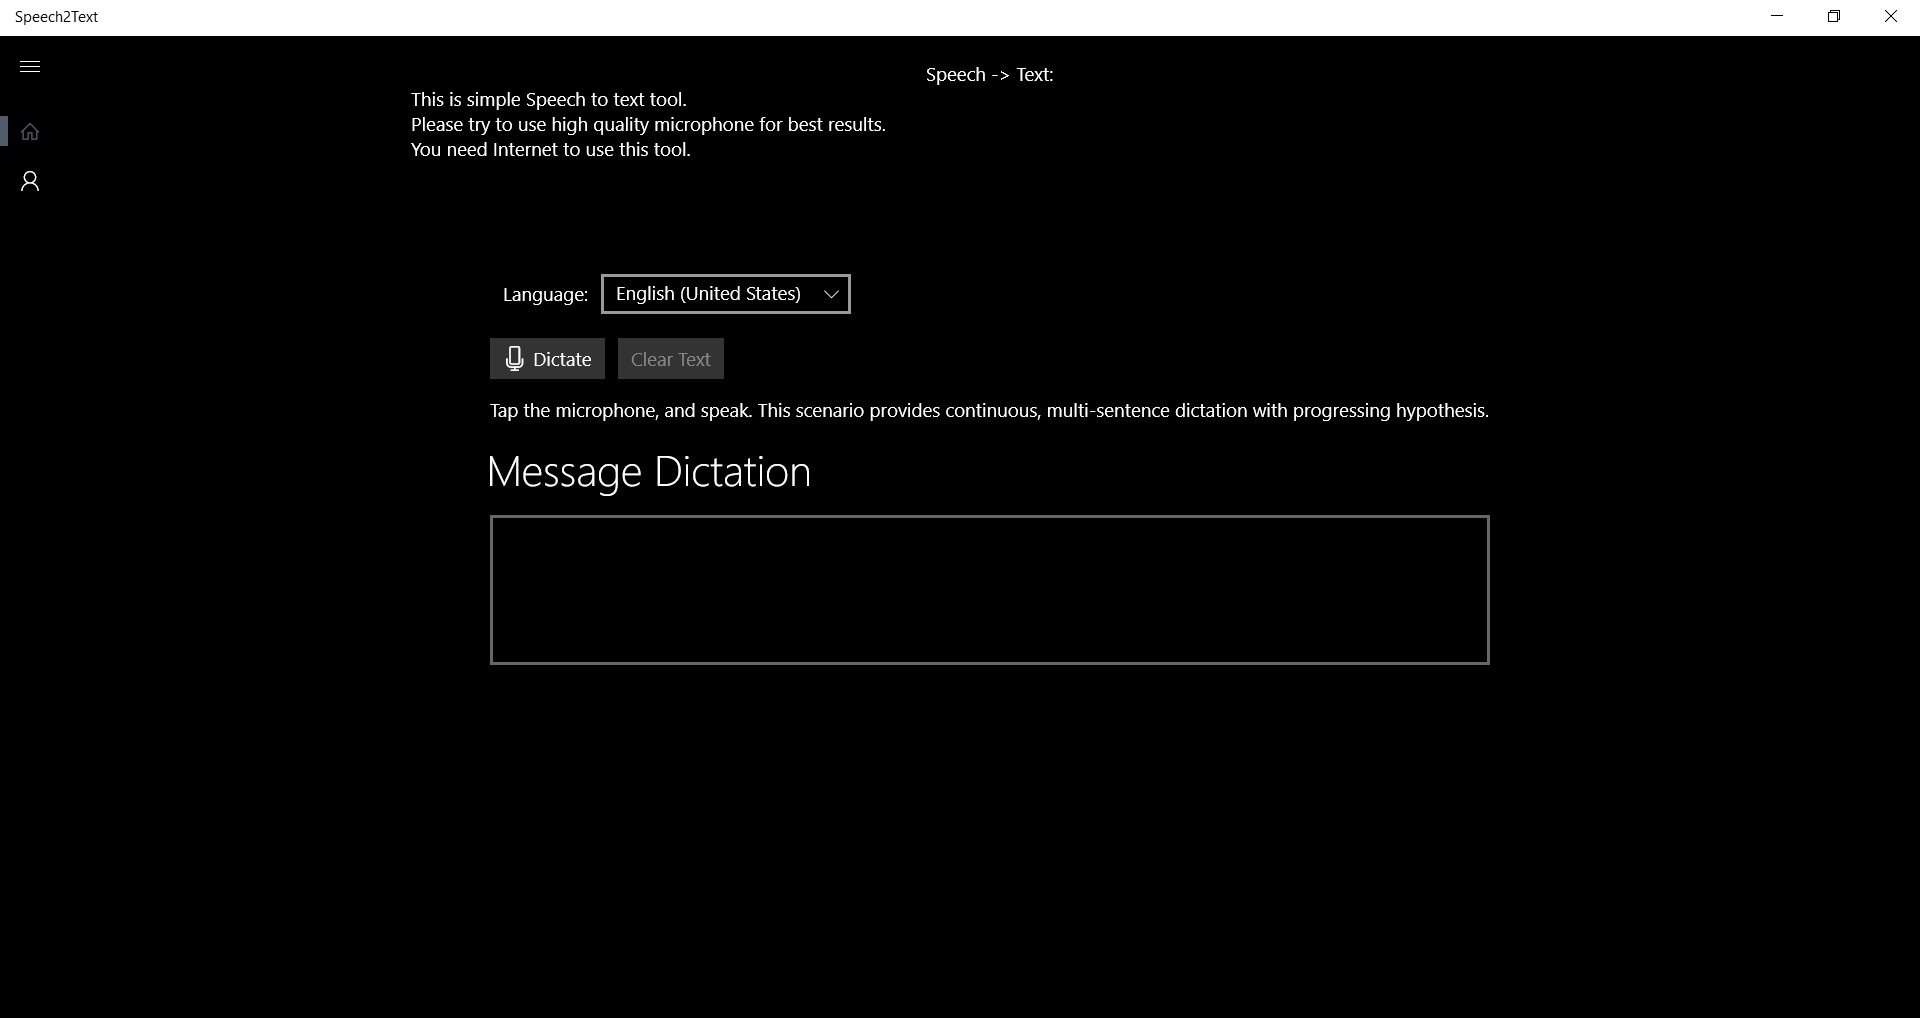
Any voice can be converted into plain text with the speech-to-text converter tool. The default language is English US. It also works with the languages that are installed on your Windows 10 computer. This tool is straightforward and uncluttered. Instead of typing your email, narrative, lesson, or chat, you can talk, and this program will convert it to text. You may copy and paste this content anywhere you like. It’s a Universal Windows Platform (UWP) software, which means it’ll run on any Windows 10 device, including phones, PCs, tablets, and Xboxes.
Platform: Windows
**Price:**Free
Features
- Voice commands
- Text editor
- Will support the language that you use in your PC
Pros
- It is highly efficient due to the usage of keyboard controls
- It gives simple keyboard shortcuts for navigation
Cons
- It needs an internet connection
5. Sobolsoft
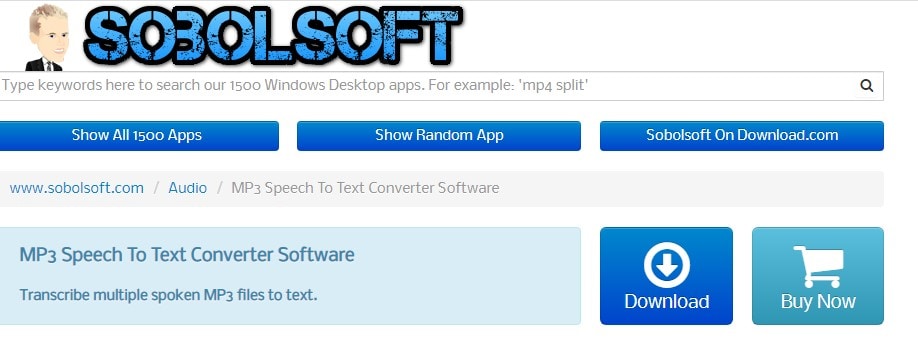
Sobolsoft’s MP3 Voice to Text Converter software is one of the most incredible solutions on the market if you’re seeking a trustworthy mp3 to text program that you can use on your PC. The program is simple; just choose the audio files you want to transcribe and press the Start Converting button. All of the text generated by the program will be presented in the Results box, where you may modify, copy, or save it as a text file. This program, however, does not handle video files, so you won’t be able to use it to transcribe videos stored in MP4, AVI, MOV, or any other common video file type. You may sample Sobolsoft’s MP3 Speech to Text Converter for free before deciding if you want to buy a license to use the program without limitations.
Platform: Windows
Price:$19.99 per month
Features
- Powerful speech to text conversion
- Transcribe in real time
Pros
- In terms of production and understandable alternatives, there are no time constraints.
- You can separate the timeframes and convert numerous files.
Cons
- This software doesn’t provide support for video files.
6. InqScribe
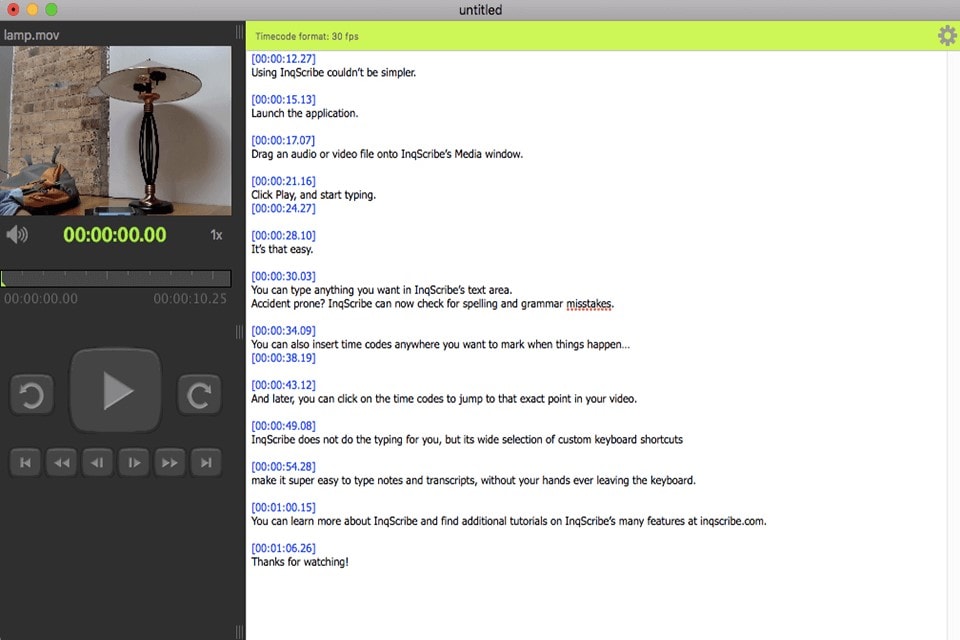
Even though InqScribe does not produce text automatically, it is still one of the best tools for creating subtitles for films and audio transcripts on Windows and Mac computers. The program supports a wide range of languages, allowing you to transcribe several languages in the same document. Simply drag and drop a video or audio file into the media window of the app and begin composing your transcript. InqScribe also allows you to include timecodes wherever in the text, making it ideal for creating subtitle files that you can simply add to videos you post online.
**Platform:**Windows/Mac
Price:$99 for an individual license
Features
- The program lets you export the process and add subtitles to your projects before exporting them as video files using Final Cut Pro or Adobe Premiere Pro.
Pros
- It can convert movie subtitles
- Feature-rich
Cons
- Installation is required
- It doesn’t allow recording directly into the software
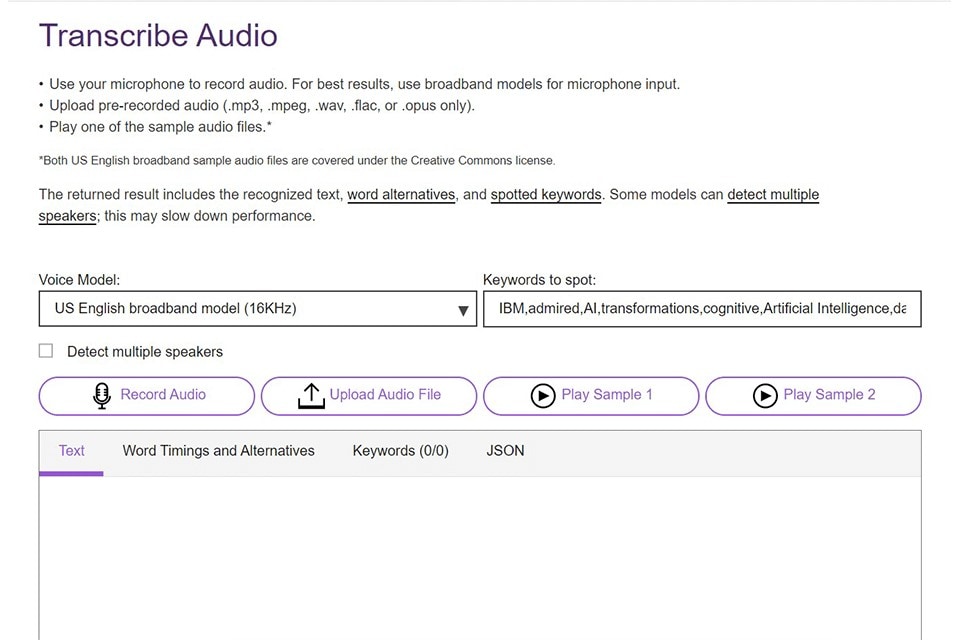
7. Watson STT
Arabic, English, Brazilian, German, Portuguese, Spanish, French, Japanese, Korean, and Mandarin are just a few of the languages available. The IBMWatson STT is ideal for anybody who works with one of these languages. This is one of the greatest free audio to text converters out there.
This transcription program enables you to convert audio to text in real time or upload previously recorded files. It boasts of advanced language models, audio frequency settings, and transcription output capabilities.
You can easily organize and prepare your transcripts with features like numeric redaction, speaker labels, smart formatting, word timestamps, confidence, keyword detection, and alternatives.
**Platform:**Windows/Mac
**Price:**Free
Features
- Smart formatting
- Speaker labels
- Keyword spotting
- Word timestamps
- Numeric redaction
Pros
- Utilizes unstructured data
- Enhances the user experience
- Allows you to upload prerecorded audio
Cons
- Limited options in a free version
15 Best mp3 to text converter Online
2. VEED.IO
Veed.io is much more than just an MP3 to text converter. With this powerful tool, you may make any kind of audio or video. It lets you add sound effects to Instagram stories and YouTube intros, among other things. To transcribe the voice from your MP3 to a text file, get Veed’s free, fast, and simple online transcription tool. It works with WAVs, M4As, OGGs, and even video files and MP3.

**Price:**free and paid ($12/mo)
Features
- Fast cloud servers
- It can read and transcribe a variety of languages, including English, French, Chinese, Spanish, and others.
Pros
- Simple interface
Cons
- The free version is not accurate
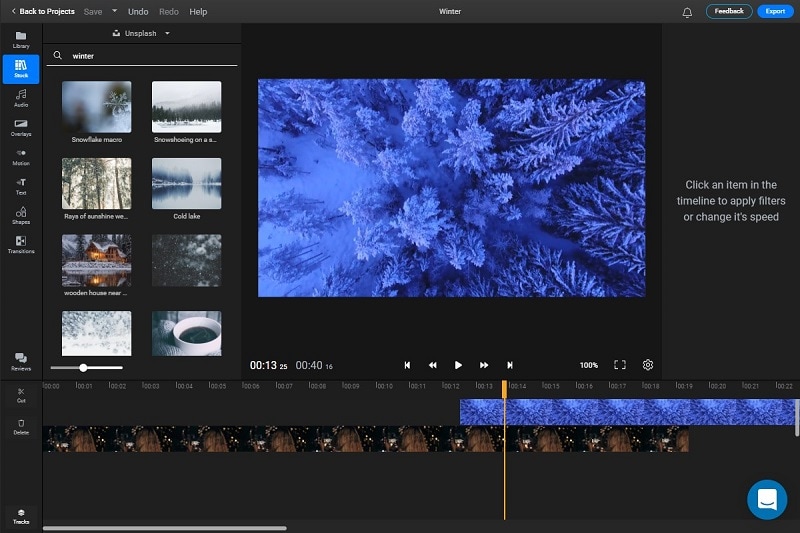
3. Flixier
Flixier is a cloud-based, collaborative video editing application that operates on any computer browser, significantly speeding up your video production process. Flixier is a robust video editor that runs entirely inside the browser. This means you can keep editing on several devices, including Chromebooks, without sacrificing performance. Flixier is also simple for collaborative video editings, such as when working with a cameraperson or an outside editor.
**Price:**free and paid ($10/user/mo)
Features
- Speech to text converter
Pros
- It is a collaborative tool that allows you to use other apps.
Cons
- It takes to transcribe a file.
- The free version has fewer features.
4. Happyscribe
Happy Scribe is a reliable voice-to-text converter that can also transcribe MPA, MPE, MPEG, M4A, WMA, MP4, and MOV files for 120 Euros per hour of conversion. It has been recommended by the BBC, Forbes, Spotify, and other reputable organizations. When your account’s credits go below a certain level, the solution automatically recharges your account.
Price:$2.11 per minute
Features
- Fast and reliable speech to text converter
- Real-time transcription
Pros
- No credit expirations.
- It can transcribe Zoom meetings.
Cons
- Since AI is used for transcription, the text might not be as accurate as expected.
5. Go Transcribe
Go transcribe is a popular service that uses artificial intelligence. The app is compatible with any device and supports 17 different languages. Within the same sector, it also offers Team Management solutions. Go Transcribe offers a pay-per-minute service at 22 cents (USD). It also offers a monthly membership plan that starts at 48 USD a month for 4 hours. They also provide free audio and video translation services for testing reasons.

Price:$48 for 4 hours a month
Features
- Mp3 to text converter
- Audio and video translation
Pros
- Has a lot of useful features
- Simple interface for novices
Cons
- Text is accurate at times
6. Rev
Rev , one of the greatest and most reputable transcription services, does not use Artificial Intelligence (AI) technology and instead relies on people to do all of the conversions. It assures that the transcribed audio is accurate up to 99 %.

Price:$1.25 per minute
Features
- AI-based mp3 and speech to text converter
Pros
- It offers a rough draft (generated by the AI) with up to 80% accuracy at a comparatively lower cost.
- It can add English and foreign captions to your videos.
Cons
- Rev is a bit more expensive than other service providers in the same industry.
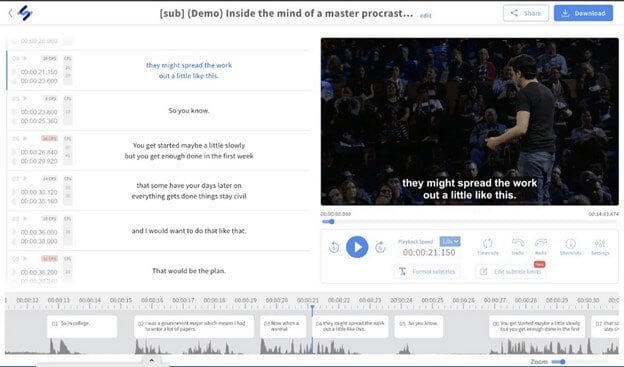
7. Transcribe
Transcribe , a widely used and acknowledged program is a must-have for journalists, lawyers, students, and anybody else who could use such software. It is one of the most popular web tools since it is fast, simple, and flexible to the demands of users. It offers a one-week free trial and then charges $20 per year for a single subscription with an additional $6 per hour of automated audio to text conversion. Alternatively, you can pay 20 USD per year to use the editor without automated transcriptions.
Price:$20/year + $6/hour
Features
- Integrated editor
- Voice typing
- Automatic text expander
Pros
- Simple interface
- Great features and shortcuts
Cons
- It is slow sometimes, depending on the size of the audio file.
8.Vocalmatic
Vocalmatic is the most convenient MP3 to text internet portal, complete with a professional transcribing service for journalists, podcasts, marketing, and sales. It converts text to MP3, WMA, and WAV formats. Its voice-to-text AI turns audio and video data into text in minutes and is rapid, efficient, and simple to use. It can transcribe your material into over 110 languages, making it as global as possible while being understandable to everybody. The online editing mode with playback controls is a highly unique feature. This text editor has Word and text export options.
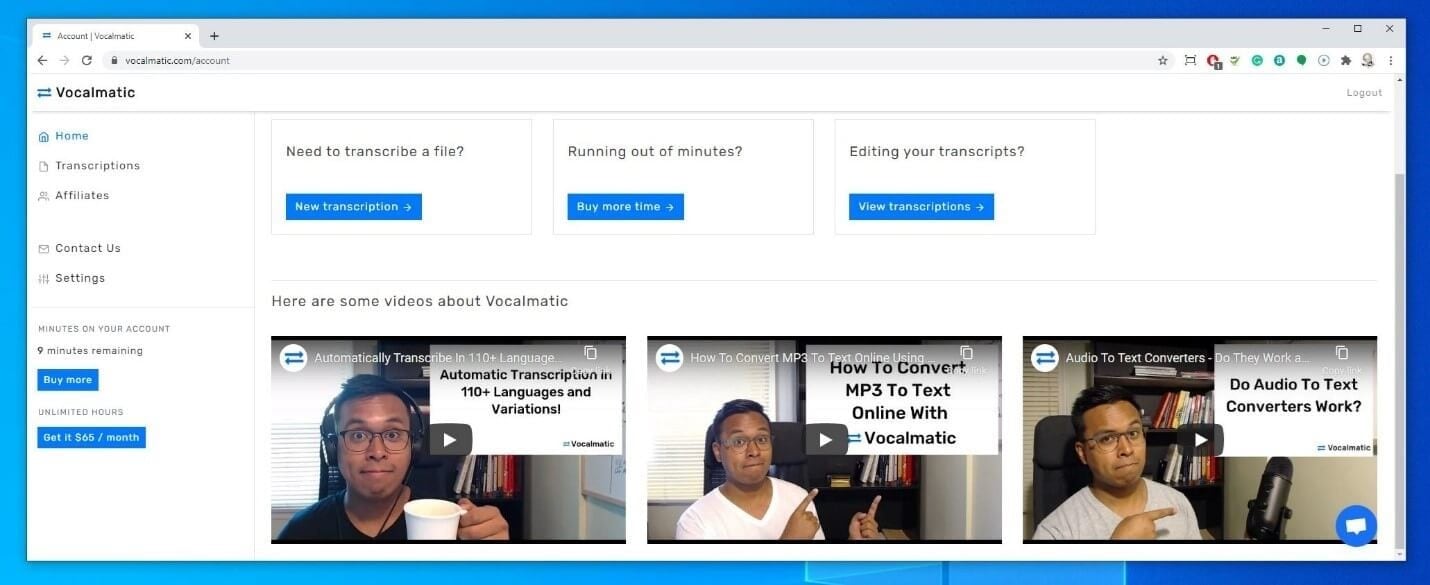
Price:$10/hour
Features
- Mp3 to text converter
- Text editor
Pros
- Supports several languages.
Cons
- The interface is not as easy to use.
9. Getwelder
Getwelder mp3 to text converter is best for those who have already begun a podcast using Zoom or Skype and want to improve the quality of their studio.
**Platform:**Android
Price:$20/month
Features
- It offers the finest user interface and user experience, making it the simplest to use.
- Amazing sound and video quality with up to 4K video and 48Khz audio.
Pros
- It provides separate audio and video tracks for appropriate editing.
- They now provide podcast transcripts that can be used right away for reusing material. Guests may quickly find out how to utilize it.
Cons
- Pricing is a little high for beginners and enthusiasts, at $20 per month.
- The video file is very big (it will quickly eat up your hard disk).
10. Amberscript
AmberScript is an online service that accepts MP3 audio recordings and converts them to text. It uses ASR (Automatic Speech Recognition) technology to significantly speed up the process. Moreover, the app gives a free trial transcription that lasts up to 30 minutes. Following that, you must acquire their premium membership to continue converting.
**Platform:**Android
Price:$8/hour
Features
- Text editor
- Multiple speakers distinction
- Mobile app available
Pros
- It provides a simple way to upload the source files.
- Artificial Intelligence (AI) is used for transcribing.
Cons
- Only the costliest membership gives 99 percent accuracy since people review the transcriptions.
11. 360 Converter
360 Converter is one of the most basic MP3 to text converters available. It features the most intuitive user interface with easy selection formats. It handles not only local files but also cloud and internet data. It can transcribe mp3 files in over 12 languages and save them as plain text, Microsoft Word documents, or PDF files. It has automated transcription software that accurately translates audio and video data to text, making it a must-have for transcribing tasks.
**Platform:**Android
**Price:**free
Features
- Video to text
- Speech to text
Pros
- Has a free version that fives accurate results
Cons
- File limit of 20MB foe guests and 50MB for members who have signed up
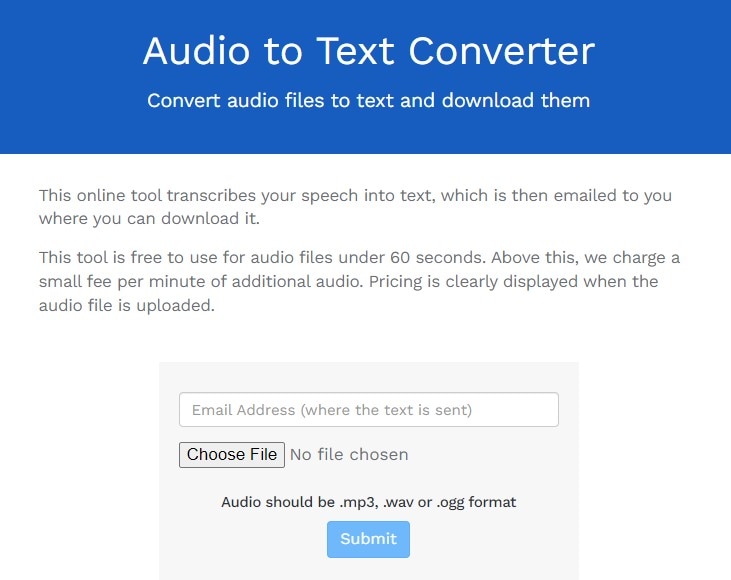
12. Virtual Speech
This internet application converts your voice into text and sends it to you through email, where you can download it. For audio files under 60 seconds, this program is free to use. We charge a nominal price for each minute of extra audio over this. When you submit an audio file, the price is plainly indicated.
**Platform:**Android/iPhone
**Price:**free
Features
- Audio to text converter
- Download text file
Pros
- The free version gives you up to 10 files per month
Cons
- It lacks a text editor
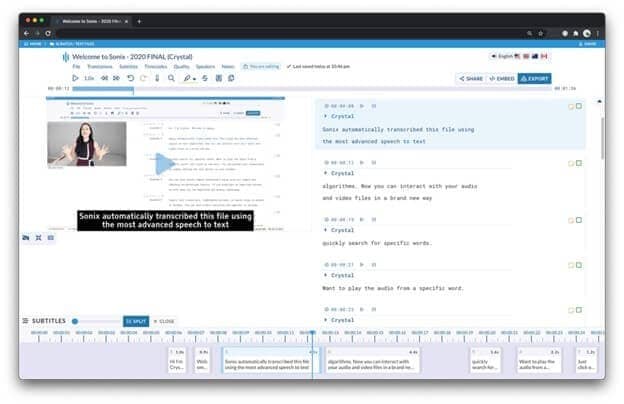
13. Sonix
Sonix is a legitimate and no-nonsense online converter that is available in three membership tiers and offers 30 minutes of free transcribing as a trial without asking for any credit card information. The online tool ensures maximum conversion accuracy and even provides attractive savings if you purchase their Enterprise package.
**Platform:**iPhone
Price:$10/hour
Features
- 35+ languages
- Text editor
- Word-by-word timestamps
- Speaker labelling
Pros
- Many prestigious companies, like Stanford University, CNBC, Harvard University, ESPN, and others, promote Sonix.
- The corporate membership provides users with enhanced training.
Cons
- Even using the trial transcription requires registration.
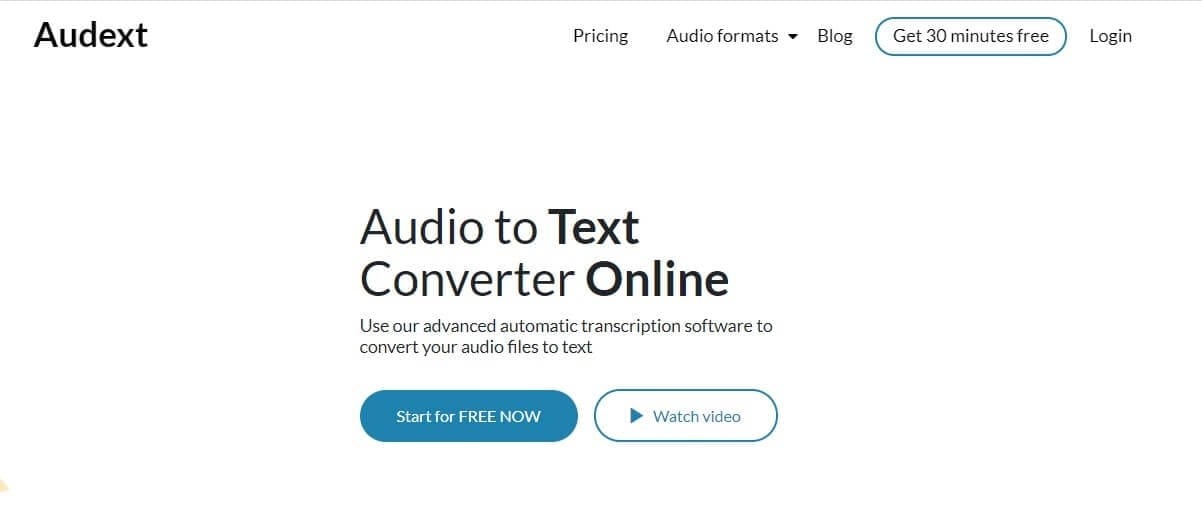
14. Audext
Audext is a fantastic online application that can automatically transcribe your audio files, which is both rapid and inexpensive. It only costs $12 per hour of transcribing, or $5 if you sign up for their subscription plan.
**Platform:**iPhone
Price:$12/hour
Features
- Built-in text editor
- Auto-save progress
- Recognition of voices despite background noise
- Speaker identification
- Various audio formats support
Pros
- Audext is simple to use and helps the process go smoothly from beginning to end.
Cons
- It needs a lot of computation power.
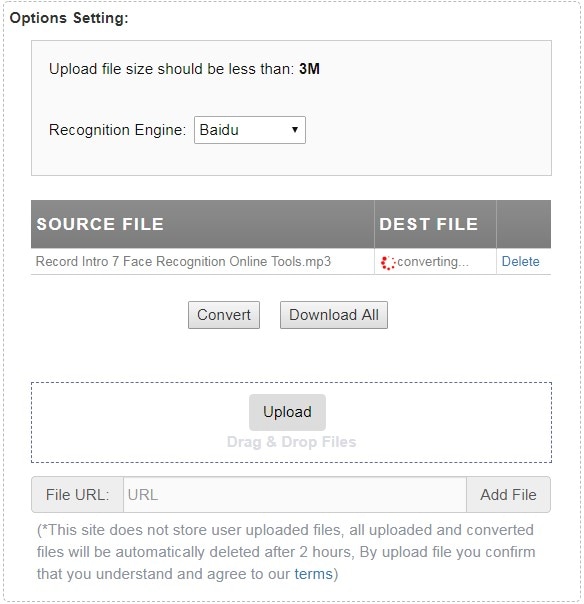
15. Bear File Converter
Bear File Converter is a good solution for quick audio-to-text conversion for short notes. Based on the Baidu recognition engine, it can convert clean audio with minimal interfering sounds properly. However, the internet program does not convert MP3 music files to text accurately. Furthermore, the internet program only records for three minutes.
**Platform:**Windows/Mac
**Price:**Free with a premium version ($29.95 per user)
Features
- Mp3 to text conversion
- AI-based speech to text conversion
- Online text editor
Pros
- For transcribing, it uses Artificial Intelligence (AI).
- It provides a simple way to upload the source files.
Cons
- The online tool has a file size limit of 3 minutes.
- It is not very accurate on mp3 files.
How to Convert MP3 to Text with Filmora
The Speech to Text effect makes it seem like someone’s words are transformed into text on your screen! Consider making several text tracks and beginning the next one a little later than the previous if you want to create a pause in the phrase.
Step1 – Add file and select speech to text feature
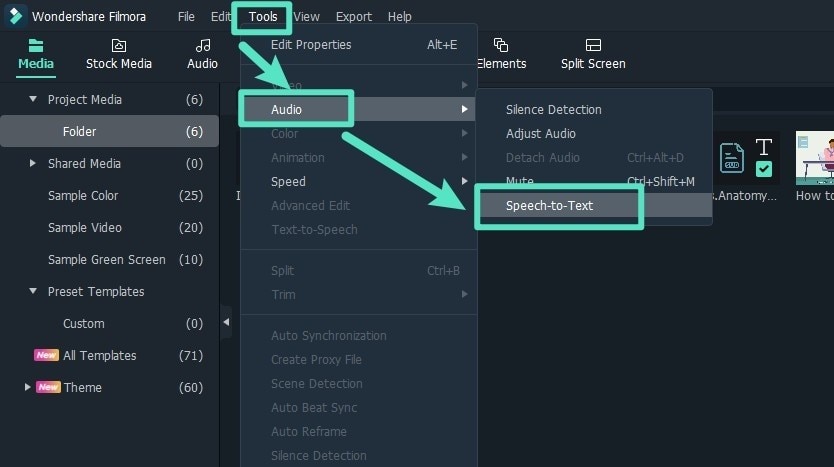
You can do this in four ways.
A. Select the audio asset on the timeline, then go to Tools > Audio > Speech-to-Text in the top menu bar.
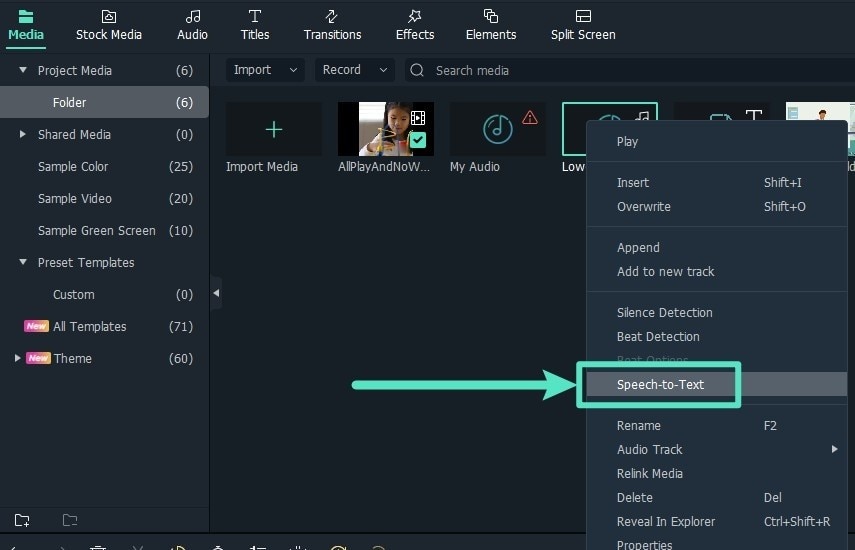
B. In the Media resource box, right-click the video/audio with the audio track and choose Speech-to-Text.
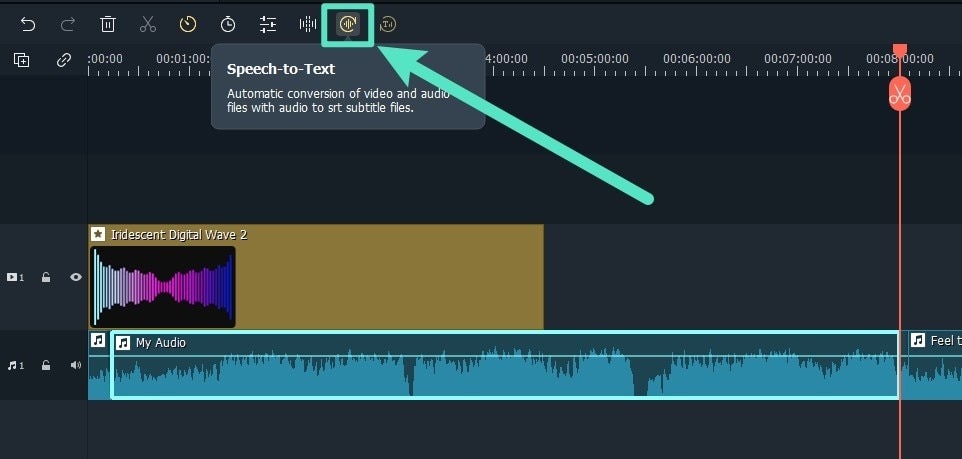
C. Once you’ve selected an audio asset, click the speech-to-text tool icon in the toolbar; if there is no compatible file type on the timeline, it will not appear.
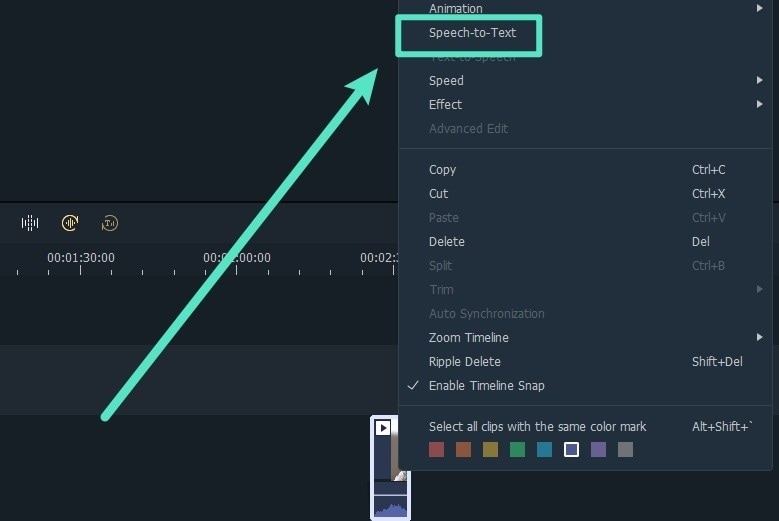
D. Right-click on the audio asset in the timeline and pick Speech-to-Text from the context menu that appears.
Step2- Parameter Settings
Select the language of the audio files to be transcribed and the files to be converted in the STT parameter setting bar and tick the automatically match to the timeline option.
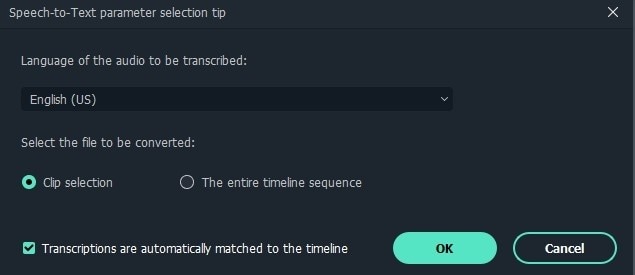
You must pick the language of the clip transcription in the language option.
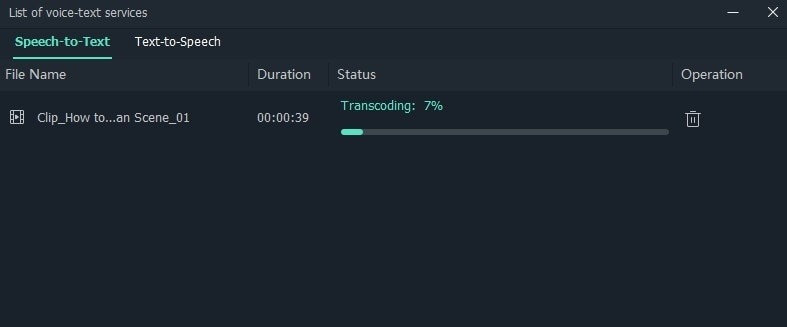
Step3– The list of tasks
- The progress of the file’s transcoding and transcription will be shown in the task list.
- The list is ordered from the first imported file to the last, with the latter at the very top of the list. It allows for up-and-down swiveling.
Step4– Generate and export files
SRT format will be used to display the created file.

Notice and Tips When Converting MP3 to Text
Keeping it Confidential
Online services present yet another potentially serious issue: privacy. Your audio file is stored on someone else’s server since you have to submit it to the service.
Your audio might be revealed to the public if that service is ever hacked or someone working there is not honest. In some circumstances, this may not be an issue, but in others, it might be a major one. In certain sectors, it might result in legal issues and large penalties. Many online voice to text services aren’t an option if you operate in a profession with tight privacy rules, such as healthcare.
Audio-to-text PC software is Better
While there are certain drawbacks to computer-assisted transcribing, it is not without merit. It’s a cheap method to convert your audio, and it can “learn” from its errors and improve over time thanks to the newest machine learning technologies. Simple audio material, taking notes, and other tasks with a low degree of complexity are best handled by software or web-based solutions. Even so, you’ll have to proofread everything and make a significant number of mistakes.
It’s also beneficial in cases when accuracy is less crucial than having the material translated to text, such as contact center monitoring. If the material is only being read internally, perfection may be less essential than speed and cost.
Bottom Line
Do you wish to convert an MP3 file to a text file and transcribe a speech? You may utilize the online auto transcribing tool provided by Filmora! It’s quick and simple to operate. Say goodbye to hours of manually transcribing audio transcriptions and welcome to automated transcriptions that just take a few clicks. There is no software to download; everything is done online.
Simply upload your audio recording, then choose the Auto Transcribe option. You may make minor changes to the transcription if necessary. WAV, M4A, and other common audio formats are all supported by Filmora’s speech-to-text service.
- VEED.IO
- Flixier
- Happyscribe
- Go Transcribe
- Rev
- Transcribe
- Vocalmatic
- Getwelder
- Amberscript
- 360 Converter
- Virtual Speech
- Sonix
- Audext
- Bear File Converter
- How to Convert MP3 to Text with Filmora
- Notice and Tips When Converting MP3 to Text
Why You Should Use MP3 to Text Converter?
Any audio can be converted to text using an MP3 to text converter. It’s an excellent approach to transcribe conferences or presentations accurately. Transcribing audio takes a long time, as we all know. Depending on the size of your MP3 files, an MP3 to text converter can correctly auto-transcribe them into text in minutes. This means you can begin correcting and polishing your transcriptions immediately, thus, cutting down on time spent on the task!
7 Best MP3 To Text Converter for Windows/Mac
1. Filmora
Although Wondershare Filmora Video Editor is well recognized for its broader video editing operations, it also has a large library of other features, such as mp3 to text conversion, that you can utilize to make your projects handy. It’s a Freemium program, like most other products we’ve discussed. However, the advantage here is that you can get mp3 to text software and all of Filmora’s other tools and features, providing you more bang for your money.
Platform: Windows/Mac
Price:$4.99/Month
Features
- Mp3 to text conversion
- Support upload audio files
Pros
- Very easy to use
- Simple interface that requires few clicks
- Pre-built text templates
2.Office 365/Word
Microsoft Word provides various useful built-in features for transcribing audio files. Word can instantly transcribe straight from your audio files, eliminating the need to place a speaker up to your PC microphone and play it. Of course, you’ll need an Office 365 or Office license for this to operate (though there are various hacks for getting Office to work for free, at least temporarily). Sign in to Office 365 on your browser and create a new Word document to transcribe.
Platform: Windows
**Price:**Free
Features
- Directly record in Word.
- Voice instructions may be uploaded as an audio file.
Pros
- It allows you to capture audio from your device’s microphone, as well as recognize and transcribe noises from the speakers in real-time.
Cons
- It is compatible with Windows devices only.
3. Google Docs
Google Docs has become an indispensable tool for most content creators., especially if you’re already using Google services. It allows you to write with your voice and access over 100 view commands for altering and formatting your documents in any manner you like. Making bullet points, altering the text style, and shifting the pointer to other document places are all examples. Consider Google Docs or Google Slides with Google’s Voice Typing tool for Google products like Gmail and Google Drive and require an in-built, powerful, but free dictation tool.
Platform: Windows/Mac
**Price:**Free
Features
- Voice typing and commands
- Transcribe in real-time
Pros
- Compatible with any device
- Very accurate
- It’s quick, particularly for real-time typing, since no prepared audio files are required
Cons
- It can only function in real-time, not with previously recorded data
4. Speech to Text converter
Any voice can be converted into plain text with the speech-to-text converter tool. The default language is English US. It also works with the languages that are installed on your Windows 10 computer. This tool is straightforward and uncluttered. Instead of typing your email, narrative, lesson, or chat, you can talk, and this program will convert it to text. You may copy and paste this content anywhere you like. It’s a Universal Windows Platform (UWP) software, which means it’ll run on any Windows 10 device, including phones, PCs, tablets, and Xboxes.
Platform: Windows
**Price:**Free
Features
- Voice commands
- Text editor
- Will support the language that you use in your PC
Pros
- It is highly efficient due to the usage of keyboard controls
- It gives simple keyboard shortcuts for navigation
Cons
- It needs an internet connection
5. Sobolsoft
Sobolsoft’s MP3 Voice to Text Converter software is one of the most incredible solutions on the market if you’re seeking a trustworthy mp3 to text program that you can use on your PC. The program is simple; just choose the audio files you want to transcribe and press the Start Converting button. All of the text generated by the program will be presented in the Results box, where you may modify, copy, or save it as a text file. This program, however, does not handle video files, so you won’t be able to use it to transcribe videos stored in MP4, AVI, MOV, or any other common video file type. You may sample Sobolsoft’s MP3 Speech to Text Converter for free before deciding if you want to buy a license to use the program without limitations.
Platform: Windows
Price:$19.99 per month
Features
- Powerful speech to text conversion
- Transcribe in real time
Pros
- In terms of production and understandable alternatives, there are no time constraints.
- You can separate the timeframes and convert numerous files.
Cons
- This software doesn’t provide support for video files.
6. InqScribe
Even though InqScribe does not produce text automatically, it is still one of the best tools for creating subtitles for films and audio transcripts on Windows and Mac computers. The program supports a wide range of languages, allowing you to transcribe several languages in the same document. Simply drag and drop a video or audio file into the media window of the app and begin composing your transcript. InqScribe also allows you to include timecodes wherever in the text, making it ideal for creating subtitle files that you can simply add to videos you post online.
**Platform:**Windows/Mac
Price:$99 for an individual license
Features
- The program lets you export the process and add subtitles to your projects before exporting them as video files using Final Cut Pro or Adobe Premiere Pro.
Pros
- It can convert movie subtitles
- Feature-rich
Cons
- Installation is required
- It doesn’t allow recording directly into the software
7. Watson STT
Arabic, English, Brazilian, German, Portuguese, Spanish, French, Japanese, Korean, and Mandarin are just a few of the languages available. The IBMWatson STT is ideal for anybody who works with one of these languages. This is one of the greatest free audio to text converters out there.
This transcription program enables you to convert audio to text in real time or upload previously recorded files. It boasts of advanced language models, audio frequency settings, and transcription output capabilities.
You can easily organize and prepare your transcripts with features like numeric redaction, speaker labels, smart formatting, word timestamps, confidence, keyword detection, and alternatives.
**Platform:**Windows/Mac
**Price:**Free
Features
- Smart formatting
- Speaker labels
- Keyword spotting
- Word timestamps
- Numeric redaction
Pros
- Utilizes unstructured data
- Enhances the user experience
- Allows you to upload prerecorded audio
Cons
- Limited options in a free version
15 Best mp3 to text converter Online
2. VEED.IO
Veed.io is much more than just an MP3 to text converter. With this powerful tool, you may make any kind of audio or video. It lets you add sound effects to Instagram stories and YouTube intros, among other things. To transcribe the voice from your MP3 to a text file, get Veed’s free, fast, and simple online transcription tool. It works with WAVs, M4As, OGGs, and even video files and MP3.
**Price:**free and paid ($12/mo)
Features
- Fast cloud servers
- It can read and transcribe a variety of languages, including English, French, Chinese, Spanish, and others.
Pros
- Simple interface
Cons
- The free version is not accurate
3. Flixier
Flixier is a cloud-based, collaborative video editing application that operates on any computer browser, significantly speeding up your video production process. Flixier is a robust video editor that runs entirely inside the browser. This means you can keep editing on several devices, including Chromebooks, without sacrificing performance. Flixier is also simple for collaborative video editings, such as when working with a cameraperson or an outside editor.
**Price:**free and paid ($10/user/mo)
Features
- Speech to text converter
Pros
- It is a collaborative tool that allows you to use other apps.
Cons
- It takes to transcribe a file.
- The free version has fewer features.
4. Happyscribe
Happy Scribe is a reliable voice-to-text converter that can also transcribe MPA, MPE, MPEG, M4A, WMA, MP4, and MOV files for 120 Euros per hour of conversion. It has been recommended by the BBC, Forbes, Spotify, and other reputable organizations. When your account’s credits go below a certain level, the solution automatically recharges your account.
Price:$2.11 per minute
Features
- Fast and reliable speech to text converter
- Real-time transcription
Pros
- No credit expirations.
- It can transcribe Zoom meetings.
Cons
- Since AI is used for transcription, the text might not be as accurate as expected.
5. Go Transcribe
Go transcribe is a popular service that uses artificial intelligence. The app is compatible with any device and supports 17 different languages. Within the same sector, it also offers Team Management solutions. Go Transcribe offers a pay-per-minute service at 22 cents (USD). It also offers a monthly membership plan that starts at 48 USD a month for 4 hours. They also provide free audio and video translation services for testing reasons.
Price:$48 for 4 hours a month
Features
- Mp3 to text converter
- Audio and video translation
Pros
- Has a lot of useful features
- Simple interface for novices
Cons
- Text is accurate at times
6. Rev
Rev , one of the greatest and most reputable transcription services, does not use Artificial Intelligence (AI) technology and instead relies on people to do all of the conversions. It assures that the transcribed audio is accurate up to 99 %.
Price:$1.25 per minute
Features
- AI-based mp3 and speech to text converter
Pros
- It offers a rough draft (generated by the AI) with up to 80% accuracy at a comparatively lower cost.
- It can add English and foreign captions to your videos.
Cons
- Rev is a bit more expensive than other service providers in the same industry.
7. Transcribe
Transcribe , a widely used and acknowledged program is a must-have for journalists, lawyers, students, and anybody else who could use such software. It is one of the most popular web tools since it is fast, simple, and flexible to the demands of users. It offers a one-week free trial and then charges $20 per year for a single subscription with an additional $6 per hour of automated audio to text conversion. Alternatively, you can pay 20 USD per year to use the editor without automated transcriptions.
Price:$20/year + $6/hour
Features
- Integrated editor
- Voice typing
- Automatic text expander
Pros
- Simple interface
- Great features and shortcuts
Cons
- It is slow sometimes, depending on the size of the audio file.
8.Vocalmatic
Vocalmatic is the most convenient MP3 to text internet portal, complete with a professional transcribing service for journalists, podcasts, marketing, and sales. It converts text to MP3, WMA, and WAV formats. Its voice-to-text AI turns audio and video data into text in minutes and is rapid, efficient, and simple to use. It can transcribe your material into over 110 languages, making it as global as possible while being understandable to everybody. The online editing mode with playback controls is a highly unique feature. This text editor has Word and text export options.
Price:$10/hour
Features
- Mp3 to text converter
- Text editor
Pros
- Supports several languages.
Cons
- The interface is not as easy to use.
9. Getwelder
Getwelder mp3 to text converter is best for those who have already begun a podcast using Zoom or Skype and want to improve the quality of their studio.
**Platform:**Android
Price:$20/month
Features
- It offers the finest user interface and user experience, making it the simplest to use.
- Amazing sound and video quality with up to 4K video and 48Khz audio.
Pros
- It provides separate audio and video tracks for appropriate editing.
- They now provide podcast transcripts that can be used right away for reusing material. Guests may quickly find out how to utilize it.
Cons
- Pricing is a little high for beginners and enthusiasts, at $20 per month.
- The video file is very big (it will quickly eat up your hard disk).
10. Amberscript
AmberScript is an online service that accepts MP3 audio recordings and converts them to text. It uses ASR (Automatic Speech Recognition) technology to significantly speed up the process. Moreover, the app gives a free trial transcription that lasts up to 30 minutes. Following that, you must acquire their premium membership to continue converting.
**Platform:**Android
Price:$8/hour
Features
- Text editor
- Multiple speakers distinction
- Mobile app available
Pros
- It provides a simple way to upload the source files.
- Artificial Intelligence (AI) is used for transcribing.
Cons
- Only the costliest membership gives 99 percent accuracy since people review the transcriptions.
11. 360 Converter
360 Converter is one of the most basic MP3 to text converters available. It features the most intuitive user interface with easy selection formats. It handles not only local files but also cloud and internet data. It can transcribe mp3 files in over 12 languages and save them as plain text, Microsoft Word documents, or PDF files. It has automated transcription software that accurately translates audio and video data to text, making it a must-have for transcribing tasks.
**Platform:**Android
**Price:**free
Features
- Video to text
- Speech to text
Pros
- Has a free version that fives accurate results
Cons
- File limit of 20MB foe guests and 50MB for members who have signed up
12. Virtual Speech
This internet application converts your voice into text and sends it to you through email, where you can download it. For audio files under 60 seconds, this program is free to use. We charge a nominal price for each minute of extra audio over this. When you submit an audio file, the price is plainly indicated.
**Platform:**Android/iPhone
**Price:**free
Features
- Audio to text converter
- Download text file
Pros
- The free version gives you up to 10 files per month
Cons
- It lacks a text editor
13. Sonix
Sonix is a legitimate and no-nonsense online converter that is available in three membership tiers and offers 30 minutes of free transcribing as a trial without asking for any credit card information. The online tool ensures maximum conversion accuracy and even provides attractive savings if you purchase their Enterprise package.
**Platform:**iPhone
Price:$10/hour
Features
- 35+ languages
- Text editor
- Word-by-word timestamps
- Speaker labelling
Pros
- Many prestigious companies, like Stanford University, CNBC, Harvard University, ESPN, and others, promote Sonix.
- The corporate membership provides users with enhanced training.
Cons
- Even using the trial transcription requires registration.
14. Audext
Audext is a fantastic online application that can automatically transcribe your audio files, which is both rapid and inexpensive. It only costs $12 per hour of transcribing, or $5 if you sign up for their subscription plan.
**Platform:**iPhone
Price:$12/hour
Features
- Built-in text editor
- Auto-save progress
- Recognition of voices despite background noise
- Speaker identification
- Various audio formats support
Pros
- Audext is simple to use and helps the process go smoothly from beginning to end.
Cons
- It needs a lot of computation power.
15. Bear File Converter
Bear File Converter is a good solution for quick audio-to-text conversion for short notes. Based on the Baidu recognition engine, it can convert clean audio with minimal interfering sounds properly. However, the internet program does not convert MP3 music files to text accurately. Furthermore, the internet program only records for three minutes.
**Platform:**Windows/Mac
**Price:**Free with a premium version ($29.95 per user)
Features
- Mp3 to text conversion
- AI-based speech to text conversion
- Online text editor
Pros
- For transcribing, it uses Artificial Intelligence (AI).
- It provides a simple way to upload the source files.
Cons
- The online tool has a file size limit of 3 minutes.
- It is not very accurate on mp3 files.
How to Convert MP3 to Text with Filmora
The Speech to Text effect makes it seem like someone’s words are transformed into text on your screen! Consider making several text tracks and beginning the next one a little later than the previous if you want to create a pause in the phrase.
Step1 – Add file and select speech to text feature
You can do this in four ways.
A. Select the audio asset on the timeline, then go to Tools > Audio > Speech-to-Text in the top menu bar.
B. In the Media resource box, right-click the video/audio with the audio track and choose Speech-to-Text.
C. Once you’ve selected an audio asset, click the speech-to-text tool icon in the toolbar; if there is no compatible file type on the timeline, it will not appear.
D. Right-click on the audio asset in the timeline and pick Speech-to-Text from the context menu that appears.
Step2- Parameter Settings
Select the language of the audio files to be transcribed and the files to be converted in the STT parameter setting bar and tick the automatically match to the timeline option.
You must pick the language of the clip transcription in the language option.
Step3– The list of tasks
- The progress of the file’s transcoding and transcription will be shown in the task list.
- The list is ordered from the first imported file to the last, with the latter at the very top of the list. It allows for up-and-down swiveling.
Step4– Generate and export files
SRT format will be used to display the created file.
Notice and Tips When Converting MP3 to Text
Keeping it Confidential
Online services present yet another potentially serious issue: privacy. Your audio file is stored on someone else’s server since you have to submit it to the service.
Your audio might be revealed to the public if that service is ever hacked or someone working there is not honest. In some circumstances, this may not be an issue, but in others, it might be a major one. In certain sectors, it might result in legal issues and large penalties. Many online voice to text services aren’t an option if you operate in a profession with tight privacy rules, such as healthcare.
Audio-to-text PC software is Better
While there are certain drawbacks to computer-assisted transcribing, it is not without merit. It’s a cheap method to convert your audio, and it can “learn” from its errors and improve over time thanks to the newest machine learning technologies. Simple audio material, taking notes, and other tasks with a low degree of complexity are best handled by software or web-based solutions. Even so, you’ll have to proofread everything and make a significant number of mistakes.
It’s also beneficial in cases when accuracy is less crucial than having the material translated to text, such as contact center monitoring. If the material is only being read internally, perfection may be less essential than speed and cost.
Bottom Line
Do you wish to convert an MP3 file to a text file and transcribe a speech? You may utilize the online auto transcribing tool provided by Filmora! It’s quick and simple to operate. Say goodbye to hours of manually transcribing audio transcriptions and welcome to automated transcriptions that just take a few clicks. There is no software to download; everything is done online.
Simply upload your audio recording, then choose the Auto Transcribe option. You may make minor changes to the transcription if necessary. WAV, M4A, and other common audio formats are all supported by Filmora’s speech-to-text service.
Also read:
- Updated Audio Retrieval Techniques Extracting Audio From Visual Media for 2024
- 2024 Approved The Cyber Soundscape Changing Audio Speeds and Tones on the Web
- Updated 2024 Approved Fighting the Frenzy of Wind Vibration in Multimedia Capture Across OSes and Devices
- Updated Rapid Removal of Electrical Audio Disturbances
- New 2024 Approved Online Audiophiles MP3 Decomposer & Assembler
- 2024 Approved Are There Better Alternatives to MAGIX Samplitude for Professional Sound Design?
- 2024 Approved FREE 8 Best DAW for Chromebook to Make Music
- Updated 2024 Approved Pinpointing Audible Whistle Phenomena
- New The Ultimate Technique for Taming Room Rumbles in Recording Sessions
- 8 Best Voice Recognition Software for Windows, Mac and Online
- Updated Beating Time A Guide to Adding Rhythms and Tempos Using Premiere Pro
- 2024 Approved Premier Free MP3 Harmonizer Software
- New Navigating iPhone Audio Modification First-Time Users Introduction to Voice Changer Plus for 2024
- Updated 2024 Approved Utilizing Mystery and Intrigue Through Suspense Music for Film Scoring Excellence
- New Enhancing Movie Scores with Effective Dramatic Audio Techniques for 2024
- Updated Best 10 Websites to Download Montage Music
- 2024 Approved Conquering Complex Audioscapes A No-Nonsense Guide to Effective Track Combination in Premiere Pro
- 2024 Approved Transforming Vocal Landscapes A Methodical Approach to Swapping Video Audio Tracks (Part 1)
- New Tune Tracker Prodigies The Finest Song Identification Apps Enhancing Your Android Musical Experience for 2024
- Updated 2024 Approved Steps for Integrating Soundtracks Into MKV Format (MKV v2.0.2 Release)
- How to Choose the Best Sound Editor?
- Global Top-Rated MP3 Editing Applications for 2024
- New In 2024, The Contemporary Guide to Achieving Perfect Audio Gradual Decline
- 2024 Approved The Ultimate Process Rewiring Audio in Film Projects
- Updated Auditory Access From MP4 An Assembled List of Simple Steps to Tap Into Sound for 2024
- Expertly Curated List of Music to Text Transcription Tools
- Updated 2024 Approved Seamless Setup of Audacity in Ubuntu Instructional Steps
- In 2024, Harmony Hush Helper Innovative Sound Cleaner for Android & iPhone Enthusiasts, Unveiled
- Updated Navigating the Modern Landscape of Live Audio Capturing for Streaming
- New 2024 Approved Digital Beat Downloads Accessing DJ Anthems
- New Normalizing Audio in 3 Quick Ways-Audio Normalization for 2024
- Updated 2024 Approved The Audio Engineers Guide to Live Sound Management with OBS Maximizing Your Broadcast Quality
- Implementing Dynamic Ducking Techniques in Adobe Premiere for Windows Users
- New Fine-Tuning Tone in Audacity Keeping the Quality Intact While Changing Pitch
- New The Ultimate List 10 Best Free and Paid Audio Editors for Professional Sound Designers
- Updated In 2024, Harmonious Editing Adding Music to Media Projects via Filmora Software
- New 2024 Approved Furry Fidelities High-Quality Dog Soundtracks and Effects
- Updated 2024 Approved The Comprehensive Guide to Choosing the Best Chromebooks with Remarkable Vocal Transformation Software - PixEditPro
- New Essential Free Music Library for Editors for 2024
- Elevate Video Audio Dynamics Increase Surround Impact for 2024
- In 2024, Discovering the Finest Online Sound Design Tools - With Cost Breakdown
- In 2024, Unveiling the Best MacDAW Software of the Year Detailed Reviews and Comparisons
- Are You Curious About the Functionality of LUTs in LumaFusion? This Article Will Satisfy Your Queries with Ease
- Can I recover permanently deleted photos from HTC U23 Pro
- How to Change Location On Facebook Dating for your Oppo Find N3 | Dr.fone
- How to Transfer Data from Honor V Purse to Other Android Devices? | Dr.fone
- Full Guide on Mirroring Your Nokia C12 Pro to Your PC/Mac | Dr.fone
- How Do You Unlock your Apple iPhone XS? Learn All 4 Methods
- Simple Solutions to Fix Android SystemUI Has Stopped Error For Realme Narzo 60 5G | Dr.fone
- In 2024, Android to Apple How To Transfer Photos From Lava Yuva 2 to iPad Easily | Dr.fone
- In 2024, A Full Review for iTools Virtual Location and Top 5 Alternatives For Apple iPhone 14/iPad | Dr.fone
- In 2024, How to Bypass FRP on Tecno Spark 20C?
- Pokemon Go No GPS Signal? Heres Every Possible Solution On Vivo Y17s | Dr.fone
- What is the best Pokemon for pokemon pvp ranking On Poco X5 Pro? | Dr.fone
- Title: New Precision in Perception Eliminating Background Buzz with Audacitys Tools for 2024
- Author: Jacob
- Created at : 2024-05-05 04:02:53
- Updated at : 2024-05-06 04:02:53
- Link: https://audio-shaping.techidaily.com/new-precision-in-perception-eliminating-background-buzz-with-audacitys-tools-for-2024/
- License: This work is licensed under CC BY-NC-SA 4.0.
