

New In 2024, Mastering Sound Levels Adjusting Volume on Audacity
Mastering Sound Levels: Adjusting Volume on Audacity
Audacity is a free, open access, cross-platform sound editing and recording tool. It is compatible with Windows, Mac OS X, Linux, and various other operating systems. All of these aspects have contributed to Audacity’s worldwide popularity. Audacity features an amplified effect that alters the loudness of your chosen audio and other practical tools that can change the sound in different ways.
As a result, Audacity can not only assist you in modifying the level of an audio file, but it can also help you equalize, reduce, normalize, and so on.
Yes, you have heard it right, Audacity increase volume, but the primary question is how? But don’t worry, you will get the answer after reading the article. This article will explain how you can increase or decrease the volume of a whole and a specific segment of the audio file. Let’s get started.
In this article
01 How to Increase or Decrease Volume Without Distortion and Clipping in Audacity
02 How to Increase Volume of Multiple Files in Audacity?
03 How to Increase Volume in Certain Parts of Track?
04 What’s the Difference between Normalize and Amplify?
Part 1: How to Increase or Decrease Volume Without Distortion and Clipping in Audacity
Audio clipping occurs when the audio input becomes too loud for an amplifier to produce, and the surplus signal creates distortion. When editing, you cannot add additional volume to your audio clip forever because this would result in clipping. In this case, you can use the Audacity application to emphasize your material by turning the volume up or down without distortion and clipping on a track or recording.
Learn how Audacity increase volume without distortion by following the procedure described below:
Step 1: First, download and install the Audacity software on your computer.
Step 2: Select the File from the menu above and click Open to open the audio file.

Step 3: Choose the audio track, go to the Effect menu and pick the Amplify option from the drop-down menu.

Note: You can increase or decrease the volume by double-clicking the track and using the slider under the Gain title.
Step 4: Increase or decrease the volume by sliding the slider or typing the amplification value in the text box next to it in the Amplify window as needed.

Note: Ensure that the Allow Clipping checkbox remains unchecked to avoid clipping. Moreover, keep in mind that increasing the volume to a greater extent can result in distortion.
Related: How to Change Audio Volume in Filmora
Part 2: How to Increase Volume of Multiple Files in Audacity?
Audacity is an open-source audio editing tool. It is used for various purposes, like audio recording, music creation, and audio file editing. It also allows you to increase and decrease the volume of audio files.
You may also apply the modifications to multiple files at once, rather than one at a time. Check out the instructions below to learn how to change the volume of multiple audio files:
Step 1: Select the Import option from the File menu, and then pick the Audio option. Browse to your audio files, choose all of them, and then click the Open option.

Step 2: To select all the files, press Ctrl + A, click on the Effect option in the menu bar and pick Amplify.

Step 3: Now, either enter the value in the text box next to the Amplification Decibels tab or use the slider under it. To verify the operation of increasing the volume, check the allow clipping checkbox. When you’re through with the options, click the Ok button.

Step 4: Amplification will be applied to all the tracks. Go to the File option from the above menu to export the files and then select the Export option.

If you’re running Audacity on macOS computer, you can watch the video tutorial below to apply effects to multiple files.
Part 3: How to Increase Volume in Certain Parts of Track?
The audacity software also allows you to alter a specific section of an audio file. The selection tool can assist in locating a particular area of the track. After you’ve chosen a section of the audio file, you may utilize the amplification effect to increase its loudness. Check out the instructions below to learn how you can achieve it:
Step 1: Launch the Audacity software on the computer. To open the audio file, go to the File menu and select Open. You may also open the file by dragging it.
Step 2: Ensure that the Selection tool is active now. Click and hold the mouse left-click to move from one spot on the track to another.

Step 3: After picking the part, go to the Effect option from the menu and select Amplify.

Step 4: Now, for that specific region, modify the amplification and click OK. This will only change the volume for the area you have selected.

Part 4: What’s the Difference between Normalize and Amplify?
Amplify and Normalize are two essential features of the Audacity tool. Many people think they are the same thing, they are right up to some extent, but there exists a big difference between both the features. Before discussing the differences, you need to know what the terms Normalize and Amplify imply.
Amplify
It is the quickest approach to comprehend the effect’s name if you want to know precisely what impacts are. The frequency of the vibration is enhanced to increase the amplification effect. As previously said, it raises a tiny sound.
Furthermore, because this amplification is extended to all frequencies and amplitude, the noise increases. If you choose ten sources and magnify them by ten decibels, each source will be ten decibels louder than your present sound.

Normalize
The meaning of normalizing is standardized, which is also a feature of its name. Whenever you pick an audio input and use the normalize feature, the level is adjusted automatically according to the previously indicated average volume size in Oda City.
As a result, when one sound source is normalized, there is no discernible difference between it and the amplification mechanism. Still, the effect is evident when several sound sources are performed concurrently.
By pressing Ctrl + A and selecting all ten various audio sources, you may compute the required standard of every sound source, enhance the audio input that is smaller than the normal, and create the audio signal more significant than the standard. Shrink the size of each noise source, such as the name, and normalize the sound.

Related: Best Audio Normalizers for Windows
Differences
To differentiate the meaning and impact precisely, amplification means increasing or reducing the sound, whereas normalizing means equalizing the sound. Simply defined, if you magnify ten sources by ten decibels, each of the shorter and louder noises equals ten decibels in their actual loudness.
When the ten sources are normalized, the louder sounds grow louder, conforming to the standard sound source size. Because the amplifying is done regardless, the little noises are going insane during this procedure.
Conclusion
All in all, Audacity does an excellent job at audio editing. If you simply need to modify an audio file, Audacity is a great option. For increasing and decreasing the volume of single and multiple audio files, Audacity is still one of the best bets in the market. We hope that now know how Audacity increase volume of the audio files after reading this article.
02 How to Increase Volume of Multiple Files in Audacity?
03 How to Increase Volume in Certain Parts of Track?
04 What’s the Difference between Normalize and Amplify?
Part 1: How to Increase or Decrease Volume Without Distortion and Clipping in Audacity
Audio clipping occurs when the audio input becomes too loud for an amplifier to produce, and the surplus signal creates distortion. When editing, you cannot add additional volume to your audio clip forever because this would result in clipping. In this case, you can use the Audacity application to emphasize your material by turning the volume up or down without distortion and clipping on a track or recording.
Learn how Audacity increase volume without distortion by following the procedure described below:
Step 1: First, download and install the Audacity software on your computer.
Step 2: Select the File from the menu above and click Open to open the audio file.
Step 3: Choose the audio track, go to the Effect menu and pick the Amplify option from the drop-down menu.
Note: You can increase or decrease the volume by double-clicking the track and using the slider under the Gain title.
Step 4: Increase or decrease the volume by sliding the slider or typing the amplification value in the text box next to it in the Amplify window as needed.
Note: Ensure that the Allow Clipping checkbox remains unchecked to avoid clipping. Moreover, keep in mind that increasing the volume to a greater extent can result in distortion.
Related: How to Change Audio Volume in Filmora
Part 2: How to Increase Volume of Multiple Files in Audacity?
Audacity is an open-source audio editing tool. It is used for various purposes, like audio recording, music creation, and audio file editing. It also allows you to increase and decrease the volume of audio files.
You may also apply the modifications to multiple files at once, rather than one at a time. Check out the instructions below to learn how to change the volume of multiple audio files:
Step 1: Select the Import option from the File menu, and then pick the Audio option. Browse to your audio files, choose all of them, and then click the Open option.
Step 2: To select all the files, press Ctrl + A, click on the Effect option in the menu bar and pick Amplify.
Step 3: Now, either enter the value in the text box next to the Amplification Decibels tab or use the slider under it. To verify the operation of increasing the volume, check the allow clipping checkbox. When you’re through with the options, click the Ok button.
Step 4: Amplification will be applied to all the tracks. Go to the File option from the above menu to export the files and then select the Export option.
If you’re running Audacity on macOS computer, you can watch the video tutorial below to apply effects to multiple files.
Part 3: How to Increase Volume in Certain Parts of Track?
The audacity software also allows you to alter a specific section of an audio file. The selection tool can assist in locating a particular area of the track. After you’ve chosen a section of the audio file, you may utilize the amplification effect to increase its loudness. Check out the instructions below to learn how you can achieve it:
Step 1: Launch the Audacity software on the computer. To open the audio file, go to the File menu and select Open. You may also open the file by dragging it.
Step 2: Ensure that the Selection tool is active now. Click and hold the mouse left-click to move from one spot on the track to another.
Step 3: After picking the part, go to the Effect option from the menu and select Amplify.
Step 4: Now, for that specific region, modify the amplification and click OK. This will only change the volume for the area you have selected.
Part 4: What’s the Difference between Normalize and Amplify?
Amplify and Normalize are two essential features of the Audacity tool. Many people think they are the same thing, they are right up to some extent, but there exists a big difference between both the features. Before discussing the differences, you need to know what the terms Normalize and Amplify imply.
Amplify
It is the quickest approach to comprehend the effect’s name if you want to know precisely what impacts are. The frequency of the vibration is enhanced to increase the amplification effect. As previously said, it raises a tiny sound.
Furthermore, because this amplification is extended to all frequencies and amplitude, the noise increases. If you choose ten sources and magnify them by ten decibels, each source will be ten decibels louder than your present sound.
Normalize
The meaning of normalizing is standardized, which is also a feature of its name. Whenever you pick an audio input and use the normalize feature, the level is adjusted automatically according to the previously indicated average volume size in Oda City.
As a result, when one sound source is normalized, there is no discernible difference between it and the amplification mechanism. Still, the effect is evident when several sound sources are performed concurrently.
By pressing Ctrl + A and selecting all ten various audio sources, you may compute the required standard of every sound source, enhance the audio input that is smaller than the normal, and create the audio signal more significant than the standard. Shrink the size of each noise source, such as the name, and normalize the sound.
Related: Best Audio Normalizers for Windows
Differences
To differentiate the meaning and impact precisely, amplification means increasing or reducing the sound, whereas normalizing means equalizing the sound. Simply defined, if you magnify ten sources by ten decibels, each of the shorter and louder noises equals ten decibels in their actual loudness.
When the ten sources are normalized, the louder sounds grow louder, conforming to the standard sound source size. Because the amplifying is done regardless, the little noises are going insane during this procedure.
Conclusion
All in all, Audacity does an excellent job at audio editing. If you simply need to modify an audio file, Audacity is a great option. For increasing and decreasing the volume of single and multiple audio files, Audacity is still one of the best bets in the market. We hope that now know how Audacity increase volume of the audio files after reading this article.
8 Best Cartoon Sound Effects You Can Download
8 Best Cartoon Sound Effects You Can Download

Benjamin Arango
Mar 27, 2024• Proven solutions
The sound plays a significant role in the videos. Without the right sound effects, your videos become dull. It doesn’t create an impact to grab the attention of the viewers. Especially when it comes to attracting the attention of kids while they watch cartoons.
Are you working on a cartoon video for kids or some animated action cartoons? Use the cartoon sound effects to add more intensity and emotions to the videos. Every time creating a new sound effect for your cartoon video becomes difficult.
If you are on a strict budget, producing new content becomes almost impossible. In such situations, free cartoon sound effects are the best way to enhance your cartoon videos.
In this article, you will learn eight best cartoon sound effects that you can download and make your videos perfect.
8 Best Cartoon Sound Effects Resources
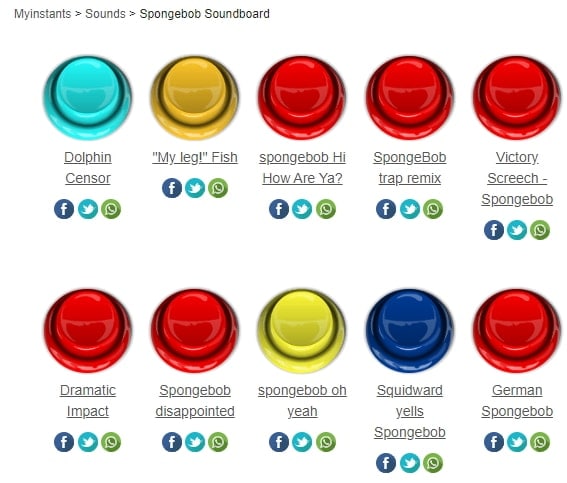
1. Spongebob Sound Effects
MyInstant’s Spongebob soundboard offers a range of cartoon sound effects that can be easily downloaded just by clicking on the Download mp3 sound effect button. You can listen to over 120 classic cartoon sound effects and download it for free. You can also copy the embed link and paste it to your website.
2. Hanna Barbera Sound Effects
From Sounddogs, Hanna Barbera sound effects library, you can find over 2200 cartoon sound effects that are divided into 4 CDs. It has almost all the legendary classic cartoon sound effects from the cartoon shows like Yogi Bear, Huckleberry Hound, the Flintstones, The Jetsons, Quick Draw McGraw, and all the rest of the gang.
You can download the mp3 cartoon sound effects completely free by clicking on the Download ID number mentioned at the right end of each link.
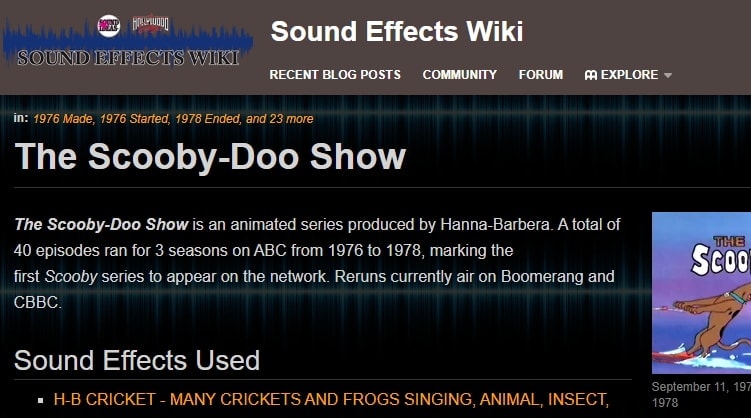
3. Scooby Doo Running Sound
Fandom’s Scooby Doo running sound effects offers all the ideas used in 40 episodes of Scooby Doo throughout the three seasons on ABC. It is over 37000 pages wiki that you can click and browse through the pages to find the right sound effect and download it for free.
4. Tom and Jerry Sound Effects
Pond5 offers 13 Tom and Jerry sound effects that you can listen by scrolling the cursor over the boxes and download the free preview of cartoon sound effects by clicking on Download Preview.
If you want to download the entire cartoon sound effect, you need to register, log in, and pay for it. There are filters like price, collections, duration, etc. to make your selection more precise.
5. Free SFX
In FreeSFX website, you can find a range of comical cartoon sound effects that includes classic effects like descend, boink, impact, pop, musical, running, rip and snap, bounce spring, slide whistle, squelch and splat, horn and loads more.
You need to log in to the website to download free cartoon sound effects.

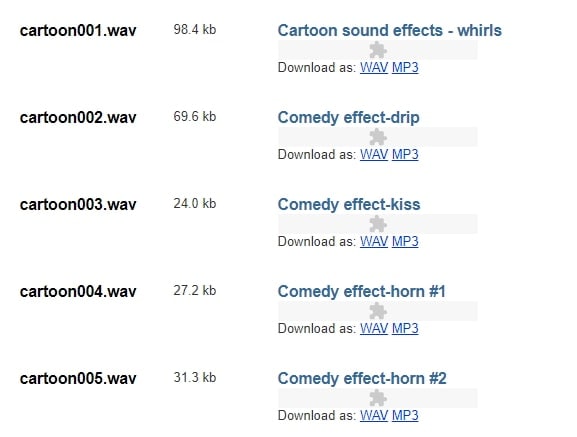
6.GRSites
With over 1980 cartoon sound effects, the GRSites is one of the best free sites for downloading both mp3 and WAV files. You can browse from a range of categories to find the best cartoon sound effects for your videos.
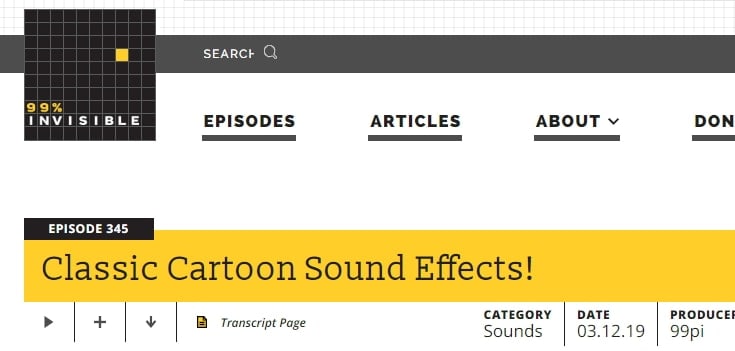
7. Cartoon Running Sound Effect
If you are looking for cartoon running sound effect, turn to Episode 345 in 99PercentInvisible. You can download the complete transcript page of around 30 minutes to use it in your video. Use the cartoon running sound effect produced by 99pi to enhance your video.
8. Big Fish Audio
The Big Fish Audio’s cartoon sound FX includes 23 free classic cartoon sound effects. The filters include a range of sound FX types, styles, format, brand, etc.
You can click on the cartoon sound effect and listen to it or add it to your playlist. But, if you wish to download the free cartoon sound effects, you need to register and pay to use the sound effect.

You may also like: How to Extract Audio from Videos on Win/Mac/Phone >>
Conclusion
Make your cartoon videos perfect with the fantastic free cartoon sound effects available for download completely free. With the range of free cartoon sound effects, you don’t need to worry about creating new sounds or expenses. You need to download the free sounds and beautifully enhance it with your creativity. There are several other sites for downloading free cartoon sound effects, but here you can check out some of the trusted ones to use.
Benjamin Arango
Benjamin Arango is a writer and a lover of all things video.
Follow @Benjamin Arango
Benjamin Arango
Mar 27, 2024• Proven solutions
The sound plays a significant role in the videos. Without the right sound effects, your videos become dull. It doesn’t create an impact to grab the attention of the viewers. Especially when it comes to attracting the attention of kids while they watch cartoons.
Are you working on a cartoon video for kids or some animated action cartoons? Use the cartoon sound effects to add more intensity and emotions to the videos. Every time creating a new sound effect for your cartoon video becomes difficult.
If you are on a strict budget, producing new content becomes almost impossible. In such situations, free cartoon sound effects are the best way to enhance your cartoon videos.
In this article, you will learn eight best cartoon sound effects that you can download and make your videos perfect.
8 Best Cartoon Sound Effects Resources
1. Spongebob Sound Effects
MyInstant’s Spongebob soundboard offers a range of cartoon sound effects that can be easily downloaded just by clicking on the Download mp3 sound effect button. You can listen to over 120 classic cartoon sound effects and download it for free. You can also copy the embed link and paste it to your website.
2. Hanna Barbera Sound Effects
From Sounddogs, Hanna Barbera sound effects library, you can find over 2200 cartoon sound effects that are divided into 4 CDs. It has almost all the legendary classic cartoon sound effects from the cartoon shows like Yogi Bear, Huckleberry Hound, the Flintstones, The Jetsons, Quick Draw McGraw, and all the rest of the gang.
You can download the mp3 cartoon sound effects completely free by clicking on the Download ID number mentioned at the right end of each link.
3. Scooby Doo Running Sound
Fandom’s Scooby Doo running sound effects offers all the ideas used in 40 episodes of Scooby Doo throughout the three seasons on ABC. It is over 37000 pages wiki that you can click and browse through the pages to find the right sound effect and download it for free.
4. Tom and Jerry Sound Effects
Pond5 offers 13 Tom and Jerry sound effects that you can listen by scrolling the cursor over the boxes and download the free preview of cartoon sound effects by clicking on Download Preview.
If you want to download the entire cartoon sound effect, you need to register, log in, and pay for it. There are filters like price, collections, duration, etc. to make your selection more precise.
5. Free SFX
In FreeSFX website, you can find a range of comical cartoon sound effects that includes classic effects like descend, boink, impact, pop, musical, running, rip and snap, bounce spring, slide whistle, squelch and splat, horn and loads more.
You need to log in to the website to download free cartoon sound effects.
6.GRSites
With over 1980 cartoon sound effects, the GRSites is one of the best free sites for downloading both mp3 and WAV files. You can browse from a range of categories to find the best cartoon sound effects for your videos.
7. Cartoon Running Sound Effect
If you are looking for cartoon running sound effect, turn to Episode 345 in 99PercentInvisible. You can download the complete transcript page of around 30 minutes to use it in your video. Use the cartoon running sound effect produced by 99pi to enhance your video.
8. Big Fish Audio
The Big Fish Audio’s cartoon sound FX includes 23 free classic cartoon sound effects. The filters include a range of sound FX types, styles, format, brand, etc.
You can click on the cartoon sound effect and listen to it or add it to your playlist. But, if you wish to download the free cartoon sound effects, you need to register and pay to use the sound effect.
You may also like: How to Extract Audio from Videos on Win/Mac/Phone >>
Conclusion
Make your cartoon videos perfect with the fantastic free cartoon sound effects available for download completely free. With the range of free cartoon sound effects, you don’t need to worry about creating new sounds or expenses. You need to download the free sounds and beautifully enhance it with your creativity. There are several other sites for downloading free cartoon sound effects, but here you can check out some of the trusted ones to use.
Benjamin Arango
Benjamin Arango is a writer and a lover of all things video.
Follow @Benjamin Arango
Discovering the Finest Zero-Cost, Open-Source Audio Management on Windows
Audios are as crucial a part of our lives as any other media communication tool. To get the most out of your audio, you can use the help of a suitable open-source audio editor. The best part about open-source sound editor software is its freely available source codes. Thus, you can study and change them yourself to enhance accessibility.
Want the perfect tool for your audio editing needs? Look no further. Here, you can find the 6 best open-source audio editing tools to make your audio files stand out. Learn more about these audio editors and what you can achieve with them below. Let’s get started with the tools!
Part 1: 5 Best Free Open-Source Audio Editor for Windows User
Looking for the perfect tool to edit your audio file? Here are some top-list open-source audio editing software you can use to enhance your audio files. These tools come with a variety of functions that can help your audio files stand out. Let’s get started! You won’t be disappointed!
1. Audacity
Audacity is one of the best open-source audio editor currently available in the market. Available for Windows 7 and later versions, Audacity is also supported by Mac and Linux. The software comes with a variety of easy-to-use features. This makes the editing process considerably stress-free for beginners. It surely is the deal.
Audacity is a remarkable audio editor. It allows you to perform all the basic editing functions on your audio. These include recording, editing, trimming, and splitting files. Additionally, the tool also provides some top-tier audio effects. Resultantly, you can analyze your audio file in depth. Are you impressed with it?

Key Features
- Introduce various types of noise and other sound effects to your audios.
- Preview and quick-play your audio clips easily.
- Merge or align tracks to the position of your choice.
- A range of supported formats includes MP3, WMA, WAV, AC3, OGG, and more.
- Simple keyboard shortcuts to make things easier.
2. WaveShop
WaveShop is yet another excellent open-source sound editor that can get the job done. It is a free and simple audio editor that is perfect for Windows users. WaveShop also comes in portable packages to suit your various needs. Do you wish to know more about it?
WaveShop offers many useful features for audio editing. You can import your audio files into the program’s interface and can then apply a range of functions. From trimming to amplifying and reversing audios, WaveShop lets you do it all. Go through its features to know more about it.

Key Features
- A multi-tab interface that enables you to edit different soundtracks in different windows.
- A timeline to easily delete, insert, or edit audio tracks.
- Audio effects and filters such as fade, reverse, amplify, etc.
- Save your output file in several formats such as RAW, WAV, AVR, FLAC, etc.
- A range of customization options like changing the sample size and waveform etc.
3. SoundEditor
The next open-source audio editor on our list is SoundEditor. Like other audio editors, SoundEditor comes with a range of editing options. These include cut/copy functions and recording soundtracks. The editor can also support multiple file editing in as many windows as you want. Isn’t it great?
Although SoundEditor comes with a full set of editing tools, it only supports WAV file formats. Still, the software is a good choice with its thorough toolset and easy-to-use functions. You can look across the key features to be sure about your selection.

Key Features
- A built-in sound recorder in the software.
- Options to insert silence at specified lengths in the audio.
- Change the playback speed of the entire track or specific sections.
- Wave synthesizer and resampler options for audio files.
- A multiple documents interface to let you open many windows at once.
4. Ardour
Another splendid open-source sound editor specifically meant for Windows users is Ardour. Musicians, audio engineers, soundtrack editors, and composers worldwide trust Ardour. Ardour offers a set of comprehensive audio editing tools which can be used to make your audios shine. This is truly phenomenal!
Despite its unique features, Ardour is still pretty easy to use. Anyone with a basic idea about editing can use it to create audio masterpieces. From multichannel tracks to mixing and panning, Ardour has it all. Look across these features to know why it is among the best!

Key Features
- No limit to the number of tracks that can be edited simultaneously.
- Multichannel file export to save output files in different formats and sample rates.
- Flexible recording style without any setup requirement.
- Import videos and extract audio from them.
- Multiple routing and panning options along with sample-accurate automation.
5. Jokosher
Looking for a beginner-friendly tool? The answer lies in Jokosher. Jokosher is a simple and easy open-source audio editing software. As opposed to other complicated editors, Jokosher offers a plain and user-friendly interface. For people who do not have much experience in the field, Jokosher is the perfect fit.
You can use the tool to create powerful soundtracks for music, podcasts, and more. The timeline in Jokosher’s interface is relatively simple. You can achieve all basic aspects of audio editing, including audio mixing and splitting. Why is this option great? The features below say it all!

Key Features
- A simple and easy-to-use interface.
- Support for extended audio file formats including MP3, OGG, FLAC, WAV, etc.
- Multi-track overlayed audio mixing and editing support.
- Add instrumentals to your audios, including bass guitars, saxophone, trumpets, and more.
- An Extensions menu for extra features such as managing instruments and setting the tempo.
Conclusion
Finding the right tool for your every need is not always an easy task. But with the correct guidance, you can select the appropriate tool based on your needs.
The above-mentioned tools can make your audio files flourish in the best way possible. You can trim, merge, delete, or split audio files in a few simple clicks. You can also use these open-source sound editor tools to change playback speed and other properties. You can now put your creative abilities to good use. There’s so much that you can do!
If you wish to work with video files, your go-to video editor should undoubtedly be Wondershare Filmora . This one-of-a-kind editor allows you to make and edit quality video content in a stress-free way. Filmora is certainly every content creator’s first choice when it comes to top video editing software. You won’t be disappointed with the results!
For Win 7 or later (64-bit)
For macOS 10.12 or later
2. WaveShop
WaveShop is yet another excellent open-source sound editor that can get the job done. It is a free and simple audio editor that is perfect for Windows users. WaveShop also comes in portable packages to suit your various needs. Do you wish to know more about it?
WaveShop offers many useful features for audio editing. You can import your audio files into the program’s interface and can then apply a range of functions. From trimming to amplifying and reversing audios, WaveShop lets you do it all. Go through its features to know more about it.
Key Features
- A multi-tab interface that enables you to edit different soundtracks in different windows.
- A timeline to easily delete, insert, or edit audio tracks.
- Audio effects and filters such as fade, reverse, amplify, etc.
- Save your output file in several formats such as RAW, WAV, AVR, FLAC, etc.
- A range of customization options like changing the sample size and waveform etc.
3. SoundEditor
The next open-source audio editor on our list is SoundEditor. Like other audio editors, SoundEditor comes with a range of editing options. These include cut/copy functions and recording soundtracks. The editor can also support multiple file editing in as many windows as you want. Isn’t it great?
Although SoundEditor comes with a full set of editing tools, it only supports WAV file formats. Still, the software is a good choice with its thorough toolset and easy-to-use functions. You can look across the key features to be sure about your selection.
Key Features
- A built-in sound recorder in the software.
- Options to insert silence at specified lengths in the audio.
- Change the playback speed of the entire track or specific sections.
- Wave synthesizer and resampler options for audio files.
- A multiple documents interface to let you open many windows at once.
4. Ardour
Another splendid open-source sound editor specifically meant for Windows users is Ardour. Musicians, audio engineers, soundtrack editors, and composers worldwide trust Ardour. Ardour offers a set of comprehensive audio editing tools which can be used to make your audios shine. This is truly phenomenal!
Despite its unique features, Ardour is still pretty easy to use. Anyone with a basic idea about editing can use it to create audio masterpieces. From multichannel tracks to mixing and panning, Ardour has it all. Look across these features to know why it is among the best!
Key Features
- No limit to the number of tracks that can be edited simultaneously.
- Multichannel file export to save output files in different formats and sample rates.
- Flexible recording style without any setup requirement.
- Import videos and extract audio from them.
- Multiple routing and panning options along with sample-accurate automation.
5. Jokosher
Looking for a beginner-friendly tool? The answer lies in Jokosher. Jokosher is a simple and easy open-source audio editing software. As opposed to other complicated editors, Jokosher offers a plain and user-friendly interface. For people who do not have much experience in the field, Jokosher is the perfect fit.
You can use the tool to create powerful soundtracks for music, podcasts, and more. The timeline in Jokosher’s interface is relatively simple. You can achieve all basic aspects of audio editing, including audio mixing and splitting. Why is this option great? The features below say it all!
Key Features
- A simple and easy-to-use interface.
- Support for extended audio file formats including MP3, OGG, FLAC, WAV, etc.
- Multi-track overlayed audio mixing and editing support.
- Add instrumentals to your audios, including bass guitars, saxophone, trumpets, and more.
- An Extensions menu for extra features such as managing instruments and setting the tempo.
Conclusion
Finding the right tool for your every need is not always an easy task. But with the correct guidance, you can select the appropriate tool based on your needs.
The above-mentioned tools can make your audio files flourish in the best way possible. You can trim, merge, delete, or split audio files in a few simple clicks. You can also use these open-source sound editor tools to change playback speed and other properties. You can now put your creative abilities to good use. There’s so much that you can do!
If you wish to work with video files, your go-to video editor should undoubtedly be Wondershare Filmora . This one-of-a-kind editor allows you to make and edit quality video content in a stress-free way. Filmora is certainly every content creator’s first choice when it comes to top video editing software. You won’t be disappointed with the results!
For Win 7 or later (64-bit)
For macOS 10.12 or later
Also read:
- New 2024 Approved Convenient Language Alteration Software Examination of Functionality and Alternate Choices
- New Unleashing Your Vocal Potential The Best Free Online Tools to Transform Your Voice
- Updated Cutting-Edge Audio Mastery Expert Tips for Implementing Gradual Sound Diminishment & Augmentation in Adobe After Effects for 2024
- New 2024 Approved High-Definition Sound Partitioning for Mac New Update
- Updated 2024 Approved MAGIX Samplitude Vs. Other Leading Music Software The Ultimate Showdown
- Explore These 5 Pinnacle Platforms for Efficient MP3 File Tagging for 2024
- Updated In 2024, Comprehensive Overview Discover the Best macOS-Based Music Editors Ranked Top 4
- 2024 Approved Crescendo of Creativity The Best Matched Music for Every Video Format
- How to Dub a Video Video Dubbing - Wondershare Filmora for 2024
- How to Remove Audio Seamlessly A Windows 10 Users Handbook for Sound-Free Vids (Free of Charge) for 2024
- New Uncovering Hidden Whistles in Soundscapes for 2024
- New Unearth Brushstroke Sonic Imprints
- New The Ultimate Guide to Autotuning Vocals in Audacity for Professional Results
- Updated In 2024, Best Chromecast Microphones for High-Quality Sound Capture
- New Find Glass Breaking Sound Effect for 2024
- Updated From Bystander to Expert Taking Control of Your Calls Through Google Voice for 2024
- In 2024, Elevate Your IGTV Storytelling With Musical Elements
- Updated In 2024, From Script to Screen A Kids Adventure in Movie Making
- Recover your music after Vivo S17e has been deleted
- In 2024, How to Unlock iPhone 13 Pro Max Without Passcode?
- In 2024, Unlock Your Nokia C12 Pluss Potential The Top 20 Lock Screen Apps You Need to Try
- Android Safe Mode - How to Turn off Safe Mode on Realme Narzo 60 Pro 5G? | Dr.fone
- New Top 4 Eminem Voice Generator Apps for PC, Mac, Mobile, and Online for 2024
- How To Get Out of DFU Mode on iPhone 12 Pro? | Dr.fone
- In 2024, 15 Best Strongest Pokémon To Use in Pokémon GO PvP Leagues For Tecno Spark 20 | Dr.fone
- 7 Fixes for Unfortunately, Phone Has Stopped on Honor 90 | Dr.fone
- New 2024 Approved Unleash Your Creativity Free 32-Bit Windows Video Editing Tools
- Updated In 2024, The Cream of the Crop Top 10 Free Ubuntu Video Editors
- Title: New In 2024, Mastering Sound Levels Adjusting Volume on Audacity
- Author: Jacob
- Created at : 2024-06-09 17:03:56
- Updated at : 2024-06-10 17:03:56
- Link: https://audio-shaping.techidaily.com/new-in-2024-mastering-sound-levels-adjusting-volume-on-audacity/
- License: This work is licensed under CC BY-NC-SA 4.0.
