
:max_bytes(150000):strip_icc():format(webp)/patch-tuesday-2625783-d6bcf232b3c64fc5958037ad31299bd9.png)
New In 2024, Cutting Edge Free Vocal Modifications Made Simple In-Depth Tutorials on Audio Editing with Filmora
“Cutting Edge Free Vocal Modifications Made Simple: In-Depth Tutorials on Audio Editing with Filmora”
Best Free Voice Changer & How to Video Voice Editing With Filmora in 2024

Shanoon Cox
Mar 27, 2024• Proven solutions
Whenever you make videos, have you ever wished you could do voice video editing? What about just changing the voice in a video using a voice changer? It’s not just you. Below are some questions that users have frequently asked.
- Are there any free software programs that can change your voice even if the video is already recorded?
- I have recorded my video; how can I change the pitch of my voice to make it high or low?
A voice in a video can be changed for a number of reasons, such as changing the quality of the voice or adjusting the sound for anonymity. Whatever the reason for changing your voice, the methods remain the same. There are plenty of software programs available in the market using which you can easily change the voice of your video regardless of your purpose.
In this article, we will discuss how you can do voice video editing using Filmora X version 10.5. We are using Filmora because it is one of the easiest video editing software available in the market right now, and it is also loaded with audio editing tools. Who needs a free voice changer if you can do it in an all-in-one tool. The latest version of Filmora (Version 10.5) has some amazing tools to easily modify and change your voice to make it sound different in your videos.
You might be interested in:
For Win 7 or later (64-bit)
For macOS 10.12 or later
How To Change Your Voice Using Filmora Version 10.5
In this article, we will discuss three different methods to change your voice in Filmora.
  1. **[Using Tune-up or Tune Down Option](#a)**
  2. **[Using Equilizer Option](#b)**
  3. **[Using Filmora Audio Effects](#c)**
Let’s discuss every method one by one in detail and see how you can easily change your voice in Filmora. First of all, make sure that Filmora version 10.5 is installed in your system. If it isn’t already installed, you can visit the official website of Wondershare Filmora and download it from there. If you have an older version of Filmora Installed on your system, then you can update it. The best thing about Filmora is that you can download it for free and use all its features without paying anything. The only drawback here is that the final output of your video will have a watermark on it, which you can easily remove by purchasing Filmora.
1. Using Tune-up or Tune Down Option
Step1: Open Filmora and Import your desired video to filmora by going into a file, then clicking on import, and selecting import media files from there.

Step 2: Now drag and drop the video file to your timeline and double click on it to open the clip settings. You will see different options here; make sure to select the audio to open the audio settings.

Step3: From there, you can easily adjust the pitch of your voice. You can either increase or decrease the pitch of your voice, and it will make your voice sound a lot different as compared to your original voice.

Step4: Once you have done adjusting the pitch of your voice, click ok to apply changes to your audio.
Step5: Now play the audio, and you will notice a considerable change in your voice. Even if you show the video to your friends and family, they won’t even recognize your voice.
2. Using Equilizer Option
Step1: First of all, repeat all steps that we did in option one and open the audio settings of your video clip.

Step2: Not go to the equalizer option and click on the arrow in front of the equalizer option.

Step3: A dropdown menu will appear on your screen where you will see a lot of presets.

Step4: You can select any preset of your choice from this menu. Like if you want to make your voice sound very crisp, then you can choose Sparkle preset.
Step5: Once you have selected your desired preset, click the ok button to apply it to your video.
Step6: Now listen to your video’s audio, and you will notice a considerable difference in the voice of your video.

Also, don’t forget to tick that auto normalization box at the bottom of the audio settings for the above-mentioned methods. It will automatically normalize your video’s audio and make it sound more professional.
3. Using Filmora Audio Effects
The third method you can use to change your voice in a video is through the audio effects of Filmora.
Step1: Click on the Effects tab from the top menu, and you will see an audio effects option in the left sidebar.

Step2: You can see there are a lot of audio effects available to use in your videos.
Step3: If you want to apply any effect on your audio, drag the effect and drop it above your video in the timeline. A yellow symbol will appear on the video file, indicating that the effect has been applied to your audio.

Step4: Now play the video, and you will see that the audio effect has been applied to your voice, and it sounds a lot different.
Conclusion
So, these are the three different methods using which you can easily change your voice in Filmora. As discussed earlier, Filmora is free to download, and you can try all of its features without paying anything. Also, it has a very intuitive interface that is easy to adopt for anyone, even if you are a newbie and don’t have any prior video editing experience. So, make sure to give it a try. You can easily download it from the official website of Filmora.


Shanoon Cox
Shanoon Cox is a writer and a lover of all things video.
Follow @Shanoon Cox
Shanoon Cox
Mar 27, 2024• Proven solutions
Whenever you make videos, have you ever wished you could do voice video editing? What about just changing the voice in a video using a voice changer? It’s not just you. Below are some questions that users have frequently asked.
- Are there any free software programs that can change your voice even if the video is already recorded?
- I have recorded my video; how can I change the pitch of my voice to make it high or low?
A voice in a video can be changed for a number of reasons, such as changing the quality of the voice or adjusting the sound for anonymity. Whatever the reason for changing your voice, the methods remain the same. There are plenty of software programs available in the market using which you can easily change the voice of your video regardless of your purpose.
In this article, we will discuss how you can do voice video editing using Filmora X version 10.5. We are using Filmora because it is one of the easiest video editing software available in the market right now, and it is also loaded with audio editing tools. Who needs a free voice changer if you can do it in an all-in-one tool. The latest version of Filmora (Version 10.5) has some amazing tools to easily modify and change your voice to make it sound different in your videos.
You might be interested in:
For Win 7 or later (64-bit)
For macOS 10.12 or later
How To Change Your Voice Using Filmora Version 10.5
In this article, we will discuss three different methods to change your voice in Filmora.
  1. **[Using Tune-up or Tune Down Option](#a)**
  2. **[Using Equilizer Option](#b)**
  3. **[Using Filmora Audio Effects](#c)**
Let’s discuss every method one by one in detail and see how you can easily change your voice in Filmora. First of all, make sure that Filmora version 10.5 is installed in your system. If it isn’t already installed, you can visit the official website of Wondershare Filmora and download it from there. If you have an older version of Filmora Installed on your system, then you can update it. The best thing about Filmora is that you can download it for free and use all its features without paying anything. The only drawback here is that the final output of your video will have a watermark on it, which you can easily remove by purchasing Filmora.
1. Using Tune-up or Tune Down Option
Step1: Open Filmora and Import your desired video to filmora by going into a file, then clicking on import, and selecting import media files from there.
Step 2: Now drag and drop the video file to your timeline and double click on it to open the clip settings. You will see different options here; make sure to select the audio to open the audio settings.
Step3: From there, you can easily adjust the pitch of your voice. You can either increase or decrease the pitch of your voice, and it will make your voice sound a lot different as compared to your original voice.
Step4: Once you have done adjusting the pitch of your voice, click ok to apply changes to your audio.
Step5: Now play the audio, and you will notice a considerable change in your voice. Even if you show the video to your friends and family, they won’t even recognize your voice.
2. Using Equilizer Option
Step1: First of all, repeat all steps that we did in option one and open the audio settings of your video clip.
Step2: Not go to the equalizer option and click on the arrow in front of the equalizer option.
Step3: A dropdown menu will appear on your screen where you will see a lot of presets.
Step4: You can select any preset of your choice from this menu. Like if you want to make your voice sound very crisp, then you can choose Sparkle preset.
Step5: Once you have selected your desired preset, click the ok button to apply it to your video.
Step6: Now listen to your video’s audio, and you will notice a considerable difference in the voice of your video.
Also, don’t forget to tick that auto normalization box at the bottom of the audio settings for the above-mentioned methods. It will automatically normalize your video’s audio and make it sound more professional.
3. Using Filmora Audio Effects
The third method you can use to change your voice in a video is through the audio effects of Filmora.
Step1: Click on the Effects tab from the top menu, and you will see an audio effects option in the left sidebar.
Step2: You can see there are a lot of audio effects available to use in your videos.
Step3: If you want to apply any effect on your audio, drag the effect and drop it above your video in the timeline. A yellow symbol will appear on the video file, indicating that the effect has been applied to your audio.
Step4: Now play the video, and you will see that the audio effect has been applied to your voice, and it sounds a lot different.
Conclusion
So, these are the three different methods using which you can easily change your voice in Filmora. As discussed earlier, Filmora is free to download, and you can try all of its features without paying anything. Also, it has a very intuitive interface that is easy to adopt for anyone, even if you are a newbie and don’t have any prior video editing experience. So, make sure to give it a try. You can easily download it from the official website of Filmora.
Shanoon Cox
Shanoon Cox is a writer and a lover of all things video.
Follow @Shanoon Cox
Streamline Your Sound: Four Cutting-Edge Methods to Enhance Video Audio Quality
How to Adjust Audio Volume in Videos [4 Ways]
Shanoon Cox
Mar 27, 2024• Proven solutions
Some of the greatest film directors of all time have used sound to make the scenes in their movies more dramatic, romantic or to build suspense. The importance of sound for the overall quality of a video is often overlooked by young filmmakers, as they tend to dedicate all of their attention to the visual part of their projects.
The fact of the matter is that even a minor error in the video’s soundtrack can distract the viewer and ruin a video completely. That’s why, in this article, we are going to show you four different methods of adjusting the audio volume in Filmora.
To increse the volume of your video, click here.
Four Ways of Adjusting Audio Volume in Filmora
The audio clips often have different volume levels, so in order to create a balanced soundtrack, you have to adjust the volume of each audio track you intend to use in your projects. Filmora offers several different ways to adjust the volume of audio files quickly and effortlessly. Here’s how you can increase or decrease the volume of the audio clips in Filmora.
Download Filmora and watch the video below to get a full knowledge abtou adjusting volume!
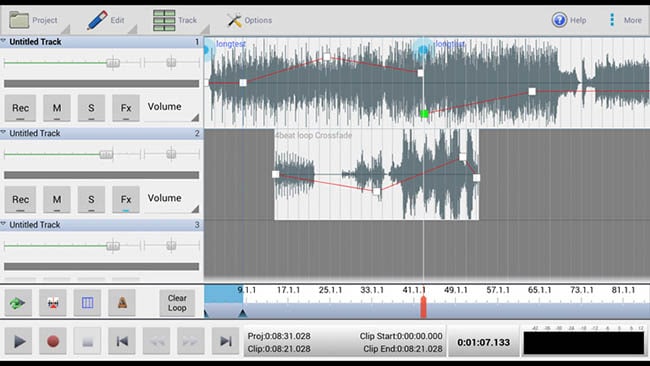
1. Changing the Audio Volume of Entire Track
This is probably the easiest and fastest way to adjust the volume of a video or an audio file in Filmora. After you import the file into a project you just have to add it to a certain position on the timeline. You can do this by simply dragging and dropping the file at the location on the timeline where you want the file to be placed. Click on the Add Track menu that is located in the upper left corner of the timeline and select the Big option from the Adjust Track Height submenu.
Enlarging the video and audio tracks will enable you to see the audio volume line that is displayed over all clips that contain sound you add to the timeline. Click on the line and drag it upwards if you would like to increase the volume or drag it downwards if you want to decrease the volume of an audio or a video file.
2. Applying the Fade In and Fade Out Effects to Change the Audio Volume Partially
Once you add an audio clip to an audio track on Filmora’s timeline, you can adjust its volume from the Audio Editing panel. Double-clicking on an audio file will bring up the Audio Editing panel that contains Fade In and Fade Out sliders. Both sliders are going to be set to zero by default, so you just have to drag each of them to the right in order to create the Fade In or Fade Out effect.
Filmora also lets you create the Fade In and Fade Out effect directly from the timeline, as you just have to hover the mouse over an audio file and drag the Fade In or Fade Out markers to set the duration of the effect for that particular file.
3. Using the Volume Slider to Change the Audio Volume
On the left side of the Audio Editing panel that can be accessed by double clicking on an audio file, you will be able to see the volume slider. Its value is going to be set to 0 dB by default and you just have to drag it upward or downward in order to adjust the audio volume. As you drag the slider the new audio volume value is going to be displayed in a box below the slider. The left/right balance value can be adjusted by dragging the knob that is located above the volume slider in either direction. Alternatively, you can insert a new numerical value in the box below the knob. If the displayed value is 0 dB, then the left and right channels are balanced, while the value of -100 dB means that all the sound goes through the left channel and if the displayed value is 100 dB all the sound will go through the right channel.

4. Adding Keyframes to Adjust the Audio Volume
Once you add an audio file to the timeline you can adjust its volume by adding keyframes to it. Place the playhead to the exact spot in the audio file where you want to add the first keyframe and then double click on the file to bring up the Audio Editing panel. Click on the Add Volume Keyframes icon and use the volume slider to adjust the volume at the position of the first keyframe.

Simply move the playhead and change the value on the volume slider to add new keyframes to the audio file. This method of adjusting audio volume enables you to set different volume values for different parts of an audio file.
Still not solved? Try this audio guide of Filmora to settle all the audio problems.
Conclusion
Having complete control over the volume of all audio files you use in your projects is important for so many different reasons. Filmora offers four easy ways to adjust the audio volume so you can focus on more important tasks. Which method of adjusting the audio volume in Filmora do you like to use the most? Leave a comment and let us know.
Shanoon Cox
Shanoon Cox is a writer and a lover of all things video.
Follow @Shanoon Cox
Shanoon Cox
Mar 27, 2024• Proven solutions
Some of the greatest film directors of all time have used sound to make the scenes in their movies more dramatic, romantic or to build suspense. The importance of sound for the overall quality of a video is often overlooked by young filmmakers, as they tend to dedicate all of their attention to the visual part of their projects.
The fact of the matter is that even a minor error in the video’s soundtrack can distract the viewer and ruin a video completely. That’s why, in this article, we are going to show you four different methods of adjusting the audio volume in Filmora.
To increse the volume of your video, click here.
Four Ways of Adjusting Audio Volume in Filmora
The audio clips often have different volume levels, so in order to create a balanced soundtrack, you have to adjust the volume of each audio track you intend to use in your projects. Filmora offers several different ways to adjust the volume of audio files quickly and effortlessly. Here’s how you can increase or decrease the volume of the audio clips in Filmora.
Download Filmora and watch the video below to get a full knowledge abtou adjusting volume!
1. Changing the Audio Volume of Entire Track
This is probably the easiest and fastest way to adjust the volume of a video or an audio file in Filmora. After you import the file into a project you just have to add it to a certain position on the timeline. You can do this by simply dragging and dropping the file at the location on the timeline where you want the file to be placed. Click on the Add Track menu that is located in the upper left corner of the timeline and select the Big option from the Adjust Track Height submenu.
Enlarging the video and audio tracks will enable you to see the audio volume line that is displayed over all clips that contain sound you add to the timeline. Click on the line and drag it upwards if you would like to increase the volume or drag it downwards if you want to decrease the volume of an audio or a video file.
2. Applying the Fade In and Fade Out Effects to Change the Audio Volume Partially
Once you add an audio clip to an audio track on Filmora’s timeline, you can adjust its volume from the Audio Editing panel. Double-clicking on an audio file will bring up the Audio Editing panel that contains Fade In and Fade Out sliders. Both sliders are going to be set to zero by default, so you just have to drag each of them to the right in order to create the Fade In or Fade Out effect.
Filmora also lets you create the Fade In and Fade Out effect directly from the timeline, as you just have to hover the mouse over an audio file and drag the Fade In or Fade Out markers to set the duration of the effect for that particular file.
3. Using the Volume Slider to Change the Audio Volume
On the left side of the Audio Editing panel that can be accessed by double clicking on an audio file, you will be able to see the volume slider. Its value is going to be set to 0 dB by default and you just have to drag it upward or downward in order to adjust the audio volume. As you drag the slider the new audio volume value is going to be displayed in a box below the slider. The left/right balance value can be adjusted by dragging the knob that is located above the volume slider in either direction. Alternatively, you can insert a new numerical value in the box below the knob. If the displayed value is 0 dB, then the left and right channels are balanced, while the value of -100 dB means that all the sound goes through the left channel and if the displayed value is 100 dB all the sound will go through the right channel.
4. Adding Keyframes to Adjust the Audio Volume
Once you add an audio file to the timeline you can adjust its volume by adding keyframes to it. Place the playhead to the exact spot in the audio file where you want to add the first keyframe and then double click on the file to bring up the Audio Editing panel. Click on the Add Volume Keyframes icon and use the volume slider to adjust the volume at the position of the first keyframe.
Simply move the playhead and change the value on the volume slider to add new keyframes to the audio file. This method of adjusting audio volume enables you to set different volume values for different parts of an audio file.
Still not solved? Try this audio guide of Filmora to settle all the audio problems.
Conclusion
Having complete control over the volume of all audio files you use in your projects is important for so many different reasons. Filmora offers four easy ways to adjust the audio volume so you can focus on more important tasks. Which method of adjusting the audio volume in Filmora do you like to use the most? Leave a comment and let us know.
Shanoon Cox
Shanoon Cox is a writer and a lover of all things video.
Follow @Shanoon Cox
Top 10 Audio Recording Software to Capture Your Voice Easily
Top 10 Audio Recording Software to Capture Your Voice Easily
Shanoon Cox
Mar 27, 2024• Proven solutions
Whether professional or for amateur purposes, the audio recording software programs are very important. These programs allow manipulating the audio so that it matches the need for a specific project.
The best audio recording software has a variety of tools embedded to polish the audio recorded, in which this article we are going to review the best of them for you.
What is Audio Recording Software?
As the name suggests, the audio recording software is used to record audio using a unique technology. This allows the users to capture their own or the voice they want and transfer it wherever they want. The software also adds effects to the voice and makes it professional to use wherever the user wants to.
What Does a Sound Recorder Use for?
There are several uses of audio recording software program. Some are listed as under:
- In the music field, this software is of great use. It can be used for multitrack recording. The mixing of the sound is then done using the same or different tools.
- The audio recorded can be edited with ease. This includes enhancing and adding effects to it with perfection.
- With microphone use, the recording software can be integrated to make sure that the voice of the user is also recorded if required.
- Some audio recording software programs also come with screen recording, and therefore, these foster multitasking.
List of Top 10 Audio Recording Software Programs
The audio recording software for PC that would make your life easy is mentioned as under.
1.Wondershare DemoCreator
This is by far the best and the most used software program when it comes to audio recording. It is highly reliable and comes with a GUI. The user interface is easy to understand, and so are the functionalities.
With the best and the most advanced controls recording audio has never been this easy. It also acts as Mac audio recording software, and therefore it is highly recommended for all platforms. The frequent updates make this program even easier to use.
Features
- The interface of the program is very easy to use and stress-free.
- The high definition audio can be recorded with ease.
- The program supports 50+ formats to import audio, video, and other files to the system.
- There are highly advanced options for professional audio recording.
- The program can record endless video and audio as far as there is space on your disk.
Pros
- It is one of the programs that support professional audio editing.
- The program is very easy to use as it has a graphical interface.
Cons
- The program is flash software-based, which can slow down the system.
- It does not offer highly advanced audio editing at all.
Supported Platforms
The program can be used with both Windows and Mac.
Go ahead to download and have a try now!
2.WavePad
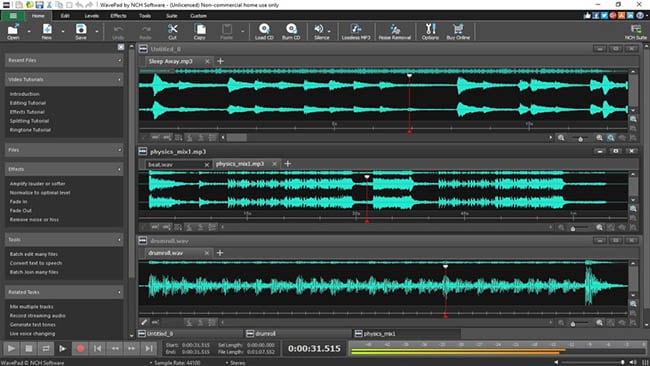
It is one of the best and most used programs to make sure that the audio is recorded with perfection. This program is compatible with most of the audio formats, and therefore it is highly recommended. The overall rating of the program is high as it is used by professionals and, therefore, highly rated as well.
Features
- It has several audio enhancing capabilities, which include amplification and effect addition.
- The audio can be edited, trimmed, and cropped with this program.
- The professional-quality sound recording is used by this program to enhance the capabilities.
Pros
- The best part of this program is its quality of end product that is very high.
- It is a wave editor that gives the users more control over the end product.
Cons
- The mp3 editor of this program does not offer top quality work.
- The program cannot work with multiple files efficiently.
Supported Platforms
It can be installed over Mac, Windows, Android, and iOS.
3.Ocenaudio

As a cross-platform program, this one has a lot to offer. The interface is a bit technical, but overall the use of the program is easy once the hands-on is done. The program is also highly intuitive and allows the users to overcome the day to day audio recording and editing tasks.
Features
- The Ocen Framework is also integrated with this platform to enhance its capabilities.
- The program also records screen if required by the users.
- It is one of the programs that have been rated on other high-end platforms.
Pros
- The program uses auto trim and voice recording controls.
- The sound spectral analysis of the program is highly advanced.
Cons
- The program cannot directly load the file from a CD.
- The program cannot be opened in multiple screens, so the work rate is slow.
Supported Platforms
It is compatible with Mac, Windows, and Linux.
4.Adobe Audition

It can be rightfully regarded as one of the best and the most advanced programs. Backed by years of Adobe experience, it is a program that will get the user a step forward. It is highly recommended to all those users that are looking for a professional level of audio recording.
Features
- It includes multitrack, wave editing, and audio restoration tools to give the best results.
- The essential sound panel has been integrated with the program to get the best oomph effect to the audio.
- The music clips can be integrated within the audio recording to make it sound professional.
Pros
- The platform can be used to create awesome podcasts.
- The audio break can be repaired with perfection.
Cons
- It is expensive, so all the users cannot afford it at all.
- The interface is high tech in nature and requires time to learn.
Supported Platforms
It is supported by Windows and Mac.
5.Audacity

It is free software that is used to record audio professionally. This high-performance program makes sure that the audio which is recorded is also shared with different platforms. The built-in panel is upgraded, and therefore it is highly advance.
Features
- It is ad-free and therefore provides hassle-free work.
- The audio editing and recording have never been as easy as it is with audacity.
- Multitrack editing is also possible with this program.
Pros
- The VST plugin support is provided by the program.
- It is a portable program that can be used for pitch correction.
Cons
- The noise reduction tool of this program needs an upgrade.
- The record to tape feature is currently unavailable.
Supported Platforms
It is supported by Mac, Linux, Windows, and BSD.
6.Wavosaur

It is one of the free programs that can be regarded as better than many paid ones. It is all because the qualities of the program are matchless. The processing of files is done with WAV and Mp3 files filter, which makes the process very much easier.
Features
- The program has multiple document interfaces for multiple file handling.
- The editing features such as cut, copy, paste, and edit can be performed in a single window.
- The waveform representation of the program is accurate and highly advanced.
Pros
- The program offers bit depth convert, pitch shift, and DC offset removal.
- The VST effects can be added to the entire batch of sound files.
Cons
- The audio routing and the multichannel support of the program are not efficient.
- The software sampler extraction is a bit slow when it comes to this program.
Supported Platforms
The program can only be installed on Windows.
7.MixPad
The audio processing and mixing have been made very easy with this platform. The program has an interface that is sleek in design and allows the processing of the audio info with care. The program also supports cloud storage, which means that the entire user’s hard work remains safe and secures all the time.
Features
- The program can mix the unlimited number of tracks all at the same time.
- Depending upon the requirement, the multiple or a single track can be processed at the same time.
- The program supports almost every sound format, so any type of sound can be imported with perfection.
Pros
- The audio effects such as EQ, compression, and reverb can be added with perfection.
- The latency rate is very low, and the program also offers ASIO support for accurate processing.
Cons
- The program only offers the export of the sound that is up to 32 bits.
- The sample rates of up to 96 kHz are only supported, which is less than most of the other mixers.
Supported Platforms
The program can be installed on Mac, Windows, Android, iPad, and Kindle Fire.
8.Sound Forge

If a user wants to completely control the audio editing process, then this software is for them. It is highly advanced and makes sure that the work that is done is highly précised. From Red Book CD creation to sound design and mixing, this program provides the users with complete control and authority over the process.
Features
- The multichannel WAV recording and processing is now possible with the new version of the program.
- The VST plugin support is provided by this program with perfection.
- The VST effects can be chained in a virtual rack.
Pros
- The simple digitization and restoration of the audio have been made simple by this program.
- The one-click solutions allow the users to process the audio tracks easily.
Cons
- The program only offers 32 bits of power, which is very low.
- The multiple VST GUI is not supported by this program.
Supported Platforms
The Sound Forge can be installed on Mac and Windows.
9.Spek

The best part of the software is that it is free and allows the users to overcome the problems which the other audio recorders present. The interface is easy to learn, and therefore the overall usage is easy. The lossless quality is something for which the software is known for. It also supports the FFMPEG library.
Features
- The signal processing is ultra-fast as it uses several threads to process audio.
- The drag and drop support of the program is highly efficient, and the program supports common audio formats.
- The program can be accessed in 19 different languages.
Pros
- The spectral density rulers allow the auto fitting of time.
- The spectral density range of the program is also adjustable.
Cons
- The codec names are, and the audio signal parameters cannot be seen.
- The program is licensed under GPLv3, which is now obsolete.
Supported Platforms
The program is compatible with Windows, Linux, and Mac.
10.Audio Highjack

The program, as the name suggests, makes it possible for the users to completely delve deep into the process of audio editing. The interface, as well as the controls, is very easy to understand and use. For novice users, this program is highly recommended as it makes audio editing a fun-filled activity.
Features
- It provides detailed statistics and min, the max value per channel.
- The processed audio can be listened in real-time to get an idea about the end product.
- The waveform generator and frequency impulse train are embedded within the program.
Pros
- The lame encoder support has been embedded within the recorder to export mp3 files.
- The editor’s look is skin able, which can be changed as per the user choice.
Cons
- The processing options are less as compared to the other recorders.
- The audio files cannot be exported as text, so the program cannot be used with PSpice.
Supported Platforms
The program is only available for Mac.
A Roundup of the Best Audio Recording Software Programs
| No. | Tools | Rating | Supported Formats | Price | Processing Power |
|---|---|---|---|---|---|
| 1 | DemoCreator | 4.5 | .mp3, .m4a, .wav, .wma, .ogg, .flac, .aif, .aiff | $29.99 | 64-bit |
| 2 | WavePad | 4.4 | vox, gsm, WMA, real audio, au, aif, FLAC, and Ogg | $69.95 | 64-bit |
| 3 | Ocenaudio | 4.0 | vox, gsm, WMA, wav, .wma, .ogg, and .flac | Free | 32-bit |
| 4 | Adobe Audition | 4.5 | AIF, AIFF, AIFC | $74.99 | 64-bit |
| 5 | Audacity | 3.9 | mp3, wav, AIFF, au, and ogg | Free | 32-bit |
| 6 | Wavosaur | 3.5 | VST plugins, ASIO driver, multichannel wav files, real-time effect processing. | Free | 32-bit |
| 7 | MixPad | 3.2 | wav, mp3, vox, and gsm | $129 | 32-bit |
| 8 | Sound Forge | 4.0 | SWF, RealMedia 9, WMA, AVI , AIFF, AIF, and SND | Free | 32-bit |
| 9 | Spek | 4.4 | vox, gsm, WMA, Wav, WMA, real audio, au, aif, FLAC, and Ogg | Free | 64-bit |
| 10 | Audio Highjack | 4.2 | .mp3, .m4a, .wav, .wma, aif, FLAC, and Ogg | Free | 64-bit |
Conclusion
With the overall specs and ratings by the users, the Wondershare DemoCreator is the best software that should be used for audio recording.
The program is highly compatible with major operating systems, and therefore it is highly recommended. The overall mechanism is easy, and the program also supports multiple formats.
It is highly technical and is constantly upgraded to make sure that it remains in line with modern technologies. It is a one-stop-shop for all the audio recording needs of the users and therefore highly viable.
With this program, the audio that has been worked on can be shared on most popular social media platforms like YouTube and Facebook.
Shanoon Cox
Shanoon Cox is a writer and a lover of all things video.
Follow @Shanoon Cox
Shanoon Cox
Mar 27, 2024• Proven solutions
Whether professional or for amateur purposes, the audio recording software programs are very important. These programs allow manipulating the audio so that it matches the need for a specific project.
The best audio recording software has a variety of tools embedded to polish the audio recorded, in which this article we are going to review the best of them for you.
What is Audio Recording Software?
As the name suggests, the audio recording software is used to record audio using a unique technology. This allows the users to capture their own or the voice they want and transfer it wherever they want. The software also adds effects to the voice and makes it professional to use wherever the user wants to.
What Does a Sound Recorder Use for?
There are several uses of audio recording software program. Some are listed as under:
- In the music field, this software is of great use. It can be used for multitrack recording. The mixing of the sound is then done using the same or different tools.
- The audio recorded can be edited with ease. This includes enhancing and adding effects to it with perfection.
- With microphone use, the recording software can be integrated to make sure that the voice of the user is also recorded if required.
- Some audio recording software programs also come with screen recording, and therefore, these foster multitasking.
List of Top 10 Audio Recording Software Programs
The audio recording software for PC that would make your life easy is mentioned as under.
1.Wondershare DemoCreator
This is by far the best and the most used software program when it comes to audio recording. It is highly reliable and comes with a GUI. The user interface is easy to understand, and so are the functionalities.
With the best and the most advanced controls recording audio has never been this easy. It also acts as Mac audio recording software, and therefore it is highly recommended for all platforms. The frequent updates make this program even easier to use.
Features
- The interface of the program is very easy to use and stress-free.
- The high definition audio can be recorded with ease.
- The program supports 50+ formats to import audio, video, and other files to the system.
- There are highly advanced options for professional audio recording.
- The program can record endless video and audio as far as there is space on your disk.
Pros
- It is one of the programs that support professional audio editing.
- The program is very easy to use as it has a graphical interface.
Cons
- The program is flash software-based, which can slow down the system.
- It does not offer highly advanced audio editing at all.
Supported Platforms
The program can be used with both Windows and Mac.
Go ahead to download and have a try now!
2.WavePad
It is one of the best and most used programs to make sure that the audio is recorded with perfection. This program is compatible with most of the audio formats, and therefore it is highly recommended. The overall rating of the program is high as it is used by professionals and, therefore, highly rated as well.
Features
- It has several audio enhancing capabilities, which include amplification and effect addition.
- The audio can be edited, trimmed, and cropped with this program.
- The professional-quality sound recording is used by this program to enhance the capabilities.
Pros
- The best part of this program is its quality of end product that is very high.
- It is a wave editor that gives the users more control over the end product.
Cons
- The mp3 editor of this program does not offer top quality work.
- The program cannot work with multiple files efficiently.
Supported Platforms
It can be installed over Mac, Windows, Android, and iOS.
3.Ocenaudio
As a cross-platform program, this one has a lot to offer. The interface is a bit technical, but overall the use of the program is easy once the hands-on is done. The program is also highly intuitive and allows the users to overcome the day to day audio recording and editing tasks.
Features
- The Ocen Framework is also integrated with this platform to enhance its capabilities.
- The program also records screen if required by the users.
- It is one of the programs that have been rated on other high-end platforms.
Pros
- The program uses auto trim and voice recording controls.
- The sound spectral analysis of the program is highly advanced.
Cons
- The program cannot directly load the file from a CD.
- The program cannot be opened in multiple screens, so the work rate is slow.
Supported Platforms
It is compatible with Mac, Windows, and Linux.
4.Adobe Audition
It can be rightfully regarded as one of the best and the most advanced programs. Backed by years of Adobe experience, it is a program that will get the user a step forward. It is highly recommended to all those users that are looking for a professional level of audio recording.
Features
- It includes multitrack, wave editing, and audio restoration tools to give the best results.
- The essential sound panel has been integrated with the program to get the best oomph effect to the audio.
- The music clips can be integrated within the audio recording to make it sound professional.
Pros
- The platform can be used to create awesome podcasts.
- The audio break can be repaired with perfection.
Cons
- It is expensive, so all the users cannot afford it at all.
- The interface is high tech in nature and requires time to learn.
Supported Platforms
It is supported by Windows and Mac.
5.Audacity
It is free software that is used to record audio professionally. This high-performance program makes sure that the audio which is recorded is also shared with different platforms. The built-in panel is upgraded, and therefore it is highly advance.
Features
- It is ad-free and therefore provides hassle-free work.
- The audio editing and recording have never been as easy as it is with audacity.
- Multitrack editing is also possible with this program.
Pros
- The VST plugin support is provided by the program.
- It is a portable program that can be used for pitch correction.
Cons
- The noise reduction tool of this program needs an upgrade.
- The record to tape feature is currently unavailable.
Supported Platforms
It is supported by Mac, Linux, Windows, and BSD.
6.Wavosaur
It is one of the free programs that can be regarded as better than many paid ones. It is all because the qualities of the program are matchless. The processing of files is done with WAV and Mp3 files filter, which makes the process very much easier.
Features
- The program has multiple document interfaces for multiple file handling.
- The editing features such as cut, copy, paste, and edit can be performed in a single window.
- The waveform representation of the program is accurate and highly advanced.
Pros
- The program offers bit depth convert, pitch shift, and DC offset removal.
- The VST effects can be added to the entire batch of sound files.
Cons
- The audio routing and the multichannel support of the program are not efficient.
- The software sampler extraction is a bit slow when it comes to this program.
Supported Platforms
The program can only be installed on Windows.
7.MixPad
The audio processing and mixing have been made very easy with this platform. The program has an interface that is sleek in design and allows the processing of the audio info with care. The program also supports cloud storage, which means that the entire user’s hard work remains safe and secures all the time.
Features
- The program can mix the unlimited number of tracks all at the same time.
- Depending upon the requirement, the multiple or a single track can be processed at the same time.
- The program supports almost every sound format, so any type of sound can be imported with perfection.
Pros
- The audio effects such as EQ, compression, and reverb can be added with perfection.
- The latency rate is very low, and the program also offers ASIO support for accurate processing.
Cons
- The program only offers the export of the sound that is up to 32 bits.
- The sample rates of up to 96 kHz are only supported, which is less than most of the other mixers.
Supported Platforms
The program can be installed on Mac, Windows, Android, iPad, and Kindle Fire.
8.Sound Forge
If a user wants to completely control the audio editing process, then this software is for them. It is highly advanced and makes sure that the work that is done is highly précised. From Red Book CD creation to sound design and mixing, this program provides the users with complete control and authority over the process.
Features
- The multichannel WAV recording and processing is now possible with the new version of the program.
- The VST plugin support is provided by this program with perfection.
- The VST effects can be chained in a virtual rack.
Pros
- The simple digitization and restoration of the audio have been made simple by this program.
- The one-click solutions allow the users to process the audio tracks easily.
Cons
- The program only offers 32 bits of power, which is very low.
- The multiple VST GUI is not supported by this program.
Supported Platforms
The Sound Forge can be installed on Mac and Windows.
9.Spek
The best part of the software is that it is free and allows the users to overcome the problems which the other audio recorders present. The interface is easy to learn, and therefore the overall usage is easy. The lossless quality is something for which the software is known for. It also supports the FFMPEG library.
Features
- The signal processing is ultra-fast as it uses several threads to process audio.
- The drag and drop support of the program is highly efficient, and the program supports common audio formats.
- The program can be accessed in 19 different languages.
Pros
- The spectral density rulers allow the auto fitting of time.
- The spectral density range of the program is also adjustable.
Cons
- The codec names are, and the audio signal parameters cannot be seen.
- The program is licensed under GPLv3, which is now obsolete.
Supported Platforms
The program is compatible with Windows, Linux, and Mac.
10.Audio Highjack
The program, as the name suggests, makes it possible for the users to completely delve deep into the process of audio editing. The interface, as well as the controls, is very easy to understand and use. For novice users, this program is highly recommended as it makes audio editing a fun-filled activity.
Features
- It provides detailed statistics and min, the max value per channel.
- The processed audio can be listened in real-time to get an idea about the end product.
- The waveform generator and frequency impulse train are embedded within the program.
Pros
- The lame encoder support has been embedded within the recorder to export mp3 files.
- The editor’s look is skin able, which can be changed as per the user choice.
Cons
- The processing options are less as compared to the other recorders.
- The audio files cannot be exported as text, so the program cannot be used with PSpice.
Supported Platforms
The program is only available for Mac.
A Roundup of the Best Audio Recording Software Programs
| No. | Tools | Rating | Supported Formats | Price | Processing Power |
|---|---|---|---|---|---|
| 1 | DemoCreator | 4.5 | .mp3, .m4a, .wav, .wma, .ogg, .flac, .aif, .aiff | $29.99 | 64-bit |
| 2 | WavePad | 4.4 | vox, gsm, WMA, real audio, au, aif, FLAC, and Ogg | $69.95 | 64-bit |
| 3 | Ocenaudio | 4.0 | vox, gsm, WMA, wav, .wma, .ogg, and .flac | Free | 32-bit |
| 4 | Adobe Audition | 4.5 | AIF, AIFF, AIFC | $74.99 | 64-bit |
| 5 | Audacity | 3.9 | mp3, wav, AIFF, au, and ogg | Free | 32-bit |
| 6 | Wavosaur | 3.5 | VST plugins, ASIO driver, multichannel wav files, real-time effect processing. | Free | 32-bit |
| 7 | MixPad | 3.2 | wav, mp3, vox, and gsm | $129 | 32-bit |
| 8 | Sound Forge | 4.0 | SWF, RealMedia 9, WMA, AVI , AIFF, AIF, and SND | Free | 32-bit |
| 9 | Spek | 4.4 | vox, gsm, WMA, Wav, WMA, real audio, au, aif, FLAC, and Ogg | Free | 64-bit |
| 10 | Audio Highjack | 4.2 | .mp3, .m4a, .wav, .wma, aif, FLAC, and Ogg | Free | 64-bit |
Conclusion
With the overall specs and ratings by the users, the Wondershare DemoCreator is the best software that should be used for audio recording.
The program is highly compatible with major operating systems, and therefore it is highly recommended. The overall mechanism is easy, and the program also supports multiple formats.
It is highly technical and is constantly upgraded to make sure that it remains in line with modern technologies. It is a one-stop-shop for all the audio recording needs of the users and therefore highly viable.
With this program, the audio that has been worked on can be shared on most popular social media platforms like YouTube and Facebook.
Shanoon Cox
Shanoon Cox is a writer and a lover of all things video.
Follow @Shanoon Cox
Also read:
- 2024 Approved Ultimate Selection The Top 7 DAWs Excelling in Guitar Track Production (Updated )
- New In 2024, Identify the Aural Representation of a Bell Clangor
- Updated In 2024, Essential Guide to Top 10 Budget-Friendly Podcasting Software (Free)
- New In 2024, The Hasty Guide to Altering Playback Rate in Sound Files
- Essential Online Hubs for Natural Environment Recordings for 2024
- Mastering the Art of Free Music Integration Into Video Media
- Updated Amp Up Your Projects Navigating to the Best 8 Free Sound FX Hubs for 2024
- Updated In 2024, Unlock the Potential of AMR WAVES Detailed Guide to Their Conversion and Manipulation
- New Essential Windows Audio Enhancers The Ultimate List for Instant Volume Upgrade for 2024
- New In 2024, DJ Audio Editor Software Review
- 2024 Approved Quieting the Cinematic Chaos Techniques for Audio Trimming in iMovie Videos
- Comprehensive Methods for Adding Sound to Modernized AVI Videos
- Updated Exploring Android The Most Popular and Acclaimed Voice Capture Apps
- New In 2024, How to Record & Add Voiceover to Videos
- 2024 Approved 3 Ways to Get Rid of Echo in Your Audio Recordings
- 8 Best Voice Recognition Software for Windows, Mac, and Online
- New In 2024, Counteracting Sonic Overlap 3 Proven Techniques for Clear Audio
- New 2024 Approved Utilizing the Audio Capture Tool in Samsung S10/S9 Smartphones
- New Audio-Visual Symbiosis Exploring Innovative Techniques for Combining Video and Music
- New Audio Mastery on a Budget Top Ten Cost-Free Editors
- 2024 Approved Mastering the Art of Silencing Irrelevant Acoustic Interferences in Web-Based Audio Content
- New 5 Premier Free Tools for Enhancing Your Vocal Range
- Must-Try List of Prime Song Capture Technology for Fans
- 2024 Approved The Complete Audio Enhancement Manual From Raw Footage to Final Cut 2023S Methodology
- Unveiling the Essential Techniques to Isolate Video Sounds The Future of Sound Extraction Technology for 2024
- Updated Viral Cellphone Alert Songs You Cant Ignore for 2024
- In 2024, The Premier Selection 6 Excellent Voice Alteration Apps for Smartphones
- New 2024 Approved Exploring the Future of Android Calls Beyond Apples FaceTime
- Updated Explore the Best Selection of 7 Internet-Based Audio Trimming Utilities for 2024
- In 2024, Finding the Ideal Game Voice Modifier A Comprehensive Guide
- Updated Enhancing Project Focus Extracting Audio From Video in iMovie on Mac
- 2024 Approved Harnessing the Clownfish Voice Change Technique for More Dynamic Conversations on Discord/Fortnite/Skype
- Updated The Soundscape Explorers Guide to Button Effects in Games
- Updated Elevate Your Media Incorporating Music and Dialogue Into Android Videos for 2024
- 2024 Approved Mastering the Art of Audio Precision in Home Cinematography (Current Techniques)
- New In 2024, Refined Audio Enhancers for Online Video and Podcasting Endeavors
- Top 10 Real-Time Audio Amplifiers for Windows OS for 2024
- Updated In 2024, Enhance Your Speaking Style with AV Voice Changers A Comprehensive Guide
- Updated In 2024, Echoing Quietness A Guide to Purifying Your Podcasts From High-Frequency Humming
- New Balancing the Scales Normalizing Sound Volume for Optimal Viewing with VLC
- New 2024 Approved Advanced Audacity Methods for High-Fidelity Computer Audio Recording (2023 Guidebook)
- Updated 2024 Approved Mastering the Samsung S10/S9 Voice Recording Feature A Step-by-Step Guide
- Updated 2024 Approved Crafting a Commanding Presence in Audio Media with Filmoras Filters
- Finding the Best Dog Noise Samples for Audio Creators
- Unleash Your Creativity Top 1080P Video Editing Programs for 2024
- How To Update or Downgrade Apple iPhone 12 Pro Without Losing Data? | Dr.fone
- How to Unlock iPhone SE (2022) When We Dont Have Apple ID or Password?
- Android Screen Stuck General Nubia Red Magic 8S Pro+ Partly Screen Unresponsive | Dr.fone
- In 2024, Pokémon Go Cooldown Chart On Vivo Y200e 5G | Dr.fone
- In 2024, Unlocking Made Easy The Best 10 Apps for Unlocking Your Xiaomi Redmi Note 12R Device
- In 2024, How to Fix Pokemon Go Route Not Working On Apple iPhone 12 Pro Max? | Dr.fone
- In 2024, The Ultimate Guide to Unlocking Apple Watch Or iPhone 11 from iCloud
- How to Delete iCloud Account with or without Password from your iPhone 14 Pro Max/Windows/Mac
- How to Repair Broken video files of Asus ROG Phone 8 on Mac?
- New The Best Free iPhone Video Editing Apps for Rotation 2023 Review for 2024
- Fake Android Location without Rooting For Your Tecno Camon 20 | Dr.fone
- In 2024, Why Your WhatsApp Location is Not Updating and How to Fix On Apple iPhone 11 | Dr.fone
- In 2024, Unlocking Global Audiences Top Video Language Converters
- Lock Your Xiaomi Redmi A2+ Phone in Style The Top 5 Gesture Lock Screen Apps
- New In 2024, Get Your Final Cut Pro 90 Days FREE Trial Here
- New How to Make Foggy Text Reflection Effect for 2024
- New Fast and Easy Online Video Reversal 2023S Best Options for 2024
- Updated How to Select a Reliable YouTube to MP3 Conversion Tool for 2024
- Title: New In 2024, Cutting Edge Free Vocal Modifications Made Simple In-Depth Tutorials on Audio Editing with Filmora
- Author: Jacob
- Created at : 2024-05-05 03:50:19
- Updated at : 2024-05-06 03:50:19
- Link: https://audio-shaping.techidaily.com/new-in-2024-cutting-edge-free-vocal-modifications-made-simple-in-depth-tutorials-on-audio-editing-with-filmora/
- License: This work is licensed under CC BY-NC-SA 4.0.
