
:max_bytes(150000):strip_icc():format(webp)/6-best-parental-control-apps-of-2019-featured-c5b50932ab9c4c0fbc0757665e46b6b2.jpg)
New In 2024, Best 13 No-Cost Digital Audio Recording Apps Available on Windows & macOS
“Best 13 No-Cost Digital Audio Recording Apps Available on Windows & macOS [2023 Edition]”
13 Free Music Production Software for Windows/Mac/Online

Benjamin Arango
Mar 27, 2024• Proven solutions
13 Free Music Production Software for Windows/Mac/Online
Technology advances have spread through all fields of human activity, including music recording and development. The invention of music development tools has made it simpler for people engaged in the creation of music in one form or another.
Numerous applications for music development are on the market, and some are meant for musicians, and others are for educators and teachers. There is also a need to direct prospective customers to the right free music production software.
A comprehensive analysis of some of the best music development tools has been conducted to help you make the correct decision while you’re ready to purchase the app. This comprehensive Music Production Software Guide will provide solutions to many of your unanswered questions relating to the purchase of music production software.
- Part 1: Free Music Production Software for Windows
- Part 2: Free Music Production Software for Mac
- Part 3: Free Music Production Software Online
Part 1: Free Music Production Software for Windows
1. Audacity
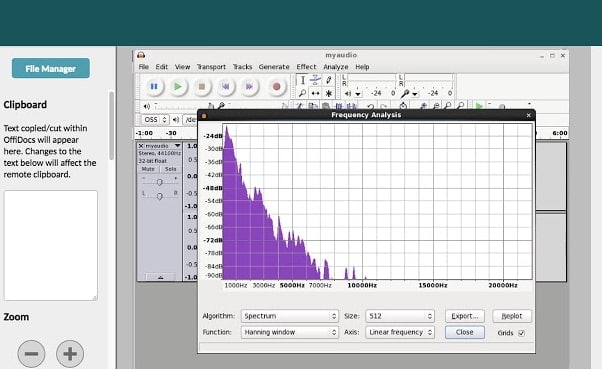
The system for music development is not complete without an audio editor. Audacity is the best free music creation software available on the market. Audacity is open-source and extensive and provides a wide range of tools and effects for performing all audio editing and recording activities. It is created by a community of volunteers and provides regular notifications almost every month. It’s lightweight, safe, and intuitive enough to be used by novice music makers.
Pros
- It is open-source
- It can load VST plugins
Cons
- Only 32-bit plugins are allowed
- Limited features
2. Ardour
Ardour is a highly integrated program of music production that allows users to record and edit on Mac, Linux, and Windows operating systems. Ardour Music Production Software was created by integrating the efforts of the world’s skilled team, such as recording technicians, programmers, and musicians. Such experienced technicians make their concerted and thorough efforts to build the program. Ardour is one of the few applications in music production that respects honesty. The accessibility of this program allows app developers to concentrate on functionality that matters to consumers rather than to construct compelling apps for advertising purposes. This is a system that should be celebrated for its user-focused functionality.
Pros
- It has excellent user-friendliness
- It is available on Mac, Linux, and Windows
Cons
- It lacks a few integral features
- It is difficult to operate for people new to audio editing

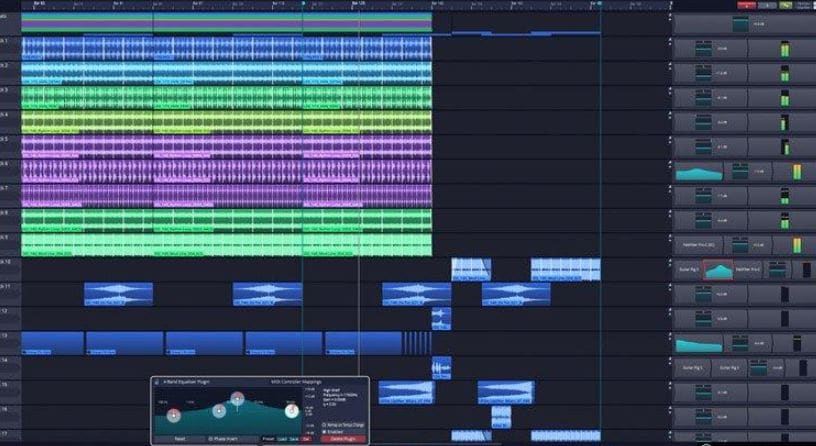
3. Tracktion T7
The people at Tracktion seem to have reached a reasonably canny business model by launching older DAW versions for free and without anything removed.
The convention appears to make it possible to access the edition without charge of two iterations before the new one. You will not be provided with all new functionality, but you will receive an update every time the company updates its flagship DAW, which it does nearly every year.
The growing section is adjustable to match the workflow, and the bottom panel adjusts so that any parameters anywhere on the screen can be seen.
Pros
- It features an unlimited number of audio and MIDI tracks
- It is able to host multiple plugin formats
Cons
- It doesn’t provide all the features at once
- It does not support many plugins
4. LMMS
LMMS is a fully free music production software for windows for music development. It is an open-source and also a project platform for the community. LMMS is a cross-platform device app. It makes it easier to manufacture beats, particularly when many music production professionals have to manufacture quality music with their computers.
Thanks to the powerful sample, beat and melody design, mixing and synthetic sound processes, and many other features, the LMMS music production software provides high-quality audio output. The product also features playback tools, plugins, and samples to produce powerful, high-quality sound.
Pros
- It is compatible with Linux, Windows, and Mac
- Hydrogen project files and MIDI can be imported easily for editing
Cons
- It eats a lot of memory and requires a high-end device to support it
- Some users complained that understanding its working is difficult

5. Cakewalk
This is an exciting app for music production to purchase. It is a fantastic tech to invest in music production. Cakewalk Sonar Artist Software is one of Cakewalk Sonar Artist ‘s great productions. Cakewalk is known for an excellent GUI, an excellent mixing console, an excellent commercial radio system, and limitless MIDI tracks.
A good device to use as part of your instruments for the development of music is the Cakewalk Sonar Artist Music Production program. It stands out as a program packed with excellent features amongst its counterparts. And the app is unmatched in the area of apps.
Pros
- You can share music compilation directly to social media
- You can easily add effects to your tracks
Cons
- It is priced, very high
- One window interface makes it hectic

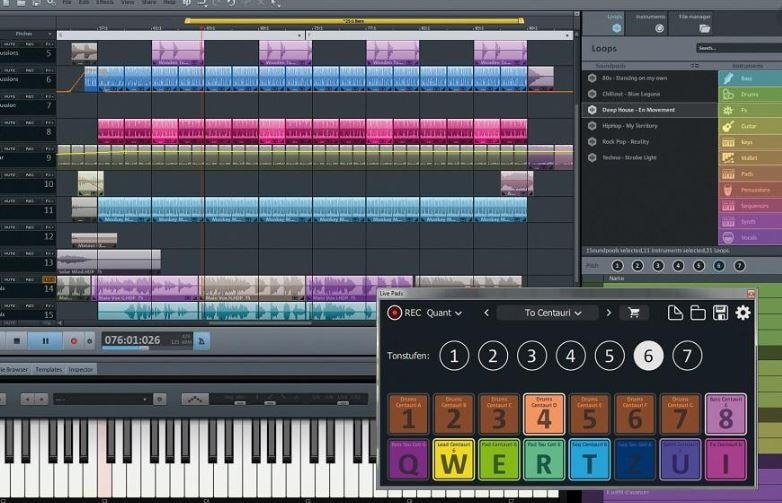
6. Music Maker by Magix
This app is a special program for sound engineers, skilled musicians, and accomplished music producers, developed by US Magix Entertainment. It offers an excellent forum for creative music development in music production professionals.
In reality, the software for music production is excellent software for the Music Maker by Magix. In the field of music post-production and music mastering, mixing and arrangement, recording, and more, the software achieved remarkable breakthroughs. Thanks to the successful combination of a technical device and highly flexible workflow, the Music Maker by Magix has achieved this groundbreaking success.
With creative algorithm and superb plugin effects, the Music Maker by Magix program enables music manufacturers to develop their ideas in line with the highest quality in this industry.
Pros
- It is great for EDM producers
Cons
- It is not suitable for newbies
- The GUI feels a bit cluttered
Part 2: Free Music Production Software for Mac
7. Garageband
This is a music development studio app that is designed to function on Mac. It is a great free music production software for Mac. This software has a full sound collection, which includes virtual instruments, voice, and guitar preset.
GarageBand is a well-known app for music development and is an excellent tool for music beginners. Many people have chosen GarageBand because it does not match the ease and ease of use for recording purposes in particular.
The user-friendly interface makes you easy to create music with a more unobstructed view of what you’re recording. Apps from GarageBand captured the attention of others because of their ease-to-use and user-friendliness.
Pros
- The software offers some nicely packaged preset for vocal and guitar recording
- Productive workflow
Cons
- It has limited plugins
- It is only supported for Mac platforms

8. Ableton Live
The Ableton Live 10 Suite is a dynamic and comprehensive program for the creation and performance of musical recordings.
An essential feature of this software is that it allows you to work on your time-based workflow without affecting the live session. This means that the software gives you a rare chance to get involved with the workflow without stopping live performance.
The Multitrack Recording Technology of Ableton Live10 Suite allows music producers to adjust the speed and pacing of any audio during the recording. To make these adjustments, you don’t have to pause the recording. This is one of the striking characteristics which makes this product a good option for all.
Pros
- Adjusting the speed and pace of audio is a delight
- Sophisticated MIDI/audio routing capabilities
Cons
- It has a traditional design
- Not enough updates to fix the buggy features

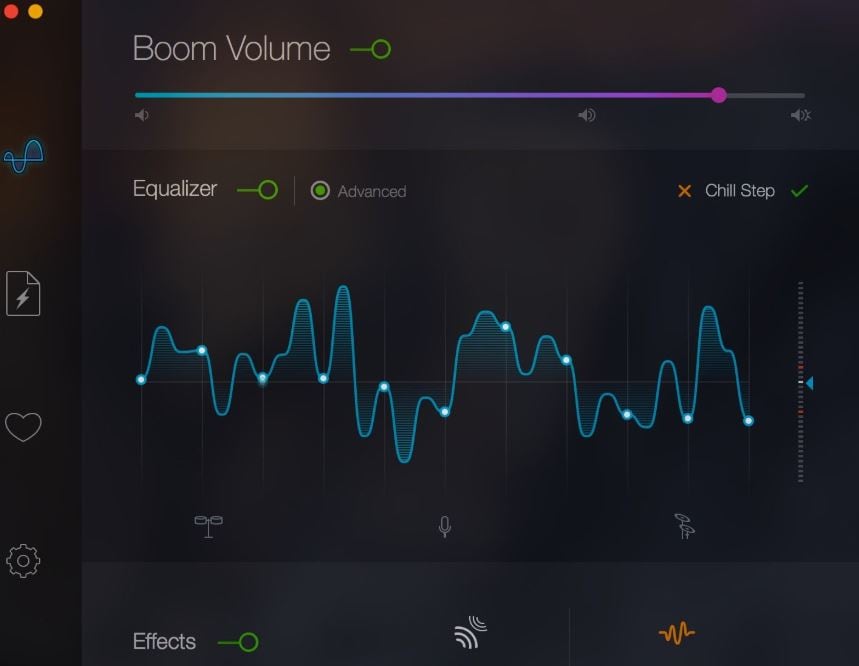
9. Boom 3D
Boom 3D for Mac & Windows is an award-winning pro sound improvement software designed to play your media content on any and all of your devices, phones, or streaming services with amazing 3D effects. No costly headphones or sound boosters will be needed to make your music feel like it! Designed in a new immersive 3D surround sound technology, Boom 3D redefines how people listen to music, watch films, or play games with some headphones on their devices. 3D sound provides the option to check the LFE (subwoofer), and the audio intensity of each Virtual 3D Surround audio system speaker.
Pros
- It comes with loads of content
- Audio quality can be enhanced
Cons
- The design is not suitable for everybody
- It does not have a Linux version
10. Mixxx
For beginners, Mixxx is just another great device. This is also one of the best free music production software downloads for your music. This software supports all Mac, Windows, and Linux platforms.
The application provides you with a DJ-mixing environment and supports all standard formats such as Mp3 and many other formats.
Pros
- It is a great app for beginners
- Supported by Mac, Windows, and Linux
Cons
- It doesn’t support many plugins
- GUI isn’t that great

Part 3: Free Music Production Software Online
11. Soundation
Soundation is a platform that provides free music production software online only capabilities. The free version and three paid versions are offered. You can use this to build your tracks unless you have the resources to do so if you need a web-based music maker and editor.
If you pay, even after you have made your music, you can always cancel. Remember first to save them to your hard drive. If you need paid characteristics, pay for the monthly plan again through PayPal, and you have to use it for a month.
Pros
- Great SSL-modelled mixer
- You can use its devices as a plugin
Cons
- It works only online

12. Audiotool
Audiotool is a popular app for music production hosted online and can be used without installation from inside your browser. It uses a cloud-based network to store all your music and files wherever you are. It is also confirmed that you will share music and tracks directly with YouTube, SoundCloud, and Facebook on its own publishing site. They have premium releases from Loopmasters and some fantastic online VSTs, for example, Heisenberg, Machiniste, Bassline, and Beatbox 8 & 9.
Pros
- No installation needed
- You can directly share it to your social media
Cons
- It works only online
- No upgrades

13. Soundtrap
Soundtrap is not only an online music studio but a training site for students and instructors. The STEAM Curriculum is an online learning resource that helps students to follow music and podcasts, incorporated into the Web app. As we mentioned earlier, in addition to the online Web App, you can also use it on different devices, share it with other users, and work in innovative projects for your music.
The interface is simple, easy to use, and easy to understand. It is simply an instrument for innovation; you don’t have to learn how to apply VST or any other technical elements to music creation. You can also record your MIDI instruments directly from your machine or device’s mic.
Pros
- It provides a great platform for teachers to teach their students
- It is very easy to use
Cons
- It only has a limited number of plugins
- It cannot be used professionally

Conclusion
If you make music on a computer, the most important resource in your artistic arsenal is your DAW; in your home recording system, you ‘re probably going to have the MIDI keyboard, audio interface, studio monitor speakers, and maybe a microphone or two. But your program is at the core of it all. Not everyone can afford expensive DAWs, but one must not worry as free music production software are present to aid us.
It is important to have a DAW with which you are pleased and, perhaps more importantly, a DAW, which allows you to turn your ideas into music as quickly and painlessly as possible. So make sure you choose the best one for you according to your needs. Hopefully, this guide will aid you!


Benjamin Arango
Benjamin Arango is a writer and a lover of all things video.
Follow @Benjamin Arango
Benjamin Arango
Mar 27, 2024• Proven solutions
13 Free Music Production Software for Windows/Mac/Online
Technology advances have spread through all fields of human activity, including music recording and development. The invention of music development tools has made it simpler for people engaged in the creation of music in one form or another.
Numerous applications for music development are on the market, and some are meant for musicians, and others are for educators and teachers. There is also a need to direct prospective customers to the right free music production software.
A comprehensive analysis of some of the best music development tools has been conducted to help you make the correct decision while you’re ready to purchase the app. This comprehensive Music Production Software Guide will provide solutions to many of your unanswered questions relating to the purchase of music production software.
- Part 1: Free Music Production Software for Windows
- Part 2: Free Music Production Software for Mac
- Part 3: Free Music Production Software Online
Part 1: Free Music Production Software for Windows
1. Audacity
The system for music development is not complete without an audio editor. Audacity is the best free music creation software available on the market. Audacity is open-source and extensive and provides a wide range of tools and effects for performing all audio editing and recording activities. It is created by a community of volunteers and provides regular notifications almost every month. It’s lightweight, safe, and intuitive enough to be used by novice music makers.
Pros
- It is open-source
- It can load VST plugins
Cons
- Only 32-bit plugins are allowed
- Limited features
2. Ardour
Ardour is a highly integrated program of music production that allows users to record and edit on Mac, Linux, and Windows operating systems. Ardour Music Production Software was created by integrating the efforts of the world’s skilled team, such as recording technicians, programmers, and musicians. Such experienced technicians make their concerted and thorough efforts to build the program. Ardour is one of the few applications in music production that respects honesty. The accessibility of this program allows app developers to concentrate on functionality that matters to consumers rather than to construct compelling apps for advertising purposes. This is a system that should be celebrated for its user-focused functionality.
Pros
- It has excellent user-friendliness
- It is available on Mac, Linux, and Windows
Cons
- It lacks a few integral features
- It is difficult to operate for people new to audio editing
3. Tracktion T7
The people at Tracktion seem to have reached a reasonably canny business model by launching older DAW versions for free and without anything removed.
The convention appears to make it possible to access the edition without charge of two iterations before the new one. You will not be provided with all new functionality, but you will receive an update every time the company updates its flagship DAW, which it does nearly every year.
The growing section is adjustable to match the workflow, and the bottom panel adjusts so that any parameters anywhere on the screen can be seen.
Pros
- It features an unlimited number of audio and MIDI tracks
- It is able to host multiple plugin formats
Cons
- It doesn’t provide all the features at once
- It does not support many plugins
4. LMMS
LMMS is a fully free music production software for windows for music development. It is an open-source and also a project platform for the community. LMMS is a cross-platform device app. It makes it easier to manufacture beats, particularly when many music production professionals have to manufacture quality music with their computers.
Thanks to the powerful sample, beat and melody design, mixing and synthetic sound processes, and many other features, the LMMS music production software provides high-quality audio output. The product also features playback tools, plugins, and samples to produce powerful, high-quality sound.
Pros
- It is compatible with Linux, Windows, and Mac
- Hydrogen project files and MIDI can be imported easily for editing
Cons
- It eats a lot of memory and requires a high-end device to support it
- Some users complained that understanding its working is difficult
5. Cakewalk
This is an exciting app for music production to purchase. It is a fantastic tech to invest in music production. Cakewalk Sonar Artist Software is one of Cakewalk Sonar Artist ‘s great productions. Cakewalk is known for an excellent GUI, an excellent mixing console, an excellent commercial radio system, and limitless MIDI tracks.
A good device to use as part of your instruments for the development of music is the Cakewalk Sonar Artist Music Production program. It stands out as a program packed with excellent features amongst its counterparts. And the app is unmatched in the area of apps.
Pros
- You can share music compilation directly to social media
- You can easily add effects to your tracks
Cons
- It is priced, very high
- One window interface makes it hectic
6. Music Maker by Magix
This app is a special program for sound engineers, skilled musicians, and accomplished music producers, developed by US Magix Entertainment. It offers an excellent forum for creative music development in music production professionals.
In reality, the software for music production is excellent software for the Music Maker by Magix. In the field of music post-production and music mastering, mixing and arrangement, recording, and more, the software achieved remarkable breakthroughs. Thanks to the successful combination of a technical device and highly flexible workflow, the Music Maker by Magix has achieved this groundbreaking success.
With creative algorithm and superb plugin effects, the Music Maker by Magix program enables music manufacturers to develop their ideas in line with the highest quality in this industry.
Pros
- It is great for EDM producers
Cons
- It is not suitable for newbies
- The GUI feels a bit cluttered
Part 2: Free Music Production Software for Mac
7. Garageband
This is a music development studio app that is designed to function on Mac. It is a great free music production software for Mac. This software has a full sound collection, which includes virtual instruments, voice, and guitar preset.
GarageBand is a well-known app for music development and is an excellent tool for music beginners. Many people have chosen GarageBand because it does not match the ease and ease of use for recording purposes in particular.
The user-friendly interface makes you easy to create music with a more unobstructed view of what you’re recording. Apps from GarageBand captured the attention of others because of their ease-to-use and user-friendliness.
Pros
- The software offers some nicely packaged preset for vocal and guitar recording
- Productive workflow
Cons
- It has limited plugins
- It is only supported for Mac platforms
8. Ableton Live
The Ableton Live 10 Suite is a dynamic and comprehensive program for the creation and performance of musical recordings.
An essential feature of this software is that it allows you to work on your time-based workflow without affecting the live session. This means that the software gives you a rare chance to get involved with the workflow without stopping live performance.
The Multitrack Recording Technology of Ableton Live10 Suite allows music producers to adjust the speed and pacing of any audio during the recording. To make these adjustments, you don’t have to pause the recording. This is one of the striking characteristics which makes this product a good option for all.
Pros
- Adjusting the speed and pace of audio is a delight
- Sophisticated MIDI/audio routing capabilities
Cons
- It has a traditional design
- Not enough updates to fix the buggy features
9. Boom 3D
Boom 3D for Mac & Windows is an award-winning pro sound improvement software designed to play your media content on any and all of your devices, phones, or streaming services with amazing 3D effects. No costly headphones or sound boosters will be needed to make your music feel like it! Designed in a new immersive 3D surround sound technology, Boom 3D redefines how people listen to music, watch films, or play games with some headphones on their devices. 3D sound provides the option to check the LFE (subwoofer), and the audio intensity of each Virtual 3D Surround audio system speaker.
Pros
- It comes with loads of content
- Audio quality can be enhanced
Cons
- The design is not suitable for everybody
- It does not have a Linux version
10. Mixxx
For beginners, Mixxx is just another great device. This is also one of the best free music production software downloads for your music. This software supports all Mac, Windows, and Linux platforms.
The application provides you with a DJ-mixing environment and supports all standard formats such as Mp3 and many other formats.
Pros
- It is a great app for beginners
- Supported by Mac, Windows, and Linux
Cons
- It doesn’t support many plugins
- GUI isn’t that great
Part 3: Free Music Production Software Online
11. Soundation
Soundation is a platform that provides free music production software online only capabilities. The free version and three paid versions are offered. You can use this to build your tracks unless you have the resources to do so if you need a web-based music maker and editor.
If you pay, even after you have made your music, you can always cancel. Remember first to save them to your hard drive. If you need paid characteristics, pay for the monthly plan again through PayPal, and you have to use it for a month.
Pros
- Great SSL-modelled mixer
- You can use its devices as a plugin
Cons
- It works only online
12. Audiotool
Audiotool is a popular app for music production hosted online and can be used without installation from inside your browser. It uses a cloud-based network to store all your music and files wherever you are. It is also confirmed that you will share music and tracks directly with YouTube, SoundCloud, and Facebook on its own publishing site. They have premium releases from Loopmasters and some fantastic online VSTs, for example, Heisenberg, Machiniste, Bassline, and Beatbox 8 & 9.
Pros
- No installation needed
- You can directly share it to your social media
Cons
- It works only online
- No upgrades
13. Soundtrap
Soundtrap is not only an online music studio but a training site for students and instructors. The STEAM Curriculum is an online learning resource that helps students to follow music and podcasts, incorporated into the Web app. As we mentioned earlier, in addition to the online Web App, you can also use it on different devices, share it with other users, and work in innovative projects for your music.
The interface is simple, easy to use, and easy to understand. It is simply an instrument for innovation; you don’t have to learn how to apply VST or any other technical elements to music creation. You can also record your MIDI instruments directly from your machine or device’s mic.
Pros
- It provides a great platform for teachers to teach their students
- It is very easy to use
Cons
- It only has a limited number of plugins
- It cannot be used professionally
Conclusion
If you make music on a computer, the most important resource in your artistic arsenal is your DAW; in your home recording system, you ‘re probably going to have the MIDI keyboard, audio interface, studio monitor speakers, and maybe a microphone or two. But your program is at the core of it all. Not everyone can afford expensive DAWs, but one must not worry as free music production software are present to aid us.
It is important to have a DAW with which you are pleased and, perhaps more importantly, a DAW, which allows you to turn your ideas into music as quickly and painlessly as possible. So make sure you choose the best one for you according to your needs. Hopefully, this guide will aid you!
Benjamin Arango
Benjamin Arango is a writer and a lover of all things video.
Follow @Benjamin Arango
Separate Sounds From Images: IMovie’s Methodology for Mac Computers
How to Separate Audio from Video in iMovie on Mac?

Liza Brown
Oct 26, 2023• Proven solutions
Apple’s video editing program, iMovie, is a popular choice. By removing background noise and raising audio levels of quiet clips, iMovie may likewise modify and enhance the audio of a project.
iMovie gives you the basic, no-frills editing tools you need to make a movie out of a collection of video clips. Without using videotape, you can easily browse from scene to scene and save your edits and changes in digital format. The end product is a high-quality digital video movie that you can save as a QuickTime file or dump back to digital videotape.
Now let’s look at how to separate audio from video in iMovie on Mac.
- Part 1. How to Separate/Detach/Split Audio from Video in iMovie on Mac
- Part 2. Separate Audio from Video on Mac with the Best Alternative to iMovie
- Part 3. FAQs about Separating Audio from Video in iMovie
Part 1. How to Separate/Detach/Split Audio from Video in iMovie on Mac
The iMovie program is capable of producing high-quality movies and videos. If you’re dealing with a video that includes both sound and pictures, you may want to split the two at some point.
To separate audio from video in iMovie on Mac, just open the video and follow the steps below.
Step 1. Remove the audio clip from the video
In your iMovie timeline, find the clip that contains both video and audio.
Right-click the clip or hold Control and click it. You can also go to the menu bar and choose Detach Audio.
The audio from that clip will then show as its own “clip” in green below the video. The little line on the left, however, confirms that the video and audio are still connected. This implies that if you delete the video, you’ll lose the audio as well. As a result, you’ll either need to move the audio clip somewhere else in your video or place it in the Background Music Well at the bottom of the timeline.
Simply select, drag, and drop the green audio clip where you want it. It will be in the background of all other noises in your movie if you set it in the Background Music Well.
Step 2. Get rid of the video
You can remove the video by clicking it and utilizing one of these techniques after you disconnect the audio and unlink it from the video.
Select Delete from the shortcut menu by right-clicking.
Or hold Control while clicking and selecting Delete.
Part 2. Separate Audio from Video on Mac with the Best Alternative to iMovie
Want to extract the music file from a video clip’s audio and visual tracks? Or do you want to add another audio file to the video frame? In this part, you’ll learn how to easily separate audio from video and create your own MP3s with iMovie’s alternative - Wondershare Filmora. It’s a powerful video editing software available on both Mac and Windows.
You can make your own MP3 file of the amazing piece of music for enjoyment on the move, whether it’s from a music video, TV show, or concert footage. To separate your audio from your video, follow the steps outlined below.
Step 1. Import your media files into Filmora
To enter the editing mode, run the software and select the 16:9 or 4:3 ratio that best suits your demands. Then select Import to import video clips, audio, or photographs from your computer’s file folder.
It’s worth noting that this tool is highly compatible with a variety of formats, allowing you to edit them frame by frame while maintaining the original quality. Drag and drop videos onto the timeline after they’ve been imported. All files in the timeline are combined without any gaps by default.
Step 2. Separate the audio and video with a single click
Select “Detach Audio” from the context menu of the video file from which you wish to extract the audio track. You’ll see an audio file appearing on the audio track right away. Yes, this is the source video’s actual audio file.
You’ve successfully detached the audio track from the video file.
Step 3. Save the video or audio that has been split
Because the audio and video tracks have been split, you may simply delete the audio or video track you don’t need and replace it with the new one. Then press “Export” to save the audio track as an MP3 file, or go straight to the “iPod” preset to listen on the move.
You should first save the split video frame or audio track to a project file on your hard disk if you wish to save it separately in a new file. Reload the project file that contains the video frame after you’ve finished exporting the audio track, and then export it to a new video file.
Part 3. FAQs about Separating Audio from Video in iMovie
To learn more about separating audio from video in iMovie, you can check the FAQs below.
1. Is it possible to split audio and video in iMovie?
Yes, you certainly can. Select the video clip you want to separate after you’ve imported it into iMovie. Select “Detach Audio” from the context menu by right-clicking. You can now remove one of the tracks (audio or video), relocate it to a different location in the movie timeline, or alter it.
2. In iMovie, what does “detach audio” do?
The video clip’s audio is deleted, and an audio-only clip (with a green bar) is inserted below the video clip. The audio clip can now be linked to any other clip in your movie, or it can be relocated to the background music section.
3. How can I remove the original audio (from the camera) and lock the new audio to the video so that I don’t have to deal with two different parts (video and audio) when editing?
Make a movie in iMovie that simply mixes all the audio and visuals. You can align the video by listening to it or looking at the waveforms. After it’s all lined up, go into the clip inspector and turn off the video track’s volume. To maintain as much quality as feasible, SHARE/EXPORT using QuickTime and choose Apple Intermediate Codec as your codec. This will link the secondary audio and video tracks together. Now, into an Event, import the movie you just made in iMovie. You may now combine audio and video editing.
4. Is it feasible to simply take the video’s audio and save it as a sound file?
If you have other clips in the timeline, you can detach the audio and copy and paste it around, but if you want all the audio from a clip or set of clips, put them in a project and make a custom QT export and export “Sound to AIFF file”. Drag that into another movie clip or import it as an audio track in iTunes.
5. How do I get the audio from the clip to detach so that I may remove it and record fresh audio over it?
Only in the project timeline, not in the event pane, can you disconnect audio from a clip.
6. In iMovie for Mac, how can I mute a video?
Click the Create New button in iMovie to start a new project. From the resulting dropdown menu, pick Movie. Select the video you wish to mute by clicking the Import Media option. Drag and drop the video onto the timeline once it’s been imported. Right-click on the video in the timeline and choose Detach Audio from the dropdown menu.
The audio and video will be separated or detached as a result of this. Remove the audio from the video that you separated or disconnected in the previous step. The audio file (or layer) is located just beneath the video file on your timeline. Then you can either delete it by right-clicking on it and selecting Delete from the dropdown menu, or by simply clicking on it. It will be highlighted in yellow to indicate that it has been selected. And then press the delete key.
7. How do I view and download a preview?
By clicking the play button next to the Share button, you may see a preview of the video. The video can then be downloaded to your computer by selecting Download Video from the dropdown menu after hitting the Publish button.
Alternatively, you can share it directly from the app to other social media platforms. Apart from removing audio from videos, Animaker also includes other video editing tools that you’ll need to modify your videos for social media and your website.
Wrap Up
As seen in this instructional article, iMovie has countless amazing features as a video editor on Mac . Separating audio from a video is one of those interesting features on iMovie.
If a video has music, sounds, or voices that you’d like to separate from the video, following the above-listed steps is an easy way to do just that. One thing to always remember is to keep the app open while exporting.
And if iMovie can’t meet your need, don’t worry. Wondershare Filmora can be your better choice.
Liza Brown
Liza Brown is a writer and a lover of all things video.
Follow @Liza Brown
Liza Brown
Oct 26, 2023• Proven solutions
Apple’s video editing program, iMovie, is a popular choice. By removing background noise and raising audio levels of quiet clips, iMovie may likewise modify and enhance the audio of a project.
iMovie gives you the basic, no-frills editing tools you need to make a movie out of a collection of video clips. Without using videotape, you can easily browse from scene to scene and save your edits and changes in digital format. The end product is a high-quality digital video movie that you can save as a QuickTime file or dump back to digital videotape.
Now let’s look at how to separate audio from video in iMovie on Mac.
- Part 1. How to Separate/Detach/Split Audio from Video in iMovie on Mac
- Part 2. Separate Audio from Video on Mac with the Best Alternative to iMovie
- Part 3. FAQs about Separating Audio from Video in iMovie
Part 1. How to Separate/Detach/Split Audio from Video in iMovie on Mac
The iMovie program is capable of producing high-quality movies and videos. If you’re dealing with a video that includes both sound and pictures, you may want to split the two at some point.
To separate audio from video in iMovie on Mac, just open the video and follow the steps below.
Step 1. Remove the audio clip from the video
In your iMovie timeline, find the clip that contains both video and audio.
Right-click the clip or hold Control and click it. You can also go to the menu bar and choose Detach Audio.
The audio from that clip will then show as its own “clip” in green below the video. The little line on the left, however, confirms that the video and audio are still connected. This implies that if you delete the video, you’ll lose the audio as well. As a result, you’ll either need to move the audio clip somewhere else in your video or place it in the Background Music Well at the bottom of the timeline.
Simply select, drag, and drop the green audio clip where you want it. It will be in the background of all other noises in your movie if you set it in the Background Music Well.
Step 2. Get rid of the video
You can remove the video by clicking it and utilizing one of these techniques after you disconnect the audio and unlink it from the video.
Select Delete from the shortcut menu by right-clicking.
Or hold Control while clicking and selecting Delete.
Part 2. Separate Audio from Video on Mac with the Best Alternative to iMovie
Want to extract the music file from a video clip’s audio and visual tracks? Or do you want to add another audio file to the video frame? In this part, you’ll learn how to easily separate audio from video and create your own MP3s with iMovie’s alternative - Wondershare Filmora. It’s a powerful video editing software available on both Mac and Windows.
You can make your own MP3 file of the amazing piece of music for enjoyment on the move, whether it’s from a music video, TV show, or concert footage. To separate your audio from your video, follow the steps outlined below.
Step 1. Import your media files into Filmora
To enter the editing mode, run the software and select the 16:9 or 4:3 ratio that best suits your demands. Then select Import to import video clips, audio, or photographs from your computer’s file folder.
It’s worth noting that this tool is highly compatible with a variety of formats, allowing you to edit them frame by frame while maintaining the original quality. Drag and drop videos onto the timeline after they’ve been imported. All files in the timeline are combined without any gaps by default.
Step 2. Separate the audio and video with a single click
Select “Detach Audio” from the context menu of the video file from which you wish to extract the audio track. You’ll see an audio file appearing on the audio track right away. Yes, this is the source video’s actual audio file.
You’ve successfully detached the audio track from the video file.
Step 3. Save the video or audio that has been split
Because the audio and video tracks have been split, you may simply delete the audio or video track you don’t need and replace it with the new one. Then press “Export” to save the audio track as an MP3 file, or go straight to the “iPod” preset to listen on the move.
You should first save the split video frame or audio track to a project file on your hard disk if you wish to save it separately in a new file. Reload the project file that contains the video frame after you’ve finished exporting the audio track, and then export it to a new video file.
Part 3. FAQs about Separating Audio from Video in iMovie
To learn more about separating audio from video in iMovie, you can check the FAQs below.
1. Is it possible to split audio and video in iMovie?
Yes, you certainly can. Select the video clip you want to separate after you’ve imported it into iMovie. Select “Detach Audio” from the context menu by right-clicking. You can now remove one of the tracks (audio or video), relocate it to a different location in the movie timeline, or alter it.
2. In iMovie, what does “detach audio” do?
The video clip’s audio is deleted, and an audio-only clip (with a green bar) is inserted below the video clip. The audio clip can now be linked to any other clip in your movie, or it can be relocated to the background music section.
3. How can I remove the original audio (from the camera) and lock the new audio to the video so that I don’t have to deal with two different parts (video and audio) when editing?
Make a movie in iMovie that simply mixes all the audio and visuals. You can align the video by listening to it or looking at the waveforms. After it’s all lined up, go into the clip inspector and turn off the video track’s volume. To maintain as much quality as feasible, SHARE/EXPORT using QuickTime and choose Apple Intermediate Codec as your codec. This will link the secondary audio and video tracks together. Now, into an Event, import the movie you just made in iMovie. You may now combine audio and video editing.
4. Is it feasible to simply take the video’s audio and save it as a sound file?
If you have other clips in the timeline, you can detach the audio and copy and paste it around, but if you want all the audio from a clip or set of clips, put them in a project and make a custom QT export and export “Sound to AIFF file”. Drag that into another movie clip or import it as an audio track in iTunes.
5. How do I get the audio from the clip to detach so that I may remove it and record fresh audio over it?
Only in the project timeline, not in the event pane, can you disconnect audio from a clip.
6. In iMovie for Mac, how can I mute a video?
Click the Create New button in iMovie to start a new project. From the resulting dropdown menu, pick Movie. Select the video you wish to mute by clicking the Import Media option. Drag and drop the video onto the timeline once it’s been imported. Right-click on the video in the timeline and choose Detach Audio from the dropdown menu.
The audio and video will be separated or detached as a result of this. Remove the audio from the video that you separated or disconnected in the previous step. The audio file (or layer) is located just beneath the video file on your timeline. Then you can either delete it by right-clicking on it and selecting Delete from the dropdown menu, or by simply clicking on it. It will be highlighted in yellow to indicate that it has been selected. And then press the delete key.
7. How do I view and download a preview?
By clicking the play button next to the Share button, you may see a preview of the video. The video can then be downloaded to your computer by selecting Download Video from the dropdown menu after hitting the Publish button.
Alternatively, you can share it directly from the app to other social media platforms. Apart from removing audio from videos, Animaker also includes other video editing tools that you’ll need to modify your videos for social media and your website.
Wrap Up
As seen in this instructional article, iMovie has countless amazing features as a video editor on Mac . Separating audio from a video is one of those interesting features on iMovie.
If a video has music, sounds, or voices that you’d like to separate from the video, following the above-listed steps is an easy way to do just that. One thing to always remember is to keep the app open while exporting.
And if iMovie can’t meet your need, don’t worry. Wondershare Filmora can be your better choice.
Liza Brown
Liza Brown is a writer and a lover of all things video.
Follow @Liza Brown
Best Places to Download and Listen to Bird Songs in MP3 Format
Versatile Video Editor - Wondershare Filmora
An easy yet powerful editor
Numerous effects to choose from
Detailed tutorials provided by the official channel
The sounds of the bird are a form of musical sound that smears through the ears. They can range in different forms like chirping, high sounds, piercing, etc. You may be wondering where and how you can find bird sounds effects to add your videos for that professional and complete feel. The bird sound effects make your videos connect emotionally to your viewers and increase the authenticity of the feeling of nature.
Bird sound mp3 lets you also enjoy the serenity of the environment in which the video is being watched and gives the viewer a more concentrating environment. There are many bird sound effects to choose from for that turnaround of your videos.
For your YouTube videos, documentaries, video games, plays, Foley, Adobe Premiere, and more, you can now download all these birds’ sound mp3 for free! They include hummingbird sound effects, birds tweet sound effects, birds chirping sound effects, morning birds sound effects, angry bird sound effects, and forest birds chirping nature mp3. How? Tag along and learn how to download each of these bird effects steps by step.
In this article
01 [Ways to Download All Kinds of Sound Effect](#Part 1)
02 [Use Filmora to Add Sound/MP3 Effect in Your Video](#Part 2)
Part 1 Ways to Download All Kinds of Sound Effect
There are various ways to help you download or create all kinds of sound effects, and sometimes they are free to use. Here are some ways to download all sound effects, including bird sounds mp3 effect.
1. Download from Some YouTube Video
YouTube is an excellent platform for showcasing your videos and also gives you a chance to download and reproduce music, sound effects, and tracks. Here, I will provide you with a step-by-step guide to download mp3 sound effects from YouTube for free! You can download your bird sounds mp3 effects on YouTube in various ways. These ways are as follows,
- Use of Converto
- Use of mp3 download
- Use of 320 YouTube
- Use YTMp3
- YouTube to mp3 converter
● Use of Converto:
Converto is one web-based tool that converts your YouTube videos to mp3. It is highly recommended for long-term use as you can convert your music videos or sound effects into mp3 for free. Here is a guide on how to use Converto.

Step 1: Go to Converto, copy and paste the URL for the song or video you want to convert to mp3, then click on the download button. Converto will immediately start searching for the video.
Step 2: Hit the convert button. Before then, make sure you select mp3 on the drop-down. Note the speed of converting your video to mp3 depends on your internet speed and the size of your file.
Step 3: A notification appears on your screen ‘click here’ once your mp3 file download is ready. You can then click the highlighted section and download your audio on your desktop.
● Use of MP3 Download:
Mp3 download is an easy and swift way to use mp3 downloads from YouTube videos. Here is a guide on using mp3 download to convert your YouTube videos to mp3 for free.
Step 1: Go to mp3 download to paste the URL of the video/music you wish to convert to mp3 and search.
Step 2: The site then gives you an option of converting your audio into different formats, including FLAC or WAV. Here, navigate to the audio tab, choose the design you want to save, and click the download button.
Step 3: A pop-up then appears when your file is ready for download, and if you want to save it on your system, you click ‘download now.’
● Use of 320 YouTube:
This converter converts optimal YouTube videos into high-quality audio and is also very easy to use; we use it in two ways for free.
● Directly via YouTube in the following steps
Step 1: Type 320 into the URL you want to download before “youtube.com/watch?v….”
Step 2: The URL will then direct you to the 320 converter page, where you click download mp3 to download your audio file.
● Via the 320 YouTube converter site
Step 1: Go to the YouTube 320 website, then paste the URL of the song or the video you want to convert into the box. Then press the convert button.
Step 1: It will then display the video you want to download; then, on your left-hand side, you can click on the ‘download mp3’ button to convert your video to mp3 audio.
● Use of YTmp3:
This web tool can convert up to 90 min video into an mp3 for free. It is also straightforward to use. Here is a guide on how to use it;
Step 1: Go to YTmp3, and on the blue bar, select the mp3 option. Then paste the URL video you want to convert into the white box, and click the convert button.
Step 2: Then download your mp3 file by clicking the ‘download’ button.
● Use of YouTube to MP3 Converter:
YouTube to mp3 converter is a quick way to download all your YouTube sound mp3 effects conveniently for free. Here is a guide on how to use it:
Step 1: Go to the Youtube mp3 converter, paste the URL of the video you want to download on the search bar and hit ‘Go.’
Step 2: After displaying the video, you want to convert, you can click on the drop-down to select the selection format, either mp3 or mp4, and hit the convert button once done.
Step 3: After the convert is complete, hit the download button to save your mp3.
2. Make Bird Sound Effect by Yourself
You can make sound effects at your home with everyday objects to add to your film videos through a process called Foley. Here is a guide on how you can do it.
Start down the recording process; we break it into two categories: room acoustics and microphone selection.
● Room Acoustics:
Room acoustics are vital to capturing good recordings. You need a generally larger room to make room acoustics compared to an average size room for better results. Here we emphasize that your sound should have appropriate height, width, and depth. These attributes make the difference in recording high-quality and low-quality sound effects.
The quality of your recordings using acoustics should not be much of a bother, though, because various easy-to-use software eliminates the excess noise in your recordings and make the quality of your recording as good as you would want. This software includes; intrusions prevalence, sixty-cycle hum, and more.
● Microphone Selection:
Microphone selection is a crucial component in making sound effects during recording. You use sensitive mics for interior scenes to capture subtle nuances make good audio. Here we preferably recommend hyper-cardioid condenser mics.
Consider also placement and closeness of the microphone as they significantly affect the sound effect recorded concerning the sound source. For close-up shots, use closer microphone placement, but if you desire more room sound, put distance between the mic and the sound source.
You can also use the standard mic technique to directly capture a bird sound effect by picking it on a mick. Most of those tones will work fine, but post-production manipulation can create excellent cinematic quality.
3. Use Free SFX
Free SFX is a website designed to give something to everybody. It has no complexity in use and has millions of sound effects to choose from. You need to click on the download button, and you can try as many as you want.
4. Use 99Sounds
99sounds is a site that allows you to download the most modern sound effects easily. They are divided into categories to make finding the right sound reasonably simple. They also give you a wide range to choose from; click “Download.”
Part 2 Use Filmora to Add Sound/MP3 Effect in Your Video
Filmora is a video editing software with an excellent built-in audio library. It enables you to add music to videos inform of mp3, mp4, WMA, and more. This software allows you to remove any existing background music as well. Its intuitive feature makes video editing feel like a walk in the park with its simplicity in usage. Filmora transforms your ordinal videos into an extraordinary piece of art with its support for a wide variety of audios and videos formats. As a beginner in the video editing field or even an expert, you can never go wrong with Filmora as your number one choice.
Features:
- It widely supports different formats.
- Powerful video editing features and intuitive user interface.
- Transfer to a popular device option, upload to YouTube, or burn to DVD.
- A choice of 300+ stunning effects for different niches.
- Royalty-free music, Modern and easy to use.
Step by Step Guide for How to Add Sound/MP3 to Video with Filmora:
Step 1 Go to the Filmora official website, install wonder share Filmora, and lunch it
Once it’s launched, you will find a tab just below the menu bar, tap media, and click import. After this, there will be a drop-down where you can click on import media files and choose the video file. Repeat the process to pick the desired background music. You can also use build-in music tracks to add music to your video by selecting the Music tab.

Step 2 Now, you can navigate the video you imported to Filmora, then tap on the sign ‘+’on it alternatively, you can drag down the media file to the timeline
Step 3 Now, edit your music by double-tapping the audio from the timeline. It will display the audio panel at the top of the screen
You can use it to set the desired equalizer to manage pitch volume and speed. You can also use the forum to fade in or fade out.

Step4 Finally, you can now export the video that has made the desired changes by clicking ‘export’ on the toolbar to export the video
You can now save the exported in the desired format and remember to rename it directly.
Wondershare Filmora
Get started easily with Filmora’s powerful performance, intuitive interface, and countless effects!
Try It Free Try It Free Try It Free Learn More >

AI Portrait – The best feature of Wondershare Filmora for gameplay editing
The AI Portrait is a new add-on in Wondershare Filmora. It can easily remove video backgrounds without using a green screen or chroma key, allowing you to add borders, glitch effects, pixelated, noise, or segmentation video effects.

Conclusion
Having learned how and where to download bird sound effects and the ease of doing it, your videos can never be the same. You will always have an easy way of adding professional bird sound effects by; adding tweeting bird effects, angry bird sound effects, forest birds chirping nature sounds, or whatever you choose. Make your viewers remain emotionally connected to your videos. Now you have discovered how easy it is to add music to your videos using Filmora; you will long forget your old boring style of sharing nonmusical videos. With the guide above, whether you are a beginner or an expert in using Filmora, you will find the ease of using it and its incredible features.
The sounds of the bird are a form of musical sound that smears through the ears. They can range in different forms like chirping, high sounds, piercing, etc. You may be wondering where and how you can find bird sounds effects to add your videos for that professional and complete feel. The bird sound effects make your videos connect emotionally to your viewers and increase the authenticity of the feeling of nature.
Bird sound mp3 lets you also enjoy the serenity of the environment in which the video is being watched and gives the viewer a more concentrating environment. There are many bird sound effects to choose from for that turnaround of your videos.
For your YouTube videos, documentaries, video games, plays, Foley, Adobe Premiere, and more, you can now download all these birds’ sound mp3 for free! They include hummingbird sound effects, birds tweet sound effects, birds chirping sound effects, morning birds sound effects, angry bird sound effects, and forest birds chirping nature mp3. How? Tag along and learn how to download each of these bird effects steps by step.
In this article
01 [Ways to Download All Kinds of Sound Effect](#Part 1)
02 [Use Filmora to Add Sound/MP3 Effect in Your Video](#Part 2)
Part 1 Ways to Download All Kinds of Sound Effect
There are various ways to help you download or create all kinds of sound effects, and sometimes they are free to use. Here are some ways to download all sound effects, including bird sounds mp3 effect.
1. Download from Some YouTube Video
YouTube is an excellent platform for showcasing your videos and also gives you a chance to download and reproduce music, sound effects, and tracks. Here, I will provide you with a step-by-step guide to download mp3 sound effects from YouTube for free! You can download your bird sounds mp3 effects on YouTube in various ways. These ways are as follows,
- Use of Converto
- Use of mp3 download
- Use of 320 YouTube
- Use YTMp3
- YouTube to mp3 converter
● Use of Converto:
Converto is one web-based tool that converts your YouTube videos to mp3. It is highly recommended for long-term use as you can convert your music videos or sound effects into mp3 for free. Here is a guide on how to use Converto.
Step 1: Go to Converto, copy and paste the URL for the song or video you want to convert to mp3, then click on the download button. Converto will immediately start searching for the video.
Step 2: Hit the convert button. Before then, make sure you select mp3 on the drop-down. Note the speed of converting your video to mp3 depends on your internet speed and the size of your file.
Step 3: A notification appears on your screen ‘click here’ once your mp3 file download is ready. You can then click the highlighted section and download your audio on your desktop.
● Use of MP3 Download:
Mp3 download is an easy and swift way to use mp3 downloads from YouTube videos. Here is a guide on using mp3 download to convert your YouTube videos to mp3 for free.
Step 1: Go to mp3 download to paste the URL of the video/music you wish to convert to mp3 and search.
Step 2: The site then gives you an option of converting your audio into different formats, including FLAC or WAV. Here, navigate to the audio tab, choose the design you want to save, and click the download button.
Step 3: A pop-up then appears when your file is ready for download, and if you want to save it on your system, you click ‘download now.’
● Use of 320 YouTube:
This converter converts optimal YouTube videos into high-quality audio and is also very easy to use; we use it in two ways for free.
● Directly via YouTube in the following steps
Step 1: Type 320 into the URL you want to download before “youtube.com/watch?v….”
Step 2: The URL will then direct you to the 320 converter page, where you click download mp3 to download your audio file.
● Via the 320 YouTube converter site
Step 1: Go to the YouTube 320 website, then paste the URL of the song or the video you want to convert into the box. Then press the convert button.
Step 1: It will then display the video you want to download; then, on your left-hand side, you can click on the ‘download mp3’ button to convert your video to mp3 audio.
● Use of YTmp3:
This web tool can convert up to 90 min video into an mp3 for free. It is also straightforward to use. Here is a guide on how to use it;
Step 1: Go to YTmp3, and on the blue bar, select the mp3 option. Then paste the URL video you want to convert into the white box, and click the convert button.
Step 2: Then download your mp3 file by clicking the ‘download’ button.
● Use of YouTube to MP3 Converter:
YouTube to mp3 converter is a quick way to download all your YouTube sound mp3 effects conveniently for free. Here is a guide on how to use it:
Step 1: Go to the Youtube mp3 converter, paste the URL of the video you want to download on the search bar and hit ‘Go.’
Step 2: After displaying the video, you want to convert, you can click on the drop-down to select the selection format, either mp3 or mp4, and hit the convert button once done.
Step 3: After the convert is complete, hit the download button to save your mp3.
2. Make Bird Sound Effect by Yourself
You can make sound effects at your home with everyday objects to add to your film videos through a process called Foley. Here is a guide on how you can do it.
Start down the recording process; we break it into two categories: room acoustics and microphone selection.
● Room Acoustics:
Room acoustics are vital to capturing good recordings. You need a generally larger room to make room acoustics compared to an average size room for better results. Here we emphasize that your sound should have appropriate height, width, and depth. These attributes make the difference in recording high-quality and low-quality sound effects.
The quality of your recordings using acoustics should not be much of a bother, though, because various easy-to-use software eliminates the excess noise in your recordings and make the quality of your recording as good as you would want. This software includes; intrusions prevalence, sixty-cycle hum, and more.
● Microphone Selection:
Microphone selection is a crucial component in making sound effects during recording. You use sensitive mics for interior scenes to capture subtle nuances make good audio. Here we preferably recommend hyper-cardioid condenser mics.
Consider also placement and closeness of the microphone as they significantly affect the sound effect recorded concerning the sound source. For close-up shots, use closer microphone placement, but if you desire more room sound, put distance between the mic and the sound source.
You can also use the standard mic technique to directly capture a bird sound effect by picking it on a mick. Most of those tones will work fine, but post-production manipulation can create excellent cinematic quality.
3. Use Free SFX
Free SFX is a website designed to give something to everybody. It has no complexity in use and has millions of sound effects to choose from. You need to click on the download button, and you can try as many as you want.
4. Use 99Sounds
99sounds is a site that allows you to download the most modern sound effects easily. They are divided into categories to make finding the right sound reasonably simple. They also give you a wide range to choose from; click “Download.”
Part 2 Use Filmora to Add Sound/MP3 Effect in Your Video
Filmora is a video editing software with an excellent built-in audio library. It enables you to add music to videos inform of mp3, mp4, WMA, and more. This software allows you to remove any existing background music as well. Its intuitive feature makes video editing feel like a walk in the park with its simplicity in usage. Filmora transforms your ordinal videos into an extraordinary piece of art with its support for a wide variety of audios and videos formats. As a beginner in the video editing field or even an expert, you can never go wrong with Filmora as your number one choice.
Features:
- It widely supports different formats.
- Powerful video editing features and intuitive user interface.
- Transfer to a popular device option, upload to YouTube, or burn to DVD.
- A choice of 300+ stunning effects for different niches.
- Royalty-free music, Modern and easy to use.
Step by Step Guide for How to Add Sound/MP3 to Video with Filmora:
Step 1 Go to the Filmora official website, install wonder share Filmora, and lunch it
Once it’s launched, you will find a tab just below the menu bar, tap media, and click import. After this, there will be a drop-down where you can click on import media files and choose the video file. Repeat the process to pick the desired background music. You can also use build-in music tracks to add music to your video by selecting the Music tab.
Step 2 Now, you can navigate the video you imported to Filmora, then tap on the sign ‘+’on it alternatively, you can drag down the media file to the timeline
Step 3 Now, edit your music by double-tapping the audio from the timeline. It will display the audio panel at the top of the screen
You can use it to set the desired equalizer to manage pitch volume and speed. You can also use the forum to fade in or fade out.
Step4 Finally, you can now export the video that has made the desired changes by clicking ‘export’ on the toolbar to export the video
You can now save the exported in the desired format and remember to rename it directly.
Wondershare Filmora
Get started easily with Filmora’s powerful performance, intuitive interface, and countless effects!
Try It Free Try It Free Try It Free Learn More >
AI Portrait – The best feature of Wondershare Filmora for gameplay editing
The AI Portrait is a new add-on in Wondershare Filmora. It can easily remove video backgrounds without using a green screen or chroma key, allowing you to add borders, glitch effects, pixelated, noise, or segmentation video effects.
Conclusion
Having learned how and where to download bird sound effects and the ease of doing it, your videos can never be the same. You will always have an easy way of adding professional bird sound effects by; adding tweeting bird effects, angry bird sound effects, forest birds chirping nature sounds, or whatever you choose. Make your viewers remain emotionally connected to your videos. Now you have discovered how easy it is to add music to your videos using Filmora; you will long forget your old boring style of sharing nonmusical videos. With the guide above, whether you are a beginner or an expert in using Filmora, you will find the ease of using it and its incredible features.
Also read:
- 2024 Approved Refined Audio Enhancers for Online Video and Podcasting Endeavors
- Mastering Multi-Track Audio A Pathway to a Unified Soundtrack File
- Updated The Ultimate List of Internet Locales That Promote In-Person Friendships
- Updated Locate Audiovisual Tap Noise Representation
- New 2024 Approved The Complete Blueprint Incorporating Audio in KineMaster
- Updated Voice Capture Made Easy The Ultimate Mac Users Guide for High-Quality Recordings
- New 2024 Approved Overcoming the Challenge of Acoustic Reflections in Sound Engineering
- Updated Finding Your Perfect Tone Strategies for Personalized Vocal Change
- New Expert Tips on Leveraging Morphvox in Games – The Comprehensive Guide to Voice Modification
- 2024 Approved Elevate Your Mobile Music Production with the Top 5 Best Audio Editing Tools for Android
- New In 2024, Find Glass Breaking Sound Effect
- Updated 2024 Approved Efficient Techniques for Instant Silence Eliminating Static Sound in Minutes
- Updated Essential Sound Editing Apps for Mobile IPhone & iPad Edition, 2023 Edition for 2024
- New Master Mixing Suite - Your Perfect Mac MP3 Harmony Tool for 2024
- New 2024 Approved Lamentations and Lullabies Best Sad Music Choices for a Touching Experience
- In 2024, Singing Perfection Pro The Ultimate AI-Powered Audio Alteration Suite
- Updated Seamless Sound Sync A Step-by-Step Guide to Premiere Pro Audio Management for 2024
- New Seek Out Artistic Strokes Audio Illusion for 2024
- New The Audio Editors Handbook Reducing Ambient Noise in iMovie Projects
- New Unveiling an Assortment of Authentic Dog Noise Recordings
- In 2024, Navigating Vocaroos Sound Recording Procedures Insights and Options
- 2024 Approved Comprehensive Guide to Vocaroo Audio Capture Practices and Substitutes
- Paths to Pure Sound Advanced Tactics for Eradicating Noise, Online & Offline for 2024
- In 2024, Master Your Sound on Mac The Top 5 Audio Mixer Selections
- Updated 2024 Approved Step-by-Step Silencing Audio in iPhone Videos
- Updated In 2024, Utilizing the Clownfish Vocal Alteration Feature in Online Gaming Platforms and Video Conferencing Apps
- New Best Digital Methods for Silencing Unwanted Sound in Recorded Music for 2024
- 2024 Approved The Comprehensive Tutorial on Detaching Audible Elements From Video Clips
- The Essential Summary 5 Superior, Cost-Free Audio Volume Correctors for 2024
- The Art of Gamers Vocal Disguise Selecting the Ultimate Toolkit for 2024
- Updated In 2024, Elevate Your IGTV Storytelling With Musical Elements
- New 2024 Approved A Comprehensive Look at Googles Integrated Podcast Solutions
- Updated Streamline Your Audio Archives with These Top 10 Free MP3 Transcription Apps – Integrated with SoundForge CC
- New 2024 Approved The Future of Clear Communication Integrating AI to Combat Noise
- Fix App Not Available in Your Country Play Store Problem on Infinix Note 30 VIP Racing Edition | Dr.fone
- How Can I Unlock My iPhone 11 After Forgetting my PIN Code? | Dr.fone
- Mastering Lock Screen Settings How to Enable and Disable on Samsung Galaxy M34
- In 2024, Which Pokémon can Evolve with a Moon Stone For Xiaomi Redmi A2+? | Dr.fone
- Edit and Send Fake Location on Telegram For your Lava Yuva 2 in 3 Ways | Dr.fone
- In 2024, What Does Enter PUK Code Mean And Why Did The Sim Get PUK Blocked On Vivo V30 Pro Device
- How to share/fake gps on Uber for Apple iPhone 11 Pro Max | Dr.fone
- New Free Filmora 13 Editor Download For Windows and Mac
- Forgot Apple iPhone 13 Pro Backup Password? Heres What to Do | Dr.fone
- The Art of Chroma Keying in FCP X Expert Techniques for Stunning Results
- How to Track WhatsApp Messages on Lava Yuva 2 Without Them Knowing? | Dr.fone
- The Best 8 VPN Hardware Devices Reviewed On OnePlus Nord 3 5G | Dr.fone
- In 2024, Life360 Circle Everything You Need to Know On Motorola Edge 40 Neo | Dr.fone
- How to Share/Fake Location on WhatsApp for OnePlus Nord CE 3 Lite 5G | Dr.fone
- How to Fix the Soft Bricked Nokia G310? | Dr.fone
- Complete guide for recovering video files on Realme
- Title: New In 2024, Best 13 No-Cost Digital Audio Recording Apps Available on Windows & macOS
- Author: Jacob
- Created at : 2024-05-05 03:47:46
- Updated at : 2024-05-06 03:47:46
- Link: https://audio-shaping.techidaily.com/new-in-2024-best-13-no-cost-digital-audio-recording-apps-available-on-windows-and-macos/
- License: This work is licensed under CC BY-NC-SA 4.0.
