
:max_bytes(150000):strip_icc():format(webp)/GettyImages-758317893-3ab5c26f770448db8b4a58205fb549f1.jpg)
New 2024 Approved Enhancing Your Soundscapes Dynamic Volume Changes Made Simple with Adobe After Effects
Enhancing Your Soundscapes: Dynamic Volume Changes Made Simple with Adobe After Effects
How to Fade In and Fade Out Audio in Adobe After Effects

Benjamin Arango
Mar 27, 2024• Proven solutions
Many of us get the first association when Adobe After Effects is mentioned: stunning motion graphics and breathtaking visual effects. Very few people think of audio editing when they talk about AE, even though this application offers a simple way to add Fade in and fade out effects to audio files used in soundtracks.
However, you will need to have at least basic video and sound editing skills to fade in and fade out audio files in AE since the app doesn’t offer a preset that you can drag and drop to the timeline. So, in this article, we will show how to create the Fade in and fade out effects in Adobe After Effects in just a few simple steps.
Read More to Get: Best Audio Mixer Software to Trim Your Sound Easily >>
Adding the Fade In and Fade Out Effects to Audio Files in AE
Step 1: Check audio waveform in After Effects
Once you’ve created a new project in AE and you’ve imported the audio files you’d like to include in the soundtrack of the video you’re making, you should place that audio file on the timeline. Click on the arrow located next to the audio file, then click on the Audio arrow that will be displayed under the file, and finally click on the Waveform arrow. This will enable you to see the waveform of the audio file you’d like to edit on the timeline and allow you to add Fade in and fade out effects with more precision. The file you added to your composition will be displayed as a layer in the Composition tab located in the lower-left region of the software’s interface.

Step 2: Add a keyframe to the audio file
The next thing you will have to do is place the playhead at the exact location where you want the Fade In effect to start. In most cases, Fade effects are added at the starting point of the audio file, so you should position the playhead at the beginning of the timeline or zero seconds. You will be able to see a stopwatch next to the Audio Levels option located in the Composition tab. Click on it to add the first keyframe and assign a negative value to the Audio Level setting. -100db or -50db values will make the audio file silent, and you can pick either based on how long you want the Fade in effect to last. If you don’t know how to use keyframes in After Effects, this article will give you some info .

You may also like: 15 Free After Effects Templates to Power up Your Video
Step 3: Complete Fade out/in audio in After Effects
Move the playhead to the location where you want the effect to end and add another keyframe by clicking on the ‘Add or remove keyframe at current time’ icon. Set the Audio Level value to 0db, and that is it. You’ve created the Fade in effect. Keep in mind that you can use more than two keyframes to fade in audio, enabling you to increase the audio level gradually. The process of creating the Fade effect requires you to add a keyframe that has a 0db value a few seconds before the clip ends and then add another keyframe at the very end of the audio file that has -50 or -100db audio level value.

Tips For Making Better Fade In and Fade Out Effects
The process of creating a fade in or a fade out effect in AE is quite simple, but it is up to you to discover creative ways of using these effects. Here are a few tips that can help you use these audio effects more creatively.
1. Avoid Hard Cuts
A high pitch sound at the very begging of a new sequence can ruin your soundtrack and ultimately the entire video, so in case you’ve cut an audio file at the location where the sound peaks, you can apply a fade in effect to make the transition between two audio files softer.
You may also like: How to Cut Video in After Effects
2. Be Mindful of Audio Compression
Audio compression is a process that reduces loud sounds and amplifies quiet sounds, resulting from the audio file’s dynamic range being compressed. In most cases, you won’t notice the effects of audio compression, but if you compress an audio file too much, you might get some unwanted side effects if you add a fade out effect to that file. That’s why it is best to rely on the default audio compression features a video or audio editing app offers.
3. Use the Fade In and Fade Out Effects Creatively
Besides opening and closing scenes, you can also use the Fade in and fade out effects to mix two different tracks while the shot is still in progress. Fade out one track, make it look like a scene is ending, and then introduce a new theme that changes the mood of that scene. The important thing is to avoid reducing the audio level all the way to -100db because you might end up creating silence in a scene that disrupts the flow of an entire video.
Conclusion
Fading in or fading out audio files in Adobe After Effects doesn’t require much effort, as you have to add a few keyframes to the file and adjust the Audio Level value. However, finding the best way to improve the quality of your soundtrack by applying these effects may take some practice. Do you often add Fade in and fade out audio effects in AE? Leave a comment below and share your experiences with us.
If you want to fade in/out audio easily, we recommend using Filmora . It is designed for people who wish to edit professional videos with simple-to-use features. Besides Fade in/out audio in Filmora, you can automatically sync audio to video. Download it now to have a try (free)!
Benjamin Arango
Benjamin Arango is a writer and a lover of all things video.
Follow @Benjamin Arango
Benjamin Arango
Mar 27, 2024• Proven solutions
Many of us get the first association when Adobe After Effects is mentioned: stunning motion graphics and breathtaking visual effects. Very few people think of audio editing when they talk about AE, even though this application offers a simple way to add Fade in and fade out effects to audio files used in soundtracks.
However, you will need to have at least basic video and sound editing skills to fade in and fade out audio files in AE since the app doesn’t offer a preset that you can drag and drop to the timeline. So, in this article, we will show how to create the Fade in and fade out effects in Adobe After Effects in just a few simple steps.
Read More to Get: Best Audio Mixer Software to Trim Your Sound Easily >>
Adding the Fade In and Fade Out Effects to Audio Files in AE
Step 1: Check audio waveform in After Effects
Once you’ve created a new project in AE and you’ve imported the audio files you’d like to include in the soundtrack of the video you’re making, you should place that audio file on the timeline. Click on the arrow located next to the audio file, then click on the Audio arrow that will be displayed under the file, and finally click on the Waveform arrow. This will enable you to see the waveform of the audio file you’d like to edit on the timeline and allow you to add Fade in and fade out effects with more precision. The file you added to your composition will be displayed as a layer in the Composition tab located in the lower-left region of the software’s interface.
Step 2: Add a keyframe to the audio file
The next thing you will have to do is place the playhead at the exact location where you want the Fade In effect to start. In most cases, Fade effects are added at the starting point of the audio file, so you should position the playhead at the beginning of the timeline or zero seconds. You will be able to see a stopwatch next to the Audio Levels option located in the Composition tab. Click on it to add the first keyframe and assign a negative value to the Audio Level setting. -100db or -50db values will make the audio file silent, and you can pick either based on how long you want the Fade in effect to last. If you don’t know how to use keyframes in After Effects, this article will give you some info .
You may also like: 15 Free After Effects Templates to Power up Your Video
Step 3: Complete Fade out/in audio in After Effects
Move the playhead to the location where you want the effect to end and add another keyframe by clicking on the ‘Add or remove keyframe at current time’ icon. Set the Audio Level value to 0db, and that is it. You’ve created the Fade in effect. Keep in mind that you can use more than two keyframes to fade in audio, enabling you to increase the audio level gradually. The process of creating the Fade effect requires you to add a keyframe that has a 0db value a few seconds before the clip ends and then add another keyframe at the very end of the audio file that has -50 or -100db audio level value.
Tips For Making Better Fade In and Fade Out Effects
The process of creating a fade in or a fade out effect in AE is quite simple, but it is up to you to discover creative ways of using these effects. Here are a few tips that can help you use these audio effects more creatively.
1. Avoid Hard Cuts
A high pitch sound at the very begging of a new sequence can ruin your soundtrack and ultimately the entire video, so in case you’ve cut an audio file at the location where the sound peaks, you can apply a fade in effect to make the transition between two audio files softer.
You may also like: How to Cut Video in After Effects
2. Be Mindful of Audio Compression
Audio compression is a process that reduces loud sounds and amplifies quiet sounds, resulting from the audio file’s dynamic range being compressed. In most cases, you won’t notice the effects of audio compression, but if you compress an audio file too much, you might get some unwanted side effects if you add a fade out effect to that file. That’s why it is best to rely on the default audio compression features a video or audio editing app offers.
3. Use the Fade In and Fade Out Effects Creatively
Besides opening and closing scenes, you can also use the Fade in and fade out effects to mix two different tracks while the shot is still in progress. Fade out one track, make it look like a scene is ending, and then introduce a new theme that changes the mood of that scene. The important thing is to avoid reducing the audio level all the way to -100db because you might end up creating silence in a scene that disrupts the flow of an entire video.
Conclusion
Fading in or fading out audio files in Adobe After Effects doesn’t require much effort, as you have to add a few keyframes to the file and adjust the Audio Level value. However, finding the best way to improve the quality of your soundtrack by applying these effects may take some practice. Do you often add Fade in and fade out audio effects in AE? Leave a comment below and share your experiences with us.
If you want to fade in/out audio easily, we recommend using Filmora . It is designed for people who wish to edit professional videos with simple-to-use features. Besides Fade in/out audio in Filmora, you can automatically sync audio to video. Download it now to have a try (free)!
Benjamin Arango
Benjamin Arango is a writer and a lover of all things video.
Follow @Benjamin Arango
Best Nature Sounds Apps for iOS and Android
Best Nature Sounds Apps for iOS and Android
Benjamin Arango
Apr 26, 2024• Proven solutions
In today’s challenging times, when stress and anxiety has become inevitable for a majority of population, there is a constant search for solutions that will enable people to live a peaceful and pleasant life. Here, the technology comes to their rescue with nature sound effects app.
These applications provide multiple sounds related to the Nature. The users just need to download any of these programs, and select the desired tone according to their choice. Such mobile software also offer numerous relaxing audios that assist in achieving a deeper level of concentration during the meditation.
10 Best Nature Sounds Apps
1. YouTube
YouTube is also one of the important apps for nature sounds where one can get almost any kind of relaxing sounds related to the Nature.
Binaural beats videos, where two different frequencies of sounds are combined to create a new frequency tone are getting highly popular among people. These are believed to help in lowering stress, anxiety and depression and increase concentration, attention, and efficiency of an individual.
It can also be helpful in attaining mental peace and serenity. The app even contains peaceful meditation sounds that ease the ability to focus and remain relaxed during the whole process. It is highly a user-friendly app and is absolutely free to download on the Android Smartphones.
2. Atmosphere: Relaxing Sounds
Compatible with Android 5.0 or up , and iOS 10.0 or later

Atmosphere is one of the best apps for nature sounds. It is custom-made to help people relieve stress and relax their mind.
The key feature of this application is that it allows users to import their personalized audios and mix them with various default acoustics available within the app itself.
The soothing sounds available here are divided into 8 different environments such as Beach, City, Park, Countryside, Home, Underwater, Forest and Oriental. Users can also mix and match the sounds between environments to produce a tailored theme.
3. Rainy Mood
Compatible with both iOS and Android OS 5.0 and up

Rainy Mood provides the most genuine rain, thunderstorm, and lightening sounds available online.
It not only relieves tension and anxiety but also helps users suffering from insomnia.
This app even contains natural white noise facility that helps in getting rid of any unwanted sounds around us.
The various rain sounds are available here in different environments such as heavy rain, tropical rain, umbrella, rain on tent, rain on porch etc. The best thing about this app is that it can work in offline mode, i.e. without any Internet connection. This eventually results in less power consumption.
4. Animal Sounds
Compatible with Android 4.1 and up
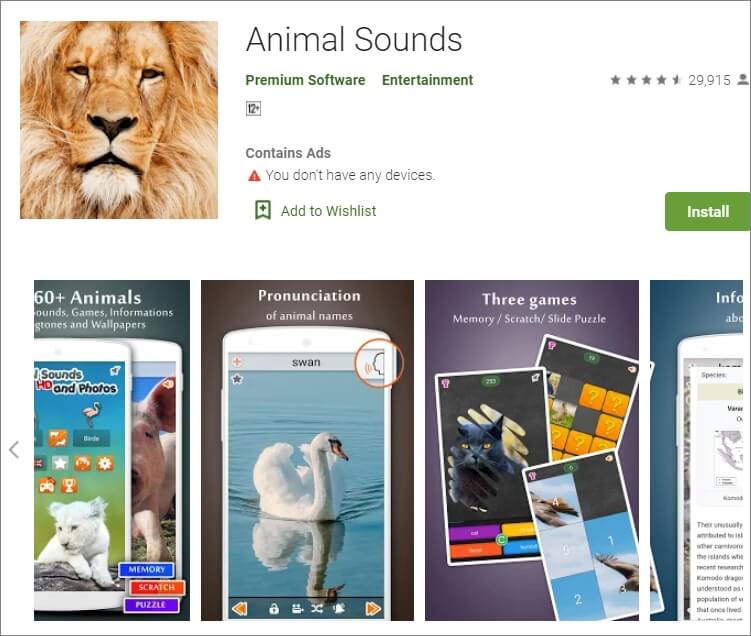
Animal Sounds is a one-stop destination for all animal lovers. The program provides the most detailed information about animals, and also contains hundreds of animal sounds and photographs from all over the globe.
The quality of audios and pictures is remarkably high and clear. The sounds here are categorized under pet animals, mammals, farm animals, bird sounds, wild animals, reptiles and amphibians.
The application also provides the facility of customized ringtones and wallpapers to its users.
5. Sleep Sounds
Compatible with Android 4.4 or later
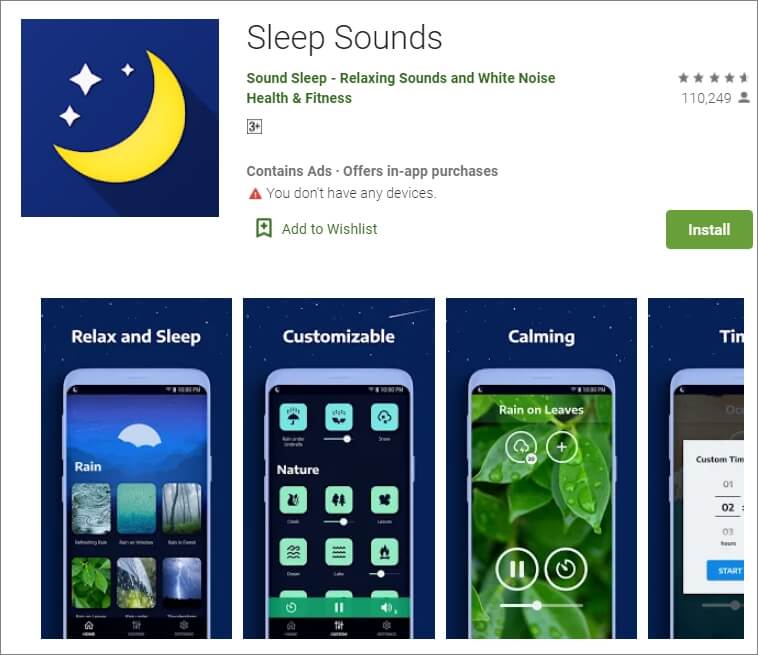
Sleep Sounds is one of the top trending apps nowadays owing to the increasing problems of insomnia and irregular sleep patterns among people. It is very helpful for an uninterrupted quality sleep.
The calm and soft music gradually tranquilizes the mind and the user eases into a good sleep. Its interface is user-friendly with beautiful images in the background.
The sounds here are categorized under rain, nature, relax, transport, noise, and white noise classes. This app also works without an Internet connection.
6.Calm
Compatible with Android and iOS 10.0 and watchOS 6.0 or later
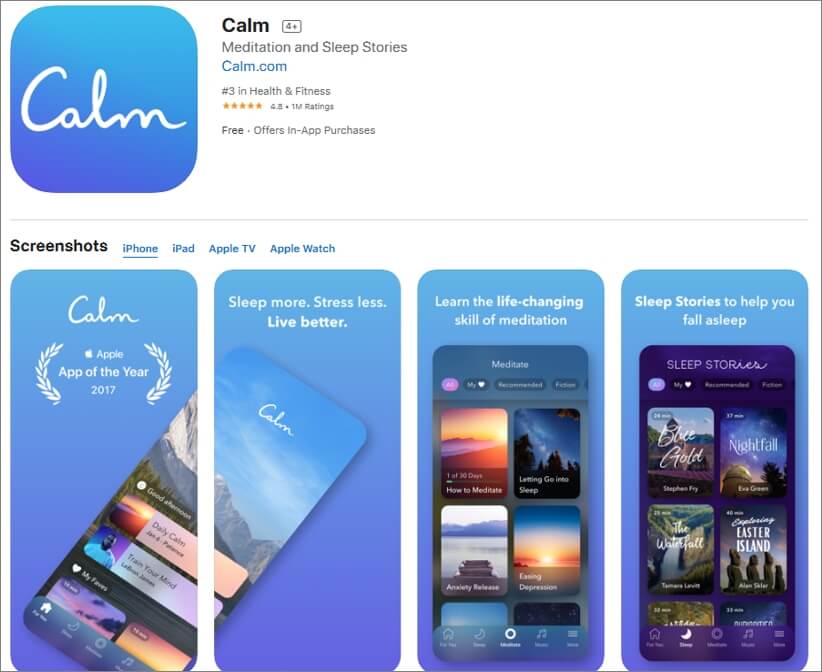
Calm is best suitable for the people who practice meditation on a daily basis. It is available for free and can be used by the beginners as well as experienced users.
The main features include guided meditation programs, breathing sessions, adult bed-time stories, masterclasses by the international coaches, etc.
Here, one can choose a personalized guide for meditation from several topics such as relationships, self-esteem, breaking habits, forgiveness, mindfulness, etc. Users can even track their daily progress on the basis of time spent by them on the app.
7. Ambience – Nature sounds: sleep and meditation
Compatible with Android 4.2 and up .
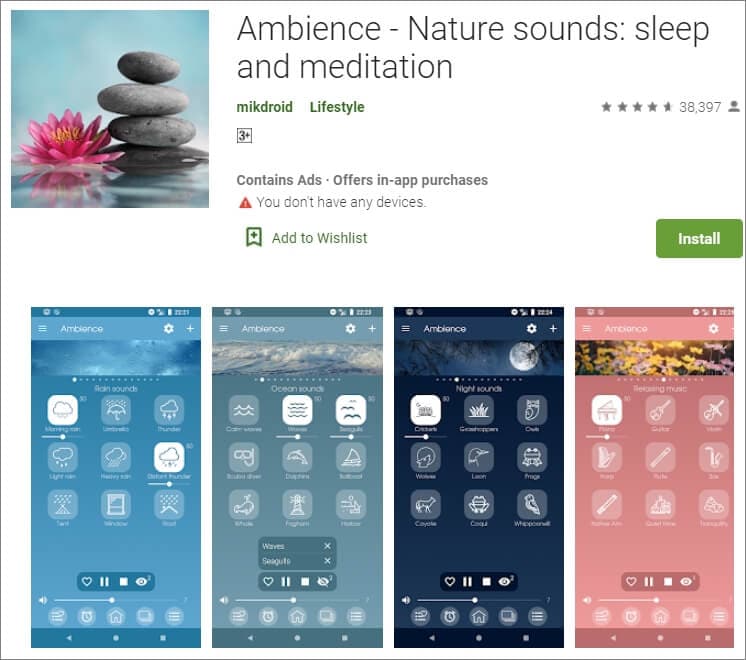
Ambience is another one of the most popular apps for nature sounds providing peace and serenity to its users through relaxing and soothing tones.
It has a very simple and clean user interface which makes it a highly demanding program. The main features include the facility of mixing maximum 10 sounds at the same time. Along with various preset mixtures of audios that are available here, users can also save their customized combinations for future use.
8. Naturespace: Sleep Relax Focus
Compatible with Android 4.0 or up and iOS 9.0 or later
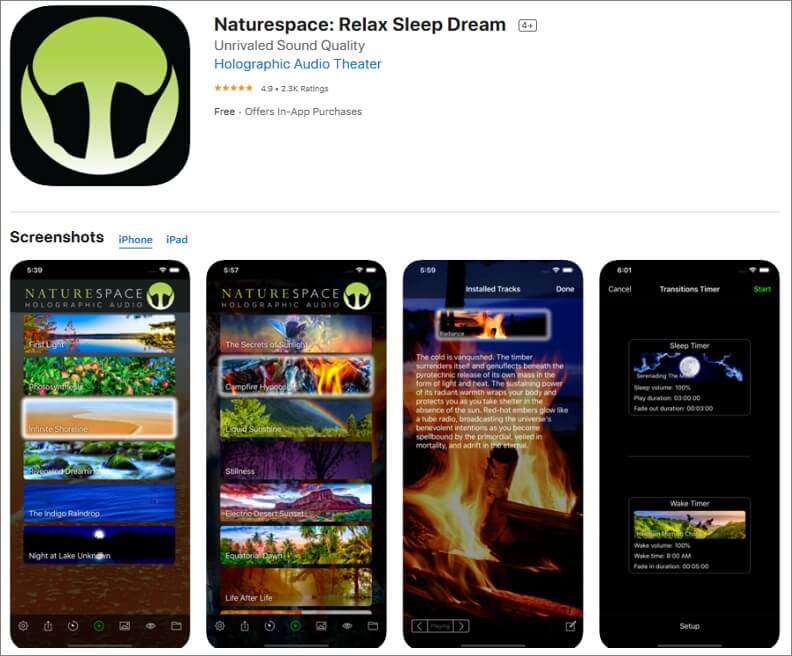
Naturespace is a unique app containing real time 3D recordings of natural places such as forests, deserts, mountains, etc. The equipment used in the program for recording the sounds are of extremely high quality, and as a result, the listening experience is out of this world.
The clarity of the sound surpasses almost every other application available in this genre of nature sound apps. It also provides the facility of sleep and wake timer to its users. The simple user interface along with earbud optimisation facility makes the software highly efficient and popular among people.
9. SimplyNoise – Free White Noise
Compatible with iOS 8.0 or later and Android
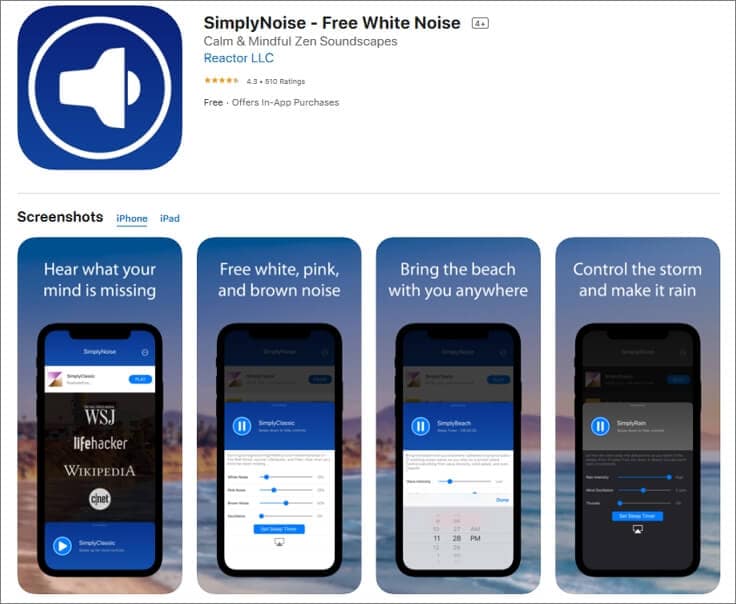
Simply Noise is one of the most basic apps for nature sounds as it provides only one acoustic without any background noises. As there are no such complexities involved, it can also be used by people who are not tech-savvy.
The categorization of sounds is done here as white noise, pink noise, and brown noise. Users can select any of these according to their requirement.
This app is best suitable for people who are unable to concentrate on a particular thing, or suffer from sleeping disorder. Sleep-timer option is also available here.
10. aSleep
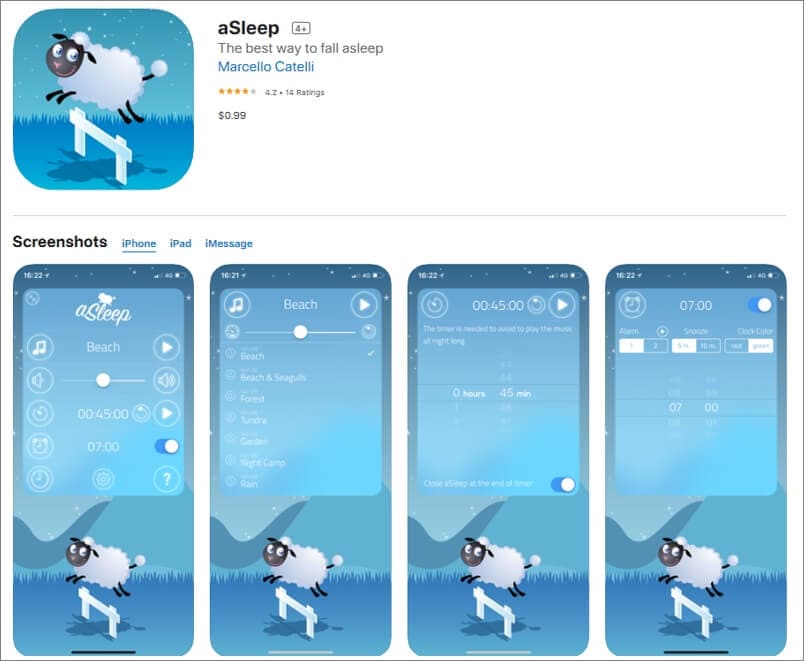
Available for iOS devices like iPhone and iPad, aSleep offers around 64 realistic stereo nature sounds to help you relax your mind and fall asleep almost instantaneously. With the built-in Timer feature, the music can be programmed to stop automatically after a certain amount of time to save your device’s battery.
Furthermore, the also works as an alarm clock that wakes you up with nature sounds at your predefined hour. The application is also good for kids as it can be used to play lullabies to help them get a tight sleep at night. And the program does all this without collecting any data from your iDevice.
What Is the Best Rain Sound App?
Among various rain sound applications available online, Rainy Mood is the most popular one that enjoys high star rating. When it comes to rain sounds, there is no match to it. It mainly includes 4 rain scenes namely Classic, Ocean, Countryside and Cafe. These genres can be customized according to different tastes and preferences.
What Are the Different Sounds of Nature?
The nature is made up of 5 basic elements which include Air, Water, Fire, Earth and Space. These components constitute various natural acoustics. Some examples are music of the rain, thunderstorm or a waterfall, wind blows, sounds of leaves and water streams, chirping of birds or grasshoppers, stridulation of insects like crickets, etc. All these sounds are beautifully incorporated in nature sound effects app.
In case that you want to add some nature sound to your video clip, you can try Wondershare Filmora, which features an audio library containing different nature sound effects as well. Download the free trial version of Filmora and have a try.


Besides adding sound to video, you can also add some elemental 2D visual effects to videos to make it cooler.
Benjamin Arango
Benjamin Arango is a writer and a lover of all things video.
Follow @Benjamin Arango
Benjamin Arango
Apr 26, 2024• Proven solutions
In today’s challenging times, when stress and anxiety has become inevitable for a majority of population, there is a constant search for solutions that will enable people to live a peaceful and pleasant life. Here, the technology comes to their rescue with nature sound effects app.
These applications provide multiple sounds related to the Nature. The users just need to download any of these programs, and select the desired tone according to their choice. Such mobile software also offer numerous relaxing audios that assist in achieving a deeper level of concentration during the meditation.
10 Best Nature Sounds Apps
1. YouTube
YouTube is also one of the important apps for nature sounds where one can get almost any kind of relaxing sounds related to the Nature.
Binaural beats videos, where two different frequencies of sounds are combined to create a new frequency tone are getting highly popular among people. These are believed to help in lowering stress, anxiety and depression and increase concentration, attention, and efficiency of an individual.
It can also be helpful in attaining mental peace and serenity. The app even contains peaceful meditation sounds that ease the ability to focus and remain relaxed during the whole process. It is highly a user-friendly app and is absolutely free to download on the Android Smartphones.
2. Atmosphere: Relaxing Sounds
Compatible with Android 5.0 or up , and iOS 10.0 or later
Atmosphere is one of the best apps for nature sounds. It is custom-made to help people relieve stress and relax their mind.
The key feature of this application is that it allows users to import their personalized audios and mix them with various default acoustics available within the app itself.
The soothing sounds available here are divided into 8 different environments such as Beach, City, Park, Countryside, Home, Underwater, Forest and Oriental. Users can also mix and match the sounds between environments to produce a tailored theme.
3. Rainy Mood
Compatible with both iOS and Android OS 5.0 and up
Rainy Mood provides the most genuine rain, thunderstorm, and lightening sounds available online.
It not only relieves tension and anxiety but also helps users suffering from insomnia.
This app even contains natural white noise facility that helps in getting rid of any unwanted sounds around us.
The various rain sounds are available here in different environments such as heavy rain, tropical rain, umbrella, rain on tent, rain on porch etc. The best thing about this app is that it can work in offline mode, i.e. without any Internet connection. This eventually results in less power consumption.
4. Animal Sounds
Compatible with Android 4.1 and up
Animal Sounds is a one-stop destination for all animal lovers. The program provides the most detailed information about animals, and also contains hundreds of animal sounds and photographs from all over the globe.
The quality of audios and pictures is remarkably high and clear. The sounds here are categorized under pet animals, mammals, farm animals, bird sounds, wild animals, reptiles and amphibians.
The application also provides the facility of customized ringtones and wallpapers to its users.
5. Sleep Sounds
Compatible with Android 4.4 or later
Sleep Sounds is one of the top trending apps nowadays owing to the increasing problems of insomnia and irregular sleep patterns among people. It is very helpful for an uninterrupted quality sleep.
The calm and soft music gradually tranquilizes the mind and the user eases into a good sleep. Its interface is user-friendly with beautiful images in the background.
The sounds here are categorized under rain, nature, relax, transport, noise, and white noise classes. This app also works without an Internet connection.
6.Calm
Compatible with Android and iOS 10.0 and watchOS 6.0 or later
Calm is best suitable for the people who practice meditation on a daily basis. It is available for free and can be used by the beginners as well as experienced users.
The main features include guided meditation programs, breathing sessions, adult bed-time stories, masterclasses by the international coaches, etc.
Here, one can choose a personalized guide for meditation from several topics such as relationships, self-esteem, breaking habits, forgiveness, mindfulness, etc. Users can even track their daily progress on the basis of time spent by them on the app.
7. Ambience – Nature sounds: sleep and meditation
Compatible with Android 4.2 and up .
Ambience is another one of the most popular apps for nature sounds providing peace and serenity to its users through relaxing and soothing tones.
It has a very simple and clean user interface which makes it a highly demanding program. The main features include the facility of mixing maximum 10 sounds at the same time. Along with various preset mixtures of audios that are available here, users can also save their customized combinations for future use.
8. Naturespace: Sleep Relax Focus
Compatible with Android 4.0 or up and iOS 9.0 or later
Naturespace is a unique app containing real time 3D recordings of natural places such as forests, deserts, mountains, etc. The equipment used in the program for recording the sounds are of extremely high quality, and as a result, the listening experience is out of this world.
The clarity of the sound surpasses almost every other application available in this genre of nature sound apps. It also provides the facility of sleep and wake timer to its users. The simple user interface along with earbud optimisation facility makes the software highly efficient and popular among people.
9. SimplyNoise – Free White Noise
Compatible with iOS 8.0 or later and Android
Simply Noise is one of the most basic apps for nature sounds as it provides only one acoustic without any background noises. As there are no such complexities involved, it can also be used by people who are not tech-savvy.
The categorization of sounds is done here as white noise, pink noise, and brown noise. Users can select any of these according to their requirement.
This app is best suitable for people who are unable to concentrate on a particular thing, or suffer from sleeping disorder. Sleep-timer option is also available here.
10. aSleep
Available for iOS devices like iPhone and iPad, aSleep offers around 64 realistic stereo nature sounds to help you relax your mind and fall asleep almost instantaneously. With the built-in Timer feature, the music can be programmed to stop automatically after a certain amount of time to save your device’s battery.
Furthermore, the also works as an alarm clock that wakes you up with nature sounds at your predefined hour. The application is also good for kids as it can be used to play lullabies to help them get a tight sleep at night. And the program does all this without collecting any data from your iDevice.
What Is the Best Rain Sound App?
Among various rain sound applications available online, Rainy Mood is the most popular one that enjoys high star rating. When it comes to rain sounds, there is no match to it. It mainly includes 4 rain scenes namely Classic, Ocean, Countryside and Cafe. These genres can be customized according to different tastes and preferences.
What Are the Different Sounds of Nature?
The nature is made up of 5 basic elements which include Air, Water, Fire, Earth and Space. These components constitute various natural acoustics. Some examples are music of the rain, thunderstorm or a waterfall, wind blows, sounds of leaves and water streams, chirping of birds or grasshoppers, stridulation of insects like crickets, etc. All these sounds are beautifully incorporated in nature sound effects app.
In case that you want to add some nature sound to your video clip, you can try Wondershare Filmora, which features an audio library containing different nature sound effects as well. Download the free trial version of Filmora and have a try.
Besides adding sound to video, you can also add some elemental 2D visual effects to videos to make it cooler.
Benjamin Arango
Benjamin Arango is a writer and a lover of all things video.
Follow @Benjamin Arango
Unveiling the Secrets of Vimeo Videos: Exploring Aspect Ratio Options
Video customization does not come automatically. There is something extraordinary you need to look around. One platform that most people are aware of is YouTube that offers video sharing services. But the world is not so small. There exists a new genre picking up pace with personalized effect. The talk is about Vimeo, the latest trending video streaming site, with a vast viewer base after YouTube.

It is a beautiful platform for those professional videographers, filmmakers, event organizers, graphic designers, or those who want to expand their business and gain a viewer base. While creating videos for the platform, there are some basic requirements such as Vimeo Aspect RatioorVimeo Thumbnail Dimensions. If all these terms look unknown to you, and you are eager to discover more with Vimeo Ratio, you have landed the right place. Here, you will get all the recipe ingredients required to prepare for a professional-looking, customized video through Vimeo.
In this article
04 How big of a File can upload to Vimeo
Part 1: What is Vimeo?
Vimeo is a video streaming and hosting services provider online platform that equips a user with a powerful video customization feature. This feature distinguishes it from other video streaming sites. Vimeo reflects the vision of its founder filmmakers, who furnish advanced video customization features for Audio and Video content. Vimeo renders services from “Freemium” the free users to that of Advance business partners.

Basic features it enabled in itself are:
- Users can customize and promote their videos
- HD audio and video quality
- Freemium account for free usage
- Supports 8K Video resolution
- The pricing plan ranges from $7 to $75
- Specific sites promotion option
- Customized screen end view
- Multiple options such as color, size, or different types of buttons
- For the same URL video replacement option
- Featuring Team collaboration
- Live Streaming
In addition, additional features and services get added up with each account up-gradation.
Part 2: Vimeo Video Requirement
If you are also interested in being a part of Vimeo’s community and geared up to share the video, you must be aware of Vimeo Video requirements and Vimeo dimensions. So that you can upload the video with ease on the site without facing any issue. Let’s look at some of the critical video ratios and other requirements.

- Frame Rate:
Keep the Video Frame Rate constant. Some common frame rates are: 60, 59.94, 50, 30, 29.97, 25, 24, and 23.98. While compressing, keep the frame rate below 60.
- Codecs:
Codecs represent video encoded format. Some of the most recommended codecs are , (), Apple ProRes (HQ) 422
- Color
Most of the color display is acceptable. But the recommended ones are:
- Color Matrix Coefficients/Primaries- [BT.709 (Rec.709), BT.2020, whereas Rec.2020 HLG for Dolby Vision]
- Bit Depth- 10 or more than 10 for better quality.
- Characteristics of Color Transfer- Multiple ranges for SDR. But HLG or PQ (SMPTE 2084) for HDR
- Bit Rate- Video file size, visual quality control by data rate/Bit-rate. Go with Variable Bit Rate. That might range in different parameters, or you can choose from 2 to 50 MBPS. Where for SD (2 to 5), 720P (5 to 10), 1080p (10 to 20), 2k (20 to 30), 4k (30 to 60), 8k (50 to 80).
- Scan Type- Progressive playback is advisable before uploading de-interlace the video.
- Resolution/Aspect Ratio
Though all shapes and sizes are available, the most preferable Vimeo Video Aspect Ratio and Proportions are:
| Format | Aspect Ratio | Resolution |
|---|---|---|
| HD (720P) | 16:9 | 1280X720 |
| HD (1080P) | 16:9 | 1920X1080 |
| SD | 16:9 | 640X360 |
| SD | 4:3 | 640X480 |
| 2K | 16:9 | 2560X1440 |
| UHD (4K) | 16:9 | 3840X2160 |
| UHD (DCI 4K) | 17:9 | 4096X2160 |
| Stereoscopic 360 4K | 2:1 | 4096X2048 |
| Monoscopic 3604K | 2:1 | 4096X2048 |
| UHD 8K | 17:9 | 8192X4320 |
Here, a question that might arise. OK, these are the requirements by Vimeo Video Ratio. But, how to set the Vimeo dimensions? For this purpose, one valuable suggestion is the Wondershare Filmora Video Editing tool.
Wondershare Filmora is a friendly and effective interface if looking to adjust the Vimeo Video size ratio or pre-setting the Vimeo Aspect Ratio to make it as per the norms of Vimeo. Then we can go with the efficient, quick, and easy-to-use way to edit the Vimeo Aspect ratio.
Versatile Video Editor - Wondershare Filmora
An easy yet powerful editor
Numerous effects to choose from
Detailed tutorials provided by the official channel
Steps are simple: land the home page of Wondershare Filmora, upload your video project, and select the desired video Ratiounder project settings.
Part 3: Size Limit of Vimeo File
Are you ready to create an exciting video and about to upload that into your Vimeo account? Then, there is a precious suggestion to you. Wait for a while, as some restrictions come under Vimeo dimensions uploading. And you must be aware of that. Let’s first understand about Size Limit of the Vimeo File. In terms of duration, there is no limit, but for file size following criteria is used:
As per Vimeo, the user can upload a file of any size. For instance, it can upload videos ranging from the most minor 30 seconds to a whopping 3-hour duration epics. The maximum limit is 25GB per video.
Part 4: How big of a File can upload to Vimeo
The following important question comes out, how big a file can you upload to Vimeo? Let’s scrap out this information for you:
- Basic account- 5GB total
- Vimeo Plus- Up to 250 GB in a year
- Vimeo Pro- 1TB in a Year
- Vimeo Business- 5 TB in total
- Vimeo Premium – 7 TB in total
So, by checking the above criteria, it becomes easy for you to create and upload your video as per the mentioned guidelines. So, let you be ready with your sizzling video following Vimeo ratio and size criteria.
Part 5: Vimeo Weekly Upload Limit
Now, it is crucial to understand. What could be the weekly upload limit to your Vimeo account? As accordingly, you will plan for the appropriate tab. Here are the details:
- Free Account- 500 MB/week
- Vimeo Plus Account- 5GB/week
- Vimeo Pro Account- 20GB/week
- Vimeo Business Account- No Weekly Limit
- Vimeo Premium Account- Unlimited Live Streaming
It looks like Vimeo has divided its size criteria into different frames, usage, daily basis, weekly basis, yearly basis, and maximum limit. So, if you, as a potential user, have all this valuable information to grow your business, hobby, or any peculiar interest, it will become a bonanza to your efforts. As exemplary efforts always show the way to success. I hope that till now, all your queries, concerns such as Vimeo Thumbnail dimensions, Vimeo Video Size ratio, duration, size limit gets filled up. So, without delay, rock on in the video world of Vimeo and let the world know your potential right away.
Conclusion:
Vimeo Video Size Ratio and other requirements to upload your video to the Vimeo site are covered here. Indeed, these will be going to be the milestone to start or progress your business with Vimeo. Vimeo is trending nowadays, especially among the users who prefer a customized look to their video and a solution to grow their business with proper after support. So, doing little pre-work in terms of Vimeo Video Dimensions will pave the way to start your journey. In addition, while adjusting Vimeo Aspect Ratio, Wondershare Filmora will act as the right approach with appropriate tools to change the Vimeo Aspect Ratio and other important editing options. All the best!
04 How big of a File can upload to Vimeo
Part 1: What is Vimeo?
Vimeo is a video streaming and hosting services provider online platform that equips a user with a powerful video customization feature. This feature distinguishes it from other video streaming sites. Vimeo reflects the vision of its founder filmmakers, who furnish advanced video customization features for Audio and Video content. Vimeo renders services from “Freemium” the free users to that of Advance business partners.
Basic features it enabled in itself are:
- Users can customize and promote their videos
- HD audio and video quality
- Freemium account for free usage
- Supports 8K Video resolution
- The pricing plan ranges from $7 to $75
- Specific sites promotion option
- Customized screen end view
- Multiple options such as color, size, or different types of buttons
- For the same URL video replacement option
- Featuring Team collaboration
- Live Streaming
In addition, additional features and services get added up with each account up-gradation.
Part 2: Vimeo Video Requirement
If you are also interested in being a part of Vimeo’s community and geared up to share the video, you must be aware of Vimeo Video requirements and Vimeo dimensions. So that you can upload the video with ease on the site without facing any issue. Let’s look at some of the critical video ratios and other requirements.
- Frame Rate:
Keep the Video Frame Rate constant. Some common frame rates are: 60, 59.94, 50, 30, 29.97, 25, 24, and 23.98. While compressing, keep the frame rate below 60.
- Codecs:
Codecs represent video encoded format. Some of the most recommended codecs are , (), Apple ProRes (HQ) 422
- Color
Most of the color display is acceptable. But the recommended ones are:
- Color Matrix Coefficients/Primaries- [BT.709 (Rec.709), BT.2020, whereas Rec.2020 HLG for Dolby Vision]
- Bit Depth- 10 or more than 10 for better quality.
- Characteristics of Color Transfer- Multiple ranges for SDR. But HLG or PQ (SMPTE 2084) for HDR
- Bit Rate- Video file size, visual quality control by data rate/Bit-rate. Go with Variable Bit Rate. That might range in different parameters, or you can choose from 2 to 50 MBPS. Where for SD (2 to 5), 720P (5 to 10), 1080p (10 to 20), 2k (20 to 30), 4k (30 to 60), 8k (50 to 80).
- Scan Type- Progressive playback is advisable before uploading de-interlace the video.
- Resolution/Aspect Ratio
Though all shapes and sizes are available, the most preferable Vimeo Video Aspect Ratio and Proportions are:
| Format | Aspect Ratio | Resolution |
|---|---|---|
| HD (720P) | 16:9 | 1280X720 |
| HD (1080P) | 16:9 | 1920X1080 |
| SD | 16:9 | 640X360 |
| SD | 4:3 | 640X480 |
| 2K | 16:9 | 2560X1440 |
| UHD (4K) | 16:9 | 3840X2160 |
| UHD (DCI 4K) | 17:9 | 4096X2160 |
| Stereoscopic 360 4K | 2:1 | 4096X2048 |
| Monoscopic 3604K | 2:1 | 4096X2048 |
| UHD 8K | 17:9 | 8192X4320 |
Here, a question that might arise. OK, these are the requirements by Vimeo Video Ratio. But, how to set the Vimeo dimensions? For this purpose, one valuable suggestion is the Wondershare Filmora Video Editing tool.
Wondershare Filmora is a friendly and effective interface if looking to adjust the Vimeo Video size ratio or pre-setting the Vimeo Aspect Ratio to make it as per the norms of Vimeo. Then we can go with the efficient, quick, and easy-to-use way to edit the Vimeo Aspect ratio.
Versatile Video Editor - Wondershare Filmora
An easy yet powerful editor
Numerous effects to choose from
Detailed tutorials provided by the official channel
Steps are simple: land the home page of Wondershare Filmora, upload your video project, and select the desired video Ratiounder project settings.
Part 3: Size Limit of Vimeo File
Are you ready to create an exciting video and about to upload that into your Vimeo account? Then, there is a precious suggestion to you. Wait for a while, as some restrictions come under Vimeo dimensions uploading. And you must be aware of that. Let’s first understand about Size Limit of the Vimeo File. In terms of duration, there is no limit, but for file size following criteria is used:
As per Vimeo, the user can upload a file of any size. For instance, it can upload videos ranging from the most minor 30 seconds to a whopping 3-hour duration epics. The maximum limit is 25GB per video.
Part 4: How big of a File can upload to Vimeo
The following important question comes out, how big a file can you upload to Vimeo? Let’s scrap out this information for you:
- Basic account- 5GB total
- Vimeo Plus- Up to 250 GB in a year
- Vimeo Pro- 1TB in a Year
- Vimeo Business- 5 TB in total
- Vimeo Premium – 7 TB in total
So, by checking the above criteria, it becomes easy for you to create and upload your video as per the mentioned guidelines. So, let you be ready with your sizzling video following Vimeo ratio and size criteria.
Part 5: Vimeo Weekly Upload Limit
Now, it is crucial to understand. What could be the weekly upload limit to your Vimeo account? As accordingly, you will plan for the appropriate tab. Here are the details:
- Free Account- 500 MB/week
- Vimeo Plus Account- 5GB/week
- Vimeo Pro Account- 20GB/week
- Vimeo Business Account- No Weekly Limit
- Vimeo Premium Account- Unlimited Live Streaming
It looks like Vimeo has divided its size criteria into different frames, usage, daily basis, weekly basis, yearly basis, and maximum limit. So, if you, as a potential user, have all this valuable information to grow your business, hobby, or any peculiar interest, it will become a bonanza to your efforts. As exemplary efforts always show the way to success. I hope that till now, all your queries, concerns such as Vimeo Thumbnail dimensions, Vimeo Video Size ratio, duration, size limit gets filled up. So, without delay, rock on in the video world of Vimeo and let the world know your potential right away.
Conclusion:
Vimeo Video Size Ratio and other requirements to upload your video to the Vimeo site are covered here. Indeed, these will be going to be the milestone to start or progress your business with Vimeo. Vimeo is trending nowadays, especially among the users who prefer a customized look to their video and a solution to grow their business with proper after support. So, doing little pre-work in terms of Vimeo Video Dimensions will pave the way to start your journey. In addition, while adjusting Vimeo Aspect Ratio, Wondershare Filmora will act as the right approach with appropriate tools to change the Vimeo Aspect Ratio and other important editing options. All the best!
Also read:
- Unleashing Creativity in Mobile Sound Selection How to Design Ringtones for 2024
- New In 2024, Insight Into the Usability of Googles Podcast Listening Tool
- Updated Sonic Clarity Achieved Methods to Remove Noise From Audio Using Cloud-Based Cleaners for 2024
- New Perfecting Audio Levels in Film and Streaming Content for 2024
- New 2024 Approved Harnessing the Power of Tension-Building Melodies in Cinematic Storytelling
- Updated In 2024, Find Funny Sound Effects
- Updated In 2024, Strategies for Silencing Acoustic Reflections A Guide to Clearer Recordings
- Updated In 2024, Advanced Filmmaking Techniques Silencing the Distractions in Your Audio Recordings with Wondershare Filmora
- Proving Ground The Six Finest Voice Alteration Applications on Chromebooks to Test Out - PhotoShopProX
- New 2024 Approved The Ultimate Compilation Best Volume Boosting Software for Windows Users Seeking Immediate Results
- New Eliminating Echoes and Interference AI Strategies for Pristine Sound Quality
- Choreographed Audio Selecting Superior Soundtracks for Montage Masterpieces for 2024
- New In 2024, Innovative Approaches to Infusing Sound Into AVI Files Post-Update
- The Songbird Anthology (MP3 Version) for 2024
- Updated In 2024, Infuse Harmonies Into Motion Picture Sequences Using Media Encrypter
- New Budget Beats for Video Production Finding No-Cost Music
- Updated 2024 Approved The MP4 Soundscape Guide Ten Straightforward Approaches to Accessing Audio
- Updated 2024 Approved 8 Best Cinematic Sound Effects Pack Included
- 2024 Approved Premiere Pro Essentials How to Seamlessly Integrate Sound with Visuals
- 2024 Approved Proficient Strategies for Separating Chants From Imagery
- In 2024, Pure Sound Protocols Methods to Minimize Distractions in Digital Videos
- Updated Winning Windows DAW Choices Ranking the Best Free and Premium Software for 2024
- Updated 2024 Approved Peak Happiness Uprising in Crowds
- Updated 10 Advanced Audio Separation Programs for Video Content
- New Essential Plugin List The Ultimate Selection of Logic Pro X Upgrades
- In 2024, 4 Feasible Ways to Fake Location on Facebook For your Oppo A18 | Dr.fone
- How to Share Location in Messenger On Itel A05s? | Dr.fone
- Updated 2024 Approved Best Photo Video Maker Apps with Song PC, Mobile, Online
- New FCP vs FCE A Side-by-Side Comparison of Video Editing Powerhouses for 2024
- Step-by-Step Tutorial How To Bypass Tecno Camon 30 Pro 5G FRP
- Life360 Learn How Everything Works On Apple iPhone 15 Pro | Dr.fone
- How to Fake GPS on Android without Mock Location For your Poco X6 | Dr.fone
- In 2024, How to Fake GPS on Android without Mock Location For your Oppo K11 5G | Dr.fone
- Remove Google FRP Lock on Vivo Y200
- How To Pause Life360 Location Sharing For Vivo X100 | Dr.fone
- In 2024, A Step-by-Step Guide on Using ADB and Fastboot to Remove FRP Lock on your Samsung Galaxy S23 FE
- Updated In 2024, Top 5 Tips to Freeze-Frame in After Effects
- In 2024, Premiere Pro Essentials Stabilizing Unsteady Video Footage
- Updated 2024 Approved The Best Video Editing Software for Those New to Video Production
- 2024 Approved The Ultimate Guide to Linux Video Editing Top 10 Premiere Alternatives
- Title: New 2024 Approved Enhancing Your Soundscapes Dynamic Volume Changes Made Simple with Adobe After Effects
- Author: Jacob
- Created at : 2024-05-05 03:53:16
- Updated at : 2024-05-06 03:53:16
- Link: https://audio-shaping.techidaily.com/new-2024-approved-enhancing-your-soundscapes-dynamic-volume-changes-made-simple-with-adobe-after-effects/
- License: This work is licensed under CC BY-NC-SA 4.0.
