

New 2024 Approved Advanced Techniques to Purify Recorded Audio From Unwanted Echoes
Advanced Techniques to Purify Recorded Audio From Unwanted Echoes
You just finished recording your content and everything seems fine. But when you start editing, you notice echo in your audio with reverberations. This can be so annoying and you will have to publish your content before you remove echo from audio. There are several ways to do this. Some prefer audition echo removal while others are familiar with audacity remove echo tactics. You may also remove echo in Premiere Pro and achieve quality results. This will remove the echo sound in your audio and help achieve better sound clarity. In this article, we explore how you can remove echo from audio using these three main methods and achieve the best results.
AI Vocal Remover A cross-platform for facilitating your video editing process by offering valuable benefits Free Download Learn More

Part 1. **How to Remove Echo from Audio in Audacity
Echo in your audio can occur for many reasons. You could be recording a podcast in different locations and working from a home studio. This could naturally create echoes in your audio when microphones pick undesired background noise. When you realize such noises post-production, Audacity may be your solution. Audacity reduces echo and other background sounds with high accuracy. Here are the steps you will need to follow:
Step 1: Start Audacity and Import Audio Files
Visit the Audacity website and download the software if you haven’t already. Do the simple installation process and open the Audacity software on your desktop. Import the audio files that you want to edit by going to File, and then opening or dragging and dropping the files into Audacity.

Step 2: Select Sound Track
Select the track you need to edit by clicking Select on the left side menu. Then choose the file that you want or press CMD+A on Mac or CTRL+A on Windows.

Step 3: Get a Noise Profile
Under the Effect dropdown menu, click Noise Reduction then select Get Noise Profile. This will prepare the track for noise reduction. The window will close immediately after this. Repeat the steps by clicking the Effects Menu, then Noise Reduction, and OK.

Step 4: Replay and Amplify Audio
The waveform of the audio track will change. Replay it to hear the results. Press CMD+Z or CTRL+Z on your to undo the process if not satisfied. Then, repeat the previous steps and play around with different values to achieve a better outcome. When you like the results, the audio volume output will be lower. Click Effects then Amplify to bring the volume back again, and adjust it to the level that you want.

**Part 2. How to Remove Echo from Audio in Adobe Audition
Adobe Audition is an effective editing software that will clean up echoes, winds, reverberations, instruments, and anything in between. The software offers a perfect solution to achieve pleasant audio within minutes.
Step 1: Launch Adobe Audition and Import Files
Start by launching the Audition software on your PC. Then, import the files you want to edit by going to File. Click Menu and select Open to browse the files on your computer.

Step 2: Select Audio File to Edit
You need to select the audio files that you will be removing echo from. Go to the Edit menu, Click Select, and choose Select All. You can also double-click the track.

Step 3: Start the Noise Restoration Menu
Click the Effects Menu, and then the Noise Reduction Restoration. Choose the DeReverb option. This will open the DeReverb window where you can make appropriate adjustments. You also have the option to left-click at the start of the selection. Then drag the dereverb over the part of the track you want to apply it to.

Step 4: Adjust the Amount of DeReverb Effect
Use the slider at the bottom of the DeReverb window to make the adjustments. Drag the slider slowly as you listen to the audio sounds. Be careful not to drag it too far that you start hearing buzzing and clipping. Once satisfied, preview the audio then click Apply and the audio file will be ready.

Part 3. **How to Remove Echo from Audio in Premiere Pro
The other effective way to remove echoes and reverberation in your audio file is using Premiere Pro. To remove Echo Premiere Pro, you need to add your audio click with Echo and process it with the software. Here is a summary of the steps to follow:
Step 1: Start DeReverb Effect
Start by importing the files that you want to edit to Adobe Premiere Pro. Then drag it into the timeline. On the search box, type DeReverb. You can also click on Audio Effects, followed by Noise Reduction/Restoration, and then DeReverb. Click on the effect and drag it to your clip on the timeline.

Step 2: Setup Your Settings
You should see the new effects under the Effects Control panel. Click the little arrow to the left, followed by Edit to open a new window.

Step 3: Adjust Settings
The new window will display the Clip FX Editor. You will have the option for presents on the top where you can find a default, light, and heavy reverb reduction. Choose one of them and preview it. Adjust the amount of reverb using the slider on the bottom. You can also check the Auto Gain to automatically take care of the volume as you edit the settings. Preview the settings and close the window once satisfied.

Bonus Part. **How to Remove Echo from Audio in Wondershare Filmora
In most cases, you will want to remove echo from audio files to continue editing them further. Probably it is a voiceover for your next YouTube video or even a podcast upload. Wondershare Filmora allows you to do this and more. The versatile video editing software come with some unique features that make audio and video editing a breeze. You even get an AI Copilot that serves as your personal assistant when editing your files.
Free Download For Win 7 or later(64-bit)
Free Download For macOS 10.14 or later
AI Vocal Remover
For you to remove echo from your audio files with Filmora, you will need to utilize the AI Vocal Remover feature. The feature is specially designed to separate vocals and music from any song. However, it also allows you to remove other audio elements from your soundtrack, including echoes and wind. You only need to optimize your preferences, and the feature will handle the rest. Here are the few simple steps you will need to follow:
Step 1: Launch Filmora and Create a New Project
First of all, start the Filmora software on your desktop. Then click the “New Project” tab. This will open the Filmora editing space.

Step 2: Import Your Soundtrack or Files
Select the “Media” tab in the toolbar. This will allow you to edit the soundtrack files you want to edit in this project. Click on the “Files” icon and select the files to import. You can also drag and drop the files from your Windows Explorer or Mac’s Finder onto the Filmora media section.

Step 3: Start AI Vocal Remover
Choose the clips you want to remove echoes from in the timeline. Then click on the “Audio” and select “AI Vocal Remover.” Adjust the settings for DeReverb and Wind removal to remove echoes from your audio file. You can also explore Hum removal, AI Speech Enhancement, and Denoise to achieve optimal results.

Conclusion
Echoes in your soundtracks can be so annoying. They affect the clarity of vocals and can make your audio or video seem unprofessional. While there are many ways you can remove echo from audio, we recommend Wondershare Filmora. The versatile video editor comes with a broad choice of features to help you edit your audio more accurately. You can remove echoes, wind, and more while maintaining the same quality of your audio. The software also allows you to continue editing your audio or video further as desired.
Free Download Free Download Learn More
Part 1. **How to Remove Echo from Audio in Audacity
Echo in your audio can occur for many reasons. You could be recording a podcast in different locations and working from a home studio. This could naturally create echoes in your audio when microphones pick undesired background noise. When you realize such noises post-production, Audacity may be your solution. Audacity reduces echo and other background sounds with high accuracy. Here are the steps you will need to follow:
Step 1: Start Audacity and Import Audio Files
Visit the Audacity website and download the software if you haven’t already. Do the simple installation process and open the Audacity software on your desktop. Import the audio files that you want to edit by going to File, and then opening or dragging and dropping the files into Audacity.
Step 2: Select Sound Track
Select the track you need to edit by clicking Select on the left side menu. Then choose the file that you want or press CMD+A on Mac or CTRL+A on Windows.
Step 3: Get a Noise Profile
Under the Effect dropdown menu, click Noise Reduction then select Get Noise Profile. This will prepare the track for noise reduction. The window will close immediately after this. Repeat the steps by clicking the Effects Menu, then Noise Reduction, and OK.
Step 4: Replay and Amplify Audio
The waveform of the audio track will change. Replay it to hear the results. Press CMD+Z or CTRL+Z on your to undo the process if not satisfied. Then, repeat the previous steps and play around with different values to achieve a better outcome. When you like the results, the audio volume output will be lower. Click Effects then Amplify to bring the volume back again, and adjust it to the level that you want.
**Part 2. How to Remove Echo from Audio in Adobe Audition
Adobe Audition is an effective editing software that will clean up echoes, winds, reverberations, instruments, and anything in between. The software offers a perfect solution to achieve pleasant audio within minutes.
Step 1: Launch Adobe Audition and Import Files
Start by launching the Audition software on your PC. Then, import the files you want to edit by going to File. Click Menu and select Open to browse the files on your computer.
Step 2: Select Audio File to Edit
You need to select the audio files that you will be removing echo from. Go to the Edit menu, Click Select, and choose Select All. You can also double-click the track.
Step 3: Start the Noise Restoration Menu
Click the Effects Menu, and then the Noise Reduction Restoration. Choose the DeReverb option. This will open the DeReverb window where you can make appropriate adjustments. You also have the option to left-click at the start of the selection. Then drag the dereverb over the part of the track you want to apply it to.
Step 4: Adjust the Amount of DeReverb Effect
Use the slider at the bottom of the DeReverb window to make the adjustments. Drag the slider slowly as you listen to the audio sounds. Be careful not to drag it too far that you start hearing buzzing and clipping. Once satisfied, preview the audio then click Apply and the audio file will be ready.
Part 3. **How to Remove Echo from Audio in Premiere Pro
The other effective way to remove echoes and reverberation in your audio file is using Premiere Pro. To remove Echo Premiere Pro, you need to add your audio click with Echo and process it with the software. Here is a summary of the steps to follow:
Step 1: Start DeReverb Effect
Start by importing the files that you want to edit to Adobe Premiere Pro. Then drag it into the timeline. On the search box, type DeReverb. You can also click on Audio Effects, followed by Noise Reduction/Restoration, and then DeReverb. Click on the effect and drag it to your clip on the timeline.
Step 2: Setup Your Settings
You should see the new effects under the Effects Control panel. Click the little arrow to the left, followed by Edit to open a new window.
Step 3: Adjust Settings
The new window will display the Clip FX Editor. You will have the option for presents on the top where you can find a default, light, and heavy reverb reduction. Choose one of them and preview it. Adjust the amount of reverb using the slider on the bottom. You can also check the Auto Gain to automatically take care of the volume as you edit the settings. Preview the settings and close the window once satisfied.
Bonus Part. **How to Remove Echo from Audio in Wondershare Filmora
In most cases, you will want to remove echo from audio files to continue editing them further. Probably it is a voiceover for your next YouTube video or even a podcast upload. Wondershare Filmora allows you to do this and more. The versatile video editing software come with some unique features that make audio and video editing a breeze. You even get an AI Copilot that serves as your personal assistant when editing your files.
Free Download For Win 7 or later(64-bit)
Free Download For macOS 10.14 or later
AI Vocal Remover
For you to remove echo from your audio files with Filmora, you will need to utilize the AI Vocal Remover feature. The feature is specially designed to separate vocals and music from any song. However, it also allows you to remove other audio elements from your soundtrack, including echoes and wind. You only need to optimize your preferences, and the feature will handle the rest. Here are the few simple steps you will need to follow:
Step 1: Launch Filmora and Create a New Project
First of all, start the Filmora software on your desktop. Then click the “New Project” tab. This will open the Filmora editing space.
Step 2: Import Your Soundtrack or Files
Select the “Media” tab in the toolbar. This will allow you to edit the soundtrack files you want to edit in this project. Click on the “Files” icon and select the files to import. You can also drag and drop the files from your Windows Explorer or Mac’s Finder onto the Filmora media section.
Step 3: Start AI Vocal Remover
Choose the clips you want to remove echoes from in the timeline. Then click on the “Audio” and select “AI Vocal Remover.” Adjust the settings for DeReverb and Wind removal to remove echoes from your audio file. You can also explore Hum removal, AI Speech Enhancement, and Denoise to achieve optimal results.
Conclusion
Echoes in your soundtracks can be so annoying. They affect the clarity of vocals and can make your audio or video seem unprofessional. While there are many ways you can remove echo from audio, we recommend Wondershare Filmora. The versatile video editor comes with a broad choice of features to help you edit your audio more accurately. You can remove echoes, wind, and more while maintaining the same quality of your audio. The software also allows you to continue editing your audio or video further as desired.
“2023 Compilation of Top Free Music Software: Produce, Edit & Record with Zero Cost [Windows and macOS]”
13 Free Music Production Software for Windows/Mac/Online

Benjamin Arango
Mar 27, 2024• Proven solutions
13 Free Music Production Software for Windows/Mac/Online
Technology advances have spread through all fields of human activity, including music recording and development. The invention of music development tools has made it simpler for people engaged in the creation of music in one form or another.
Numerous applications for music development are on the market, and some are meant for musicians, and others are for educators and teachers. There is also a need to direct prospective customers to the right free music production software.
A comprehensive analysis of some of the best music development tools has been conducted to help you make the correct decision while you’re ready to purchase the app. This comprehensive Music Production Software Guide will provide solutions to many of your unanswered questions relating to the purchase of music production software.
- Part 1: Free Music Production Software for Windows
- Part 2: Free Music Production Software for Mac
- Part 3: Free Music Production Software Online
Part 1: Free Music Production Software for Windows
1. Audacity
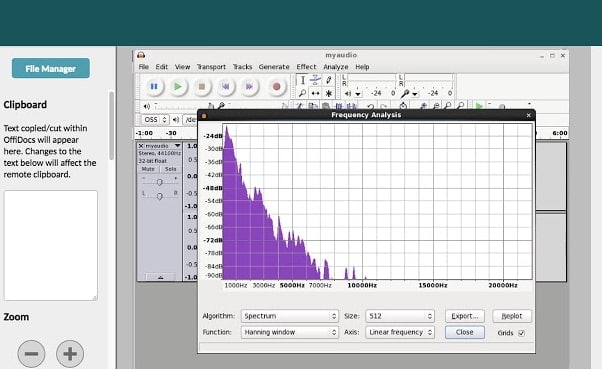
The system for music development is not complete without an audio editor. Audacity is the best free music creation software available on the market. Audacity is open-source and extensive and provides a wide range of tools and effects for performing all audio editing and recording activities. It is created by a community of volunteers and provides regular notifications almost every month. It’s lightweight, safe, and intuitive enough to be used by novice music makers.
Pros
- It is open-source
- It can load VST plugins
Cons
- Only 32-bit plugins are allowed
- Limited features
2. Ardour
Ardour is a highly integrated program of music production that allows users to record and edit on Mac, Linux, and Windows operating systems. Ardour Music Production Software was created by integrating the efforts of the world’s skilled team, such as recording technicians, programmers, and musicians. Such experienced technicians make their concerted and thorough efforts to build the program. Ardour is one of the few applications in music production that respects honesty. The accessibility of this program allows app developers to concentrate on functionality that matters to consumers rather than to construct compelling apps for advertising purposes. This is a system that should be celebrated for its user-focused functionality.
Pros
- It has excellent user-friendliness
- It is available on Mac, Linux, and Windows
Cons
- It lacks a few integral features
- It is difficult to operate for people new to audio editing

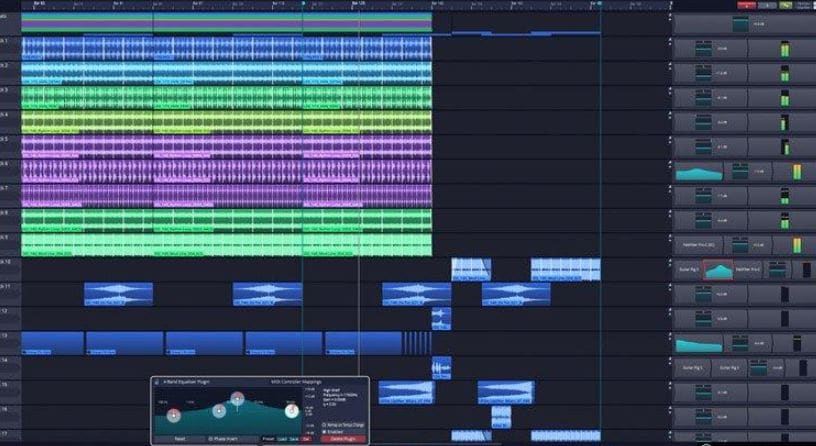
3. Tracktion T7
The people at Tracktion seem to have reached a reasonably canny business model by launching older DAW versions for free and without anything removed.
The convention appears to make it possible to access the edition without charge of two iterations before the new one. You will not be provided with all new functionality, but you will receive an update every time the company updates its flagship DAW, which it does nearly every year.
The growing section is adjustable to match the workflow, and the bottom panel adjusts so that any parameters anywhere on the screen can be seen.
Pros
- It features an unlimited number of audio and MIDI tracks
- It is able to host multiple plugin formats
Cons
- It doesn’t provide all the features at once
- It does not support many plugins
4. LMMS
LMMS is a fully free music production software for windows for music development. It is an open-source and also a project platform for the community. LMMS is a cross-platform device app. It makes it easier to manufacture beats, particularly when many music production professionals have to manufacture quality music with their computers.
Thanks to the powerful sample, beat and melody design, mixing and synthetic sound processes, and many other features, the LMMS music production software provides high-quality audio output. The product also features playback tools, plugins, and samples to produce powerful, high-quality sound.
Pros
- It is compatible with Linux, Windows, and Mac
- Hydrogen project files and MIDI can be imported easily for editing
Cons
- It eats a lot of memory and requires a high-end device to support it
- Some users complained that understanding its working is difficult

5. Cakewalk
This is an exciting app for music production to purchase. It is a fantastic tech to invest in music production. Cakewalk Sonar Artist Software is one of Cakewalk Sonar Artist ‘s great productions. Cakewalk is known for an excellent GUI, an excellent mixing console, an excellent commercial radio system, and limitless MIDI tracks.
A good device to use as part of your instruments for the development of music is the Cakewalk Sonar Artist Music Production program. It stands out as a program packed with excellent features amongst its counterparts. And the app is unmatched in the area of apps.
Pros
- You can share music compilation directly to social media
- You can easily add effects to your tracks
Cons
- It is priced, very high
- One window interface makes it hectic

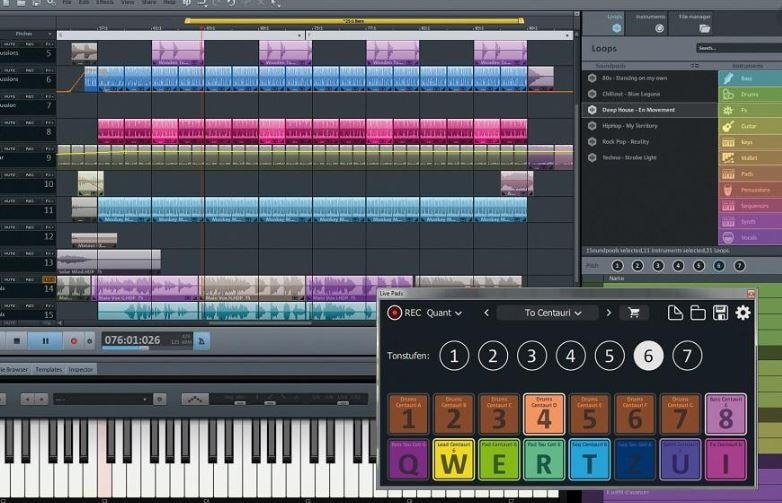
6. Music Maker by Magix
This app is a special program for sound engineers, skilled musicians, and accomplished music producers, developed by US Magix Entertainment. It offers an excellent forum for creative music development in music production professionals.
In reality, the software for music production is excellent software for the Music Maker by Magix. In the field of music post-production and music mastering, mixing and arrangement, recording, and more, the software achieved remarkable breakthroughs. Thanks to the successful combination of a technical device and highly flexible workflow, the Music Maker by Magix has achieved this groundbreaking success.
With creative algorithm and superb plugin effects, the Music Maker by Magix program enables music manufacturers to develop their ideas in line with the highest quality in this industry.
Pros
- It is great for EDM producers
Cons
- It is not suitable for newbies
- The GUI feels a bit cluttered
Part 2: Free Music Production Software for Mac
7. Garageband
This is a music development studio app that is designed to function on Mac. It is a great free music production software for Mac. This software has a full sound collection, which includes virtual instruments, voice, and guitar preset.
GarageBand is a well-known app for music development and is an excellent tool for music beginners. Many people have chosen GarageBand because it does not match the ease and ease of use for recording purposes in particular.
The user-friendly interface makes you easy to create music with a more unobstructed view of what you’re recording. Apps from GarageBand captured the attention of others because of their ease-to-use and user-friendliness.
Pros
- The software offers some nicely packaged preset for vocal and guitar recording
- Productive workflow
Cons
- It has limited plugins
- It is only supported for Mac platforms

8. Ableton Live
The Ableton Live 10 Suite is a dynamic and comprehensive program for the creation and performance of musical recordings.
An essential feature of this software is that it allows you to work on your time-based workflow without affecting the live session. This means that the software gives you a rare chance to get involved with the workflow without stopping live performance.
The Multitrack Recording Technology of Ableton Live10 Suite allows music producers to adjust the speed and pacing of any audio during the recording. To make these adjustments, you don’t have to pause the recording. This is one of the striking characteristics which makes this product a good option for all.
Pros
- Adjusting the speed and pace of audio is a delight
- Sophisticated MIDI/audio routing capabilities
Cons
- It has a traditional design
- Not enough updates to fix the buggy features

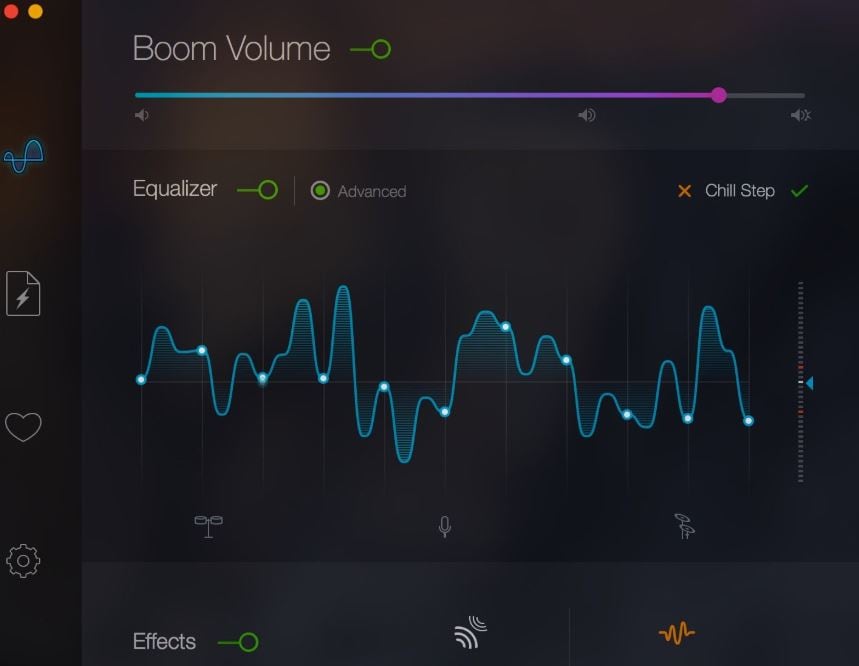
9. Boom 3D
Boom 3D for Mac & Windows is an award-winning pro sound improvement software designed to play your media content on any and all of your devices, phones, or streaming services with amazing 3D effects. No costly headphones or sound boosters will be needed to make your music feel like it! Designed in a new immersive 3D surround sound technology, Boom 3D redefines how people listen to music, watch films, or play games with some headphones on their devices. 3D sound provides the option to check the LFE (subwoofer), and the audio intensity of each Virtual 3D Surround audio system speaker.
Pros
- It comes with loads of content
- Audio quality can be enhanced
Cons
- The design is not suitable for everybody
- It does not have a Linux version
10. Mixxx
For beginners, Mixxx is just another great device. This is also one of the best free music production software downloads for your music. This software supports all Mac, Windows, and Linux platforms.
The application provides you with a DJ-mixing environment and supports all standard formats such as Mp3 and many other formats.
Pros
- It is a great app for beginners
- Supported by Mac, Windows, and Linux
Cons
- It doesn’t support many plugins
- GUI isn’t that great

Part 3: Free Music Production Software Online
11. Soundation
Soundation is a platform that provides free music production software online only capabilities. The free version and three paid versions are offered. You can use this to build your tracks unless you have the resources to do so if you need a web-based music maker and editor.
If you pay, even after you have made your music, you can always cancel. Remember first to save them to your hard drive. If you need paid characteristics, pay for the monthly plan again through PayPal, and you have to use it for a month.
Pros
- Great SSL-modelled mixer
- You can use its devices as a plugin
Cons
- It works only online

12. Audiotool
Audiotool is a popular app for music production hosted online and can be used without installation from inside your browser. It uses a cloud-based network to store all your music and files wherever you are. It is also confirmed that you will share music and tracks directly with YouTube, SoundCloud, and Facebook on its own publishing site. They have premium releases from Loopmasters and some fantastic online VSTs, for example, Heisenberg, Machiniste, Bassline, and Beatbox 8 & 9.
Pros
- No installation needed
- You can directly share it to your social media
Cons
- It works only online
- No upgrades

13. Soundtrap
Soundtrap is not only an online music studio but a training site for students and instructors. The STEAM Curriculum is an online learning resource that helps students to follow music and podcasts, incorporated into the Web app. As we mentioned earlier, in addition to the online Web App, you can also use it on different devices, share it with other users, and work in innovative projects for your music.
The interface is simple, easy to use, and easy to understand. It is simply an instrument for innovation; you don’t have to learn how to apply VST or any other technical elements to music creation. You can also record your MIDI instruments directly from your machine or device’s mic.
Pros
- It provides a great platform for teachers to teach their students
- It is very easy to use
Cons
- It only has a limited number of plugins
- It cannot be used professionally

Conclusion
If you make music on a computer, the most important resource in your artistic arsenal is your DAW; in your home recording system, you ‘re probably going to have the MIDI keyboard, audio interface, studio monitor speakers, and maybe a microphone or two. But your program is at the core of it all. Not everyone can afford expensive DAWs, but one must not worry as free music production software are present to aid us.
It is important to have a DAW with which you are pleased and, perhaps more importantly, a DAW, which allows you to turn your ideas into music as quickly and painlessly as possible. So make sure you choose the best one for you according to your needs. Hopefully, this guide will aid you


Benjamin Arango
Benjamin Arango is a writer and a lover of all things video.
Follow @Benjamin Arango
Benjamin Arango
Mar 27, 2024• Proven solutions
13 Free Music Production Software for Windows/Mac/Online
Technology advances have spread through all fields of human activity, including music recording and development. The invention of music development tools has made it simpler for people engaged in the creation of music in one form or another.
Numerous applications for music development are on the market, and some are meant for musicians, and others are for educators and teachers. There is also a need to direct prospective customers to the right free music production software.
A comprehensive analysis of some of the best music development tools has been conducted to help you make the correct decision while you’re ready to purchase the app. This comprehensive Music Production Software Guide will provide solutions to many of your unanswered questions relating to the purchase of music production software.
- Part 1: Free Music Production Software for Windows
- Part 2: Free Music Production Software for Mac
- Part 3: Free Music Production Software Online
Part 1: Free Music Production Software for Windows
1. Audacity
The system for music development is not complete without an audio editor. Audacity is the best free music creation software available on the market. Audacity is open-source and extensive and provides a wide range of tools and effects for performing all audio editing and recording activities. It is created by a community of volunteers and provides regular notifications almost every month. It’s lightweight, safe, and intuitive enough to be used by novice music makers.
Pros
- It is open-source
- It can load VST plugins
Cons
- Only 32-bit plugins are allowed
- Limited features
2. Ardour
Ardour is a highly integrated program of music production that allows users to record and edit on Mac, Linux, and Windows operating systems. Ardour Music Production Software was created by integrating the efforts of the world’s skilled team, such as recording technicians, programmers, and musicians. Such experienced technicians make their concerted and thorough efforts to build the program. Ardour is one of the few applications in music production that respects honesty. The accessibility of this program allows app developers to concentrate on functionality that matters to consumers rather than to construct compelling apps for advertising purposes. This is a system that should be celebrated for its user-focused functionality.
Pros
- It has excellent user-friendliness
- It is available on Mac, Linux, and Windows
Cons
- It lacks a few integral features
- It is difficult to operate for people new to audio editing
3. Tracktion T7
The people at Tracktion seem to have reached a reasonably canny business model by launching older DAW versions for free and without anything removed.
The convention appears to make it possible to access the edition without charge of two iterations before the new one. You will not be provided with all new functionality, but you will receive an update every time the company updates its flagship DAW, which it does nearly every year.
The growing section is adjustable to match the workflow, and the bottom panel adjusts so that any parameters anywhere on the screen can be seen.
Pros
- It features an unlimited number of audio and MIDI tracks
- It is able to host multiple plugin formats
Cons
- It doesn’t provide all the features at once
- It does not support many plugins
4. LMMS
LMMS is a fully free music production software for windows for music development. It is an open-source and also a project platform for the community. LMMS is a cross-platform device app. It makes it easier to manufacture beats, particularly when many music production professionals have to manufacture quality music with their computers.
Thanks to the powerful sample, beat and melody design, mixing and synthetic sound processes, and many other features, the LMMS music production software provides high-quality audio output. The product also features playback tools, plugins, and samples to produce powerful, high-quality sound.
Pros
- It is compatible with Linux, Windows, and Mac
- Hydrogen project files and MIDI can be imported easily for editing
Cons
- It eats a lot of memory and requires a high-end device to support it
- Some users complained that understanding its working is difficult
5. Cakewalk
This is an exciting app for music production to purchase. It is a fantastic tech to invest in music production. Cakewalk Sonar Artist Software is one of Cakewalk Sonar Artist ‘s great productions. Cakewalk is known for an excellent GUI, an excellent mixing console, an excellent commercial radio system, and limitless MIDI tracks.
A good device to use as part of your instruments for the development of music is the Cakewalk Sonar Artist Music Production program. It stands out as a program packed with excellent features amongst its counterparts. And the app is unmatched in the area of apps.
Pros
- You can share music compilation directly to social media
- You can easily add effects to your tracks
Cons
- It is priced, very high
- One window interface makes it hectic
6. Music Maker by Magix
This app is a special program for sound engineers, skilled musicians, and accomplished music producers, developed by US Magix Entertainment. It offers an excellent forum for creative music development in music production professionals.
In reality, the software for music production is excellent software for the Music Maker by Magix. In the field of music post-production and music mastering, mixing and arrangement, recording, and more, the software achieved remarkable breakthroughs. Thanks to the successful combination of a technical device and highly flexible workflow, the Music Maker by Magix has achieved this groundbreaking success.
With creative algorithm and superb plugin effects, the Music Maker by Magix program enables music manufacturers to develop their ideas in line with the highest quality in this industry.
Pros
- It is great for EDM producers
Cons
- It is not suitable for newbies
- The GUI feels a bit cluttered
Part 2: Free Music Production Software for Mac
7. Garageband
This is a music development studio app that is designed to function on Mac. It is a great free music production software for Mac. This software has a full sound collection, which includes virtual instruments, voice, and guitar preset.
GarageBand is a well-known app for music development and is an excellent tool for music beginners. Many people have chosen GarageBand because it does not match the ease and ease of use for recording purposes in particular.
The user-friendly interface makes you easy to create music with a more unobstructed view of what you’re recording. Apps from GarageBand captured the attention of others because of their ease-to-use and user-friendliness.
Pros
- The software offers some nicely packaged preset for vocal and guitar recording
- Productive workflow
Cons
- It has limited plugins
- It is only supported for Mac platforms
8. Ableton Live
The Ableton Live 10 Suite is a dynamic and comprehensive program for the creation and performance of musical recordings.
An essential feature of this software is that it allows you to work on your time-based workflow without affecting the live session. This means that the software gives you a rare chance to get involved with the workflow without stopping live performance.
The Multitrack Recording Technology of Ableton Live10 Suite allows music producers to adjust the speed and pacing of any audio during the recording. To make these adjustments, you don’t have to pause the recording. This is one of the striking characteristics which makes this product a good option for all.
Pros
- Adjusting the speed and pace of audio is a delight
- Sophisticated MIDI/audio routing capabilities
Cons
- It has a traditional design
- Not enough updates to fix the buggy features
9. Boom 3D
Boom 3D for Mac & Windows is an award-winning pro sound improvement software designed to play your media content on any and all of your devices, phones, or streaming services with amazing 3D effects. No costly headphones or sound boosters will be needed to make your music feel like it! Designed in a new immersive 3D surround sound technology, Boom 3D redefines how people listen to music, watch films, or play games with some headphones on their devices. 3D sound provides the option to check the LFE (subwoofer), and the audio intensity of each Virtual 3D Surround audio system speaker.
Pros
- It comes with loads of content
- Audio quality can be enhanced
Cons
- The design is not suitable for everybody
- It does not have a Linux version
10. Mixxx
For beginners, Mixxx is just another great device. This is also one of the best free music production software downloads for your music. This software supports all Mac, Windows, and Linux platforms.
The application provides you with a DJ-mixing environment and supports all standard formats such as Mp3 and many other formats.
Pros
- It is a great app for beginners
- Supported by Mac, Windows, and Linux
Cons
- It doesn’t support many plugins
- GUI isn’t that great
Part 3: Free Music Production Software Online
11. Soundation
Soundation is a platform that provides free music production software online only capabilities. The free version and three paid versions are offered. You can use this to build your tracks unless you have the resources to do so if you need a web-based music maker and editor.
If you pay, even after you have made your music, you can always cancel. Remember first to save them to your hard drive. If you need paid characteristics, pay for the monthly plan again through PayPal, and you have to use it for a month.
Pros
- Great SSL-modelled mixer
- You can use its devices as a plugin
Cons
- It works only online
12. Audiotool
Audiotool is a popular app for music production hosted online and can be used without installation from inside your browser. It uses a cloud-based network to store all your music and files wherever you are. It is also confirmed that you will share music and tracks directly with YouTube, SoundCloud, and Facebook on its own publishing site. They have premium releases from Loopmasters and some fantastic online VSTs, for example, Heisenberg, Machiniste, Bassline, and Beatbox 8 & 9.
Pros
- No installation needed
- You can directly share it to your social media
Cons
- It works only online
- No upgrades
13. Soundtrap
Soundtrap is not only an online music studio but a training site for students and instructors. The STEAM Curriculum is an online learning resource that helps students to follow music and podcasts, incorporated into the Web app. As we mentioned earlier, in addition to the online Web App, you can also use it on different devices, share it with other users, and work in innovative projects for your music.
The interface is simple, easy to use, and easy to understand. It is simply an instrument for innovation; you don’t have to learn how to apply VST or any other technical elements to music creation. You can also record your MIDI instruments directly from your machine or device’s mic.
Pros
- It provides a great platform for teachers to teach their students
- It is very easy to use
Cons
- It only has a limited number of plugins
- It cannot be used professionally
Conclusion
If you make music on a computer, the most important resource in your artistic arsenal is your DAW; in your home recording system, you ‘re probably going to have the MIDI keyboard, audio interface, studio monitor speakers, and maybe a microphone or two. But your program is at the core of it all. Not everyone can afford expensive DAWs, but one must not worry as free music production software are present to aid us.
It is important to have a DAW with which you are pleased and, perhaps more importantly, a DAW, which allows you to turn your ideas into music as quickly and painlessly as possible. So make sure you choose the best one for you according to your needs. Hopefully, this guide will aid you
Benjamin Arango
Benjamin Arango is a writer and a lover of all things video.
Follow @Benjamin Arango
“Championing Quiet Calls: How to Silence Zoom Audio Quickly and Easily”
Zoom Meeting is a beneficial application, and video conferencing is on another level because of this app. Zoom offers high-quality audio and video. With this conferencing app, cross-platform messaging is also possible, and you can also schedule your meeting calendar with Zoom.
Many offices conduct formal meetings through Zoom. During the pandemic era, online classes were taken through Zoom. Sometimes, you wish to mute the mic and sit back. What bothers you is that you don’t know how to mute audio in zoom. If this is your case, then stay with us. We are about to discuss how you can mute zoom audio.
In this article
01 How to Mute Zoom Audio on Windows and Mac
02 How to Mute Zoom Audio on iPhone and Android
03 Tips To Optimize Zoom Audio Settings for Better Performance
04 Frequently Asked Questions about Zoom
Part 1. How to Mute Zoom Audio on Windows and Mac
Imagine you are having a meeting on Zoom, and there are a lot of people in the meeting. You are trying to do some office work, but their voices disturb you. You cannot even leave the meeting. What are you going to do now? Are you going to submit average quality work?
One thing that you can do is to mute audio on Zoom. The question is, do you know how to mute the microphone on zoom? Let us share the steps that will help you to mute Zoom audio on your Windows or Mac.
Step 1: First of all, open the desktop Zoom app and start a call. Then, for the options to appear on the screen, you need to move the cursor.
Step 2: To mute any participant, bring the cursor over their name. The options will appear. You can click on the blue ‘Mute’ button to mute them. Or else, you can open a pop-up menu by right-clicking on the participants’ names. There, select the option of ‘Mute Audio.’ You can unmute them in the same way.

Step 3: If you are the meeting host, you can manage all participants at once. For that, look at the bottom toolbar hit the ‘Manage Participants’ tab. Zoom meeting will display the total count of the participants in a sidebar on the screen. Along with the participants’ names, a microphone and video icon will also appear.

Step 5: If you are the meeting host, then you can mute individual participants. You have to bring the cursor over the microphone icon. A ‘Mute’ and ‘Unmute’ buttons will show up.

Step 6: Being the host, you can ‘Mute All’ and ‘Unmute All’ participants at once by clicking on these buttons at the bottom. A pop-up will appear on the screen, don’t forget to check the box. With this, the participants can unmute themselves.
Step 7: Also, the participants receive a message if the host is muting or unmuting everyone. To complete the process and apply the changes, hit the ‘Continue’ button.

Part 2. How to Mute Zoom Audio on iPhone and Android
Zoom meeting is compatible with Windows, Mac, Android, and also iPhone. You don’t need to always join zoom meetings with your computer. Sometimes, you join zoom with your mobile. In any case, you might need to mute zoom audio. Sadly, you don’t know how to mute Zoom audio. Let us share an easy step-by-step guideline to do this on both Android and iPhone.
Step 1: If you want to mute the sound of your mobile device, then in the top left corner, tap on the volume button. You will see ‘X’ appears over the speaker icon. You can tap on it again to play the sound.

Step 2: Being the host, you can manage participants. For that, look at the bottom and click on the ‘Participants’ tab. A pop-up will appear on your screen, and you can individually mute participants. For this, you need to hit the microphone icon visible next to the participants’ names. You can easily reverse this and unmute it by tapping on the microphone icon again. You can also manage the settings by clicking on the participant’s name.

Step 3: The host has the authority to Mute all participants at once. For this, the host needs to tap on the ‘Mute All’ button from the bottom. The host needs to check the box. This will allow the participants to unmute themselves.

Step 4: Lastly, once you are done and satisfied with everything, hit the ‘Close’ option. This will close the participants’ window.
Part 3. Tips To Optimize Zoom Audio Settings for Better Performance
Although Zoom meeting is itself an amazing app with so many different features, among those features, one is that Zoom has high-quality video and audio. Besides everything, you can still improve Zoom Audio’s performance by following the tips that are shared below.
· Reduce Background Noise
Your audio performance is instantly improved if you reduce background noise. Any disturbing noise in the background falls under this category. It can be the fan, air conditioning, ticking clocks, etc. You should move away from the noise.
· Use High-Quality Microphone
For better audio performance, use a high-quality microphone for your Zoom meetings. This factor is the most important factor when it comes to improving audio. Investing in a decent and good external microphone is never a bad option.
· Stable Internet Connection
With a weak internet connection, your voice breaks. If you want to have improved Zoom audio performance, then make sure that you have a stable internet connection. Distortion and disturbance cause problems while communicating.
· Distance from Microphone
You must sit at an average distance from your microphone. Sitting too close will sound like you are shouting. Whereas sitting too far, your voice is quieter, and background noise sounds loud. So, measure the appropriate distance from the microphone.
Part 4. Frequently Asked Questions about Zoom
1. Can you mute Zoom audio without muting the computer?
Yes, you can mute zoom without muting your computer. For Windows, look at the bottom right corner. Right-click on the speaker/volume icon. A pop-up menu will appear; from there, select ‘Open Volume Mixer.’ When Volume Mixer appears on the screen, turn down and mute the volume for Zoom Meetings.
In case you are a Mac user, then let us tell you what to do. During the Zoom call, click on the Zoom Meetings Control for Audio. Then select the option of ‘Audio Settings.’ From the audio setting panel, you can turn down the volume for the ‘Speaker.’ This lowers the volume for Zoom meetings and can even mute it.
2. How can I improve my zoom video quality?
Various ways could be adopted to improve the video quality for Zoom meetings. For instance, you can use the ‘Touch up my Appearance’ feature. Or else, you can enable HD, apply Studio Effects, enable Zoom’s Low Light Adjustment setting, etc.
3. How do I change the resolution of a video Zoom?
For changing the resolution of Zoom video, firstly open Zoom on either your mobile or computer. Then, head over to the ‘Settings’ section. There, you need to select ‘Video Quality’ settings. Lastly, check the box with HD. This will enable the HD option, and your device will stream high-quality videos.
4. How do you set a virtual background on Zoom without a green screen?
For setting a virtual background on Zoom, you firstly need to sign in to your account. After that, you should open the ‘Settings’ by clicking on your profile picture. From settings, select ‘Virtual Background.’ Now, you can add the image that you want as your virtual background. You can even upload any image and video by hitting the ‘+’ sign.
5. Where do you get zoom backgrounds?
Zoom website offers a variety of cool virtual backgrounds. You can easily download them and use them. In comparison, there is another site that offers free backgrounds. You can also download virtual background images from Unsplash and use them easily.
Final Thoughts
Now are days, Zoom Meeting is being widely used. This article will surely increase your knowledge regarding Zoom Audio. We have shared the steps for both computer and mobile for Zoom mute microphone. We also shared tips that will help you improve the Zoom audio performance.
02 How to Mute Zoom Audio on iPhone and Android
03 Tips To Optimize Zoom Audio Settings for Better Performance
04 Frequently Asked Questions about Zoom
Part 1. How to Mute Zoom Audio on Windows and Mac
Imagine you are having a meeting on Zoom, and there are a lot of people in the meeting. You are trying to do some office work, but their voices disturb you. You cannot even leave the meeting. What are you going to do now? Are you going to submit average quality work?
One thing that you can do is to mute audio on Zoom. The question is, do you know how to mute the microphone on zoom? Let us share the steps that will help you to mute Zoom audio on your Windows or Mac.
Step 1: First of all, open the desktop Zoom app and start a call. Then, for the options to appear on the screen, you need to move the cursor.
Step 2: To mute any participant, bring the cursor over their name. The options will appear. You can click on the blue ‘Mute’ button to mute them. Or else, you can open a pop-up menu by right-clicking on the participants’ names. There, select the option of ‘Mute Audio.’ You can unmute them in the same way.
Step 3: If you are the meeting host, you can manage all participants at once. For that, look at the bottom toolbar hit the ‘Manage Participants’ tab. Zoom meeting will display the total count of the participants in a sidebar on the screen. Along with the participants’ names, a microphone and video icon will also appear.
Step 5: If you are the meeting host, then you can mute individual participants. You have to bring the cursor over the microphone icon. A ‘Mute’ and ‘Unmute’ buttons will show up.
Step 6: Being the host, you can ‘Mute All’ and ‘Unmute All’ participants at once by clicking on these buttons at the bottom. A pop-up will appear on the screen, don’t forget to check the box. With this, the participants can unmute themselves.
Step 7: Also, the participants receive a message if the host is muting or unmuting everyone. To complete the process and apply the changes, hit the ‘Continue’ button.
Part 2. How to Mute Zoom Audio on iPhone and Android
Zoom meeting is compatible with Windows, Mac, Android, and also iPhone. You don’t need to always join zoom meetings with your computer. Sometimes, you join zoom with your mobile. In any case, you might need to mute zoom audio. Sadly, you don’t know how to mute Zoom audio. Let us share an easy step-by-step guideline to do this on both Android and iPhone.
Step 1: If you want to mute the sound of your mobile device, then in the top left corner, tap on the volume button. You will see ‘X’ appears over the speaker icon. You can tap on it again to play the sound.
Step 2: Being the host, you can manage participants. For that, look at the bottom and click on the ‘Participants’ tab. A pop-up will appear on your screen, and you can individually mute participants. For this, you need to hit the microphone icon visible next to the participants’ names. You can easily reverse this and unmute it by tapping on the microphone icon again. You can also manage the settings by clicking on the participant’s name.
Step 3: The host has the authority to Mute all participants at once. For this, the host needs to tap on the ‘Mute All’ button from the bottom. The host needs to check the box. This will allow the participants to unmute themselves.
Step 4: Lastly, once you are done and satisfied with everything, hit the ‘Close’ option. This will close the participants’ window.
Part 3. Tips To Optimize Zoom Audio Settings for Better Performance
Although Zoom meeting is itself an amazing app with so many different features, among those features, one is that Zoom has high-quality video and audio. Besides everything, you can still improve Zoom Audio’s performance by following the tips that are shared below.
· Reduce Background Noise
Your audio performance is instantly improved if you reduce background noise. Any disturbing noise in the background falls under this category. It can be the fan, air conditioning, ticking clocks, etc. You should move away from the noise.
· Use High-Quality Microphone
For better audio performance, use a high-quality microphone for your Zoom meetings. This factor is the most important factor when it comes to improving audio. Investing in a decent and good external microphone is never a bad option.
· Stable Internet Connection
With a weak internet connection, your voice breaks. If you want to have improved Zoom audio performance, then make sure that you have a stable internet connection. Distortion and disturbance cause problems while communicating.
· Distance from Microphone
You must sit at an average distance from your microphone. Sitting too close will sound like you are shouting. Whereas sitting too far, your voice is quieter, and background noise sounds loud. So, measure the appropriate distance from the microphone.
Part 4. Frequently Asked Questions about Zoom
1. Can you mute Zoom audio without muting the computer?
Yes, you can mute zoom without muting your computer. For Windows, look at the bottom right corner. Right-click on the speaker/volume icon. A pop-up menu will appear; from there, select ‘Open Volume Mixer.’ When Volume Mixer appears on the screen, turn down and mute the volume for Zoom Meetings.
In case you are a Mac user, then let us tell you what to do. During the Zoom call, click on the Zoom Meetings Control for Audio. Then select the option of ‘Audio Settings.’ From the audio setting panel, you can turn down the volume for the ‘Speaker.’ This lowers the volume for Zoom meetings and can even mute it.
2. How can I improve my zoom video quality?
Various ways could be adopted to improve the video quality for Zoom meetings. For instance, you can use the ‘Touch up my Appearance’ feature. Or else, you can enable HD, apply Studio Effects, enable Zoom’s Low Light Adjustment setting, etc.
3. How do I change the resolution of a video Zoom?
For changing the resolution of Zoom video, firstly open Zoom on either your mobile or computer. Then, head over to the ‘Settings’ section. There, you need to select ‘Video Quality’ settings. Lastly, check the box with HD. This will enable the HD option, and your device will stream high-quality videos.
4. How do you set a virtual background on Zoom without a green screen?
For setting a virtual background on Zoom, you firstly need to sign in to your account. After that, you should open the ‘Settings’ by clicking on your profile picture. From settings, select ‘Virtual Background.’ Now, you can add the image that you want as your virtual background. You can even upload any image and video by hitting the ‘+’ sign.
5. Where do you get zoom backgrounds?
Zoom website offers a variety of cool virtual backgrounds. You can easily download them and use them. In comparison, there is another site that offers free backgrounds. You can also download virtual background images from Unsplash and use them easily.
Final Thoughts
Now are days, Zoom Meeting is being widely used. This article will surely increase your knowledge regarding Zoom Audio. We have shared the steps for both computer and mobile for Zoom mute microphone. We also shared tips that will help you improve the Zoom audio performance.
Also read:
- Updated In 2024, Elite Sound Weaver The Ultimate Mac MP3 Experience
- Updated 2024 Approved Balancing the Scales Normalizing Sound Volume for Optimal Viewing with VLC
- Updated 2024 Approved The Top Trio of Virtual MP3 Intensity Maximizers
- Updated Top 5 Multimedia Converters for Enhanced Sound-Visual Experience for 2024
- New In 2024, Embarking on Editing Adventures with LexiEdit for Beginners
- New In 2024, The Year of Transformation Advanced Audio Editors and Their Impact on Music Creation
- Updated In 2024, The Critical Selection Top 5 Most Cutting-Edge Voice Transformation Services Online
- In 2024, Audiophiles Advice Eliminating Sounds From iPhone Visual Captures
- In 2024, Exploring the Pinnacle of Free & Paid Audio Creation on Linux
- Updated Guide to Mute Audio in MP4 Files Without Distorting Video Quality for 2024
- Updated 2024 Approved Premiered 7 Techniques for Nonchalant Vocal Suppression Online & Offline
- New Exploring the Latest Mood-Aligned Symphonies for 2024
- Updated Simplified Approach to Sound Wave Suppression with Audacity for 2024
- Updated In 2024, Elegant Sound Sculpting An Overview of Leading Audio Editors Features, Perks & Pitfalls
- Sculpting Soundscapes Advanced Methods for Isolating Lyrics From Harmonized Tunes
- New 2024 Approved Melody Match Masters Unveiling the Hottest Tunes on Web Platforms
- Updated 2024 Approved Sweeping the Audio Board Top Strategies for Sound Excellence at Home (Film Edition, 2023)
- Updated 2024 Approved Exploring the Leading Free Audio Editors A Comprehensive Guide to Windows-Based Software
- Updated The Ultimate Guide to Premium Audio Voice-Reduction Apps & Online Services
- Updated In 2024, 5 Top-Ranked Social Media Series for Crafting Effective Marketing Tactics
- Turntable Tunes Archive Stream Your DJ Favorites for 2024
- 2024 Approved Elite Audio Engineers Choice Premium Voice Alteration Tools for Windows and macOS Platforms
- New Approaches to Isolate and Omit Audio From Video Content for 2024
- Updated In 2024, 9 Free Voice Generators Online-Generate Voice From Text
- Updated 2024 Approved Top 4 Best Music Editor for Mac
- In 2024, Elevate Sound Integrity with Preventative Noise Suppression Tactics
- New In 2024, Best 13 No-Cost Digital Audio Recording Apps Available on Windows & macOS
- Mastering Multisensory Imagery Including Music with Your Photographs for 2024
- In 2024, How to Unlock Vivo S18 Pro Pattern Lock if Forgotten? 6 Ways
- How to Downgrade Apple iPhone SE (2022) without Losing Anything? | Dr.fone
- How To Unbrick a Dead Huawei P60 | Dr.fone
- In 2024, How to Change Credit Card on Your Apple iPhone 13 mini Apple ID and Apple Pay
- Fixes for Apps Keep Crashing on OnePlus Nord N30 5G | Dr.fone
- In 2024, Solutions to Spy on Samsung Galaxy Z Flip 5 with and without jailbreak | Dr.fone
- What To Do When Realme GT Neo 5 Has Black Screen of Death? | Dr.fone
- How To Revive Your Bricked Vivo X Fold 2 in Minutes | Dr.fone
- In 2024, 5 Most Effective Methods to Unlock iPhone XR in Lost Mode | Dr.fone
- New 2024 Approved Chromebook Meets Video Editing Power How to Run Windows and Mac Apps
- New Elevate Your Visuals Advanced Slideshow Techniques in Final Cut Pro for 2024
- 5 Easy Ways to Change Location on YouTube TV On Sony Xperia 10 V | Dr.fone
- Learn How to Create Animated Titles and Text in the Filmora Video Editor. This Is a Simple Step-by-Step Tutorial for Any Skill Level for 2024
- How To Transfer WhatsApp From iPhone SE (2020) to other iPhone 13 Pro Max devices? | Dr.fone
- New 2024 Approved The Ultimate Video Effects Handbook Tips and Tricks
- In 2024, Unlocking YouTube Audio A Simple Download Guide
- Title: New 2024 Approved Advanced Techniques to Purify Recorded Audio From Unwanted Echoes
- Author: Jacob
- Created at : 2024-06-18 16:13:06
- Updated at : 2024-06-19 16:13:06
- Link: https://audio-shaping.techidaily.com/new-2024-approved-advanced-techniques-to-purify-recorded-audio-from-unwanted-echoes/
- License: This work is licensed under CC BY-NC-SA 4.0.
