:max_bytes(150000):strip_icc():format(webp)/full-frame-shot-of-speakers-1138109687-33289baddc314b44ae87abc2fc8060cd-e7bccad6d81244509ed97ddf557f89e4.jpg)
Navigating the Voice Recorder App Samsung S10/S9 Edition

Navigating the Voice Recorder App: Samsung S10/S9 Edition
Smartphones make our life easy and productive. Being portable and bringing advanced features, Android and iPhone devices have improved the user experience multifold. The Samsung Android device and its voice recording feature would be the crux of the article.
Additionally, the write-up introduces the key features of three voice recorders on Samsung. Wondershare Filmora would be recommended as the most workable audio editing software. So, without delaying this any further, let us initiate this!
In this article
01 How to Record Voice/Audio on Samsung S10/S9?
02 3 Popular Voice Recorder for Samsung
03 Recommend Audio Editing Software -Wondershare Filmora
Part 1: How to Record Voice/Audio on Samsung S10/S9?
The Samsung S10/S9 comes up with an in-built voice recorder app that handles all the recording-related concerns. A Samsung user, most probably, S10/S9 user, understands the workability of the voice recorder and its three modes. However, if you plan to buy S10/S9 to address your voice recording concerns, how about we give you a guided tour?
The article presents guidelines for how to record audio on Samsung S9 and how to record audio on Samsung S10. Let us begin!
Step 1: Launching the Voice Recording App
For starters, launch the Voice Recording app from your Samsung S10/S9. The tool offers you three modes to select based on your audio preferences.
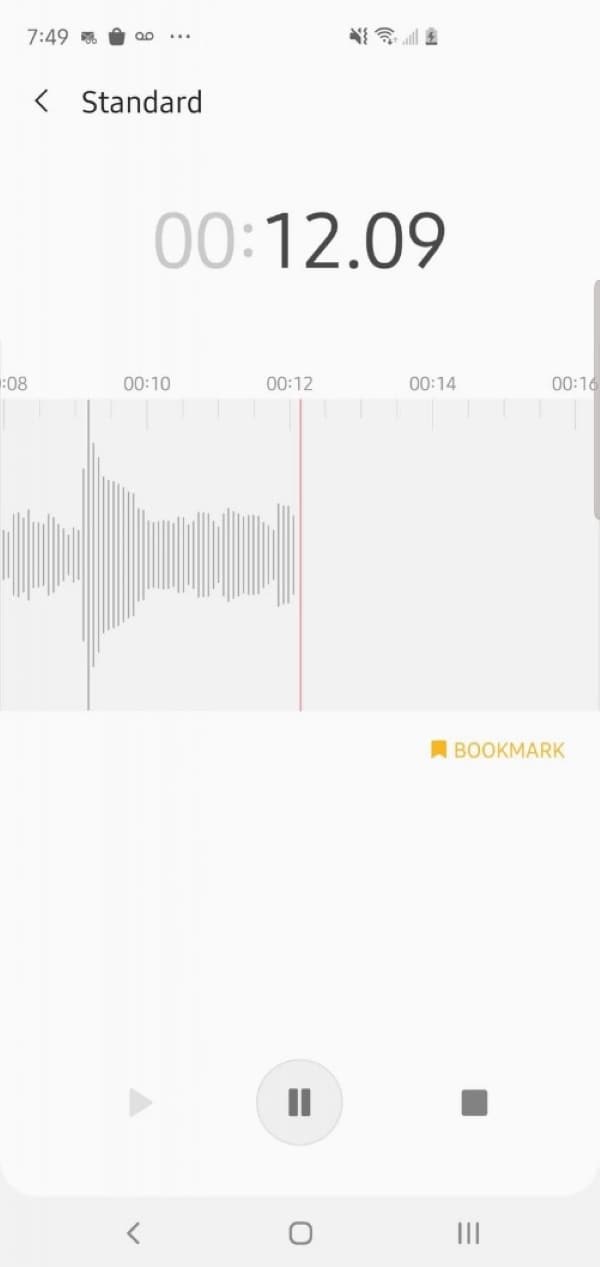
Step 2: Standard Mode
The first mode is “Standard.” It is considered a simple and fast voice recording. To use the “Standard” mode, perform the following steps.
- Click on “Standard” and then hit the “Record” button located at the bottom of the screen.
- After you have done your recording, click on “Stop” and save it.
Step 3: Interview Mode
The next mode is the “Interview” mode. This mode makes use of two microphones, which are connected at each end of the phone. The mode works like a charm when you are expected to record a conversational interview. To use the “Interview” mode, follow the steps given below:
- Choose “Interview” and then click on the “Record” button.
- Click on “Stop” after you are done with the audio recording. After that, click on “Save” to save the final output.

Step 4: Speech-to-Text Mode
“Speech to Text” is the last mode presented by the default voice recorder in Samsung S10/S9. It converts your words into text efficiently. The user is only expected to choose the final output language that you want to transcribe into. Follow the step-by-step guide below to use this mode.
- Pick “Speed to Text” mode. Hit the “Record” button once you have gathered your thoughts.
- Now, start speaking, and the audio will be converted into text. Click on “Stop” and then save the recording.

Part 2: 3 Popular Voice Recorder for Samsung
Samsung records audio through the default app and other third-party software. The sub-section shall reflect upon three voice recorders on Samsung, along with their key features. Let us have a peek, shall we?
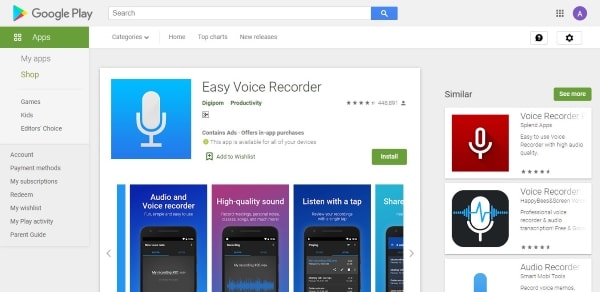
Easy Voice Recorder: HQ Audio
As the name suggests, Easy Voice Recorder does bring ease to the users. It can be students, entrepreneurs, and musicians; the voice recorder Samsung S10 has got you covered. You can record in high-quality PCM and MP4 and use AMR to save space.
Following are some exceptional features of this voice recorder on Samsung:
- The user can record using the Bluetooth microphone and even record in stereo.
- The new recordings can be easily uploaded to Google Drive or Dropbox.
- The Edit mode enables you to trim recordings and skip the unwanted sections.
Voice Recorder Pro
The next on the list of voice recorder Samsung S10 is Voice Recorder Pro. It is a free, fully-featured, and easy-to-use recording tool that supports mono and stereo recording. The live audio spectrum analyzer brings innovation to the table.

Voice Recorder Pro provides you with the following significant features:
- You can easily set the recording as your ringtone and alarm tone.
- The auto start recording process accelerates the work efficiency.
- The LED notification blinks during the recording when the screen is off.
Voice Recorder & Voice Memos
Workable for students, teachers, business tycoons, musicians, team members, and workers, allow me to introduce you to Voice Recorder and Voice Memos. The Samsung record audio software promises high quality and supports multiple recording formats, including M4A, AMR, and MP3. Moreover, you can easily share the recording without addressing any concerns.

The additional features of Voice Recorder and Voice Memos are as follows:
- As an ambient voice recorder, the software categorizes the recorded notes by using tags.
- It can record audio of meeting notes, interviews, speeches, lessons, and whatnot.
- There is no time limit for voice recordings that enhances productivity.
Part 3: Recommend Audio Editing Software -Wondershare Filmora
Voice recordings have become part and parcel of our lives. Teachers are creating recorded lectures, and students are receiving them. Creative professionals are recording their voices through audio workstations, and journalists are interviewing celebrities and influencers.
If we are not on the sending end, we would be on the receiving end; therefore, one should have access to advanced audio editing software by all means. Don’t you agree?
Wondershare Filmora understands the importance of audio usage in our life. It has developed a diverse set of editing features that would never leave you in a lurch. Let us have a look at each of them, shall we?

For Win 7 or later (64-bit)
For macOS 10.12 or later
- The “Split Audio” functionality divides and splits the audio into different sections as the user deems necessary. The feature has kept the creative professionals on the edge of their seats.
- The “Adjust Audio” trait helps make needed adjustments to the audio. There are multiple adjustment sliders for pitch and volume.
- The “Audio Denoise” feature helps you steer clear of background noise coming out of your audio clips. This trait has changed the narrative of all audio recorders in the world.
- The Audio Equalizer can also be customized in seconds that offers the user a variety of options. Moreover, you can fade the audio in and out by using the slider effortlessly.
- Wondershare Filmora can also be counted upon to remove the video’s original audio or add a new clip to it.
- The voiceovers can be added by following a simple set of procedures. Essentially, you can add as much voiceover as you fund necessary.
- You can also trim audio clips to get rid of silent parts of the recorded voice and give it a professional outlook.
- The empty audio tracks can be deleted, and track height can be adjusted as well. Furthermore, the audio volume can be adjusted using the “Audio Panel” or via your timeline.
- The audio speed status can also be tailored without facing any complications, even for beginners in the field.
Versatile Video Editor - Wondershare Filmora
An easy yet powerful editor
Numerous effects to choose from
Detailed tutorials provided by the official channel
Closing Words
The traditional ways of recording audio have gone obsolete now. The Android and iPhone devices offer in-built voice recorders to avoid downloading third-party software. The article covered the voice recorder Samsung S10 and the procedure to record through the pre-installed app. Wondershare Filmora’s editing features were covered extensively to help users pick it for their daily chores.
02 3 Popular Voice Recorder for Samsung
03 Recommend Audio Editing Software -Wondershare Filmora
Part 1: How to Record Voice/Audio on Samsung S10/S9?
The Samsung S10/S9 comes up with an in-built voice recorder app that handles all the recording-related concerns. A Samsung user, most probably, S10/S9 user, understands the workability of the voice recorder and its three modes. However, if you plan to buy S10/S9 to address your voice recording concerns, how about we give you a guided tour?
The article presents guidelines for how to record audio on Samsung S9 and how to record audio on Samsung S10. Let us begin!
Step 1: Launching the Voice Recording App
For starters, launch the Voice Recording app from your Samsung S10/S9. The tool offers you three modes to select based on your audio preferences.
Step 2: Standard Mode
The first mode is “Standard.” It is considered a simple and fast voice recording. To use the “Standard” mode, perform the following steps.
- Click on “Standard” and then hit the “Record” button located at the bottom of the screen.
- After you have done your recording, click on “Stop” and save it.

Step 3: Interview Mode
The next mode is the “Interview” mode. This mode makes use of two microphones, which are connected at each end of the phone. The mode works like a charm when you are expected to record a conversational interview. To use the “Interview” mode, follow the steps given below:
- Choose “Interview” and then click on the “Record” button.
- Click on “Stop” after you are done with the audio recording. After that, click on “Save” to save the final output.

Step 4: Speech-to-Text Mode
“Speech to Text” is the last mode presented by the default voice recorder in Samsung S10/S9. It converts your words into text efficiently. The user is only expected to choose the final output language that you want to transcribe into. Follow the step-by-step guide below to use this mode.
- Pick “Speed to Text” mode. Hit the “Record” button once you have gathered your thoughts.
- Now, start speaking, and the audio will be converted into text. Click on “Stop” and then save the recording.

Part 2: 3 Popular Voice Recorder for Samsung
Samsung records audio through the default app and other third-party software. The sub-section shall reflect upon three voice recorders on Samsung, along with their key features. Let us have a peek, shall we?
Easy Voice Recorder: HQ Audio
As the name suggests, Easy Voice Recorder does bring ease to the users. It can be students, entrepreneurs, and musicians; the voice recorder Samsung S10 has got you covered. You can record in high-quality PCM and MP4 and use AMR to save space.

Following are some exceptional features of this voice recorder on Samsung:
- The user can record using the Bluetooth microphone and even record in stereo.
- The new recordings can be easily uploaded to Google Drive or Dropbox.
- The Edit mode enables you to trim recordings and skip the unwanted sections.
Voice Recorder Pro
The next on the list of voice recorder Samsung S10 is Voice Recorder Pro. It is a free, fully-featured, and easy-to-use recording tool that supports mono and stereo recording. The live audio spectrum analyzer brings innovation to the table.

Voice Recorder Pro provides you with the following significant features:
- You can easily set the recording as your ringtone and alarm tone.
- The auto start recording process accelerates the work efficiency.
- The LED notification blinks during the recording when the screen is off.
Voice Recorder & Voice Memos
Workable for students, teachers, business tycoons, musicians, team members, and workers, allow me to introduce you to Voice Recorder and Voice Memos. The Samsung record audio software promises high quality and supports multiple recording formats, including M4A, AMR, and MP3. Moreover, you can easily share the recording without addressing any concerns.

The additional features of Voice Recorder and Voice Memos are as follows:
- As an ambient voice recorder, the software categorizes the recorded notes by using tags.
- It can record audio of meeting notes, interviews, speeches, lessons, and whatnot.
- There is no time limit for voice recordings that enhances productivity.
Part 3: Recommend Audio Editing Software -Wondershare Filmora
Voice recordings have become part and parcel of our lives. Teachers are creating recorded lectures, and students are receiving them. Creative professionals are recording their voices through audio workstations, and journalists are interviewing celebrities and influencers.
If we are not on the sending end, we would be on the receiving end; therefore, one should have access to advanced audio editing software by all means. Don’t you agree?
Wondershare Filmora understands the importance of audio usage in our life. It has developed a diverse set of editing features that would never leave you in a lurch. Let us have a look at each of them, shall we?

For Win 7 or later (64-bit)
For macOS 10.12 or later
- The “Split Audio” functionality divides and splits the audio into different sections as the user deems necessary. The feature has kept the creative professionals on the edge of their seats.
- The “Adjust Audio” trait helps make needed adjustments to the audio. There are multiple adjustment sliders for pitch and volume.
- The “Audio Denoise” feature helps you steer clear of background noise coming out of your audio clips. This trait has changed the narrative of all audio recorders in the world.
- The Audio Equalizer can also be customized in seconds that offers the user a variety of options. Moreover, you can fade the audio in and out by using the slider effortlessly.
- Wondershare Filmora can also be counted upon to remove the video’s original audio or add a new clip to it.
- The voiceovers can be added by following a simple set of procedures. Essentially, you can add as much voiceover as you fund necessary.
- You can also trim audio clips to get rid of silent parts of the recorded voice and give it a professional outlook.
- The empty audio tracks can be deleted, and track height can be adjusted as well. Furthermore, the audio volume can be adjusted using the “Audio Panel” or via your timeline.
- The audio speed status can also be tailored without facing any complications, even for beginners in the field.
Versatile Video Editor - Wondershare Filmora
An easy yet powerful editor
Numerous effects to choose from
Detailed tutorials provided by the official channel
Closing Words
The traditional ways of recording audio have gone obsolete now. The Android and iPhone devices offer in-built voice recorders to avoid downloading third-party software. The article covered the voice recorder Samsung S10 and the procedure to record through the pre-installed app. Wondershare Filmora’s editing features were covered extensively to help users pick it for their daily chores.
02 3 Popular Voice Recorder for Samsung
03 Recommend Audio Editing Software -Wondershare Filmora
Part 1: How to Record Voice/Audio on Samsung S10/S9?
The Samsung S10/S9 comes up with an in-built voice recorder app that handles all the recording-related concerns. A Samsung user, most probably, S10/S9 user, understands the workability of the voice recorder and its three modes. However, if you plan to buy S10/S9 to address your voice recording concerns, how about we give you a guided tour?
The article presents guidelines for how to record audio on Samsung S9 and how to record audio on Samsung S10. Let us begin!
Step 1: Launching the Voice Recording App
For starters, launch the Voice Recording app from your Samsung S10/S9. The tool offers you three modes to select based on your audio preferences.
Step 2: Standard Mode
The first mode is “Standard.” It is considered a simple and fast voice recording. To use the “Standard” mode, perform the following steps.
- Click on “Standard” and then hit the “Record” button located at the bottom of the screen.
- After you have done your recording, click on “Stop” and save it.

Step 3: Interview Mode
The next mode is the “Interview” mode. This mode makes use of two microphones, which are connected at each end of the phone. The mode works like a charm when you are expected to record a conversational interview. To use the “Interview” mode, follow the steps given below:
- Choose “Interview” and then click on the “Record” button.
- Click on “Stop” after you are done with the audio recording. After that, click on “Save” to save the final output.

Step 4: Speech-to-Text Mode
“Speech to Text” is the last mode presented by the default voice recorder in Samsung S10/S9. It converts your words into text efficiently. The user is only expected to choose the final output language that you want to transcribe into. Follow the step-by-step guide below to use this mode.
- Pick “Speed to Text” mode. Hit the “Record” button once you have gathered your thoughts.
- Now, start speaking, and the audio will be converted into text. Click on “Stop” and then save the recording.

Part 2: 3 Popular Voice Recorder for Samsung
Samsung records audio through the default app and other third-party software. The sub-section shall reflect upon three voice recorders on Samsung, along with their key features. Let us have a peek, shall we?
Easy Voice Recorder: HQ Audio
As the name suggests, Easy Voice Recorder does bring ease to the users. It can be students, entrepreneurs, and musicians; the voice recorder Samsung S10 has got you covered. You can record in high-quality PCM and MP4 and use AMR to save space.

Following are some exceptional features of this voice recorder on Samsung:
- The user can record using the Bluetooth microphone and even record in stereo.
- The new recordings can be easily uploaded to Google Drive or Dropbox.
- The Edit mode enables you to trim recordings and skip the unwanted sections.
Voice Recorder Pro
The next on the list of voice recorder Samsung S10 is Voice Recorder Pro. It is a free, fully-featured, and easy-to-use recording tool that supports mono and stereo recording. The live audio spectrum analyzer brings innovation to the table.

Voice Recorder Pro provides you with the following significant features:
- You can easily set the recording as your ringtone and alarm tone.
- The auto start recording process accelerates the work efficiency.
- The LED notification blinks during the recording when the screen is off.
Voice Recorder & Voice Memos
Workable for students, teachers, business tycoons, musicians, team members, and workers, allow me to introduce you to Voice Recorder and Voice Memos. The Samsung record audio software promises high quality and supports multiple recording formats, including M4A, AMR, and MP3. Moreover, you can easily share the recording without addressing any concerns.

The additional features of Voice Recorder and Voice Memos are as follows:
- As an ambient voice recorder, the software categorizes the recorded notes by using tags.
- It can record audio of meeting notes, interviews, speeches, lessons, and whatnot.
- There is no time limit for voice recordings that enhances productivity.
Part 3: Recommend Audio Editing Software -Wondershare Filmora
Voice recordings have become part and parcel of our lives. Teachers are creating recorded lectures, and students are receiving them. Creative professionals are recording their voices through audio workstations, and journalists are interviewing celebrities and influencers.
If we are not on the sending end, we would be on the receiving end; therefore, one should have access to advanced audio editing software by all means. Don’t you agree?
Wondershare Filmora understands the importance of audio usage in our life. It has developed a diverse set of editing features that would never leave you in a lurch. Let us have a look at each of them, shall we?

For Win 7 or later (64-bit)
For macOS 10.12 or later
- The “Split Audio” functionality divides and splits the audio into different sections as the user deems necessary. The feature has kept the creative professionals on the edge of their seats.
- The “Adjust Audio” trait helps make needed adjustments to the audio. There are multiple adjustment sliders for pitch and volume.
- The “Audio Denoise” feature helps you steer clear of background noise coming out of your audio clips. This trait has changed the narrative of all audio recorders in the world.
- The Audio Equalizer can also be customized in seconds that offers the user a variety of options. Moreover, you can fade the audio in and out by using the slider effortlessly.
- Wondershare Filmora can also be counted upon to remove the video’s original audio or add a new clip to it.
- The voiceovers can be added by following a simple set of procedures. Essentially, you can add as much voiceover as you fund necessary.
- You can also trim audio clips to get rid of silent parts of the recorded voice and give it a professional outlook.
- The empty audio tracks can be deleted, and track height can be adjusted as well. Furthermore, the audio volume can be adjusted using the “Audio Panel” or via your timeline.
- The audio speed status can also be tailored without facing any complications, even for beginners in the field.
Versatile Video Editor - Wondershare Filmora
An easy yet powerful editor
Numerous effects to choose from
Detailed tutorials provided by the official channel
Closing Words
The traditional ways of recording audio have gone obsolete now. The Android and iPhone devices offer in-built voice recorders to avoid downloading third-party software. The article covered the voice recorder Samsung S10 and the procedure to record through the pre-installed app. Wondershare Filmora’s editing features were covered extensively to help users pick it for their daily chores.
02 3 Popular Voice Recorder for Samsung
03 Recommend Audio Editing Software -Wondershare Filmora
Part 1: How to Record Voice/Audio on Samsung S10/S9?
The Samsung S10/S9 comes up with an in-built voice recorder app that handles all the recording-related concerns. A Samsung user, most probably, S10/S9 user, understands the workability of the voice recorder and its three modes. However, if you plan to buy S10/S9 to address your voice recording concerns, how about we give you a guided tour?
The article presents guidelines for how to record audio on Samsung S9 and how to record audio on Samsung S10. Let us begin!
Step 1: Launching the Voice Recording App
For starters, launch the Voice Recording app from your Samsung S10/S9. The tool offers you three modes to select based on your audio preferences.
Step 2: Standard Mode
The first mode is “Standard.” It is considered a simple and fast voice recording. To use the “Standard” mode, perform the following steps.
- Click on “Standard” and then hit the “Record” button located at the bottom of the screen.
- After you have done your recording, click on “Stop” and save it.

Step 3: Interview Mode
The next mode is the “Interview” mode. This mode makes use of two microphones, which are connected at each end of the phone. The mode works like a charm when you are expected to record a conversational interview. To use the “Interview” mode, follow the steps given below:
- Choose “Interview” and then click on the “Record” button.
- Click on “Stop” after you are done with the audio recording. After that, click on “Save” to save the final output.

Step 4: Speech-to-Text Mode
“Speech to Text” is the last mode presented by the default voice recorder in Samsung S10/S9. It converts your words into text efficiently. The user is only expected to choose the final output language that you want to transcribe into. Follow the step-by-step guide below to use this mode.
- Pick “Speed to Text” mode. Hit the “Record” button once you have gathered your thoughts.
- Now, start speaking, and the audio will be converted into text. Click on “Stop” and then save the recording.

Part 2: 3 Popular Voice Recorder for Samsung
Samsung records audio through the default app and other third-party software. The sub-section shall reflect upon three voice recorders on Samsung, along with their key features. Let us have a peek, shall we?
Easy Voice Recorder: HQ Audio
As the name suggests, Easy Voice Recorder does bring ease to the users. It can be students, entrepreneurs, and musicians; the voice recorder Samsung S10 has got you covered. You can record in high-quality PCM and MP4 and use AMR to save space.

Following are some exceptional features of this voice recorder on Samsung:
- The user can record using the Bluetooth microphone and even record in stereo.
- The new recordings can be easily uploaded to Google Drive or Dropbox.
- The Edit mode enables you to trim recordings and skip the unwanted sections.
Voice Recorder Pro
The next on the list of voice recorder Samsung S10 is Voice Recorder Pro. It is a free, fully-featured, and easy-to-use recording tool that supports mono and stereo recording. The live audio spectrum analyzer brings innovation to the table.

Voice Recorder Pro provides you with the following significant features:
- You can easily set the recording as your ringtone and alarm tone.
- The auto start recording process accelerates the work efficiency.
- The LED notification blinks during the recording when the screen is off.
Voice Recorder & Voice Memos
Workable for students, teachers, business tycoons, musicians, team members, and workers, allow me to introduce you to Voice Recorder and Voice Memos. The Samsung record audio software promises high quality and supports multiple recording formats, including M4A, AMR, and MP3. Moreover, you can easily share the recording without addressing any concerns.

The additional features of Voice Recorder and Voice Memos are as follows:
- As an ambient voice recorder, the software categorizes the recorded notes by using tags.
- It can record audio of meeting notes, interviews, speeches, lessons, and whatnot.
- There is no time limit for voice recordings that enhances productivity.
Part 3: Recommend Audio Editing Software -Wondershare Filmora
Voice recordings have become part and parcel of our lives. Teachers are creating recorded lectures, and students are receiving them. Creative professionals are recording their voices through audio workstations, and journalists are interviewing celebrities and influencers.
If we are not on the sending end, we would be on the receiving end; therefore, one should have access to advanced audio editing software by all means. Don’t you agree?
Wondershare Filmora understands the importance of audio usage in our life. It has developed a diverse set of editing features that would never leave you in a lurch. Let us have a look at each of them, shall we?

For Win 7 or later (64-bit)
For macOS 10.12 or later
- The “Split Audio” functionality divides and splits the audio into different sections as the user deems necessary. The feature has kept the creative professionals on the edge of their seats.
- The “Adjust Audio” trait helps make needed adjustments to the audio. There are multiple adjustment sliders for pitch and volume.
- The “Audio Denoise” feature helps you steer clear of background noise coming out of your audio clips. This trait has changed the narrative of all audio recorders in the world.
- The Audio Equalizer can also be customized in seconds that offers the user a variety of options. Moreover, you can fade the audio in and out by using the slider effortlessly.
- Wondershare Filmora can also be counted upon to remove the video’s original audio or add a new clip to it.
- The voiceovers can be added by following a simple set of procedures. Essentially, you can add as much voiceover as you fund necessary.
- You can also trim audio clips to get rid of silent parts of the recorded voice and give it a professional outlook.
- The empty audio tracks can be deleted, and track height can be adjusted as well. Furthermore, the audio volume can be adjusted using the “Audio Panel” or via your timeline.
- The audio speed status can also be tailored without facing any complications, even for beginners in the field.
Versatile Video Editor - Wondershare Filmora
An easy yet powerful editor
Numerous effects to choose from
Detailed tutorials provided by the official channel
Closing Words
The traditional ways of recording audio have gone obsolete now. The Android and iPhone devices offer in-built voice recorders to avoid downloading third-party software. The article covered the voice recorder Samsung S10 and the procedure to record through the pre-installed app. Wondershare Filmora’s editing features were covered extensively to help users pick it for their daily chores.
“Techniques in Artificial Intelligence for Effective Sonic Clarity and Denoising”
How to DeNoise AI
There have often been times when we took some photo or video with our mobile phones or digital cameras, but we found out later that the clip contained hiss, some compression or particles. Everyone, especially in this digital world, is trying to make their content as clean as possible, without impurities, for the audiences to watch, enjoy, and stay with the creators. So, you might find it really uncomfortable when you are in this kind of situation. But what you can do, is doable – you can depend on a video denoise software!
There are a lot of online or offline tools you could use to do that, and we have discussed a lot of them on our web-site, and now, we will review yet another way to achieve your desired result when it comes to noise and grain. So, in today’s article, we will touch upon how to AI DeNoise your image!
The case with this intelligent noise reduction for 2022 is that noise reduction software has been the same for over a decade. This is when DeNoise AI comes to play, because its approach is something new – it uses deep learning. The process is lengthy and focuses on learning millions of images, thus let DeNoise AI to accurately distinguish between real image detail and noise. This is so important because with this new technique, now it is possible to denoise images while actually recovering important detail, something that was impossible a few years ago.
Topaz DeNoise AI has a very simple and intuitive interface with different noise removal options. Anyway, using it in the most effective way would require some knowledge. Oh, and, it would be a headache if you have a slow computer!..
So, as mentioned, traditional noise reduction software most of the time reduces the original detail in the images, but DeNoise AI’s noise reduction eliminates noise, meanwhile, preserves the detail and even enhances it. The new update of Topaz DeNoise AI offers different advanced DeNoise AI Models that can be integrated perfectly into your workflow; you can use it as a standalone piece of software or as a plugin for Adobe Photoshop or Lightroom.
How to AI DeNoise a file
Let’s just suppose you don’t have the software. So, download and install Topaz DeNoise AI. Go to Topaz Labs and select your operating system: Windows or Macintosh OS. Then, install the program.

Once the installation is finished, you will be able to see the Topaz DeNoise AI icon among your applications. Topaz DeNoise AI plugins for Lightroom or Photoshop would also be added there automatically, without any further intervention. But, if that is not the case, it’s ok to add them manually.
The first time you open Topaz DeNoise AI, you can either log in with your Topaz Labs account or try the Denoise AI 30-day free trial.
So, let’s discover how to use DeNoise AI in its different versions!
First, how to remove digital noise with DeNoise AI: DeNoise AI supports most of the commonly used photography files like raw files, dng, tiff, jpegs, etc. So, open the program, drag or open your image and select the best AI model.
In the upper right corner, you will find a toolbar with these options:
Preview Options:
To change the view mode of the photo you’re working with, you can select:
- Original (original photo preview)
- Single (denoised photo preview).
- Split (Original and denoised photo preview with a split slider)
- Side by Side ( Original and denoised photo preview)
- Comparison ( Compare how the different Ai Models work in your photos at the same time).
Zoom
Zoom in on your images to accurately check the process’s progress.

Denoise AI full review and tutorial
On the right side, you’ll find:
- A navigator with the selected zoom box.
- A list with the following DeNoise AI Models:
- Standard: Broadly developed noise reduction that maintains detail.
- Clear: Best for photos with smooth and rounded surfaces such as skin, rocks, water, etc.
- Low light: Best for low-light conditions and heavy noise
- Severe noise: Best for extremely noisy photos
- Raw: The newest AI model in DeNoise. It provides excellent noise reduction, preserving detail, and authentic color starting from a RAW file.
- Main Settings. The Auto mode works great in most situations. However, it can be pretty aggressive and give your photos a washed-out look. With Manual Mode, you can set the adjustments according to your taste.
- The Post-processing sliders help reduce any color noise remaining in your photos and preserve original detail.
- Save Image: To set your output settings before saving your images.
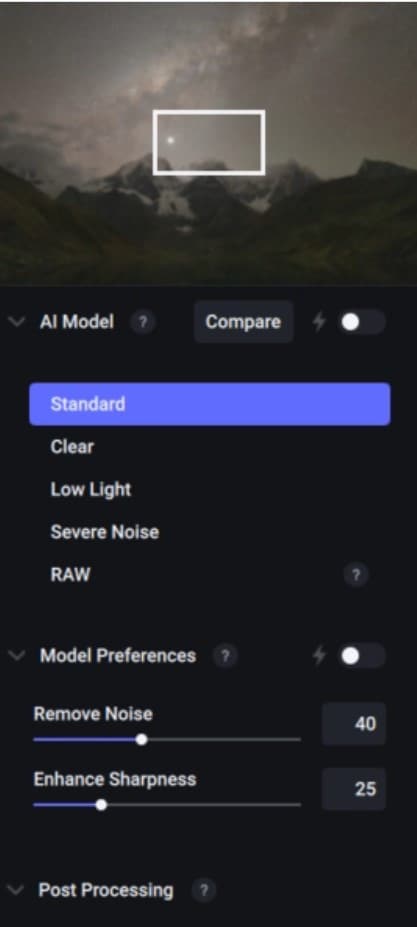
Then, adjust the setting sliders (you can just select Auto mode here); now, apply the adjustments locally, if necessary, using the mask tool; and, save the file with the output settings selected.
Second, let’ts move to DeNoise AI workflow.
If you are trying to find the simplest way to start with DeNoise Ai, it’s better to use the suggested mode, - Light bulb icon! This will automatically select an AI model, and will do so based oon your image. Anyway, in order to remove digital noise there, it’s the best to use the updated comparison view. The reason is obvious – you can take a look right away and compare varied AI models, or the same ones with some different settings to your liking.
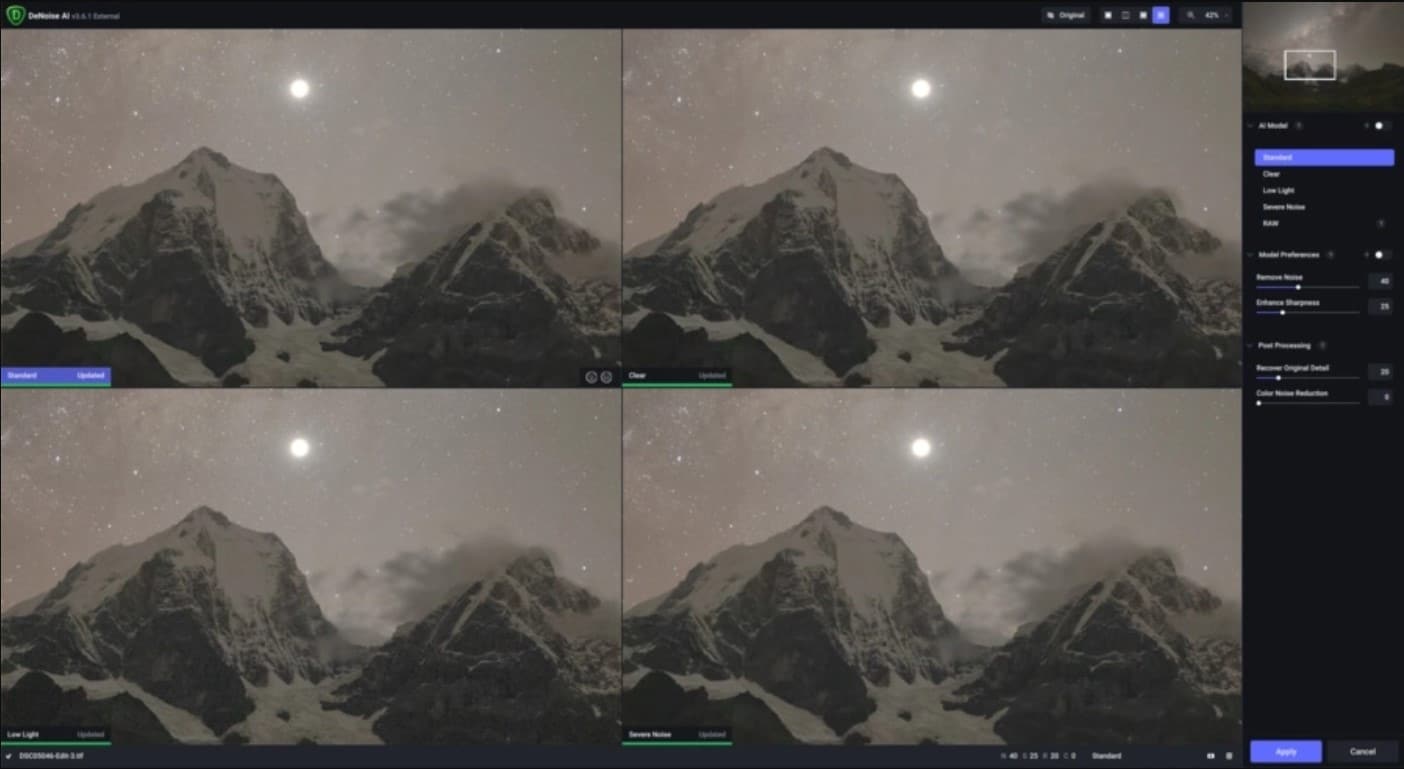
So, how to do just that? Well, select the AI model and fine-tune the adjustment using the following settings:
- Remove Noise: This slider is wonderful!. It removes the noise in your photo, but doesn’t kind of wash out the images. Values between 10-50 are the best in most cases.
- Enhance Sharpness: It sharpens and recovers the detail in images that may become a bit blurry after denoising. It would be excessive if you set the values over 30, in case you would like to avoid odd textures.
After that, you can refine your results with these DeNoise AI Post-processing adjustments:
- Recover Original Detail: It helps recover some detail that has been washed out after the noise reduction and adds a bit of grain to keep the image natural. 20-40 points is more than enough.
- Color Noise Reduction: This is a powerful tool that reduces any color noise remaining in your images. Zoom in on a dark area and adjust the slider until the color noise disappears and you are happy with the result!
And, the last topic to discuss is DeNoise AI Masking Tool! The software includes a very simple Mask tool in case you want to denoise the image only in certain areas and not in others. So, the key here is that DeNoise AI will apply your adjustments only to the areas that you paint in red.
You need to ckeck the Overlay tool to see the red color while painting. When you are satisfied with the areas you panted, After painting over these areas, you will see a preview of your mask in black and white. Here, white shows the adjustments while black hides them. Following this, DeNoise AI will just be applied to the areas painted in white.
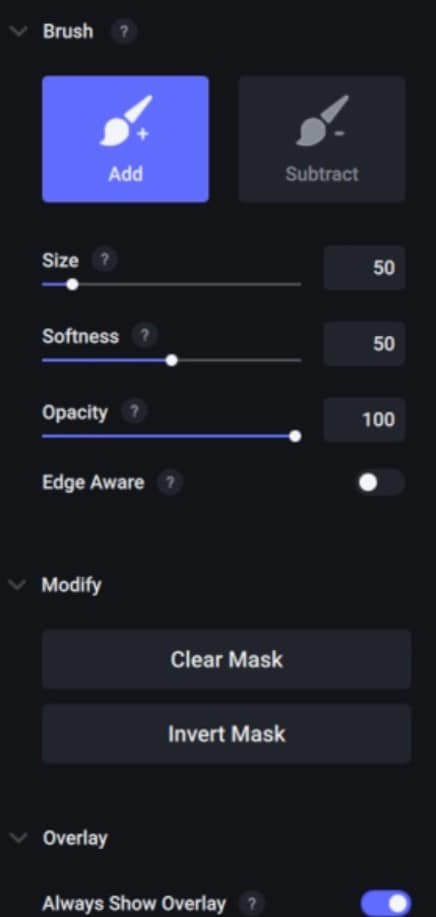
And, the masking settings are:
- Add/Subtract: to paint in white or black and reveal or hide your adjustments.
- Size: to change the size of your brush.
- Softness: to change the hardness of your brush. Being 0 is the hardest and 100 the softest.
- Opacity: to vary the opacity of the mask to add precise local adjustments.
- Mask options: to clear or invert your mask.
- Overlay: to show in red these areas where you are painting.
Once you finish creating your mask, just click on the “apply mask” button, and there you go!
Wondershare Filmora X
Even though we discussed in so much detail how to DeNoise AI our images, it’s important to keep in mind that even videos need denoising. So, we decided to keep you informed about how to do that, as well. Wondershare Filmora X is something that can help us with that – it can change our damaged scene into something more acceptable. And in order to do so, first, you need to go to the Effects panel and type: “Smart Denoise”, then, right-click on the video and choose Edit Properties.
Free Download For Win 7 or later(64-bit)
Free Download For macOS 10.14 or later
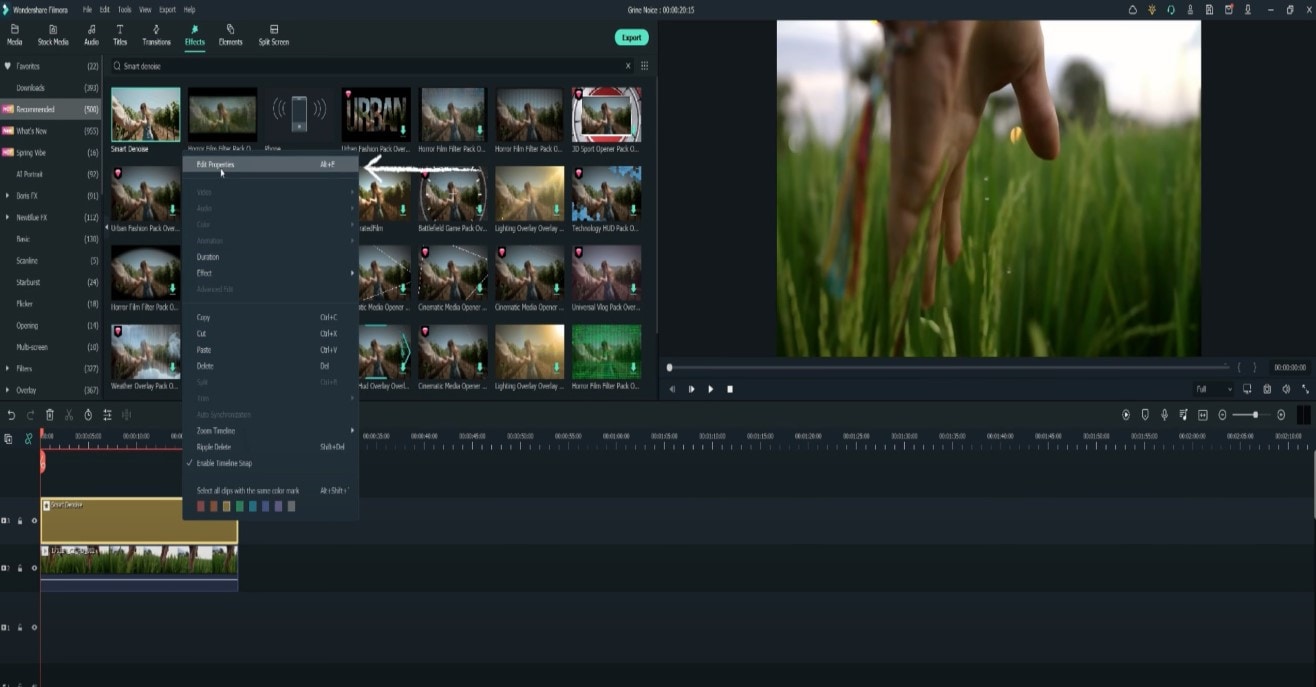
With this, you will see the Smart Denoise, where you are able to change opacity of the clip, threshold and radius.
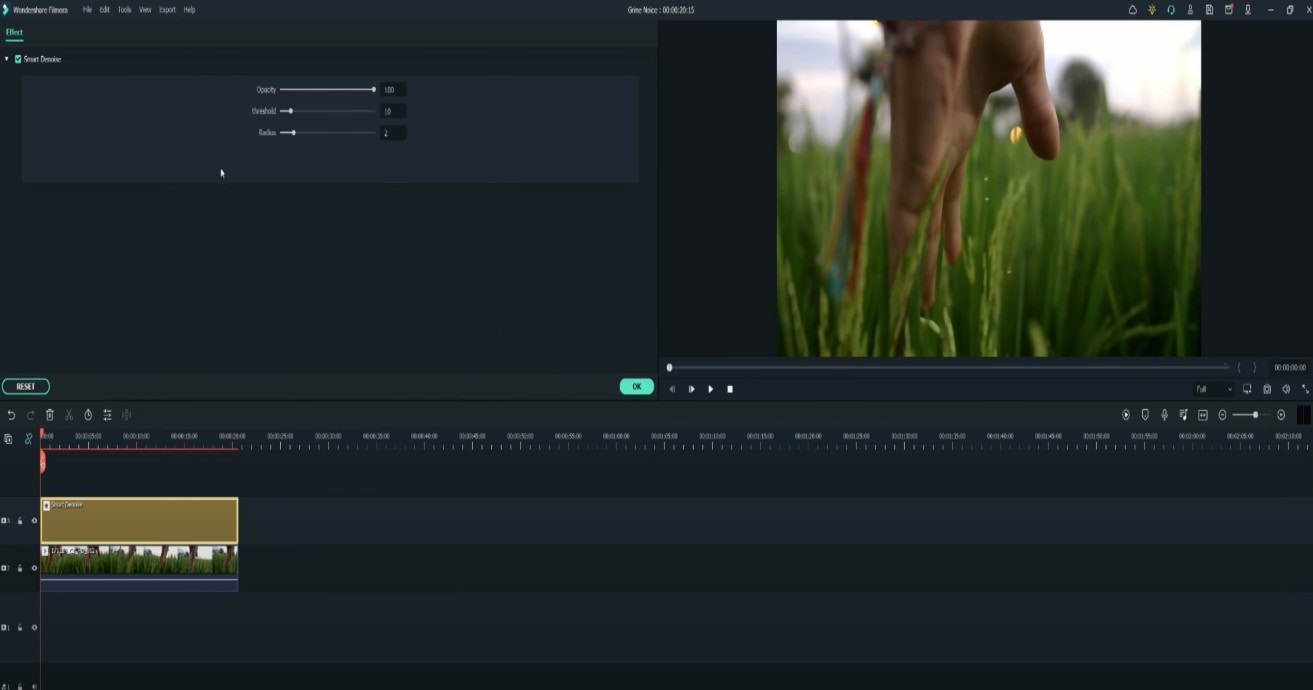
You can now reduce Opacity until you are satisfied with the result. The box next to Smart Denoise will show you the scene before and after the effect.
Of course, it is much easier than DeNoise AI looks and works, and it’s worth the try – will take so much less minutes!
Bonus tip: Wondershare Filmora audio denoise
We already explained how video image and video denoising work, but, denoising not only means digital noise on the screen, of course. It can be literally a noise! The sound which is not so pleasant to listen to… Audio background denoising is to remove unwanted hum from the audio in order for it to become more hearable. So, doing this in Wondershare Filmora works in a quite easy way. Use the guideline:
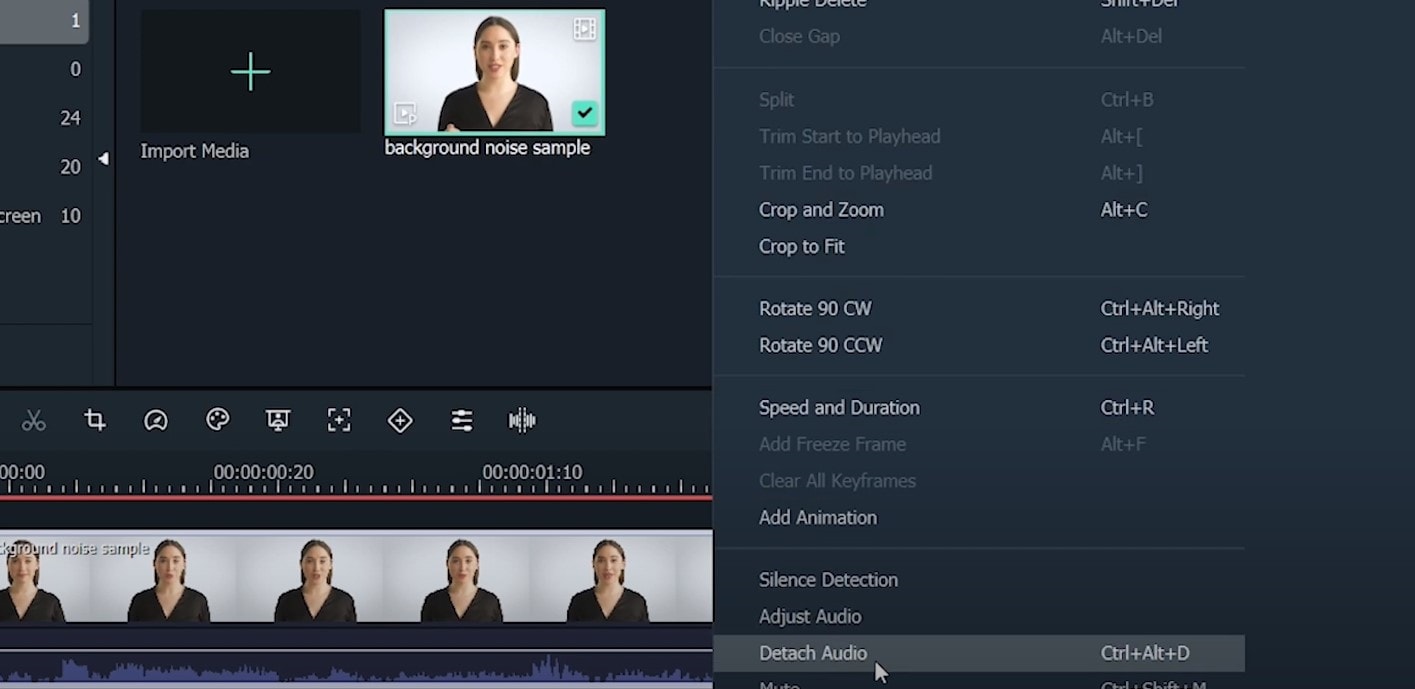
Drag and drop your video into the timeline. Right-click on the clip and hit Detach Audio, which will let you separate audio and video from one another and make sure you can work on them one by one.
Double-click on the audio track and have access to the editing panel, where you can see Remove background noise – it is not needed to emphasize what this option does for you!

Keep in mind that there is a second way to achieve the same result as well, but this in case you don’t want to detach the audio: Double-click on the video clip in the timeline, the editing panel opens, so switch to Audio. Checking the box next to Remove background noise will show that there are three levels – weak, mid, and strong, and of course, you can choose to your liking!
If the voice recording doesn’t sound natural anymore, you can do the following: Click on Customize and Customize Equalizer window will open.
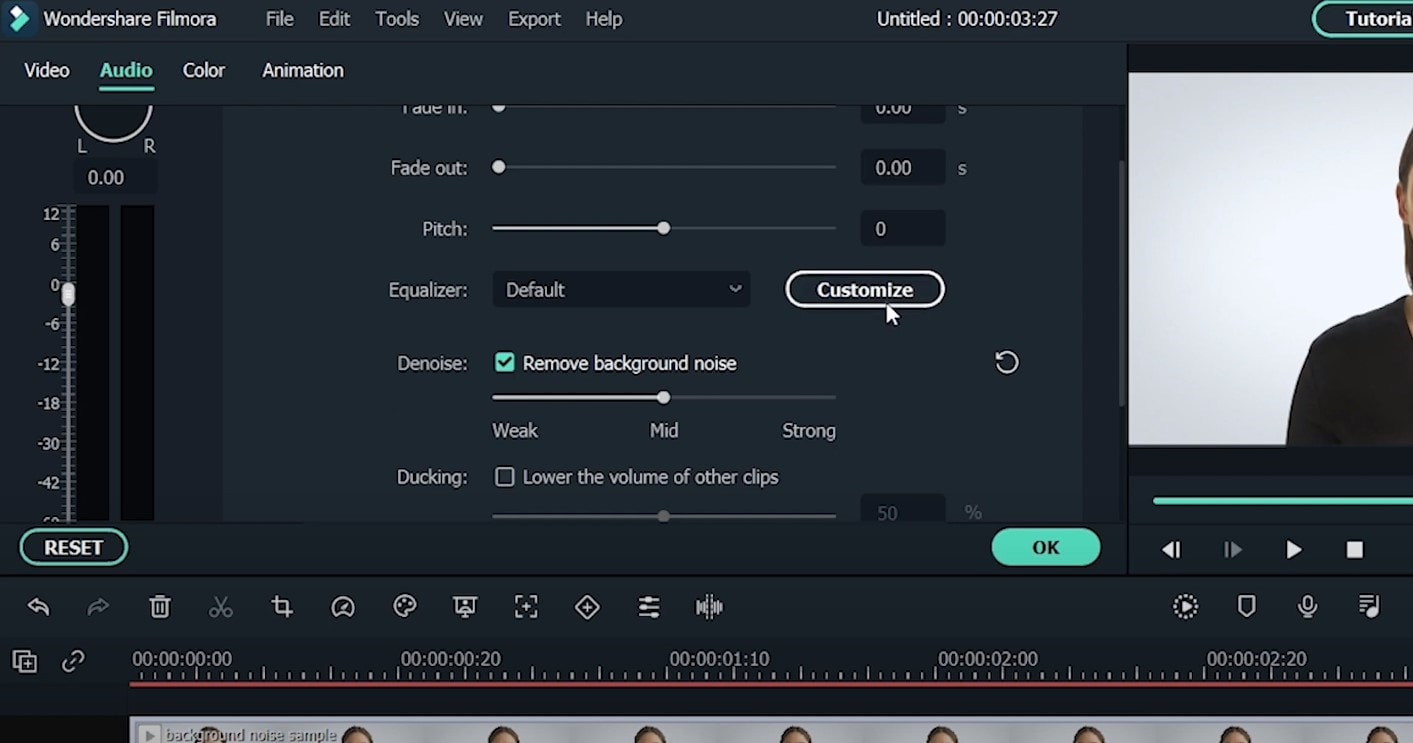
On the left, you can see the low tunes, while the highs are on the right. Background noises are often on the left, so you can lower them to get rid of them, but in order to have a more natural sound, raise the middle ones a little – and you are done when you are content with the sound!

So, in this article, you learned about different noises, and about different tools and programs to denoise your images, videos, and audios! Pretty enlightening, ha? Let’s hope this is something you are looking for, and will put to good use very, very soon!
Free Download For macOS 10.14 or later

With this, you will see the Smart Denoise, where you are able to change opacity of the clip, threshold and radius.

You can now reduce Opacity until you are satisfied with the result. The box next to Smart Denoise will show you the scene before and after the effect.
Of course, it is much easier than DeNoise AI looks and works, and it’s worth the try – will take so much less minutes!
Bonus tip: Wondershare Filmora audio denoise
We already explained how video image and video denoising work, but, denoising not only means digital noise on the screen, of course. It can be literally a noise! The sound which is not so pleasant to listen to… Audio background denoising is to remove unwanted hum from the audio in order for it to become more hearable. So, doing this in Wondershare Filmora works in a quite easy way. Use the guideline:
Drag and drop your video into the timeline. Right-click on the clip and hit Detach Audio, which will let you separate audio and video from one another and make sure you can work on them one by one.

Double-click on the audio track and have access to the editing panel, where you can see Remove background noise – it is not needed to emphasize what this option does for you!

Keep in mind that there is a second way to achieve the same result as well, but this in case you don’t want to detach the audio: Double-click on the video clip in the timeline, the editing panel opens, so switch to Audio. Checking the box next to Remove background noise will show that there are three levels – weak, mid, and strong, and of course, you can choose to your liking!
If the voice recording doesn’t sound natural anymore, you can do the following: Click on Customize and Customize Equalizer window will open.

On the left, you can see the low tunes, while the highs are on the right. Background noises are often on the left, so you can lower them to get rid of them, but in order to have a more natural sound, raise the middle ones a little – and you are done when you are content with the sound!

So, in this article, you learned about different noises, and about different tools and programs to denoise your images, videos, and audios! Pretty enlightening, ha? Let’s hope this is something you are looking for, and will put to good use very, very soon!
Auditory Alchemy: Top 15 Montage Soundtracks Adapting to Varying Visual Media
Montage is a film editing technique that combines a series of clips or shots into a single sequence. Background music is often applied to the final montage during compilation. We’ll look at some of the best montage music for different video types and the benefits of adding them to your montage video.
Why Music Is Important for Montage Video
Music plays an essential role in montage videos. Here are five reasons why you should add music to your montage video.
1. Music Captures Attention
One of the reasons people include music in montage videos is that it holds the audience’s attention; it shapes emotion while motivating viewers. In addition to touching viewers, music makes the moving images in your montage video seem more beautiful and engaging. It also brings mood and dynamism to the video.
Musicologists have discovered that the choice of musical instruments, volume, harmony, and tempo play a vital role in montage video.
2. Music Takes Your Montage Video to the Next Level
By using music, you’ll boost the cohesiveness and production value of your montage video. Your audience wants a professional montage video that is well-constructed and flows nicely. Music is the bridge that lets your montage video transition seamlessly between different scenes or ideas, particularly when you need to have a jump cut.
Additionally, montage music is a great way to fill in moments in your montage video that would have been silent. You can also use it to fill dead air in your video where there is a visual without sound.
3. Music Helps You to Communicate Your Message
Music is a vital component in conveying your message in your montage video. The music in your video should be in tune with the message you are trying to send.
4. Helps to Underscore the Unfolding Action
Montage music helps you to emphasize the action taking place in your video. As a result, this will make your audience focus on the action and get your message.
5. Helps You Create Rhythm for Your Montage Video
Music allows you to create a rhythm for scenes and clips in your montage video. A good rhythm can hold up your entire montage video.
15 Best Montage Music for Different Video Types
A good montage music track syncs to the beat of the video, and the song plays right on each shot. Keeping this in mind, here are 15 of the best montage music for different video types.
1) Tony Z - Road So Far
Released in 2017, Road So Far is a song by Tony from his album of the same name. The duration of the track is 3:31 minutes. You can use this song in your gaming montage video for free so long as you give the artist credit.
- Tony Z - Road So Far
2) Call Me - LiQWYD
Call Me by LiQWYD is an electronic pop montage music ideal vlogs. The duration of this song is 2:39 minutes, and it has a BPM of 76. The song is available under a Creative Commons Attribution. You can use it for free on your montage, but you have to give LiQWYD credit.
- Call Me - LiQWYD
3) ᴇʀᴇᴅᴀᴢᴇ ɪ ᴛᴇʟʟ ʏᴏᴜ
ᴇʀᴇᴅᴀᴢᴇ ɪ ᴛᴇʟʟ ʏᴏᴜ is suitable for daily life montage video. The length of the songs is 05:12 minutes. The music track does not have copyright, so it’s free to use on your montage video to make it more engaging and send your message.
- ᴇʀᴇᴅᴀᴢᴇ ɪ ᴛᴇʟʟ ʏᴏᴜ
4) NEFFEX - Good Day (Wake Up)
This song is ideal for daily life montage, as it motivates you to wake up and have a great day. The duration of this copyright-free pop song is 2:52 minutes. No attribution is required when you use this song.
- NEFFEX - Good Day (Wake Up)
5) K-391 - This Is Felicitas
K-391’s This Is Felicitas is a piece of good music for montages related to birthdays. The length of the song is 4:41 minutes. It is available under a Creative Commons Attribution license, and reusing is allowed. The track will bring you nostalgia, as it will make you miss being a kid.
- K-391 - This Is Felicitas
6) New York Philharmonic’s “La Gazza Ladra” Overture
“La Gazza Ladra” Overture by New York Philharmonic is a great AFV music montage. The length of this song is 4:15 minutes, and it’s included in the Absolute Masterworks - High Energy album. You can use it in event montage videos.
- New York Philharmonic’s “La Gazza Ladra” Overture
7) Win In The End by Mark Safan
Win In The End by Mark Safan is one of the most popular 80s montage music. The song is suitable for use in event montages such as basketball games. The duration of the song is 4:44 minutes. The track is from the soundtrack of the 1985 Teen Wolf movie.
- Win In The End by Mark Safan
8) We Fight For Love by The Power Station
This 80s montage music is great for birthday videos, as it will remind you of the good old days of the Eighties. The duration of this music track is 4:19 minutes.
- We Fight For Love by The Power Station
9) Night on Bald Mountain by Various Artists
The Night on Bald Mountain is a song from the album Larry Talbot’s Favorite Halloween Music. Suitable for vlog montage, the duration of this AFV music montage is 9:41 minutes.
10) Flight By Tristam and Braken
Flight By Tristam and Braken was released in 2013, and the song is from the album by the same name. The length of this dance/electronic music track is 3:39 minutes, and it’s suitable for event montages.
- Flight By Tristam and Braken
11) Colors - Tobu
Released in 201t, Colors by Tobu from the album of the same name. The track runs 4:39 long with a major mode and a key. You can use it double-time at 256 BPM or half-time at 64 BPM. This sad song has a tempo of 128 BPM, and it’s suitable for a daily life montage.
- Colors - Tobu
12) Ahrix - Nova
Ahrix by Nova is a dance/electronic song from The Beginning album. The song was released in 2015, and it runs 4 minutes and 41 seconds long. The track has a tempo of 128 BPM, meaning it’s less than allegro but moderately fast. This song is the best music for montage for your vlog.
- Ahrix - Nova
13) Renegade - Noisestorm
Renegade by Noisestorm is an electro song that was released in 2021. It’s included in the Renegade EP as the first track, and it’s the 17th track on the compilation album Monstercat 005 - Evolution. The song has a tempo of 127 BPM, and it runs 6 minutes and 10 seconds long. The track is suitable for a sports event montage.
- Renegade - Noisestorm
14) Disfigure - Blank
Blank by Disfigure is a dance/ electronic song from the album Blank (VIP). Released in 2013, the song has a tempo of 140 BPM. The length of this track is 05:2. The song has high energy, and it’s danceable with a 4-beat-per-bar time signature; this makes it suitable for a birthday montage.
- Disfigure - Blank
15) Vince DiCola - Hearts On Fire
Hearts On Fire is a pop/rock song by Vince DiCola from the soundtrack of Rocky IV: The Symphonic Rock Suite, and it features Diego Navarro. The track runs for 4 minutes and 17 seconds. This 80s montage music has a tempo of 96 BPM, making it ideal for a vlog montage.
- Vince DiCola - Hearts On Fire
Make Your Montage Video with Wondershare Filmora
Wondershare Filmora is a video editing program that allows you to create montage videos. To learn how to make a montage video with Filmora, follow the steps below:
01of 04Download & Install Filmora
Head over to https://filmora.wondershare.net/filmora-video-editor.html and download the latest Filmora. Once you have downloaded the Wondesrshare Filmora software, install it on your computer. Filmora supports both Mac and Windows. Launch the program on your computer to use it.
02of 04Import Media
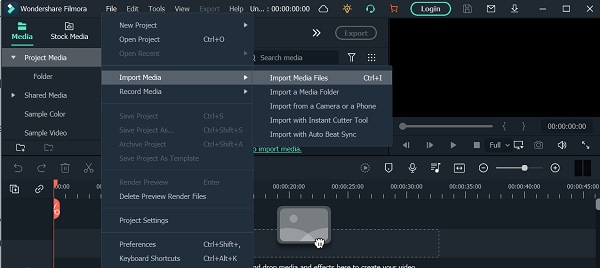
Click New Project, then go to File>Import Media>Import Media File. Doing this will allow you to import your videos and photos to the media library.
03of 04Choose Preferred Music and more
Place your files on Filmora’s timeline by dragging and dropping them. Now, right-click on the video in the timeline to see the available options, which include the options to trim, split, change, speed, zoom, and crop your videos and photos. Navigate to the Audio tab and add sound effects. Then, choose tracks from the Filmora’s music gallery that you would like to use in your montage video.
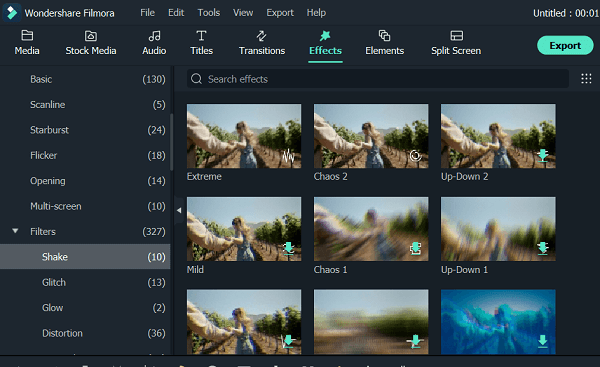
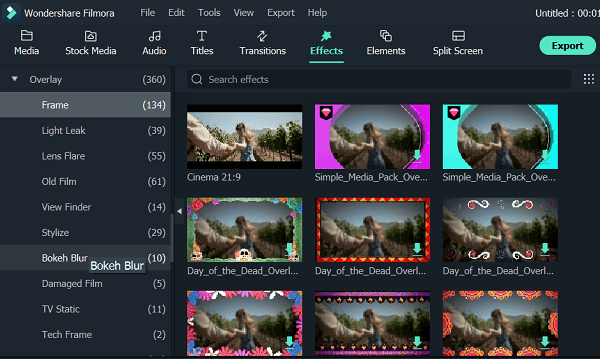
If you want to add overlays or filters to your montage video, head to the Effects tab. The Effects tab has many options that allow you to create a transition in your montage video.
04of 04Save & Export
The Export button allows you to export your montage video and save it on your device. Once you have exported your video and saved it on your PC, you can upload it directly and share it with your audience on your YouTube channel. You’ll have to enter your login details to share your montage video.
Wondershare Filmora11 Express Better
Acheive More
Grow Together
Free Download Free Download Learn More

Summarize:
You can use these songs in your montage video to convey your message and attract viewers to your content. You can use Filmora to create attention-grabbing montage videos within a couple of minutes.
- Tony Z - Road So Far
2) Call Me - LiQWYD
Call Me by LiQWYD is an electronic pop montage music ideal vlogs. The duration of this song is 2:39 minutes, and it has a BPM of 76. The song is available under a Creative Commons Attribution. You can use it for free on your montage, but you have to give LiQWYD credit.
- Call Me - LiQWYD
3) ᴇʀᴇᴅᴀᴢᴇ ɪ ᴛᴇʟʟ ʏᴏᴜ
ᴇʀᴇᴅᴀᴢᴇ ɪ ᴛᴇʟʟ ʏᴏᴜ is suitable for daily life montage video. The length of the songs is 05:12 minutes. The music track does not have copyright, so it’s free to use on your montage video to make it more engaging and send your message.
- ᴇʀᴇᴅᴀᴢᴇ ɪ ᴛᴇʟʟ ʏᴏᴜ
4) NEFFEX - Good Day (Wake Up)
This song is ideal for daily life montage, as it motivates you to wake up and have a great day. The duration of this copyright-free pop song is 2:52 minutes. No attribution is required when you use this song.
- NEFFEX - Good Day (Wake Up)
5) K-391 - This Is Felicitas
K-391’s This Is Felicitas is a piece of good music for montages related to birthdays. The length of the song is 4:41 minutes. It is available under a Creative Commons Attribution license, and reusing is allowed. The track will bring you nostalgia, as it will make you miss being a kid.
- K-391 - This Is Felicitas
6) New York Philharmonic’s “La Gazza Ladra” Overture
“La Gazza Ladra” Overture by New York Philharmonic is a great AFV music montage. The length of this song is 4:15 minutes, and it’s included in the Absolute Masterworks - High Energy album. You can use it in event montage videos.
- New York Philharmonic’s “La Gazza Ladra” Overture
7) Win In The End by Mark Safan
Win In The End by Mark Safan is one of the most popular 80s montage music. The song is suitable for use in event montages such as basketball games. The duration of the song is 4:44 minutes. The track is from the soundtrack of the 1985 Teen Wolf movie.
- Win In The End by Mark Safan
8) We Fight For Love by The Power Station
This 80s montage music is great for birthday videos, as it will remind you of the good old days of the Eighties. The duration of this music track is 4:19 minutes.
- We Fight For Love by The Power Station
9) Night on Bald Mountain by Various Artists
The Night on Bald Mountain is a song from the album Larry Talbot’s Favorite Halloween Music. Suitable for vlog montage, the duration of this AFV music montage is 9:41 minutes.
10) Flight By Tristam and Braken
Flight By Tristam and Braken was released in 2013, and the song is from the album by the same name. The length of this dance/electronic music track is 3:39 minutes, and it’s suitable for event montages.
- Flight By Tristam and Braken
11) Colors - Tobu
Released in 201t, Colors by Tobu from the album of the same name. The track runs 4:39 long with a major mode and a key. You can use it double-time at 256 BPM or half-time at 64 BPM. This sad song has a tempo of 128 BPM, and it’s suitable for a daily life montage.
- Colors - Tobu
12) Ahrix - Nova
Ahrix by Nova is a dance/electronic song from The Beginning album. The song was released in 2015, and it runs 4 minutes and 41 seconds long. The track has a tempo of 128 BPM, meaning it’s less than allegro but moderately fast. This song is the best music for montage for your vlog.
- Ahrix - Nova
13) Renegade - Noisestorm
Renegade by Noisestorm is an electro song that was released in 2021. It’s included in the Renegade EP as the first track, and it’s the 17th track on the compilation album Monstercat 005 - Evolution. The song has a tempo of 127 BPM, and it runs 6 minutes and 10 seconds long. The track is suitable for a sports event montage.
- Renegade - Noisestorm
14) Disfigure - Blank
Blank by Disfigure is a dance/ electronic song from the album Blank (VIP). Released in 2013, the song has a tempo of 140 BPM. The length of this track is 05:2. The song has high energy, and it’s danceable with a 4-beat-per-bar time signature; this makes it suitable for a birthday montage.
- Disfigure - Blank
15) Vince DiCola - Hearts On Fire
Hearts On Fire is a pop/rock song by Vince DiCola from the soundtrack of Rocky IV: The Symphonic Rock Suite, and it features Diego Navarro. The track runs for 4 minutes and 17 seconds. This 80s montage music has a tempo of 96 BPM, making it ideal for a vlog montage.
- Vince DiCola - Hearts On Fire
Make Your Montage Video with Wondershare Filmora
Wondershare Filmora is a video editing program that allows you to create montage videos. To learn how to make a montage video with Filmora, follow the steps below:
01of 04Download & Install Filmora
Head over to https://filmora.wondershare.net/filmora-video-editor.html and download the latest Filmora. Once you have downloaded the Wondesrshare Filmora software, install it on your computer. Filmora supports both Mac and Windows. Launch the program on your computer to use it.
02of 04Import Media
Click New Project, then go to File>Import Media>Import Media File. Doing this will allow you to import your videos and photos to the media library.

03of 04Choose Preferred Music and more
Place your files on Filmora’s timeline by dragging and dropping them. Now, right-click on the video in the timeline to see the available options, which include the options to trim, split, change, speed, zoom, and crop your videos and photos. Navigate to the Audio tab and add sound effects. Then, choose tracks from the Filmora’s music gallery that you would like to use in your montage video.
If you want to add overlays or filters to your montage video, head to the Effects tab. The Effects tab has many options that allow you to create a transition in your montage video.


04of 04Save & Export
The Export button allows you to export your montage video and save it on your device. Once you have exported your video and saved it on your PC, you can upload it directly and share it with your audience on your YouTube channel. You’ll have to enter your login details to share your montage video.
Wondershare Filmora11 Express Better
Acheive More
Grow Together
Free Download Free Download Learn More

Summarize:
You can use these songs in your montage video to convey your message and attract viewers to your content. You can use Filmora to create attention-grabbing montage videos within a couple of minutes.
Also read:
- New In 2024, The Voice Vault Exclusive Listing of Cutting-Edge Text to Speech Websites for 2 Written by the User
- In 2024, Audio Excellence Techniques for Clearer Sound in Video Editing Using Filmora
- New 2024 Approved Add Music to IGTV
- New 2024 Approved Precision Audio Processing Effective Methods to Eliminate Echoes and Dampen Reverb for Pristine Soundtracks
- Updated In 2024, Enhance Communication The Leading 5 Mobile Applications to Modify Call Voices
- From Surrounding Symphonies to Quietude The Gradual Roadmap for Eradicating Ambient Melodies for 2024
- New In 2024, Alice Johnson and Ethan Smith, Ph.D., Department of Musicology, University of Harmonia (Open Access). Copyright © 2023 by Dr. Johnson and Prof. Smith. This Work Is Licensed Under a Creative Commons Attribution-Share Alike 4.0 License
- Updated In 2024, 4 Best Video Volume Booster Online
- Updated Infuse Music Into MPEG Animation Using Microsoft OS
- New In 2024, The Ultimate List of Gratis Sound Effect Libraries Online
- Updated 2024 Approved Top 10 Tools for Extracting Audio Separately From Videos
- Updated Chrome Audio Recording Leaders The Top 6 Innovative Microphones to Watch for 2024
- New 2024 Approved Harmonizing Technology and Tunes The Leading 7 Digital Audio Workstations for Guitarists
- Updated Professionals Guide to the Top Vocal Dampening Software for Musicians and Producers
- Updated Where to Find Premium DJ Audios Online for 2024
- New 2024 Approved The Definitive List of the Top 5 High-Precision Instantaneous Speech Modifiers
- Updated How to Add Audio to MKV
- Premiere List Ultimate Voice Alteration Technology for Drama Schools, 2024
- Updated 2024 Approved Sound Design Excellence Applying Audio Ducking Methods in PowerDirector for Non-Intrusive Volume Reduction
- 2024 Approved The Ultimate List of Video Editing Essentials Incorporating Soundtracks From the Most Popular Platforms
- New Premier Voice Tuner and Melodic Adjustment Software for Musicians for 2024
- New Disconnect the Chatter How to Mute Your Microphone in Zoom Meetings for 2024
- New What You Should Know About Pexels.com
- Updated Precision in Production Leveraging Audio Ducking in PowerDirector for Tactful Music Volume Reduction
- In 2024, Techniques for Implementing an Audio Decline Transition
- New 2024 Approved The Best in Live Sound Alteration Technology In-Depth Reviews to Guide Your Choices
- New In 2024, Your Go-To Guide The 12 Best Audio Converters for Easy Conversion
- S Top Picks Free Open-Source Video Editing Tools for 2024
- New In 2024, 100 Working Methods to Learn How to Rotate TikTok Video
- In 2024, Everything You Need To Know About Unlocked iPhone 11 | Dr.fone
- New Transform Your Videos with Pro-Grade Jump Cuts in FCPX
- Updated 2024 Approved Create Stunning Whiteboard Animations with These Top 5 Tools
- In 2024, The Updated Method to Bypass Samsung Galaxy A14 4G FRP
- In 2024, 15 Best Strongest Pokémon To Use in Pokémon GO PvP Leagues For Oppo Find X6 Pro | Dr.fone
- Full Guide to Unlock Your OnePlus Ace 2 Pro
- In 2024, Top 4 Ways to Trace Nokia C12 Pro Location | Dr.fone
- New Boost Sales with Live Shopping Learn Winning Strategies From Top Brands for 2024
- The Most Useful Tips for Pokemon Go Ultra League On Poco X6 Pro | Dr.fone
- How to Change Lock Screen Wallpaper on Samsung Galaxy S24
- All Must-Knows to Use Fake GPS GO Location Spoofer On Apple iPhone 6 | Dr.fone
- 10 Best Fake GPS Location Spoofers for Realme V30 | Dr.fone
- Unlock Your Vivo Y27 4Gs Potential The Top 20 Lock Screen Apps You Need to Try
- Updated Fast Forward Your Videos A Beginners Guide to Time Lapse Photography for 2024
- New In 2024, Top 10 Best Free Video Editing Software for Chromebook
- Final Cut Pro Essentials 3 Ways to Create Smooth Transitions
- How to Successfully Bypass iCloud Activation Lock on iPhone 14
- Why Your WhatsApp Live Location is Not Updating and How to Fix on your Samsung Galaxy M14 5G | Dr.fone
- How to Check Distance and Radius on Google Maps For your Samsung Galaxy F15 5G | Dr.fone
- Guide to Mirror Your Oppo Find N3 Flip to Other Android devices | Dr.fone
- What Does Enter PUK Code Mean And Why Did The Sim Get PUK Blocked On Vivo Y56 5G Device
- How To Get the Apple ID Verification Code On Apple iPhone 6s Plus in the Best Ways
- In 2024, How to Remove Activation Lock From the Apple iPhone 11 Pro Without Previous Owner?
- Title: Navigating the Voice Recorder App Samsung S10/S9 Edition
- Author: Jacob
- Created at : 2024-05-20 00:03:45
- Updated at : 2024-05-21 00:03:45
- Link: https://audio-shaping.techidaily.com/navigating-the-voice-recorder-app-samsung-s10s9-edition/
- License: This work is licensed under CC BY-NC-SA 4.0.


