
Mastering the Art of Downloading Podcast Episodes on Laptops and Desktops

Mastering the Art of Downloading Podcast Episodes on Laptops and Desktops
Listening to Podcasts is a great way to gather information. Name a topic, and you will find a Podcast on it. You can always count on the best Podcast shows to get quality knowledge.
You can listen to those Podcasts online. But, sometimes, users want to download the Podcast. The reason can be anything; you might want to listen offline. There are various ways to get the job done. We will walk you through different methods to download Podcasts to the computer.
Can you download a Podcast as a file?
Yes, it’s possible. But the process is a bit different for many platforms.
If you’re downloading Podcasts from Podcast manager apps like Spotify and Apple Play. These apps will save your Podcast in the app’s library and make it available for offline listening.
Yet, you can’t get access to the saved Podcast on the PC. For this, you need third-party tools to download them to your computer. A step-by-step process of using apps and tools is given below!
But if you’re downloading a Podcast from a video platform like YouTube, then yes. You can download it as a file. Here are a few methods to download podcasts. Let’s walk you through them one by one.
Method 1- Direct Download Podcasts From Podcast Manager Apps
You can save Podcasts to your computer from Podcast manager apps. Various Podcast manager apps, such as iTunes, Spotify, Apple Podcast, and many others, allow such an operation. However, it is important to note that some podcast managers require a premium subscription to be able to download podcasts.
For example, if you’re using a Windows computer, you can use iTunes to download Podcasts. While Mac users can use Apple Podcasts. The steps below allow you to save Podcasts from Podcast manager apps like Spotify;
Step1 Install the Spotify app on your PC or Mac.
Step2 Open the Spotify app and login to your account.
Step3 Locate the Podcast show you wish to download.

Step4 Move your cursor over the Podcast episodes and click the download button to download them to your computer.
The backward of using Podcast manager apps is that it can only save your Podcast in the manager app. If you uninstall the app accidentally, you lose access to the saved Podcast because it won’t be available on your PC.
To cope with this problem, we provide third-party apps to directly download the Podcast to your computer from the manager apps.
Method 2- Download Podcasts From Popular Podcast Manager Apps Using Third-Party Tools
To download Podcasts in unprotected formats from Spotify, you need a third-party tool to alter Spotify .ogg audio. The most helpful and commonly used tool is TuneFab Spotify Music Converter. It is free for 30 days, and you can purchase it after discovering it is compatible with you!
It will convert Podcasts and as well as download songs, audiobooks, and playlists into MP3, WAV, FLAC, and M4V. Follow the below instructions to get your hands on it!
Step1 First, download TuneFab Spotify Music Converter , then follow the outlines on the screen to get set up on your computer. Then launch this tool to start the conversion process.
Step2 Now, log in to your Spotify account in this tool to easily access your download list.
Step3 After that, find out the required Podcast and click on the “Add” button in front of the Podcast. You can also directly drag and drop the file into the “Add” button.
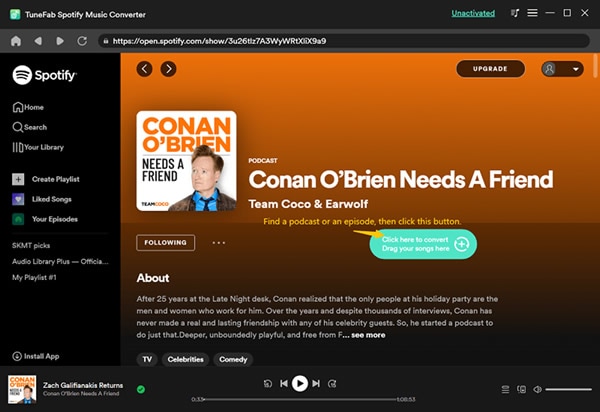
Step4 You can now get the download and convert option adjacent to every Podcast episode. You must check the file format and click on the available option to continue the process.
You can also change the output location of the Podcast on a PC, where you’ll find out easily.
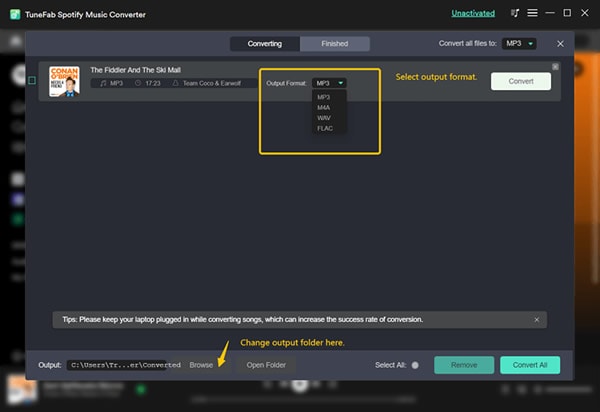
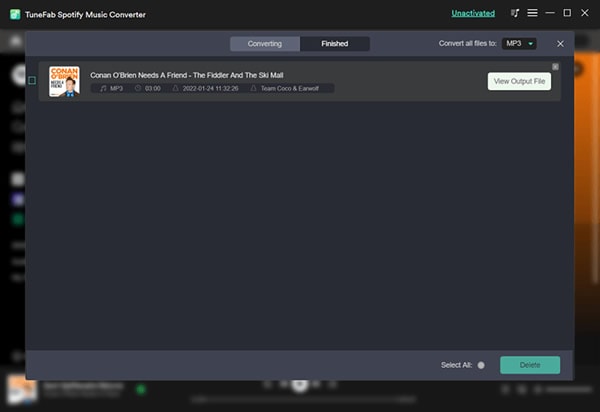
Step5 Then click on the “Convert” button and get your Podcast on your device in your required format.
Alternatives third-party tools
You can also use other third-party tools to download the Podcasts, such as:
- UkeySoft Spotify Music Converter.
- Leawo’s Prof. DRM .
- AudKit SpotiLab Music Converter.
If you want to download your Podcast in video format, then read more to get access!
Method 3- Download Podcasts From Video Platforms
Downloading Podcasts from video platforms is also simple. All you have to do is copy the link to the Podcast and paste it into a downloading tool. Let’s see this process in detail.
Here are the steps to download Podcasts from YouTube to the computer.
Step1 Open YouTube and locate the Podcast video you want to download.
Step2 Click the Share icon next to the video and click Copy Link from the pop-up on your screen.
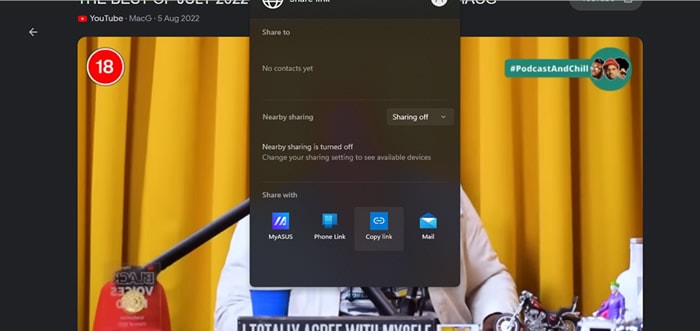
Step3 Open SSYouTube in your browser and paste the copied link in the relevant area. Then, select MP3 as the preferred output format.
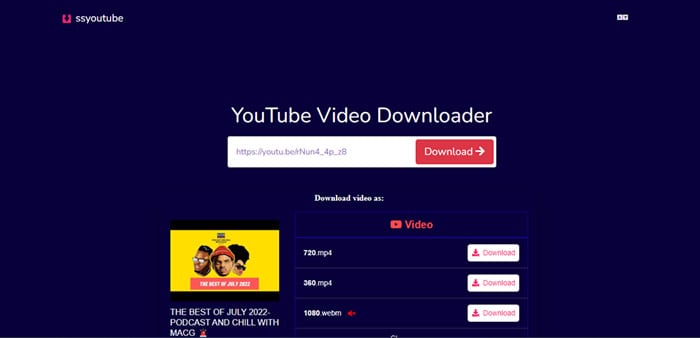
Step4 Download the Podcast video according to your preferred quality and save it to your computer.
Method 4- Download the Podcast With an Audio Recorder
You can also download Podcasts from websites by streaming with an audio recorder. Various tools like Filmora , Apowersoft, Audacity, and many others ease audio streaming. All it takes is only a few clicks!
Free Download For Win 7 or later(64-bit)
Free Download For macOS 10.14 or later
We’ve shown steps to download Podcasts from websites by streaming using a tool like Filmora;
Step1 Download the Wondershare Filmora on your computer.
Step2 Launch the installed app and open the home interface of Filmora.

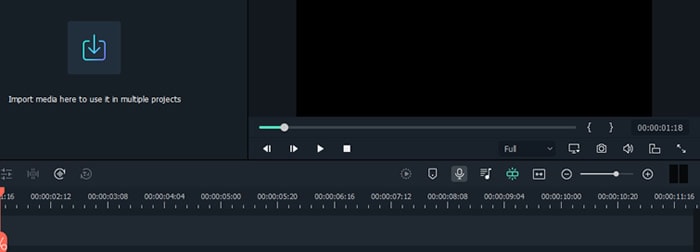
Step3 Then find the “Microphone” icon on the home screen of Filmora below the video display on the right side as shown below:
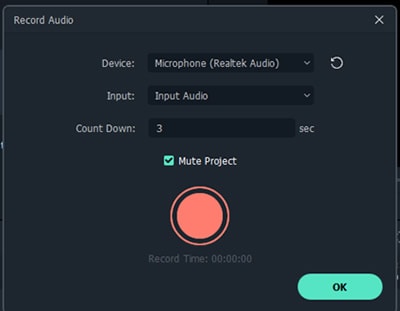
Step4 After clicking on the icon, the Record Audio box will pop up. Now, you have to start the podcast in the background on any Podcast Manager app. Adjacently, click on the Red button of the recorder on Filmora too.
![]()
Note: Make sure that background is noise-free to capture the Podcast audio easily.
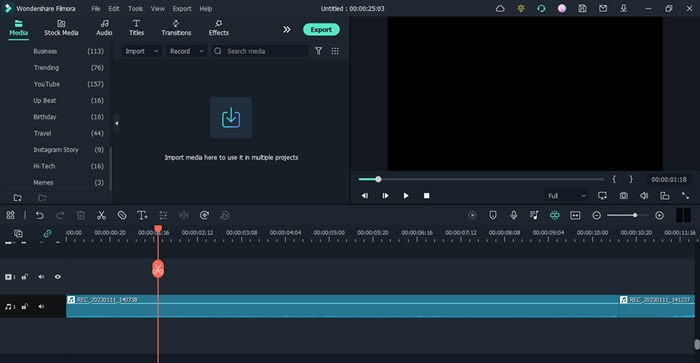
Step5 After you are all done with the Podcast recording, now again click on the Red button to stop the recording, and your audio will be recorded in the audio track as shown below:
Step6 Then click on the Export button at the top middle side to export it on your device in the required format.
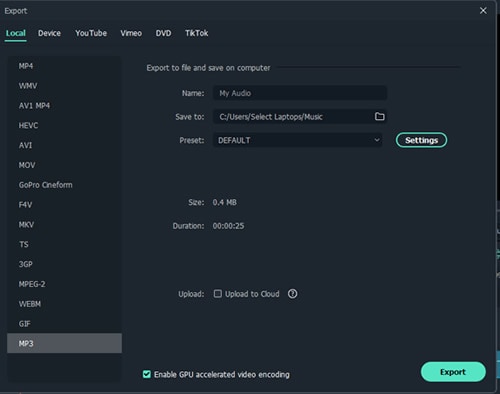
It’s all done, and you’ve successfully exported the podcast to your computer in a few steps!
FAQs
When you save a Podcast, where does it go?
Saved Podcasts are usually added to the saved list in your Podcast library and will be available for offline listening. But if you want to get access directly on your computer, then you need a third-party tool to download it from the Podcast manager app to your PC, as mentioned above in the article.
Is listening to a Podcast the same as downloading?
No. Podcast download involves saving a Podcast episode to your Podcast app. But listening to a Podcast refers to the number of times you played a Podcast.
Final words
You can download the Podcast from a Podcast manager app, an audio recorder, or a video platform. You can also use third-party tools to get directly downloaded Podcasts on your Computer.
Ensure you follow all the steps mentioned above smoothly. Now, enjoy your Podcast with high audio formats wherever you are!
Free Download For macOS 10.14 or later
We’ve shown steps to download Podcasts from websites by streaming using a tool like Filmora;
Step1 Download the Wondershare Filmora on your computer.
Step2 Launch the installed app and open the home interface of Filmora.

Step3 Then find the “Microphone” icon on the home screen of Filmora below the video display on the right side as shown below:

Step4 After clicking on the icon, the Record Audio box will pop up. Now, you have to start the podcast in the background on any Podcast Manager app. Adjacently, click on the Red button of the recorder on Filmora too.
![]()
Note: Make sure that background is noise-free to capture the Podcast audio easily.

Step5 After you are all done with the Podcast recording, now again click on the Red button to stop the recording, and your audio will be recorded in the audio track as shown below:

Step6 Then click on the Export button at the top middle side to export it on your device in the required format.

It’s all done, and you’ve successfully exported the podcast to your computer in a few steps!
FAQs
When you save a Podcast, where does it go?
Saved Podcasts are usually added to the saved list in your Podcast library and will be available for offline listening. But if you want to get access directly on your computer, then you need a third-party tool to download it from the Podcast manager app to your PC, as mentioned above in the article.
Is listening to a Podcast the same as downloading?
No. Podcast download involves saving a Podcast episode to your Podcast app. But listening to a Podcast refers to the number of times you played a Podcast.
Final words
You can download the Podcast from a Podcast manager app, an audio recorder, or a video platform. You can also use third-party tools to get directly downloaded Podcasts on your Computer.
Ensure you follow all the steps mentioned above smoothly. Now, enjoy your Podcast with high audio formats wherever you are!
Talkative Movies Trimmed Down: Steps for Eliminating Sound in Popular Video Types (MP4/MKV/AVI/MOV)
The chances are that you want to remove the audio track from a video clip and get only a video stream as an output. This is much easier than you think because there are many software available to do this. This article will show you how to perform this job with a simple and easy-to-use video editing program: Wondershare Filmora . With this ingenious tool, detaching the audio from video turns into a simple task: only with a click of mouse. Then, you can delete it directly or save it for future use. The following article will provide more information and a step-by-step guide on how to remove audio from video files.
You may also like:
10 Best Software to Detach Audio from Video in 2022 >>
How to Add Audio to Your Video> >>
Audio Remover: Wondershare Filmora
For Win 7 or later (64-bit)
For macOS 10.12 or later
Why Choose Wondershare Filmora
- Remove audio from all kinds of video formats, including AVI, WMV, WTV, MOV, MKV, FLV, etc;
- Completely remove the audio from video to keep video-only stream or mute the audio of a source video;
- Other functions such as add effect/subtitle/watermark to video; trim/crop/rotate video files and more;
- Save your video in different formats, burn to DVD or upload to YouTube and Facebook;
- Supported OS: Windows (Windows 8 included) & Mac OS X (above 10.6).
For Win 7 or later (64-bit)
For macOS 10.12 or later
1. Import your videos

Click “Import” to browse your file folder on hard disk and then pick up the videos you want to remove audio. To select multiple files, hold down the “Ctrl” button when choosing other files. All loaded files will display as thumbnails in the file tray. Doubling click them, you can preview it in the right screen window.
2. Remove audio from video

Drag video from file tray to the Video Timeline. Right-click it and select “Audio Detach.” Immediately, you’ll see a separate audio file in the Music Timeline. Yes, this is the audio track of your original video. Now just hit “Delete” on the keyboard to remove the audio.
Tips:
1. The files on Video Timeline will be merged seamlessly together by default. If you have multiple files to remove audio and need to save to separate files, please click the left top program icon and save to different project files first. After that, load the project file again and export the output file one by one.
2. You can also use the “Mute” option to remove the audio from the video, but you won’t get the audio track with this option.
3. Save the video

Double click the file in Video Timeline to check if this is what you want. If necessary, you can add some music files that fit this video. Or directly click “Create” to export only the video track. Pick your wanted format to save it on your computer in the pop-up format window.
Versatile Video Editor - Wondershare Filmora
An easy yet powerful editor
Numerous effects to choose from
Detailed tutorials provided by the official channel
For Win 7 or later (64-bit)
For macOS 10.12 or later
Why Choose Wondershare Filmora
- Remove audio from all kinds of video formats, including AVI, WMV, WTV, MOV, MKV, FLV, etc;
- Completely remove the audio from video to keep video-only stream or mute the audio of a source video;
- Other functions such as add effect/subtitle/watermark to video; trim/crop/rotate video files and more;
- Save your video in different formats, burn to DVD or upload to YouTube and Facebook;
- Supported OS: Windows (Windows 8 included) & Mac OS X (above 10.6).
For Win 7 or later (64-bit)
For macOS 10.12 or later
1. Import your videos

Click “Import” to browse your file folder on hard disk and then pick up the videos you want to remove audio. To select multiple files, hold down the “Ctrl” button when choosing other files. All loaded files will display as thumbnails in the file tray. Doubling click them, you can preview it in the right screen window.
2. Remove audio from video

Drag video from file tray to the Video Timeline. Right-click it and select “Audio Detach.” Immediately, you’ll see a separate audio file in the Music Timeline. Yes, this is the audio track of your original video. Now just hit “Delete” on the keyboard to remove the audio.
Tips:
1. The files on Video Timeline will be merged seamlessly together by default. If you have multiple files to remove audio and need to save to separate files, please click the left top program icon and save to different project files first. After that, load the project file again and export the output file one by one.
2. You can also use the “Mute” option to remove the audio from the video, but you won’t get the audio track with this option.
3. Save the video

Double click the file in Video Timeline to check if this is what you want. If necessary, you can add some music files that fit this video. Or directly click “Create” to export only the video track. Pick your wanted format to save it on your computer in the pop-up format window.
Versatile Video Editor - Wondershare Filmora
An easy yet powerful editor
Numerous effects to choose from
Detailed tutorials provided by the official channel
For Win 7 or later (64-bit)
For macOS 10.12 or later
Why Choose Wondershare Filmora
- Remove audio from all kinds of video formats, including AVI, WMV, WTV, MOV, MKV, FLV, etc;
- Completely remove the audio from video to keep video-only stream or mute the audio of a source video;
- Other functions such as add effect/subtitle/watermark to video; trim/crop/rotate video files and more;
- Save your video in different formats, burn to DVD or upload to YouTube and Facebook;
- Supported OS: Windows (Windows 8 included) & Mac OS X (above 10.6).
For Win 7 or later (64-bit)
For macOS 10.12 or later
1. Import your videos

Click “Import” to browse your file folder on hard disk and then pick up the videos you want to remove audio. To select multiple files, hold down the “Ctrl” button when choosing other files. All loaded files will display as thumbnails in the file tray. Doubling click them, you can preview it in the right screen window.
2. Remove audio from video

Drag video from file tray to the Video Timeline. Right-click it and select “Audio Detach.” Immediately, you’ll see a separate audio file in the Music Timeline. Yes, this is the audio track of your original video. Now just hit “Delete” on the keyboard to remove the audio.
Tips:
1. The files on Video Timeline will be merged seamlessly together by default. If you have multiple files to remove audio and need to save to separate files, please click the left top program icon and save to different project files first. After that, load the project file again and export the output file one by one.
2. You can also use the “Mute” option to remove the audio from the video, but you won’t get the audio track with this option.
3. Save the video

Double click the file in Video Timeline to check if this is what you want. If necessary, you can add some music files that fit this video. Or directly click “Create” to export only the video track. Pick your wanted format to save it on your computer in the pop-up format window.
Versatile Video Editor - Wondershare Filmora
An easy yet powerful editor
Numerous effects to choose from
Detailed tutorials provided by the official channel
For Win 7 or later (64-bit)
For macOS 10.12 or later
Why Choose Wondershare Filmora
- Remove audio from all kinds of video formats, including AVI, WMV, WTV, MOV, MKV, FLV, etc;
- Completely remove the audio from video to keep video-only stream or mute the audio of a source video;
- Other functions such as add effect/subtitle/watermark to video; trim/crop/rotate video files and more;
- Save your video in different formats, burn to DVD or upload to YouTube and Facebook;
- Supported OS: Windows (Windows 8 included) & Mac OS X (above 10.6).
For Win 7 or later (64-bit)
For macOS 10.12 or later
1. Import your videos

Click “Import” to browse your file folder on hard disk and then pick up the videos you want to remove audio. To select multiple files, hold down the “Ctrl” button when choosing other files. All loaded files will display as thumbnails in the file tray. Doubling click them, you can preview it in the right screen window.
2. Remove audio from video

Drag video from file tray to the Video Timeline. Right-click it and select “Audio Detach.” Immediately, you’ll see a separate audio file in the Music Timeline. Yes, this is the audio track of your original video. Now just hit “Delete” on the keyboard to remove the audio.
Tips:
1. The files on Video Timeline will be merged seamlessly together by default. If you have multiple files to remove audio and need to save to separate files, please click the left top program icon and save to different project files first. After that, load the project file again and export the output file one by one.
2. You can also use the “Mute” option to remove the audio from the video, but you won’t get the audio track with this option.
3. Save the video

Double click the file in Video Timeline to check if this is what you want. If necessary, you can add some music files that fit this video. Or directly click “Create” to export only the video track. Pick your wanted format to save it on your computer in the pop-up format window.
Versatile Video Editor - Wondershare Filmora
An easy yet powerful editor
Numerous effects to choose from
Detailed tutorials provided by the official channel
How to Edit the Beat and Sync Videos to Music in Final Cut Pro X
How to Edit the Beat and Sync Videos to Music in Final Cut Pro X

Benjamin Arango
Mar 27, 2024• Proven solutions
The amount of video content on the Internet is staggering, as hundreds of hours of videos are uploaded to platforms like YouTube, Vimeo or Twitch every day. Going the extra mile and doing all you can to produce videos that are going to attract the attention of online viewers can prove beneficial for numerous reasons.
Editing videos to the beat of the music in Final Cut Pro and other non-linear video editing apps can be a good way to create potentially viral videos. That’s why in this article we are going to show you how you can sync video to the music beat and make dynamic videos in Final Cut Pro X.
You may also like: How to Make Beats for Your Music Videos
How to Sync Videos to the Beat of a Song in Three Different Ways
Editing a video to the beat of a song requires some previous preparation because you must have all the materials in place before you start adding footage to the FCPX’s timeline. Most importantly the song you choose as a soundtrack for your video needs to have a rhythm you can use to easily sync videos and make cuts so that they match the song’s beat perfectly. So let’s have a look at three different techniques you can use to edit to the beat of a song.

Add Markers Manually and Snap Videos to the Beats of a Song
Once you’ve imported all of your footage into a project you created in FCPX, you should place the song you want to use in your video to the audio track on the timeline. You must then isolate the audio file by either clicking on the Solo icon that looks like headphones on the editor’s timeline, selecting the Solo option from the Clip menu or using the OPTION + S keyboard shortcut.
Play the audio file you isolated and start adding markers at the beats in the songs where you want to make cuts. It is worth noting that you don’t have to add a marker at each beat, and you should listen to the song a few times in order to find perfect spots where you are going to make the cuts. Place the playhead at the beginning of the audio file, click on the Play button, and press the M key to start adding markers. You can count on the beat or tap your foot in order to make keeping up with the pace of the beats easier. Switching to the waveform view can also help you add markers more accurately and reduce the amount of time you have to spend searching for a beat.
Proceed to disable the Solo option after you add all markers to the song, and use the N keyboard shortcut to activate the Snapping feature before you add video clips to the timeline. Afterward, simply arrange the clips in the order you want them to appear in the video and preview the results. If some cuts are not positioned perfectly you can easily readjust them so that they are synced to the beat of the song.
A little complicated for you? Then try Filmora, a beginner-friendly tool, and do it in an easy.
Cut to the Beat and Sync Audio with Video in FCPX
Final Cut Pro X doesn’t allow its users to line up their cuts automatically, which is the reason why you have to go through this process manually. Click on the Titles and Generators icon and then place the Custom generator to the video track on the timeline.
You should then add the song you want to use in your video to the audio track, connect it to the Custom generator and make sure that the duration of these two files matches. Listen to the song a few times before selecting both the generator and the audio file and then hold the Command button and press the B button to make cuts at beats throughout the song.
Drag a video clip from the Media Library and hold it over the section of the Custom generator until you see the Film Strip icon. Drop the video clip and select either the Replace from Start, Replace from End or Replace with Retime to Fit options. Keep adding video clips to this until you replace all parts of the generator with the footage you want to include in your video.

You can also delete cuts you’ve made on the generator by simply selecting the start or the end of a generator clip and pressing the delete button on the keyboard. Choose the Replace with Retime to Fit option in case a video clip is shorter than the segment of the generator you are trying to replace. FCPX will automatically slow down your clip and extend it to fit between two cuts. Optionally, you can use the Trim tool to align your cuts to the beats of the song perfectly, if they are a bit off, before previewing and exporting the video you created.
Click here to learn more about How to Sync Audio and Video in Final Cut Pro X 2021.
Generate Beat Markers Automatically with BeatMark X App
Adding markers to each beat of the song manually can be a painstakingly lengthy process, especially if you would like to create a video that lasts longer than a few minutes. The BeatMark X application offers a solution to this problem for just $3,99. This app analyzes songs, adds markers at the beats and lets you create XML files you can easily import into FCPX.
After installing BeatMark X, you should launch the app and drop the audio file you would like to analyze into the Music File box. Select the project’s frame rate and click on the BeatMark button to start analyzing the song.
The app will identify beats in a song and export an XML file to the same folder in which an audio file you analyzed is located. Head over to FCPX, click on the File menu, expand the Import submenu, choose the XML option and select the file you created with BeatMark X.
A new event that has the same name as the audio file you analyzed will be added to the media library. The event will contain a project, and you just have to open this project in order to see the song as well as the markers placed at every beat of the song. You can then proceed to add the video clips to the project in which the analyzed audio file is located or copy the song to any other project you created in FCPX.
Conclusion
You may wonder, is there any more way to trim audio? Yes, there is, click here to see Best Free Online Audio Trimmers to Trim Audio Easily .
Final Cut Pro X offers several ways to edit videos to the beat of a song, but the amount of time you will have to spend working on such a project depends on the video editing technique you choose. Adding markers manually and adjusting the length of each video clip you want to include in that music video can take a lot of time and effort.
The BeatMark X app can save you a lot of time by adding markers to the beats of your songs, and installing this application on your computer can help you sync videos to music beats in Final Cut Pro X much faster. Which method of editing videos to music in FCPX do you like to use the most? Leave a comment and let us know.

Benjamin Arango
Benjamin Arango is a writer and a lover of all things video.
Follow @Benjamin Arango
Benjamin Arango
Mar 27, 2024• Proven solutions
The amount of video content on the Internet is staggering, as hundreds of hours of videos are uploaded to platforms like YouTube, Vimeo or Twitch every day. Going the extra mile and doing all you can to produce videos that are going to attract the attention of online viewers can prove beneficial for numerous reasons.
Editing videos to the beat of the music in Final Cut Pro and other non-linear video editing apps can be a good way to create potentially viral videos. That’s why in this article we are going to show you how you can sync video to the music beat and make dynamic videos in Final Cut Pro X.
You may also like: How to Make Beats for Your Music Videos
How to Sync Videos to the Beat of a Song in Three Different Ways
Editing a video to the beat of a song requires some previous preparation because you must have all the materials in place before you start adding footage to the FCPX’s timeline. Most importantly the song you choose as a soundtrack for your video needs to have a rhythm you can use to easily sync videos and make cuts so that they match the song’s beat perfectly. So let’s have a look at three different techniques you can use to edit to the beat of a song.

Add Markers Manually and Snap Videos to the Beats of a Song
Once you’ve imported all of your footage into a project you created in FCPX, you should place the song you want to use in your video to the audio track on the timeline. You must then isolate the audio file by either clicking on the Solo icon that looks like headphones on the editor’s timeline, selecting the Solo option from the Clip menu or using the OPTION + S keyboard shortcut.
Play the audio file you isolated and start adding markers at the beats in the songs where you want to make cuts. It is worth noting that you don’t have to add a marker at each beat, and you should listen to the song a few times in order to find perfect spots where you are going to make the cuts. Place the playhead at the beginning of the audio file, click on the Play button, and press the M key to start adding markers. You can count on the beat or tap your foot in order to make keeping up with the pace of the beats easier. Switching to the waveform view can also help you add markers more accurately and reduce the amount of time you have to spend searching for a beat.
Proceed to disable the Solo option after you add all markers to the song, and use the N keyboard shortcut to activate the Snapping feature before you add video clips to the timeline. Afterward, simply arrange the clips in the order you want them to appear in the video and preview the results. If some cuts are not positioned perfectly you can easily readjust them so that they are synced to the beat of the song.
A little complicated for you? Then try Filmora, a beginner-friendly tool, and do it in an easy.
Cut to the Beat and Sync Audio with Video in FCPX
Final Cut Pro X doesn’t allow its users to line up their cuts automatically, which is the reason why you have to go through this process manually. Click on the Titles and Generators icon and then place the Custom generator to the video track on the timeline.
You should then add the song you want to use in your video to the audio track, connect it to the Custom generator and make sure that the duration of these two files matches. Listen to the song a few times before selecting both the generator and the audio file and then hold the Command button and press the B button to make cuts at beats throughout the song.
Drag a video clip from the Media Library and hold it over the section of the Custom generator until you see the Film Strip icon. Drop the video clip and select either the Replace from Start, Replace from End or Replace with Retime to Fit options. Keep adding video clips to this until you replace all parts of the generator with the footage you want to include in your video.

You can also delete cuts you’ve made on the generator by simply selecting the start or the end of a generator clip and pressing the delete button on the keyboard. Choose the Replace with Retime to Fit option in case a video clip is shorter than the segment of the generator you are trying to replace. FCPX will automatically slow down your clip and extend it to fit between two cuts. Optionally, you can use the Trim tool to align your cuts to the beats of the song perfectly, if they are a bit off, before previewing and exporting the video you created.
Click here to learn more about How to Sync Audio and Video in Final Cut Pro X 2021.
Generate Beat Markers Automatically with BeatMark X App
Adding markers to each beat of the song manually can be a painstakingly lengthy process, especially if you would like to create a video that lasts longer than a few minutes. The BeatMark X application offers a solution to this problem for just $3,99. This app analyzes songs, adds markers at the beats and lets you create XML files you can easily import into FCPX.
After installing BeatMark X, you should launch the app and drop the audio file you would like to analyze into the Music File box. Select the project’s frame rate and click on the BeatMark button to start analyzing the song.
The app will identify beats in a song and export an XML file to the same folder in which an audio file you analyzed is located. Head over to FCPX, click on the File menu, expand the Import submenu, choose the XML option and select the file you created with BeatMark X.
A new event that has the same name as the audio file you analyzed will be added to the media library. The event will contain a project, and you just have to open this project in order to see the song as well as the markers placed at every beat of the song. You can then proceed to add the video clips to the project in which the analyzed audio file is located or copy the song to any other project you created in FCPX.
Conclusion
You may wonder, is there any more way to trim audio? Yes, there is, click here to see Best Free Online Audio Trimmers to Trim Audio Easily .
Final Cut Pro X offers several ways to edit videos to the beat of a song, but the amount of time you will have to spend working on such a project depends on the video editing technique you choose. Adding markers manually and adjusting the length of each video clip you want to include in that music video can take a lot of time and effort.
The BeatMark X app can save you a lot of time by adding markers to the beats of your songs, and installing this application on your computer can help you sync videos to music beats in Final Cut Pro X much faster. Which method of editing videos to music in FCPX do you like to use the most? Leave a comment and let us know.

Benjamin Arango
Benjamin Arango is a writer and a lover of all things video.
Follow @Benjamin Arango
Benjamin Arango
Mar 27, 2024• Proven solutions
The amount of video content on the Internet is staggering, as hundreds of hours of videos are uploaded to platforms like YouTube, Vimeo or Twitch every day. Going the extra mile and doing all you can to produce videos that are going to attract the attention of online viewers can prove beneficial for numerous reasons.
Editing videos to the beat of the music in Final Cut Pro and other non-linear video editing apps can be a good way to create potentially viral videos. That’s why in this article we are going to show you how you can sync video to the music beat and make dynamic videos in Final Cut Pro X.
You may also like: How to Make Beats for Your Music Videos
How to Sync Videos to the Beat of a Song in Three Different Ways
Editing a video to the beat of a song requires some previous preparation because you must have all the materials in place before you start adding footage to the FCPX’s timeline. Most importantly the song you choose as a soundtrack for your video needs to have a rhythm you can use to easily sync videos and make cuts so that they match the song’s beat perfectly. So let’s have a look at three different techniques you can use to edit to the beat of a song.

Add Markers Manually and Snap Videos to the Beats of a Song
Once you’ve imported all of your footage into a project you created in FCPX, you should place the song you want to use in your video to the audio track on the timeline. You must then isolate the audio file by either clicking on the Solo icon that looks like headphones on the editor’s timeline, selecting the Solo option from the Clip menu or using the OPTION + S keyboard shortcut.
Play the audio file you isolated and start adding markers at the beats in the songs where you want to make cuts. It is worth noting that you don’t have to add a marker at each beat, and you should listen to the song a few times in order to find perfect spots where you are going to make the cuts. Place the playhead at the beginning of the audio file, click on the Play button, and press the M key to start adding markers. You can count on the beat or tap your foot in order to make keeping up with the pace of the beats easier. Switching to the waveform view can also help you add markers more accurately and reduce the amount of time you have to spend searching for a beat.
Proceed to disable the Solo option after you add all markers to the song, and use the N keyboard shortcut to activate the Snapping feature before you add video clips to the timeline. Afterward, simply arrange the clips in the order you want them to appear in the video and preview the results. If some cuts are not positioned perfectly you can easily readjust them so that they are synced to the beat of the song.
A little complicated for you? Then try Filmora, a beginner-friendly tool, and do it in an easy.
Cut to the Beat and Sync Audio with Video in FCPX
Final Cut Pro X doesn’t allow its users to line up their cuts automatically, which is the reason why you have to go through this process manually. Click on the Titles and Generators icon and then place the Custom generator to the video track on the timeline.
You should then add the song you want to use in your video to the audio track, connect it to the Custom generator and make sure that the duration of these two files matches. Listen to the song a few times before selecting both the generator and the audio file and then hold the Command button and press the B button to make cuts at beats throughout the song.
Drag a video clip from the Media Library and hold it over the section of the Custom generator until you see the Film Strip icon. Drop the video clip and select either the Replace from Start, Replace from End or Replace with Retime to Fit options. Keep adding video clips to this until you replace all parts of the generator with the footage you want to include in your video.

You can also delete cuts you’ve made on the generator by simply selecting the start or the end of a generator clip and pressing the delete button on the keyboard. Choose the Replace with Retime to Fit option in case a video clip is shorter than the segment of the generator you are trying to replace. FCPX will automatically slow down your clip and extend it to fit between two cuts. Optionally, you can use the Trim tool to align your cuts to the beats of the song perfectly, if they are a bit off, before previewing and exporting the video you created.
Click here to learn more about How to Sync Audio and Video in Final Cut Pro X 2021.
Generate Beat Markers Automatically with BeatMark X App
Adding markers to each beat of the song manually can be a painstakingly lengthy process, especially if you would like to create a video that lasts longer than a few minutes. The BeatMark X application offers a solution to this problem for just $3,99. This app analyzes songs, adds markers at the beats and lets you create XML files you can easily import into FCPX.
After installing BeatMark X, you should launch the app and drop the audio file you would like to analyze into the Music File box. Select the project’s frame rate and click on the BeatMark button to start analyzing the song.
The app will identify beats in a song and export an XML file to the same folder in which an audio file you analyzed is located. Head over to FCPX, click on the File menu, expand the Import submenu, choose the XML option and select the file you created with BeatMark X.
A new event that has the same name as the audio file you analyzed will be added to the media library. The event will contain a project, and you just have to open this project in order to see the song as well as the markers placed at every beat of the song. You can then proceed to add the video clips to the project in which the analyzed audio file is located or copy the song to any other project you created in FCPX.
Conclusion
You may wonder, is there any more way to trim audio? Yes, there is, click here to see Best Free Online Audio Trimmers to Trim Audio Easily .
Final Cut Pro X offers several ways to edit videos to the beat of a song, but the amount of time you will have to spend working on such a project depends on the video editing technique you choose. Adding markers manually and adjusting the length of each video clip you want to include in that music video can take a lot of time and effort.
The BeatMark X app can save you a lot of time by adding markers to the beats of your songs, and installing this application on your computer can help you sync videos to music beats in Final Cut Pro X much faster. Which method of editing videos to music in FCPX do you like to use the most? Leave a comment and let us know.

Benjamin Arango
Benjamin Arango is a writer and a lover of all things video.
Follow @Benjamin Arango
Benjamin Arango
Mar 27, 2024• Proven solutions
The amount of video content on the Internet is staggering, as hundreds of hours of videos are uploaded to platforms like YouTube, Vimeo or Twitch every day. Going the extra mile and doing all you can to produce videos that are going to attract the attention of online viewers can prove beneficial for numerous reasons.
Editing videos to the beat of the music in Final Cut Pro and other non-linear video editing apps can be a good way to create potentially viral videos. That’s why in this article we are going to show you how you can sync video to the music beat and make dynamic videos in Final Cut Pro X.
You may also like: How to Make Beats for Your Music Videos
How to Sync Videos to the Beat of a Song in Three Different Ways
Editing a video to the beat of a song requires some previous preparation because you must have all the materials in place before you start adding footage to the FCPX’s timeline. Most importantly the song you choose as a soundtrack for your video needs to have a rhythm you can use to easily sync videos and make cuts so that they match the song’s beat perfectly. So let’s have a look at three different techniques you can use to edit to the beat of a song.

Add Markers Manually and Snap Videos to the Beats of a Song
Once you’ve imported all of your footage into a project you created in FCPX, you should place the song you want to use in your video to the audio track on the timeline. You must then isolate the audio file by either clicking on the Solo icon that looks like headphones on the editor’s timeline, selecting the Solo option from the Clip menu or using the OPTION + S keyboard shortcut.
Play the audio file you isolated and start adding markers at the beats in the songs where you want to make cuts. It is worth noting that you don’t have to add a marker at each beat, and you should listen to the song a few times in order to find perfect spots where you are going to make the cuts. Place the playhead at the beginning of the audio file, click on the Play button, and press the M key to start adding markers. You can count on the beat or tap your foot in order to make keeping up with the pace of the beats easier. Switching to the waveform view can also help you add markers more accurately and reduce the amount of time you have to spend searching for a beat.
Proceed to disable the Solo option after you add all markers to the song, and use the N keyboard shortcut to activate the Snapping feature before you add video clips to the timeline. Afterward, simply arrange the clips in the order you want them to appear in the video and preview the results. If some cuts are not positioned perfectly you can easily readjust them so that they are synced to the beat of the song.
A little complicated for you? Then try Filmora, a beginner-friendly tool, and do it in an easy.
Cut to the Beat and Sync Audio with Video in FCPX
Final Cut Pro X doesn’t allow its users to line up their cuts automatically, which is the reason why you have to go through this process manually. Click on the Titles and Generators icon and then place the Custom generator to the video track on the timeline.
You should then add the song you want to use in your video to the audio track, connect it to the Custom generator and make sure that the duration of these two files matches. Listen to the song a few times before selecting both the generator and the audio file and then hold the Command button and press the B button to make cuts at beats throughout the song.
Drag a video clip from the Media Library and hold it over the section of the Custom generator until you see the Film Strip icon. Drop the video clip and select either the Replace from Start, Replace from End or Replace with Retime to Fit options. Keep adding video clips to this until you replace all parts of the generator with the footage you want to include in your video.

You can also delete cuts you’ve made on the generator by simply selecting the start or the end of a generator clip and pressing the delete button on the keyboard. Choose the Replace with Retime to Fit option in case a video clip is shorter than the segment of the generator you are trying to replace. FCPX will automatically slow down your clip and extend it to fit between two cuts. Optionally, you can use the Trim tool to align your cuts to the beats of the song perfectly, if they are a bit off, before previewing and exporting the video you created.
Click here to learn more about How to Sync Audio and Video in Final Cut Pro X 2021.
Generate Beat Markers Automatically with BeatMark X App
Adding markers to each beat of the song manually can be a painstakingly lengthy process, especially if you would like to create a video that lasts longer than a few minutes. The BeatMark X application offers a solution to this problem for just $3,99. This app analyzes songs, adds markers at the beats and lets you create XML files you can easily import into FCPX.
After installing BeatMark X, you should launch the app and drop the audio file you would like to analyze into the Music File box. Select the project’s frame rate and click on the BeatMark button to start analyzing the song.
The app will identify beats in a song and export an XML file to the same folder in which an audio file you analyzed is located. Head over to FCPX, click on the File menu, expand the Import submenu, choose the XML option and select the file you created with BeatMark X.
A new event that has the same name as the audio file you analyzed will be added to the media library. The event will contain a project, and you just have to open this project in order to see the song as well as the markers placed at every beat of the song. You can then proceed to add the video clips to the project in which the analyzed audio file is located or copy the song to any other project you created in FCPX.
Conclusion
You may wonder, is there any more way to trim audio? Yes, there is, click here to see Best Free Online Audio Trimmers to Trim Audio Easily .
Final Cut Pro X offers several ways to edit videos to the beat of a song, but the amount of time you will have to spend working on such a project depends on the video editing technique you choose. Adding markers manually and adjusting the length of each video clip you want to include in that music video can take a lot of time and effort.
The BeatMark X app can save you a lot of time by adding markers to the beats of your songs, and installing this application on your computer can help you sync videos to music beats in Final Cut Pro X much faster. Which method of editing videos to music in FCPX do you like to use the most? Leave a comment and let us know.

Benjamin Arango
Benjamin Arango is a writer and a lover of all things video.
Follow @Benjamin Arango
Also read:
- [New] In 2024, Superrich Streamers of the World
- [New] Integrating Instagram Effects Into Pre-Existing Content
- [New] The Essence of Pixiz Crafting Compelling Stills-to-Video Transformations
- 2024 Approved Secrets of the Trade Perfecting Sticker Removal in TikToks
- Expert Advice: How to Successfully Update ATI Radeon GPU Drivers in Windows Environment
- In 2024, 3 Ways to Track Vivo Y78+ without Them Knowing | Dr.fone
- Outlining Expenditures The Price Tag of Video Capturing Tunes
- Remove FRP Lock on Oppo Reno 8T
- The Ultimate Tutorial on Activating the Microphone in Your Meta Quest Headset
- Tom's Tech Review: Your Ultimate Guide to Computer Hardware
- Updated In 2024, Fine-Tuning Your Films Rhythm Synchronizing Soundtracks with Video in Final Cut Pro X
- Updated In 2024, Premier 8 Voice Recognition Tools Windows, macOS & Cloud Solutions Roundup
- Updated Perfecting Tone Modulation Keeping Sound Quality Intact in Audacity
- Updated Reverse Engineering Audioscape Unveiling Premium Sound Reversal Software for 2024
- Updated The Art of Audio Branding Creating Iconic Podcast Cover Imagery for 2024
- Updated The Cutting-Edge of Audio Production Adding Professional Voiceovers to Your Vids
- Updated Time-Sync Techniques in Video Editing Creating Beats-Aligned Cuts with Premiere Pro for Modern Filmmakers
- Updated Tuned in Truth Exploring How to Identify Songs on Apple Devices without Specialized Software for 2024
- Wiccan Mysticism and Spirituality: Journeying into the Mystical Realm | Free Book
- Title: Mastering the Art of Downloading Podcast Episodes on Laptops and Desktops
- Author: Jacob
- Created at : 2024-10-28 00:40:47
- Updated at : 2024-10-29 17:48:06
- Link: https://audio-shaping.techidaily.com/mastering-the-art-of-downloading-podcast-episodes-on-laptops-and-desktops/
- License: This work is licensed under CC BY-NC-SA 4.0.

