
:max_bytes(150000):strip_icc():format(webp)/GettyImages-769729481-5bd367dcc9e77c007c015257.jpg)
Low-Cost Mac MP3 Enhancer Tool for 2024
“Low-Cost Mac MP3 Enhancer Tool”
It’s really difficult to find a good MP3 editor, and it’s even harder to find a free yet great MP3 editor Mac. Looking for something good and specific is very time-consuming. Let’s guide you on what a good MP3 editor must have. Most importantly, the first thing someone interacts with is its interface. People prefer those MP3 editors that have an uncluttered interface.
Moving on, multi-track editing is an essential requirement. For complex edits, you cannot open multiple tabs of the editor. Instead, working on multiple tracks sounds better. Moreover, a great MP3 editor must support a wide range of file formats. If you want to know about cheap and free editors, then let’s begin talking about MP3 editor Mac.
In this article
01 Top 1 Recommended MP3 Editor for Mac-Wondershare Filmora
02 3 Free and Cheap MP3 Editor for Mac
Part 1. Top 1 Recommended MP3 Editor for Mac-Wondershare Filmora
If we talk about a great MP3 editor that supports various file formats and has a clean and straightforward interface with multi-track editing ability, then nothing is better than Wondershare Filmora . If you are a Mac user, then for you, Filmora is the top-recommended MP3 editor Mac.
Importantly, learning the editor and using it never challenges anyone. Its simple interface is understandable and easy to work with that even beginners can use it. The MP3 editor offers a variety of features that amaze its users.
With Filmora MP3 editor, you can easily add background music to your video files. The editor can change your media files drastically with features like Volume Adjustment, Split Audio, and Adjust Audio. Wondershare Filmora also offers Audio Equalizer, Audio Denoise feature.
For Win 7 or later (64-bit)
For macOS 10.12 or later
You can learn more about the MP3 editor by exploring it, but who will guide you about its working? Well, let us do the honors. We are about to share a step-by-step guideline. With this guideline, you will learn how to use Filmora, the MP3 editor Mac.
Step 1: Project Creation
First of all, start by opening Filmora. Then, you should create a ‘New Project.’ Once that is done, it’s time to import the MP3 audio file that you plan to edit.

Step 2: Importing MP3 File
For importing the file, click on the ‘File’ option from the top panel. There, move the cursor to the ‘Import Media’ option. A sub-menu will pop up on the screen; select ‘Import Media Files’ option from that sub-menu.

Step 3: Open Audio Editing Panel
After the file has been imported, you need it on the timeline. For this, simply drag and drop the MP3 audio file onto the timeline. Now comes the fun part that is editing for editing the file, double-click on it to open the audio editing panel.

Step 4: Increase Speed or Split Audio
As we have mentioned earlier, Filmora offers a variety of audio editing features, so now you can play with them. You can also adjust the Speed of the Audio or Split Audio with Filmora.

Step 5: Exporting MP3 File
Once you have edited the audio file and you are completely satisfied, then it’s time to export it. For that, you need to hit the ‘Export’ button. This will open a new window. From that window, head to the ‘Local’ tab and set the output format as ‘MP3’. You can now save and export the MP3 file.

Part 2. 3 Free and Cheap MP3 Editor for Mac
Do you know any good yet cheat MP3 editors for Mac? Although the market has a lot of MP3 editors, it’s hard to find a good one. For this reason, we are here to help and guide you. The following section of this article will talk about 3 free and cheap MP3 editors, Mac. Let’s get started!
1. Audacity
This MP3 editor Mac is reliable for both the users of Mac as well as for Windows. Audacity allows you the usage of sequential undo or redo options. This option allows you to go back and forth to any step in the MP3 audio editing session. Along with that, cut, copy, paste and delete options are also available.
Audacity provides an ‘Envelop tool’. It allows the user to fade the volume up or volume down smoothly. It is free, open-source audio MP3 editing software for all levels of experience. It has a straightforward interface with all the essential tools that can come under use while editing. You can pin the problems and edit them accordingly.

Key Features
- A spectrogram is available for frequency analysis. This makes it usable for high-quality 32-bit audio and, importantly, makes it the best free MP3 audio editor.
- It provides various options for input file formats, including MP3, WAV, and others. Along with recording in the software, you can edit audio files as well.
- Audacity provides Sync-Lock Track technology. It enables you to keep track of the labels and keep them synchronized.
2. WavePad
Are you ready to learn about WavePad? The MP3 audio editor is free for Mac users. It has a fine interface that can be used easily. WavePad allows the user to record new files in the app alongside editing the existing files. It enables you to process the MP3 audio files in batch, which means that up to a thousand files can be edited at once.
It provides a multi-track MP3 audio mixer that is famous among its users. WavePad can scrub, search and bookmark audio so that the users can easily edit the files. It also has tools like speech syntheses which is a text-to-speech feature. Another fantastic feature that is offered is Voice Changer.

Key Features
- It has a multi-window interface that makes it unique to the user. Along with that, noise reduction and pop removal features are also available.
- WavePad supports all kinds of audio and music formats. These formats include MP3 and others like FLAC, OGG, real audio, GSM.
- It allows the audio after-effects like an amplifier, normalizer and equalizer, reverb and echo, and much more.
3. Apple GarageBand
Apple GarageBand is the built-in MP3 audio editor of the MacBook with an innovative and modern design that is easy to learn and implement. GarageBand is Apple audio creation studio with built-in audio optimization features. It has a sound library of its own that is easily accessible to the user. Moreover, users can self-record the audio if needed through built-in options.
Apple GarageBand allows users to mix audio up to 255 different tracks. Users can add built-in drummer, pianist, or beat producers that help you in the production of sound.

Key Features
- With Apple GarageBand, users can choose between the 33 popular genres. Options like EDM, rock, jazz, hip hop, and others exist.
- iCloud can be used for the storage of tracks. It can also be used to play the sound made on any Apple device like iPhone and iPad.
- Custom guitar rigs can be made with the help of 25 built-in legendary amps and cabinets. Custom Pedalboard can be made with the help of a Stompbox that is fun.
Final Thoughts
The article above is all about sharing the information regarding the best yet cheap MP3 editors Mac. We talked about the top-recommended MP3 editor, that is Wondershare Filmora. Moreover, we shared 3 great MP3 editors that can also be used.
Wondershare Filmora
Get started easily with Filmora’s powerful performance, intuitive interface, and countless effects!
Try It Free Try It Free Try It Free Learn More >

02 3 Free and Cheap MP3 Editor for Mac
Part 1. Top 1 Recommended MP3 Editor for Mac-Wondershare Filmora
If we talk about a great MP3 editor that supports various file formats and has a clean and straightforward interface with multi-track editing ability, then nothing is better than Wondershare Filmora . If you are a Mac user, then for you, Filmora is the top-recommended MP3 editor Mac.
Importantly, learning the editor and using it never challenges anyone. Its simple interface is understandable and easy to work with that even beginners can use it. The MP3 editor offers a variety of features that amaze its users.
With Filmora MP3 editor, you can easily add background music to your video files. The editor can change your media files drastically with features like Volume Adjustment, Split Audio, and Adjust Audio. Wondershare Filmora also offers Audio Equalizer, Audio Denoise feature.
For Win 7 or later (64-bit)
For macOS 10.12 or later
You can learn more about the MP3 editor by exploring it, but who will guide you about its working? Well, let us do the honors. We are about to share a step-by-step guideline. With this guideline, you will learn how to use Filmora, the MP3 editor Mac.
Step 1: Project Creation
First of all, start by opening Filmora. Then, you should create a ‘New Project.’ Once that is done, it’s time to import the MP3 audio file that you plan to edit.
Step 2: Importing MP3 File
For importing the file, click on the ‘File’ option from the top panel. There, move the cursor to the ‘Import Media’ option. A sub-menu will pop up on the screen; select ‘Import Media Files’ option from that sub-menu.
Step 3: Open Audio Editing Panel
After the file has been imported, you need it on the timeline. For this, simply drag and drop the MP3 audio file onto the timeline. Now comes the fun part that is editing for editing the file, double-click on it to open the audio editing panel.
Step 4: Increase Speed or Split Audio
As we have mentioned earlier, Filmora offers a variety of audio editing features, so now you can play with them. You can also adjust the Speed of the Audio or Split Audio with Filmora.
Step 5: Exporting MP3 File
Once you have edited the audio file and you are completely satisfied, then it’s time to export it. For that, you need to hit the ‘Export’ button. This will open a new window. From that window, head to the ‘Local’ tab and set the output format as ‘MP3’. You can now save and export the MP3 file.
Part 2. 3 Free and Cheap MP3 Editor for Mac
Do you know any good yet cheat MP3 editors for Mac? Although the market has a lot of MP3 editors, it’s hard to find a good one. For this reason, we are here to help and guide you. The following section of this article will talk about 3 free and cheap MP3 editors, Mac. Let’s get started!
1. Audacity
This MP3 editor Mac is reliable for both the users of Mac as well as for Windows. Audacity allows you the usage of sequential undo or redo options. This option allows you to go back and forth to any step in the MP3 audio editing session. Along with that, cut, copy, paste and delete options are also available.
Audacity provides an ‘Envelop tool’. It allows the user to fade the volume up or volume down smoothly. It is free, open-source audio MP3 editing software for all levels of experience. It has a straightforward interface with all the essential tools that can come under use while editing. You can pin the problems and edit them accordingly.
Key Features
- A spectrogram is available for frequency analysis. This makes it usable for high-quality 32-bit audio and, importantly, makes it the best free MP3 audio editor.
- It provides various options for input file formats, including MP3, WAV, and others. Along with recording in the software, you can edit audio files as well.
- Audacity provides Sync-Lock Track technology. It enables you to keep track of the labels and keep them synchronized.
2. WavePad
Are you ready to learn about WavePad? The MP3 audio editor is free for Mac users. It has a fine interface that can be used easily. WavePad allows the user to record new files in the app alongside editing the existing files. It enables you to process the MP3 audio files in batch, which means that up to a thousand files can be edited at once.
It provides a multi-track MP3 audio mixer that is famous among its users. WavePad can scrub, search and bookmark audio so that the users can easily edit the files. It also has tools like speech syntheses which is a text-to-speech feature. Another fantastic feature that is offered is Voice Changer.
Key Features
- It has a multi-window interface that makes it unique to the user. Along with that, noise reduction and pop removal features are also available.
- WavePad supports all kinds of audio and music formats. These formats include MP3 and others like FLAC, OGG, real audio, GSM.
- It allows the audio after-effects like an amplifier, normalizer and equalizer, reverb and echo, and much more.
3. Apple GarageBand
Apple GarageBand is the built-in MP3 audio editor of the MacBook with an innovative and modern design that is easy to learn and implement. GarageBand is Apple audio creation studio with built-in audio optimization features. It has a sound library of its own that is easily accessible to the user. Moreover, users can self-record the audio if needed through built-in options.
Apple GarageBand allows users to mix audio up to 255 different tracks. Users can add built-in drummer, pianist, or beat producers that help you in the production of sound.
Key Features
- With Apple GarageBand, users can choose between the 33 popular genres. Options like EDM, rock, jazz, hip hop, and others exist.
- iCloud can be used for the storage of tracks. It can also be used to play the sound made on any Apple device like iPhone and iPad.
- Custom guitar rigs can be made with the help of 25 built-in legendary amps and cabinets. Custom Pedalboard can be made with the help of a Stompbox that is fun.
Final Thoughts
The article above is all about sharing the information regarding the best yet cheap MP3 editors Mac. We talked about the top-recommended MP3 editor, that is Wondershare Filmora. Moreover, we shared 3 great MP3 editors that can also be used.
Wondershare Filmora
Get started easily with Filmora’s powerful performance, intuitive interface, and countless effects!
Try It Free Try It Free Try It Free Learn More >
The Ultimate Voice Transformation Handbook: Ranking the Leading 11 Speech Alteration Software for Mobile Platforms, No Cost
Best Voice Changer Apps for iPhone and Android

Benjamin Arango
Mar 27, 2024• Proven solutions
Have you ever wondered what your voice would sound like if you were a cartoon character, a robot, or an older version of yourself? Changing how your voice sounds has never been easier, regardless of the Smartphone model you have, since voice changer apps can be used on both iPhone and Android devices.
Even though there is nothing wrong with modulating your voice to have fun with your friends, using voice changer apps to pull malicious pranks or bully strangers online is far from acceptable. Read on if you would like to find out more about the best voice changer apps for iPhone and Android devices and discover the one you enjoy using the most.
Best Voice Changer Apps for iPhone and Android
Creating a new ringtone, making a voice recording, or having fun with your friends are only a few reasons why so many people choose to try out voice changer apps. The vast majority of these apps feature well-equipped audio effects libraries that enable users to have fun with their friends and hear how they would sound if they were drunk or after inhaling helium. So, let’s take a look at some of the best voice changer apps on the market.


Changing video voice on Windows and Mac with Wondershare Filmora
Do you want to change the voice in video on Windows and Mac and don’t know which software can meet this requirement? Try Filmra video editor , which provides several ways to change voice over, such as changing the voice speed or changing the pitch. Download the trial version below and find out more possibility in video creation with Filmora.
1. Celebrity Voice Changer – Face
Price: Free, but offers in-app purchases
Compatibility: iOS 9.0 or later
User Rating: 4.0
In case you would like to sound like your favorite movie star of TV host, then Celebrity Voice Changer is one of the best choices you can make. Besides the standard set of options, the app also lets you request new voices since its machine learning technology can mimic virtually anyone’s voice. However, Celebrity Voice Changer is currently only available in English and it cannot modulate speech in other languages. In addition, you must make an in-app purchase in order to gain access to all of the app’s features or unlock the unlimited usage of the app.
Pros
- Automatic voice modulation
- Huge selection of voice filters
- The app generates video files that are better adjusted to the audience on social media than audio files
- Excellent impressions of celebrities
Cons
- Unreasonably expensive
- The app’s Deep Learning technology still has a lot of room for improvement
2. Snapchat
Price: Free, but offers in-app purchases
Compatibility: iOS 10.0 or later, Android 4.4 or up
User Rating: 3.8
With more than 203 million daily users, Snapchat is one of the largest messaging platforms on the market. Previously, we’ve shared how to change gender on Snapchat , beside that, the app lets its users capture short moments or the so-called Snaps and share them with friends. In addition to hundreds of video filters , Snapchat also features a broad spectrum of voice changing effects that make Snaps more entertaining. Even so, the audio recording options Snapchat offers are far from ideal, because the app doesn’t allow you to edit the files you create with it. Using Snapchat will drain your battery quickly, which is why you must pay attention to how frequently you use this app.
Pros
- The easy voice modulation process
- Excellent messaging options
- Grants you access to a large community of likeminded people
- Lenses and filters are updated on a daily basis
Cons
- Editing voice changes after you create a Snap is not possible
- Snapchat is not primarily a voice changer app
Check the detailed information about How to Change Voice on Snapchat with 2 Easy Methods >>
3. Voice Changer
Price: Free
Compatibility: Android 4.1 and up
User Rating: 4.3

Changing your voice with this app won’t take more than a few moments of your time. You just have to launch the app and hit the microphone button to record a message or a joke you would like to modulate. Once you’re happy with the audio recording you made, you can proceed to choose from more than twenty voice effects that will make you sound like a dwarf, a robot, or an alien. The app’s file-sharing capabilities enable you to post your audio recordings to any social media platform of your choosing or store your files and use them as many times as you want.
Pros
- Entertaining and easy to use
- The simple three-step voice modulation process
- Good selection of voice filters
- Excellent file sharing options
Cons
- The app displays ads
- No audio editing tools
4. Voicy: Celebrity Voice Changer
**Price:**Free, but offers in-app purchases
Compatibility: iOS 10 or later
User Rating: 4.3

Impersonating your favorite celebrity can be a fun way to prank your friends on social media. Voicy features a broad selection of celebrity voice impersonations you can use to make you sound like a famous actress or TV personality. The app utilizes a machine learning technology that can generate more than forty avatars and allows the users to experiment with different voice effects. The free version of the app offers only limited capabilities, so if you want to gain access to all of the Voicy’s features, you must choose a weekly, monthly or an annual subscription.
Pros
- Equipped with a powerful machine learning technology
- Offers a vast selection of voice avatars
- The quick voice modification process
- A great choice if you want to make a parody
Cons
- More expensive than the competition
- Support only the English language
5. Video Voice Changer – Fun Editor
Price: Free, but offers in-app purchases
Compatibility: iOS 8.0 or later
User Rating: 4.4

Changing the voices in the videos you record with your iPhones or iPads is a straightforward process that takes a minimum amount of effort. You can either use this iOS-based app to capture videos you’re going to dub or import them from the albums in which they are stored. The Video Voice Changer app is a great option if you want to dub videos directly from your phone because it enables you to change the voices in your videos and make them sound like mice, bears or ghosts. There are over thirty voice effects to choose from, so you can easily pick the one that best fits the video you’re editing.
Pros
- Equipped with video recording tools
- Excellent dubbing features
- A rich selection of voice effects
- Allows users to share their creations on Facebook, Instagram, and other social media platforms
Cons
- You must make an in-app purchase to unlock all of the app’s features
- No audio mixing options
6. Video Voice Changer FX
**Price:**Free, but offers in-app purchases
Compatibility: Android 4.1 and up
User Rating: 4.1

This is a simple app, anyone can use to change the voices in a video. Simply upload a video file from an SD card in your phone and choose an audio effect you want to apply. The app’s collection of funny voices includes options like echo, squirrel, space ship or chipmunk. As soon as you select the voice effect you want to add to a video, the app will start generating a new video that will be saved to your phone. Sharing the videos you edit with Video Voice Changer FX to social media directly from the app is not an option.
Pros
- Fun and easy to use
- Great price to performance ratio
- Changing a voice requires just a few taps
- Allows users to switch between effects while the video is playing
Cons
- No audio or video recording capability
- Doesn’t support social media sharing
7. Squeak Voice Changer
**Price:**Free, but offers in-app purchases
Compatibility: Android 4.3 and up
User Rating: 3.9

Every joke you want to share with your online friends is going to be a little funnier if you record it with Squeak Voice Changer. You just have to tap on the Record button and choose one of the available effects. Each voice changing effect this app offers is represented by a character so you should select Jamie the Jolly if you want to make your voice sound like you’re at a party or Bruce the Sentimental Bot if you want your voice to sound artificial. All the recordings you make with Squeak Voice Changer can be easily shared on social media.
Pros
- Equipped with audio recording options
- Cute and memorable characters that represent voice effects
- Inexpensive and fun to use
- Functional app design
Cons
- Poor selection of voice effects
- The AI only recognizes the English language
8. Voice Changer with Effects
**Price:**Free
Compatibility: Android 4.1 and up
User Rating: 4.5
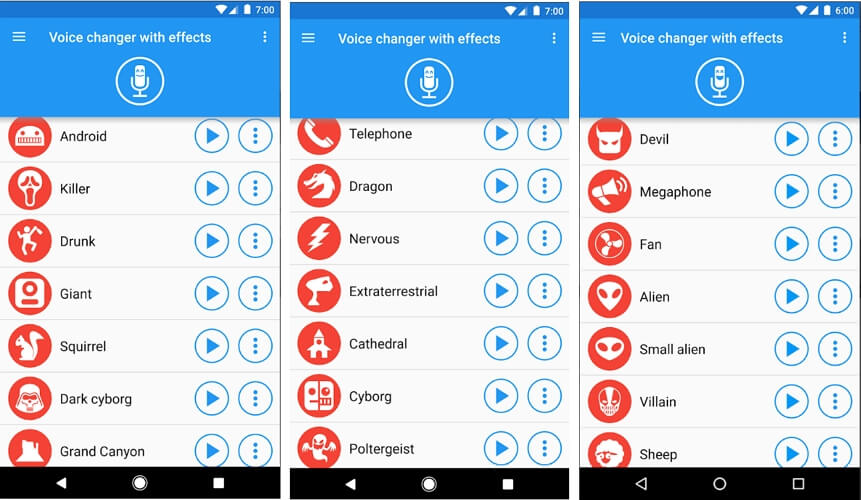
This Android-based app is designed to make fun and easy since voice modulation features enable you to play voice recording backward or change your voice to sound robotic or even alien. Besides recording your voice, the app also lets you modulate pre-recorded sounds and save them to your phone or use them as ringtones or notification sounds. Furthermore, the app lets you add sounds to images and share them to Facebook. The Voice Changer with Effects enables you to share all audio files you process with it to any of the most popular social media platforms.
Pros
- The app has over 50,000,000 installs
- Equipped with a text to voice feature
- Setting a new ringtone with this app is easy
- Supports editing of pre-recorded audio files
Cons
- Contains ads
- No audio or video editing options
9. Voice Changer
**Price:**Free
Compatibility: Android 4.1 and up
User Rating: 4.4

If you are looking for an Android app that lets you modulate your voice quickly and effortlessly, then Voice Changer may be one of the best options you can find on the market. You can record your voice by simply tapping on the microphone and speaking into your phone’s speaker and then apply one of the audio effects this app offers. Optionally, you can import an audio file you already recorded into the app and then apply Martian, Foreigner, Giant or Child effects to your voice recording. The best part is that you can apply each effect to the audio files you’re editing as many times as you want.
Pros
- Loads of funny effects
- Simple audio recording setup
- Intuitive and modernly designed interface
- Enables users to share audio files via Bluetooth or social media platforms
Cons
- No video editing tools
- The quality of output audio files can vary
10. Voice FX
**Price:**Free, but offers in-app purchases
Compatibility: Android 4.0.3 and up
User Rating: 3.8

Modulating voices in all types of audio files is a straightforward and fun process that can be completed in just a few taps. During the audio recording session, you can apply all voice effects to the sound you are recording and stream it live to your web browsers or media players you’re using. Voice FX changes your voice in real time, which enables you to preview your results before deciding if you want to save them. All files you export from this app will be saved in the MP3 format so you can use them as ringtones on your Android device.
Pros
- Allows users to modulate pre-recorded audio files
- Voice effects are applied in real time
- Offers live streaming features
- Exports files in the MP3 format
Cons
- Prone to glitches
- A limited selection of voice effects
11. Voice Changer Plus
**Price:**Free, but offers in-app purchases
Compatibility: iOS 8.0 or later
User Rating: 4.8
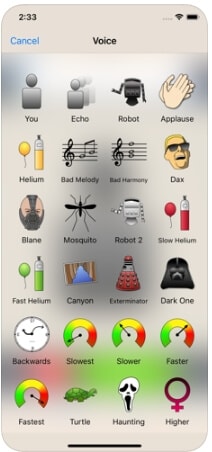
iPhone and iPad owners in need of a voice changer app that grants them complete creative freedom over the modulation of the voices they record, should consider using the Voice Changer Plus. The app features more than fifty voice effects and it provides support for voiceover recordings. Moreover, you can edit all your audio files even after you saved them, enabling you to find new ways to improve your recordings over time. Voice Changer Plus is also equipped with trim controls, so you can remove all parts of your audio files you don’t want to share with your friends on social media.
Pros
- Offers more voice effects than most of its competitors
- Provides voiceover recording options
- Users can trim their audio files
- All audio recordings can be edited after the voice modulation
Cons
- In-app purchase is required in order to unlock all of the app’s features
- Modulating audio in video files is not an option
Below is a quick comparison table among these voice changer apps, hope it will be helpful.
| App | Supported OS | User Rating | Voice Templates |
|---|---|---|---|
| Celebrity Voice Changer - Face | iOS 9.0 or later | 4.0 | Yes |
| Snapchat | iOS 10.0 or later, Android 4.4 or up | 3.8 | No |
| Voice Changer by e3games | Android 4.1 and up | 4.3 | Yes |
| Voicy: Celebrity Voice Changer | iOS 10 or later | 4.3 | Yes |
| Video Voice Changer – Fun Editor | iOS 8.0 or later | 4.4 | Yes |
| Video Voice Changer FX | Android 4.1 and up | 4.1 | Yes |
| Squeak Voice Changer | Android 4.3 and up | 3.9 | Yes |
| Voice Changer with Effects | Android 4.1 and up | 4.5 | Yes |
| Voice Changer | Android 4.1 and up | 4.4 | Yes |
| Voice FX | Android 4.0.3 and up | 3.8 | Yes |
| Voice Changer Plus | iOS 8.0 or later | 4.8 | Yes |
Conclusion
Everybody enjoys a good joke, and the apps we featured in this article enable you to have a lot of fun while experimenting with different voice modulation options. All of the voice effects these apps offer can change a voice automatically, but if you would like to alter the voices in your videos you must choose an app that supports this option. Which of the best voice changer apps for iPhone and Android devices are you going to choose? Leave a comment, and share your opinions with us.
Benjamin Arango
Benjamin Arango is a writer and a lover of all things video.
Follow @Benjamin Arango
Benjamin Arango
Mar 27, 2024• Proven solutions
Have you ever wondered what your voice would sound like if you were a cartoon character, a robot, or an older version of yourself? Changing how your voice sounds has never been easier, regardless of the Smartphone model you have, since voice changer apps can be used on both iPhone and Android devices.
Even though there is nothing wrong with modulating your voice to have fun with your friends, using voice changer apps to pull malicious pranks or bully strangers online is far from acceptable. Read on if you would like to find out more about the best voice changer apps for iPhone and Android devices and discover the one you enjoy using the most.
Best Voice Changer Apps for iPhone and Android
Creating a new ringtone, making a voice recording, or having fun with your friends are only a few reasons why so many people choose to try out voice changer apps. The vast majority of these apps feature well-equipped audio effects libraries that enable users to have fun with their friends and hear how they would sound if they were drunk or after inhaling helium. So, let’s take a look at some of the best voice changer apps on the market.
Changing video voice on Windows and Mac with Wondershare Filmora
Do you want to change the voice in video on Windows and Mac and don’t know which software can meet this requirement? Try Filmra video editor , which provides several ways to change voice over, such as changing the voice speed or changing the pitch. Download the trial version below and find out more possibility in video creation with Filmora.
1. Celebrity Voice Changer – Face
Price: Free, but offers in-app purchases
Compatibility: iOS 9.0 or later
User Rating: 4.0
In case you would like to sound like your favorite movie star of TV host, then Celebrity Voice Changer is one of the best choices you can make. Besides the standard set of options, the app also lets you request new voices since its machine learning technology can mimic virtually anyone’s voice. However, Celebrity Voice Changer is currently only available in English and it cannot modulate speech in other languages. In addition, you must make an in-app purchase in order to gain access to all of the app’s features or unlock the unlimited usage of the app.
Pros
- Automatic voice modulation
- Huge selection of voice filters
- The app generates video files that are better adjusted to the audience on social media than audio files
- Excellent impressions of celebrities
Cons
- Unreasonably expensive
- The app’s Deep Learning technology still has a lot of room for improvement
2. Snapchat
Price: Free, but offers in-app purchases
Compatibility: iOS 10.0 or later, Android 4.4 or up
User Rating: 3.8
With more than 203 million daily users, Snapchat is one of the largest messaging platforms on the market. Previously, we’ve shared how to change gender on Snapchat , beside that, the app lets its users capture short moments or the so-called Snaps and share them with friends. In addition to hundreds of video filters , Snapchat also features a broad spectrum of voice changing effects that make Snaps more entertaining. Even so, the audio recording options Snapchat offers are far from ideal, because the app doesn’t allow you to edit the files you create with it. Using Snapchat will drain your battery quickly, which is why you must pay attention to how frequently you use this app.
Pros
- The easy voice modulation process
- Excellent messaging options
- Grants you access to a large community of likeminded people
- Lenses and filters are updated on a daily basis
Cons
- Editing voice changes after you create a Snap is not possible
- Snapchat is not primarily a voice changer app
Check the detailed information about How to Change Voice on Snapchat with 2 Easy Methods >>
3. Voice Changer
Price: Free
Compatibility: Android 4.1 and up
User Rating: 4.3
Changing your voice with this app won’t take more than a few moments of your time. You just have to launch the app and hit the microphone button to record a message or a joke you would like to modulate. Once you’re happy with the audio recording you made, you can proceed to choose from more than twenty voice effects that will make you sound like a dwarf, a robot, or an alien. The app’s file-sharing capabilities enable you to post your audio recordings to any social media platform of your choosing or store your files and use them as many times as you want.
Pros
- Entertaining and easy to use
- The simple three-step voice modulation process
- Good selection of voice filters
- Excellent file sharing options
Cons
- The app displays ads
- No audio editing tools
4. Voicy: Celebrity Voice Changer
**Price:**Free, but offers in-app purchases
Compatibility: iOS 10 or later
User Rating: 4.3
Impersonating your favorite celebrity can be a fun way to prank your friends on social media. Voicy features a broad selection of celebrity voice impersonations you can use to make you sound like a famous actress or TV personality. The app utilizes a machine learning technology that can generate more than forty avatars and allows the users to experiment with different voice effects. The free version of the app offers only limited capabilities, so if you want to gain access to all of the Voicy’s features, you must choose a weekly, monthly or an annual subscription.
Pros
- Equipped with a powerful machine learning technology
- Offers a vast selection of voice avatars
- The quick voice modification process
- A great choice if you want to make a parody
Cons
- More expensive than the competition
- Support only the English language
5. Video Voice Changer – Fun Editor
Price: Free, but offers in-app purchases
Compatibility: iOS 8.0 or later
User Rating: 4.4
Changing the voices in the videos you record with your iPhones or iPads is a straightforward process that takes a minimum amount of effort. You can either use this iOS-based app to capture videos you’re going to dub or import them from the albums in which they are stored. The Video Voice Changer app is a great option if you want to dub videos directly from your phone because it enables you to change the voices in your videos and make them sound like mice, bears or ghosts. There are over thirty voice effects to choose from, so you can easily pick the one that best fits the video you’re editing.
Pros
- Equipped with video recording tools
- Excellent dubbing features
- A rich selection of voice effects
- Allows users to share their creations on Facebook, Instagram, and other social media platforms
Cons
- You must make an in-app purchase to unlock all of the app’s features
- No audio mixing options
6. Video Voice Changer FX
**Price:**Free, but offers in-app purchases
Compatibility: Android 4.1 and up
User Rating: 4.1
This is a simple app, anyone can use to change the voices in a video. Simply upload a video file from an SD card in your phone and choose an audio effect you want to apply. The app’s collection of funny voices includes options like echo, squirrel, space ship or chipmunk. As soon as you select the voice effect you want to add to a video, the app will start generating a new video that will be saved to your phone. Sharing the videos you edit with Video Voice Changer FX to social media directly from the app is not an option.
Pros
- Fun and easy to use
- Great price to performance ratio
- Changing a voice requires just a few taps
- Allows users to switch between effects while the video is playing
Cons
- No audio or video recording capability
- Doesn’t support social media sharing
7. Squeak Voice Changer
**Price:**Free, but offers in-app purchases
Compatibility: Android 4.3 and up
User Rating: 3.9
Every joke you want to share with your online friends is going to be a little funnier if you record it with Squeak Voice Changer. You just have to tap on the Record button and choose one of the available effects. Each voice changing effect this app offers is represented by a character so you should select Jamie the Jolly if you want to make your voice sound like you’re at a party or Bruce the Sentimental Bot if you want your voice to sound artificial. All the recordings you make with Squeak Voice Changer can be easily shared on social media.
Pros
- Equipped with audio recording options
- Cute and memorable characters that represent voice effects
- Inexpensive and fun to use
- Functional app design
Cons
- Poor selection of voice effects
- The AI only recognizes the English language
8. Voice Changer with Effects
**Price:**Free
Compatibility: Android 4.1 and up
User Rating: 4.5
This Android-based app is designed to make fun and easy since voice modulation features enable you to play voice recording backward or change your voice to sound robotic or even alien. Besides recording your voice, the app also lets you modulate pre-recorded sounds and save them to your phone or use them as ringtones or notification sounds. Furthermore, the app lets you add sounds to images and share them to Facebook. The Voice Changer with Effects enables you to share all audio files you process with it to any of the most popular social media platforms.
Pros
- The app has over 50,000,000 installs
- Equipped with a text to voice feature
- Setting a new ringtone with this app is easy
- Supports editing of pre-recorded audio files
Cons
- Contains ads
- No audio or video editing options
9. Voice Changer
**Price:**Free
Compatibility: Android 4.1 and up
User Rating: 4.4
If you are looking for an Android app that lets you modulate your voice quickly and effortlessly, then Voice Changer may be one of the best options you can find on the market. You can record your voice by simply tapping on the microphone and speaking into your phone’s speaker and then apply one of the audio effects this app offers. Optionally, you can import an audio file you already recorded into the app and then apply Martian, Foreigner, Giant or Child effects to your voice recording. The best part is that you can apply each effect to the audio files you’re editing as many times as you want.
Pros
- Loads of funny effects
- Simple audio recording setup
- Intuitive and modernly designed interface
- Enables users to share audio files via Bluetooth or social media platforms
Cons
- No video editing tools
- The quality of output audio files can vary
10. Voice FX
**Price:**Free, but offers in-app purchases
Compatibility: Android 4.0.3 and up
User Rating: 3.8
Modulating voices in all types of audio files is a straightforward and fun process that can be completed in just a few taps. During the audio recording session, you can apply all voice effects to the sound you are recording and stream it live to your web browsers or media players you’re using. Voice FX changes your voice in real time, which enables you to preview your results before deciding if you want to save them. All files you export from this app will be saved in the MP3 format so you can use them as ringtones on your Android device.
Pros
- Allows users to modulate pre-recorded audio files
- Voice effects are applied in real time
- Offers live streaming features
- Exports files in the MP3 format
Cons
- Prone to glitches
- A limited selection of voice effects
11. Voice Changer Plus
**Price:**Free, but offers in-app purchases
Compatibility: iOS 8.0 or later
User Rating: 4.8
iPhone and iPad owners in need of a voice changer app that grants them complete creative freedom over the modulation of the voices they record, should consider using the Voice Changer Plus. The app features more than fifty voice effects and it provides support for voiceover recordings. Moreover, you can edit all your audio files even after you saved them, enabling you to find new ways to improve your recordings over time. Voice Changer Plus is also equipped with trim controls, so you can remove all parts of your audio files you don’t want to share with your friends on social media.
Pros
- Offers more voice effects than most of its competitors
- Provides voiceover recording options
- Users can trim their audio files
- All audio recordings can be edited after the voice modulation
Cons
- In-app purchase is required in order to unlock all of the app’s features
- Modulating audio in video files is not an option
Below is a quick comparison table among these voice changer apps, hope it will be helpful.
| App | Supported OS | User Rating | Voice Templates |
|---|---|---|---|
| Celebrity Voice Changer - Face | iOS 9.0 or later | 4.0 | Yes |
| Snapchat | iOS 10.0 or later, Android 4.4 or up | 3.8 | No |
| Voice Changer by e3games | Android 4.1 and up | 4.3 | Yes |
| Voicy: Celebrity Voice Changer | iOS 10 or later | 4.3 | Yes |
| Video Voice Changer – Fun Editor | iOS 8.0 or later | 4.4 | Yes |
| Video Voice Changer FX | Android 4.1 and up | 4.1 | Yes |
| Squeak Voice Changer | Android 4.3 and up | 3.9 | Yes |
| Voice Changer with Effects | Android 4.1 and up | 4.5 | Yes |
| Voice Changer | Android 4.1 and up | 4.4 | Yes |
| Voice FX | Android 4.0.3 and up | 3.8 | Yes |
| Voice Changer Plus | iOS 8.0 or later | 4.8 | Yes |
Conclusion
Everybody enjoys a good joke, and the apps we featured in this article enable you to have a lot of fun while experimenting with different voice modulation options. All of the voice effects these apps offer can change a voice automatically, but if you would like to alter the voices in your videos you must choose an app that supports this option. Which of the best voice changer apps for iPhone and Android devices are you going to choose? Leave a comment, and share your opinions with us.
Benjamin Arango
Benjamin Arango is a writer and a lover of all things video.
Follow @Benjamin Arango
Essential Tips for Free Voice and Audio Recording in Audacity on Computers
Natural audio recording software, such as Voice Memos for Macs or Sound Recorder for Windows PCs, is included with every machine. These applications enable users to record audio using either the desktop’s internal or an external microphone, and they generally have basic audio editing features.
However, when you’re looking for a higher-quality recording program, Audacity is the way to go. Audacity is a free audio editor with a lot of cutting-edge features. More significantly, recording using Audacity is as simple as clicking a button.
In this Audacity Record Computer Audio guide, we will show you all the methods of recording internal audio on your computer and Mac.
In this article
01 Record Audio On Audacity with a Microphone
02 Record Sounds Playing on Your Computer Using Audacity on Win
03 Record Sounds Playing on Your Computer Using Audacity on Mac
04 Set up Audacity to Record as Schedule
Part 1: How to Record Audio On Audacity with a Microphone On Windows and Mac Computers?
For both Windows and Mac, the procedures for recording audio from a microphone are the same if you’re utilizing your desktop’s built-in mic or an external microphone. Here’s your step-by-step guide to audacity record using a microphone:
Step 1: Launch Audacity and get to know the Device Toolbar, situated underneath the playback controls. You may modify the Audio Host and the Recording and Playback Devices—all of which are required for Audacity recording.

Step 2: To begin, select Tracks under the Add New tab, Stereo Track, or Mono Track to create a new track.

Step 3: Select Recording Device from the options list. Select your microphone from the dropdown menu and hit the Record option.

Step 4: A soundwave emerges along the track as you talk into the speaker. The Recording Level may be found at the top of the display. To pause or stop the recording, click Stop or Pause until you select Record anew.

Step 5: With the mouse over any recording area, click the Delete button to cut out any portion of it quickly. Click Ctrl + A, then Delete to erase whatever you’ve just saved. Alternatively, press the X button to delete the track completely.

Part 2: How to Record Sounds Playing on Your Computer Using Audacity On Windows?
Unlike Mac, Windows makes it simple to capture audio from a movie or media file running on your desktop. There seem to be two primary methods for accomplishing audacity record desktop audio in this way:
1. Use MME as the Audio Host
Step 1: To use MME as your audio host, go to Tracks in the Add New tab in Stereo Track and create a new file.

Step 2: Change the Audio Host (to the left of Recording Device) to MME—this is the standard setting, so you might not have to change anything.

Step 3: Choose desired option from the Recording Device dropdown menu. Based on your configuration, this might be referred to as Wave Out or Loopback. When you’re uncertain, try it out.

Step 4: To record your audio source, click Record, then play it back.
2. Use WASAPI as the Audio Host
WASAPI provides higher-resolution digital recordings. If capturing audio from an external monitor, it’s also a good idea to utilize it.
Step 1: Convert the Audio Host from MME to Windows WASAPI after creating a fresh Stereo Track.

Step 2: Switch the Recording Device to Speaker (loopback). To display the entire label, you might have to slide the toolbar’s knobs outwards. Begin recording by pressing the red dot and then listen to the audio source. Audacity will capture the audio even if your PC is muted.
Part 3: How to Record Sounds Playing on Your Computer Using Audacity on Mac?
Unfortunately, there’s no ready-made method to record computer audio using Audacity on a Mac. Some alternative ways to use Audacity to record from Mac including using a loopback cable, or download and using a third-party software. You can try some Audacity alternatives to record the computer audio on Mac.
For Win 7 or later (64-bit)
For macOS 10.12 or later
If you have installed Filmora already, you can use it to record the sound playing on your Mac with some tricks.
Step 1: Luanch Filmora, and then click the Record button and select Record PC Screen.

Step 2: Set up the recording settings based on the need. Since we’re going to record the playing audio from the Mac computer, select Microphone and System Audio On and click the Red button to start.

Step 3: Now you have a screen captured video with sound included. Since we need th audio only, we can attache the audio from the video first and then do some editing such as adding fade in and fade out effect, or remove unwanted audio clip.

Part 4: How to Set up Audacity to Record as Schedule?
A streaming video recorder or cassette can be used to arrange a recording. All of those are identical to Time Recordings in that they are used to schedule recording. The Timer record configuration dialog box may be used to set the beginning and finish of the recording. This is how you do it:
Step 1: By definition, the recording’s Start Date and Time are set to the present time. It will begin recording on the present day and hour by default when you don’t alter it. There is no default setting for the End Date and Time. You must either choose a date and time to determine the end time.

Step 2: There is a Checkbox to Save the work immediately. By Ticking the option, you may choose the path or Folder where the file will be saved when the recording is finished.

Conclusion
Well, there you have it – your complete Audacity Record Computer Audio guide. One thing is for certain that Audacity allows some great ways of recording audio from internal and external components of your Windows and Mac. However, if your Audacity is having issues, we would highly recommend opting for another software, such as Wondershare Filmora.
Wondershare Filmora is the finest thing that has come out in recent years for recording audio from a desktop. It is intended not just for pros but also for any enthusiast videographer who desires to create a high-quality movie for their family and friends. Download it today to make your movie a delightful journey with high-quality audio recording.
02 Record Sounds Playing on Your Computer Using Audacity on Win
03 Record Sounds Playing on Your Computer Using Audacity on Mac
04 Set up Audacity to Record as Schedule
Part 1: How to Record Audio On Audacity with a Microphone On Windows and Mac Computers?
For both Windows and Mac, the procedures for recording audio from a microphone are the same if you’re utilizing your desktop’s built-in mic or an external microphone. Here’s your step-by-step guide to audacity record using a microphone:
Step 1: Launch Audacity and get to know the Device Toolbar, situated underneath the playback controls. You may modify the Audio Host and the Recording and Playback Devices—all of which are required for Audacity recording.
Step 2: To begin, select Tracks under the Add New tab, Stereo Track, or Mono Track to create a new track.
Step 3: Select Recording Device from the options list. Select your microphone from the dropdown menu and hit the Record option.
Step 4: A soundwave emerges along the track as you talk into the speaker. The Recording Level may be found at the top of the display. To pause or stop the recording, click Stop or Pause until you select Record anew.
Step 5: With the mouse over any recording area, click the Delete button to cut out any portion of it quickly. Click Ctrl + A, then Delete to erase whatever you’ve just saved. Alternatively, press the X button to delete the track completely.
Part 2: How to Record Sounds Playing on Your Computer Using Audacity On Windows?
Unlike Mac, Windows makes it simple to capture audio from a movie or media file running on your desktop. There seem to be two primary methods for accomplishing audacity record desktop audio in this way:
1. Use MME as the Audio Host
Step 1: To use MME as your audio host, go to Tracks in the Add New tab in Stereo Track and create a new file.
Step 2: Change the Audio Host (to the left of Recording Device) to MME—this is the standard setting, so you might not have to change anything.
Step 3: Choose desired option from the Recording Device dropdown menu. Based on your configuration, this might be referred to as Wave Out or Loopback. When you’re uncertain, try it out.
Step 4: To record your audio source, click Record, then play it back.
2. Use WASAPI as the Audio Host
WASAPI provides higher-resolution digital recordings. If capturing audio from an external monitor, it’s also a good idea to utilize it.
Step 1: Convert the Audio Host from MME to Windows WASAPI after creating a fresh Stereo Track.
Step 2: Switch the Recording Device to Speaker (loopback). To display the entire label, you might have to slide the toolbar’s knobs outwards. Begin recording by pressing the red dot and then listen to the audio source. Audacity will capture the audio even if your PC is muted.
Part 3: How to Record Sounds Playing on Your Computer Using Audacity on Mac?
Unfortunately, there’s no ready-made method to record computer audio using Audacity on a Mac. Some alternative ways to use Audacity to record from Mac including using a loopback cable, or download and using a third-party software. You can try some Audacity alternatives to record the computer audio on Mac.
For Win 7 or later (64-bit)
For macOS 10.12 or later
If you have installed Filmora already, you can use it to record the sound playing on your Mac with some tricks.
Step 1: Luanch Filmora, and then click the Record button and select Record PC Screen.
Step 2: Set up the recording settings based on the need. Since we’re going to record the playing audio from the Mac computer, select Microphone and System Audio On and click the Red button to start.
Step 3: Now you have a screen captured video with sound included. Since we need th audio only, we can attache the audio from the video first and then do some editing such as adding fade in and fade out effect, or remove unwanted audio clip.
Part 4: How to Set up Audacity to Record as Schedule?
A streaming video recorder or cassette can be used to arrange a recording. All of those are identical to Time Recordings in that they are used to schedule recording. The Timer record configuration dialog box may be used to set the beginning and finish of the recording. This is how you do it:
Step 1: By definition, the recording’s Start Date and Time are set to the present time. It will begin recording on the present day and hour by default when you don’t alter it. There is no default setting for the End Date and Time. You must either choose a date and time to determine the end time.
Step 2: There is a Checkbox to Save the work immediately. By Ticking the option, you may choose the path or Folder where the file will be saved when the recording is finished.
Conclusion
Well, there you have it – your complete Audacity Record Computer Audio guide. One thing is for certain that Audacity allows some great ways of recording audio from internal and external components of your Windows and Mac. However, if your Audacity is having issues, we would highly recommend opting for another software, such as Wondershare Filmora.
Wondershare Filmora is the finest thing that has come out in recent years for recording audio from a desktop. It is intended not just for pros but also for any enthusiast videographer who desires to create a high-quality movie for their family and friends. Download it today to make your movie a delightful journey with high-quality audio recording.
Also read:
- In 2024, The Top 7 Techniques for Adding Humor Through Vocal Modification on the Phone
- Updated Best Value Volume Scaling Software 5 Top Gratis Options for 2024
- Updated Cutting Through the Clutter A Comprehensive Approach to Sound Management in Video Editing
- New In 2024, The Essential Guide to Natural Ambiance Top 10 Sound Apps for iPhone and Android
- In 2024, From Raw Tape to Polished Production Advanced Techniques Using Sony Vegas Pro
- Discovering the Ultimate Voice Overhaul Mobile Tools
- New In 2024, Infusing Auditory Experience in Visual Storytelling
- New Exploring the Finest Free, Web-Integrated Digital Audio Workstations for 2024
- Explore the Best 8 Audio Editing Platforms Available for Mac & PC Users
- 2024 Approved Where Can I Find Bruh Sound Effect?
- Updated Secure Conversation Services Identifying the Best Platforms for Stranger Communication
- Mastering Clean Audio Tactics to Eradicate Background Noise
- Exploring Soundscape Inclusions of Brass Ensemble Noises for 2024
- New In 2024, Harmonizing Sound Innovative Solutions to Tackle Distorted Audio Problems
- Updated 2024 Approved Cutting-Edge Pop Playlist Ideal Background Music for Video Content Creation
- New 2024 Approved Top 6 Multichannel Sound Integration Tools for Professional Broadcasts
- New In 2024, Premiered 7 Techniques for Nonchalant Vocal Suppression Online & Offline
- Updated In 2024, Discover the Best 8 Rain Sound Archives for Free Download - A Complete List
- Audacity Installation Made Easy The Ultimate Chromebook Checklist
- 8 Popular Streaming Audio Recorder That You Cant Miss for 2024
- Updated Exclusive MPEG-4 to MP3 Transformer Zero-Cost, Top-Tier Conversion for Your Music Library From MPA Files
- Updated Taming the Waves Strategies for Diminishing Resonance and Revving up Recording Clarity
- Updated All You Want to Know About Vimeo Video Aspect Ratio Included
- Updated Sensuous Soundscape Selections for Digital Media
- New Guide to Extracting and Refining Your Audacity Recordings as MP3s
- Updated Comprehensive Insights Into Googles Mobile App Your Ultimate Podcast Experience Companion
- New 2024 Approved A Comparative Exploration of Leading Mac MP3 Tagging Applications
- 2024 Approved Web-Based Echo Eradication Mastering the Art of Noise Cancellation
- In 2024, Your First Steps in Podcast Editing A Comprehensive Beginners Guide
- New Navigating the Soundscape of Premiere Pro Simple Strategies for Audio Layer Management
- Locating Recorded Sounds of Wolf Vocalizations for 2024
- Exploring the Possibilities Methods for Vocal Variation and Control
- Updated Essential Music Libraries for Film and Video Editing - Free Edition for 2024
- Updated 2024 Approved 5 Best Sound Mixer for Windows 10
- New Ultimate Guide 10 Budget-Friendly Online Tools to Convert MP3s Into Text Documents for 2024
- 2024 Approved Iconic Public Music Pieces for Sequential Artworks
- Show Audio Waveform and Add Waveform Animation in Premiere ProTutorial
- Basic Voice Manipulation Systems A Review of Features, Procedures, and Alternative Strategies
- 2024 Approved The Ultimate List of Audio Editing Tools Comparable to Audacity for All Platforms
- 2024 Approved Unveiling the Leading Audio Recording Apps of Todays Tech Scene
- New 2024 Approved Harmonizing Technology and Tunes The Leading 7 Digital Audio Workstations for Guitarists
- 2024 Approved Leading MP3 to Verbatim Transcriptions Solutions
- New 2024 Approved Enhancing Presentations with Sound In-Depth Techniques for Recording Audio in PowerPoint on PC/Mac Platforms
- In 2024, The Soundsmiths Playbook Speeding Up and Lowering the Notes in Adobe Rush
- Expert Tips on Leveraging Morphvox in Games – The Comprehensive Guide to Voice Modification
- Easy Steps to Get and Remove Audacity on Ubuntu Linux - 2023 Edition for 2024
- New 2024 Approved Leveraging Cloud-Based Voice Storage A Closer Look at Vocaroos Capabilities
- The Vocal Navigator Discovering Premium Online Text to Speech Providers for 2024
- A Working Guide For Pachirisu Pokemon Go Map On Vivo Y100i Power 5G | Dr.fone
- In 2024, How to use Pokemon Go Joystick on Vivo S18 Pro? | Dr.fone
- Updated The Best Audio Converters A Comprehensive Review for 2024
- Top 7 Skype Hacker to Hack Any Skype Account On your Huawei Nova Y71 | Dr.fone
- 2024 Approved No Experience Needed Top Free Video Editing Software
- Updated The Ultimate List of Facebook MP3 Converters Online for 2024
- In 2024, Complete Tutorial to Use VPNa to Fake GPS Location On Honor X8b | Dr.fone
- In 2024, Full Guide to Catch 100 IV Pokémon Using a Map On Oppo K11x | Dr.fone
- Can Life360 Track Or See Text Messages? What Can You Do with Life360 On Itel A05s? | Dr.fone
- Tips and Tricks for Setting Up your Samsung Galaxy A54 5G Phone Pattern Lock
- Unlock Your Vivo Y17s Phone with Ease The 3 Best Lock Screen Removal Tools
- Easy Tutorial for Activating iCloud from Apple iPhone 13 Safe and Legal
- How to Transfer Data from Realme 12+ 5G to Samsung Phone | Dr.fone
- Updated Make Viral Reaction Videos Best iOS and Android Apps
- Mastering Android Device Manager The Ultimate Guide to Unlocking Your Xiaomi Redmi 12 Device
- Title: Low-Cost Mac MP3 Enhancer Tool for 2024
- Author: Jacob
- Created at : 2024-05-20 00:04:14
- Updated at : 2024-05-21 00:04:14
- Link: https://audio-shaping.techidaily.com/low-cost-mac-mp3-enhancer-tool-for-2024/
- License: This work is licensed under CC BY-NC-SA 4.0.
