
:max_bytes(150000):strip_icc():format(webp)/GettyImages-545864051-5c29cf6346e0fb0001d25712.jpg)
In 2024, Innovations in Home Audio Engineering Analyzing the Best and Worst of the Top Digital Music Makers This Year
Innovations in Home Audio Engineering: Analyzing the Best and Worst of the Top Digital Music Makers This Year
FREE 10 Best Online Music Makers

Benjamin Arango
Apr 26, 2024• Proven solutions


Expressing ideas through music was never easy, and even today in the age of powerful digital audio stations like Ableton Live or FruityLoops , producing original music requires a certain set of skills. However, online content producers often need music for their videos, but they neither have the time or the budget to hire a professional musician to create a soundtrack for their project in studio conditions. If you are looking for a quick way to make your own music online, then you should keep reading, because in this article we are going to take you through the ten best online music makers you should check out in 2021.
10 Best Online Music Makers in 2021
The music-making platforms that are currently available online are still not as nearly as powerful as professional software products for music producers. Nonetheless, this doesn’t mean that you can’t use them to create the music you like or just have fun with them. Here are the ten best online music makers in 2019.
1. Typeatone
Price: Free
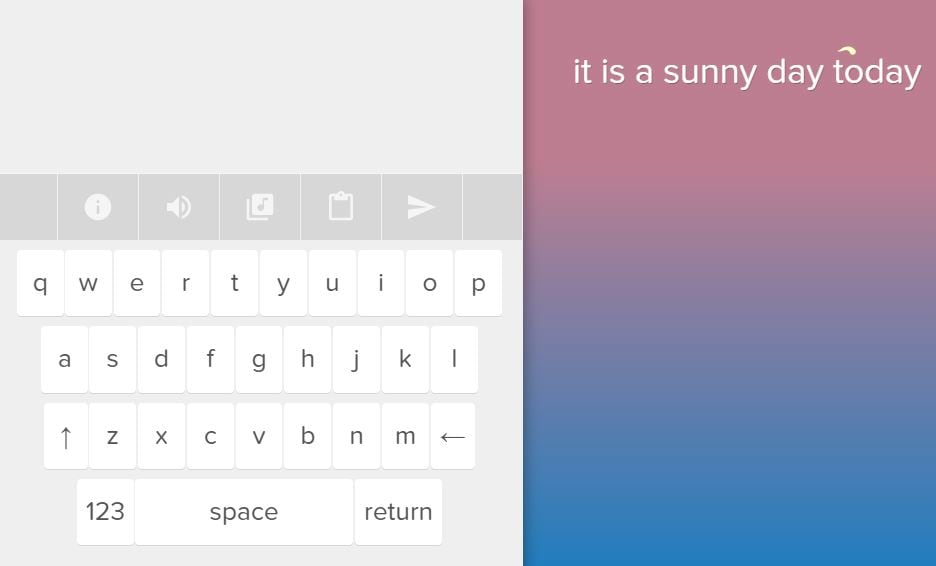
Image from Internet
Have you ever wondered what your words would sound like if they were turned into music? Head over to the Typeatone platform if you want to find out since all you have to do in order to start creating your own music is type in the text. As you type, the platform will automatically start playing your words and once you’re done, you’ll be able to hear your new song. You can also choose between different instruments to make the process of creating music with Typeatone even more entertaining. You can share all of your creations with your friends on social media.
![]()
A cross-platform for making videos anywhere for all creators

Why your video editing isn’t good enough? How about some creative inspo?
- 100 Million+ Users
- 150+ Countries and Regions
- 4 Million+ Social Media Followers
- 5 Million+ Stock Media for Use
* Secure Download

2. Audiotool
Price: Free
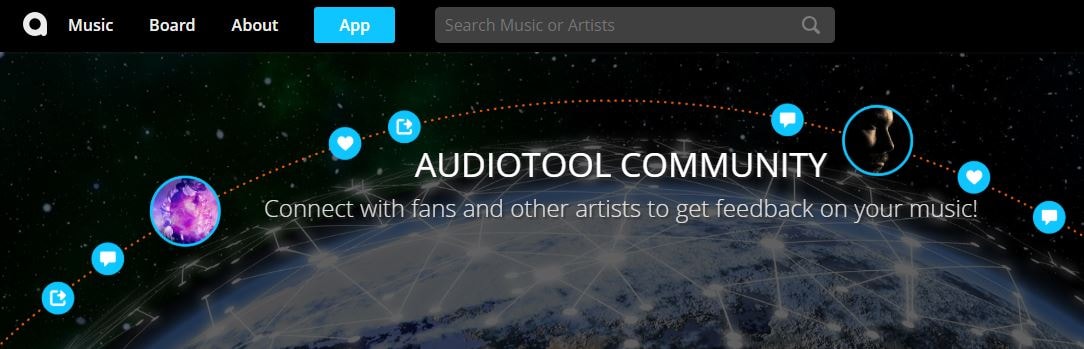
Image from Internet
Electronic music producers who often use synthesizers like Roland TB-303 or Roland TR-909 are going to love the features this online collaborative platform offers. Audiotool hosts a huge music library, you can explore even if you are not a registered user. In order to access the platform’s music studio, you first have to create an account and make sure that you are signed in. Audiotool is also a community of like-minded people where you can meet artists whose work you appreciate or hear what others think about your work. The only downside is that Audiotool’s abundance of features can be overwhelming for the newcomers to the world of electronic music production.
3. AudioSauna
Price: Free
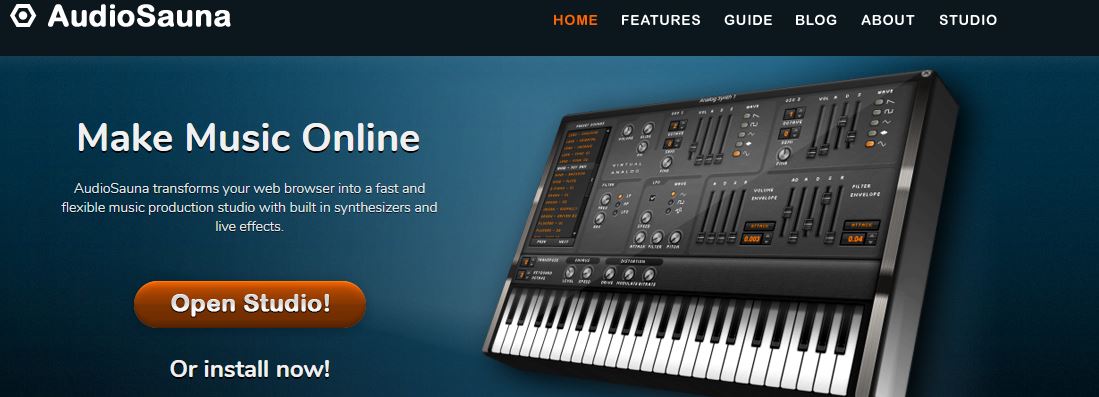
Image from Internet
AudioSauna seems to offer everything its users need to create inspiring music because it is equipped with frequency modulation synth, virtual analog synth and a sampler that provides layering features. Moreover, its intuitive interface makes the process of arranging the song structure or changing several note values simultaneously much easier. Creating an account on AudioSauna will enable to record all your projects and export them as audio files that can be uploaded to SoundCloud or any other audio distribution platform. AudioSauna is a perfect tool for skilled producers who want to create their music online.
4. Soundtrap
Price: Free trial available, subscription plans start at $3.99 per month

Image from Internet
Soundtrap offers a long list of features that enable professional musicians to create their music online. All you have to do is create an account and you will get access to the Sountrap’s studio that let you create new beat patterns, use a synthesizer or even invite friends to make music together. The platform also offers the possibility to connect your own instruments to the Soundtrap’s studio, so that you can record your music as you play it. This online platform also has an Education section where you can share your knowledge with others or learn valuable music lessons.
5. PatternSketch
Price: Free
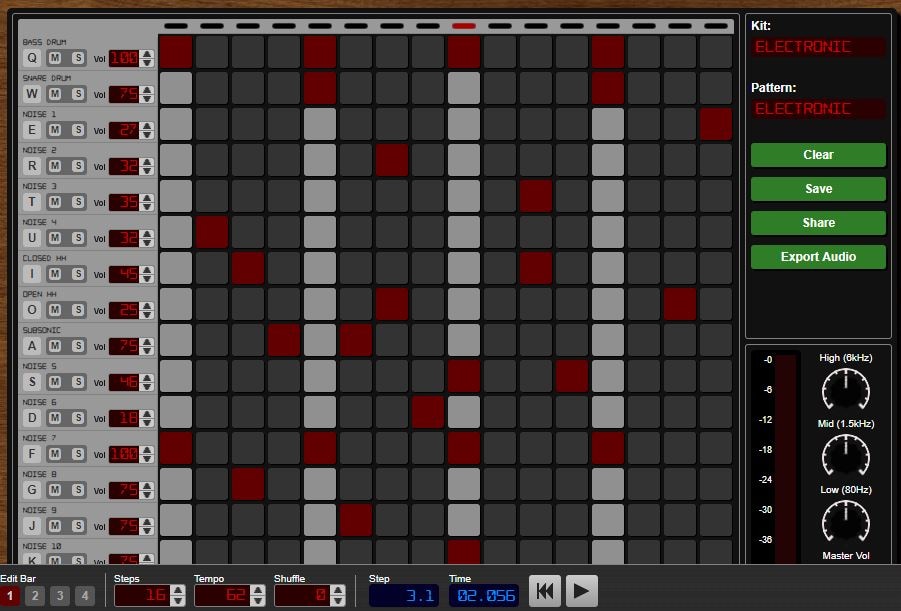
Image from Internet
This basic and yet effective drum machine can help you generate amazing beats for the songs you’re working on. Once you sign up, you will be able to choose from a number of different kits and patterns that are fully customizable or create your own original beats. After you create a pattern you like, you can save it with a single click or send it to your friends via email. Optionally, you can export all of your creations from PatternSketch and save them as wav, mp3 or ogg files, although in some cases mp3 audio files may not loop properly.
6. Soundation
Price: Free version available, pricing plans start at $1.99 per month

Image from Internet
If you choose to create music with the free version of Soundation, you’ll be able to work on up to ten projects, try out over 700 audio effects and loops, and export all your music in low quality. Purchasing the Intro pricing plan will enable you to work on an unlimited number of projects, make live audio recordings, import audio files smaller than 100MB or use an external midi controller. Moreover, opting for any of the annual or monthly subscription plans will allow you to export entire projects and audio files in high resolution from Soundation.
7. Text to Speech
Price: Free

online-music-maker-Text to Speech.jpg
Vocals are often overlooked in contemporary electronic music, but there are so many ways they can be used creatively. The platform lets you turn up to 50000 characters into speech at once, and it also offers several different voices you can choose from. Before you create an audio file you can determine how fast the text is going to be vocalized, so you should try different options and see which one fits your project the best. Text to Speech platform can be used during the process of creating a new song, but the tools it offers are not enough to make an entire song.
8. Looplabs
Price: Free
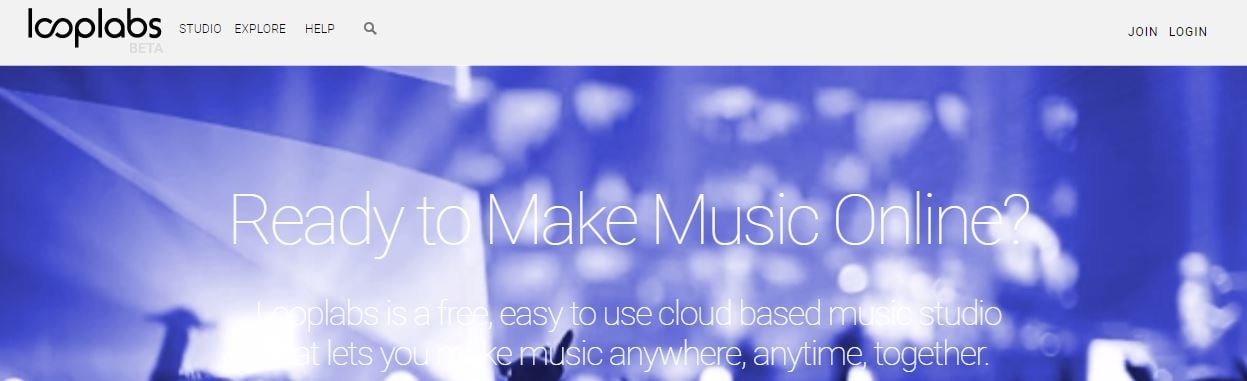
Music enthusiasts who would like to produce different genres of music online should definitely get familiar with Looplabs, as this online music maker lets its users remix songs or make music from scratch. Besides being one of the best places on the Internet to record music, Looplabs is also a community where you can meet people who like your music or discover artists whose work you admire. The Looplab’s studio features samples for a broad range of music genres and musical instruments, and you can use it to make Electro or Funk music equally effectively.
9. Online Sequencer
Price: Free
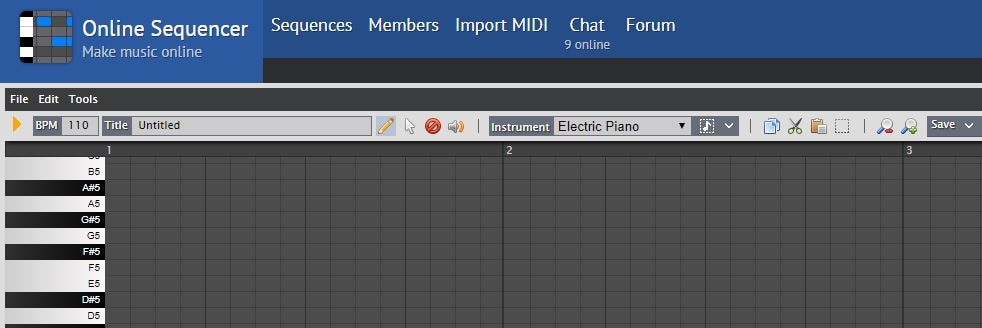
This is a perfect tool for developing an idea for a song, as you can create a sequence in just a few minutes. You can choose from Piano, Drums and Guitar categories of instruments or browse through a huge collection of fully customizable preset sequences that is updated on a daily basis. The platform also lets you import MIDI files and work on projects you’ve already started developing or you can export your sequences as MIDI files from the Online Sequencer and edit them with your DAW. Even though Online Sequencer is a useful tool for making music, the features it offers can’t really be compared with those on Soundation or AudioSauna.
10. Autochords
Price: Free
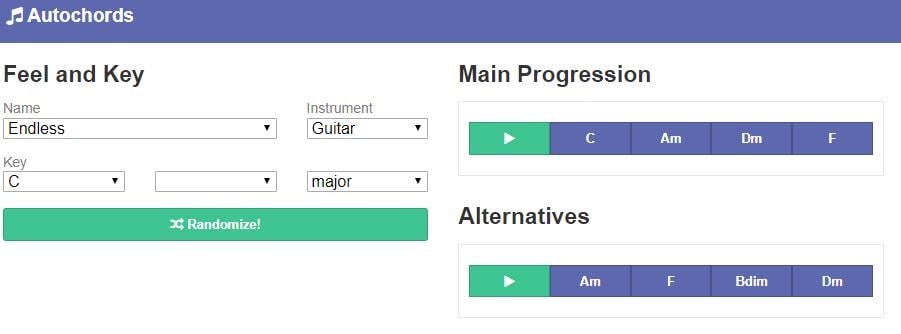
Finding new ideas for songs is often more difficult than it sounds, and if you ever face a creative block you should simply head over to Autochords. This platform suggests chord progressions based on the parameters you set, so you just have to select an instrument and the name of the song to set the feel, and the platform will show you the main progression and its alternatives. Rather than being an online music maker, Autochords is more a tool that helps piano and guitar players understand chord progressions better. iPhone and iPad users can download the Autochords app from the App Store for free.
Read More to Get : Best Free DAW for Windows and Mac for Beginners >>
Conclusion
You don’t have to be a professional musician in order to start making music online, you just have to love music, and an online music maker of your choice will take care of the rest. Do you use online music makers for entertainment or to express your creativity? Leave a comment below and share your opinions with us.
Benjamin Arango
Benjamin Arango is a writer and a lover of all things video.
Follow @Benjamin Arango
Benjamin Arango
Apr 26, 2024• Proven solutions
Expressing ideas through music was never easy, and even today in the age of powerful digital audio stations like Ableton Live or FruityLoops , producing original music requires a certain set of skills. However, online content producers often need music for their videos, but they neither have the time or the budget to hire a professional musician to create a soundtrack for their project in studio conditions. If you are looking for a quick way to make your own music online, then you should keep reading, because in this article we are going to take you through the ten best online music makers you should check out in 2021.
10 Best Online Music Makers in 2021
The music-making platforms that are currently available online are still not as nearly as powerful as professional software products for music producers. Nonetheless, this doesn’t mean that you can’t use them to create the music you like or just have fun with them. Here are the ten best online music makers in 2019.
1. Typeatone
Price: Free
Image from Internet
Have you ever wondered what your words would sound like if they were turned into music? Head over to the Typeatone platform if you want to find out since all you have to do in order to start creating your own music is type in the text. As you type, the platform will automatically start playing your words and once you’re done, you’ll be able to hear your new song. You can also choose between different instruments to make the process of creating music with Typeatone even more entertaining. You can share all of your creations with your friends on social media.
![]()
A cross-platform for making videos anywhere for all creators
Why your video editing isn’t good enough? How about some creative inspo?
- 100 Million+ Users
- 150+ Countries and Regions
- 4 Million+ Social Media Followers
- 5 Million+ Stock Media for Use
* Secure Download
2. Audiotool
Price: Free
Image from Internet
Electronic music producers who often use synthesizers like Roland TB-303 or Roland TR-909 are going to love the features this online collaborative platform offers. Audiotool hosts a huge music library, you can explore even if you are not a registered user. In order to access the platform’s music studio, you first have to create an account and make sure that you are signed in. Audiotool is also a community of like-minded people where you can meet artists whose work you appreciate or hear what others think about your work. The only downside is that Audiotool’s abundance of features can be overwhelming for the newcomers to the world of electronic music production.
3. AudioSauna
Price: Free
Image from Internet
AudioSauna seems to offer everything its users need to create inspiring music because it is equipped with frequency modulation synth, virtual analog synth and a sampler that provides layering features. Moreover, its intuitive interface makes the process of arranging the song structure or changing several note values simultaneously much easier. Creating an account on AudioSauna will enable to record all your projects and export them as audio files that can be uploaded to SoundCloud or any other audio distribution platform. AudioSauna is a perfect tool for skilled producers who want to create their music online.
4. Soundtrap
Price: Free trial available, subscription plans start at $3.99 per month
Image from Internet
Soundtrap offers a long list of features that enable professional musicians to create their music online. All you have to do is create an account and you will get access to the Sountrap’s studio that let you create new beat patterns, use a synthesizer or even invite friends to make music together. The platform also offers the possibility to connect your own instruments to the Soundtrap’s studio, so that you can record your music as you play it. This online platform also has an Education section where you can share your knowledge with others or learn valuable music lessons.
5. PatternSketch
Price: Free
Image from Internet
This basic and yet effective drum machine can help you generate amazing beats for the songs you’re working on. Once you sign up, you will be able to choose from a number of different kits and patterns that are fully customizable or create your own original beats. After you create a pattern you like, you can save it with a single click or send it to your friends via email. Optionally, you can export all of your creations from PatternSketch and save them as wav, mp3 or ogg files, although in some cases mp3 audio files may not loop properly.
6. Soundation
Price: Free version available, pricing plans start at $1.99 per month
Image from Internet
If you choose to create music with the free version of Soundation, you’ll be able to work on up to ten projects, try out over 700 audio effects and loops, and export all your music in low quality. Purchasing the Intro pricing plan will enable you to work on an unlimited number of projects, make live audio recordings, import audio files smaller than 100MB or use an external midi controller. Moreover, opting for any of the annual or monthly subscription plans will allow you to export entire projects and audio files in high resolution from Soundation.
7. Text to Speech
Price: Free

online-music-maker-Text to Speech.jpg
Vocals are often overlooked in contemporary electronic music, but there are so many ways they can be used creatively. The platform lets you turn up to 50000 characters into speech at once, and it also offers several different voices you can choose from. Before you create an audio file you can determine how fast the text is going to be vocalized, so you should try different options and see which one fits your project the best. Text to Speech platform can be used during the process of creating a new song, but the tools it offers are not enough to make an entire song.
8. Looplabs
Price: Free
Music enthusiasts who would like to produce different genres of music online should definitely get familiar with Looplabs, as this online music maker lets its users remix songs or make music from scratch. Besides being one of the best places on the Internet to record music, Looplabs is also a community where you can meet people who like your music or discover artists whose work you admire. The Looplab’s studio features samples for a broad range of music genres and musical instruments, and you can use it to make Electro or Funk music equally effectively.
9. Online Sequencer
Price: Free
This is a perfect tool for developing an idea for a song, as you can create a sequence in just a few minutes. You can choose from Piano, Drums and Guitar categories of instruments or browse through a huge collection of fully customizable preset sequences that is updated on a daily basis. The platform also lets you import MIDI files and work on projects you’ve already started developing or you can export your sequences as MIDI files from the Online Sequencer and edit them with your DAW. Even though Online Sequencer is a useful tool for making music, the features it offers can’t really be compared with those on Soundation or AudioSauna.
10. Autochords
Price: Free
Finding new ideas for songs is often more difficult than it sounds, and if you ever face a creative block you should simply head over to Autochords. This platform suggests chord progressions based on the parameters you set, so you just have to select an instrument and the name of the song to set the feel, and the platform will show you the main progression and its alternatives. Rather than being an online music maker, Autochords is more a tool that helps piano and guitar players understand chord progressions better. iPhone and iPad users can download the Autochords app from the App Store for free.
Read More to Get : Best Free DAW for Windows and Mac for Beginners >>
Conclusion
You don’t have to be a professional musician in order to start making music online, you just have to love music, and an online music maker of your choice will take care of the rest. Do you use online music makers for entertainment or to express your creativity? Leave a comment below and share your opinions with us.
Benjamin Arango
Benjamin Arango is a writer and a lover of all things video.
Follow @Benjamin Arango
How to Use Audacity for Podcasts
Free audio recording & editing software audacity for podcasts is available for Windows, Linux, & macOS. Even though it’s not expressly built for podcasts, it is a popular option for recording podcasts. If you don’t mind a steep learning curve, you can easily record, edit, & export a high-quality podcast with this software.
How to Record a Podcast using Audacity
Despite its complexity, audacity for podcasts doesn’t need a detailed understanding of the software’s internals to begin using it. As a beginner, we explain all of the initial settings and basic editing choices you’ll need to know and how to output in a format that can be used for podcasting.
Here’s how to get started recording your podcast using Audacity for Podcasts:
- By selecting the box to the left of your microphone, you may choose your audio host. Select MME for Windows and Core Audio for Mac OS X.

- Select the audio interface or microphone from the menu to the right of the microphone icon. In order to record your Audacity for Podcasts, Audacity utilizes the device that you pick from this menu.

- Select your headphones by checking the box to the right of a speaker symbol. To playback, the audio files, Audacity for Podcasts utilizes the device you specify from this option.

What you need to know about Audacity’s Input Tester
Test your input before you begin recording your podcast. This helps you to make totally clear that everything is set up properly and that your podcast is recorded.
- The monitor meter may be found on the menu bar at the very top, at the very center. “Click to begin monitoring” is what it says.

- Speak normally into the microphone you’ve placed on your computer.

- Ensure that the Microphone Volume meter doesn’t go over -12dB by adjusting the volume controls.

Audacity for Podcasts Recording Tutorial
Audacity recording is simple after you’ve set up all of the settings you need. Make sure to pick just one (Mono) Recording Channel while you’re recording with a single microphone.
Each microphone is assigned a separate audio channel if you have numerous microphones connected to an audio interface or mixer. There must be a separate microphone and channel for each participant on your podcast so that you can edit them separately and make sure they all sound well together.
Each of these mono channels will be blended into stereo when you export your podcast later.
There is nothing complicated about the actual recording procedure.
- To begin recording your podcast, press the red Record button.

- When you’ve finished recording your podcast, press the black Stop button.

- Once you’ve finished recording, use Ctrl+S to save the project. If Audacity crashes or you shut it by mistake, you won’t be able to recover your edited audio file.
Using Audacity to Edit Your Podcast
Audacity for Podcasts not only allows you to record your podcast, but it also allows you to edit it afterward. It is possible to send your raw podcast to the internet as soon as you complete the recording, but editing may add a degree of polish that makes it more pleasurable for the listener.
You may use Audacity to re-arrange your podcast’s flow by cutting and relocating portions, reducing clipping, and even deleting background noise if one of your mics was too near or someone was talking too loudly. Audacity can even alter the levels of individual recordings.
Some of these editing chores are more difficult than others, but if you just have high-quality equipment & have your settings ideal, the podcast may not need a lot of effort. Check over a few different portions of your podcast to get a sense of how much work has to be done on it before publishing.
In Audacity, you may add music, clips, & sound effects to your podcast intro and outro.
In Audacity, add music, clips, & sound effects for the podcast intro and outro
In Audacity, you may add & move sound clips, such as intro music.
- Click File > Import > Audio or press Ctrl+Shift+I to import your podcast audio into Audacity.

- Make your choice of music for the opening, outro, or anything else you’d want to include.

- It is possible to go back and forth between the past and future by clicking on the top toolbar’s time shift function.

- When your opening music stops, click and drag the main podcast audio track so that it begins when the music ends.

- Add an outro or other sound effects & music that play throughout your podcast by following these similar instructions. There should be a separate channel for each sound file so that they may be easily moved across devices.
- Using the time shift tool, you may relocate an outro to the conclusion of your podcast if necessary. If you wish to add sound effects or music to your podcast, use the time shift tool to move them around.
- To test whether your audio tracks are positioned appropriately, just click the green Play button at any moment. The cursor icon in the toolbar may be used to start listening to a podcast at a different place in the track.
In Audacity, here’s how to export your podcast
After you’ve finished editing your podcast, listen to it one more time to ensure you’re satisfied with the outcome, then save it to ensure you don’t lose your work if anything goes wrong during the export process. When you export your podcast, you’re creating an audio file that you can publish to your podcast host and share with others.
Here’s how to export the Audacity podcast:
- Select File > Export > Export as… from the File menu.
- After giving your podcast a name, click Save.
- If you wish to add metadata, you may do so now, or just hit OK to begin the exporting process.
- This procedure may take a long time if the podcast is lengthy or your machine is sluggish. During this procedure, keep your computer turned on & prevent it from sleeping and hibernating.
- You’re ready to publish your podcast to the podcast host once it’s finished exporting.
Conclusions
For recording, editing, & mixing your own podcast, an Audacity is a great option. And, like many podcasters, you could discover it meets your long-term requirements. With regard to voice effects, we talk about how people may use Filmora to modify and improve their voices. Filmora has the ability to re-speak video and audio, as well as previously recorded voiceovers. Video, audio, and voiceover files may all benefit from the Timeline’s Pitch feature. Change the tonality of a video or recording to give it a unique sound. It’s easy to replace the voices in the videos using Filmora. A video or narrative should accompany your viral in order for it to be effective. Changing Pitch allows you to alter the pitch of your voice. You may modify the pace of the video to alter the voice (Optional). Make a backup copy of the altered media.
For Win 7 or later (64-bit)
For macOS 10.12 or later
- Select the audio interface or microphone from the menu to the right of the microphone icon. In order to record your Audacity for Podcasts, Audacity utilizes the device that you pick from this menu.
- Select your headphones by checking the box to the right of a speaker symbol. To playback, the audio files, Audacity for Podcasts utilizes the device you specify from this option.
What you need to know about Audacity’s Input Tester
Test your input before you begin recording your podcast. This helps you to make totally clear that everything is set up properly and that your podcast is recorded.
- The monitor meter may be found on the menu bar at the very top, at the very center. “Click to begin monitoring” is what it says.
- Speak normally into the microphone you’ve placed on your computer.
- Ensure that the Microphone Volume meter doesn’t go over -12dB by adjusting the volume controls.
Audacity for Podcasts Recording Tutorial
Audacity recording is simple after you’ve set up all of the settings you need. Make sure to pick just one (Mono) Recording Channel while you’re recording with a single microphone.
Each microphone is assigned a separate audio channel if you have numerous microphones connected to an audio interface or mixer. There must be a separate microphone and channel for each participant on your podcast so that you can edit them separately and make sure they all sound well together.
Each of these mono channels will be blended into stereo when you export your podcast later.
There is nothing complicated about the actual recording procedure.
- To begin recording your podcast, press the red Record button.
- When you’ve finished recording your podcast, press the black Stop button.
- Once you’ve finished recording, use Ctrl+S to save the project. If Audacity crashes or you shut it by mistake, you won’t be able to recover your edited audio file.
Using Audacity to Edit Your Podcast
Audacity for Podcasts not only allows you to record your podcast, but it also allows you to edit it afterward. It is possible to send your raw podcast to the internet as soon as you complete the recording, but editing may add a degree of polish that makes it more pleasurable for the listener.
You may use Audacity to re-arrange your podcast’s flow by cutting and relocating portions, reducing clipping, and even deleting background noise if one of your mics was too near or someone was talking too loudly. Audacity can even alter the levels of individual recordings.
Some of these editing chores are more difficult than others, but if you just have high-quality equipment & have your settings ideal, the podcast may not need a lot of effort. Check over a few different portions of your podcast to get a sense of how much work has to be done on it before publishing.
In Audacity, you may add music, clips, & sound effects to your podcast intro and outro.
In Audacity, add music, clips, & sound effects for the podcast intro and outro
In Audacity, you may add & move sound clips, such as intro music.
- Click File > Import > Audio or press Ctrl+Shift+I to import your podcast audio into Audacity.
- Make your choice of music for the opening, outro, or anything else you’d want to include.
- It is possible to go back and forth between the past and future by clicking on the top toolbar’s time shift function.
- When your opening music stops, click and drag the main podcast audio track so that it begins when the music ends.
- Add an outro or other sound effects & music that play throughout your podcast by following these similar instructions. There should be a separate channel for each sound file so that they may be easily moved across devices.
- Using the time shift tool, you may relocate an outro to the conclusion of your podcast if necessary. If you wish to add sound effects or music to your podcast, use the time shift tool to move them around.
- To test whether your audio tracks are positioned appropriately, just click the green Play button at any moment. The cursor icon in the toolbar may be used to start listening to a podcast at a different place in the track.
In Audacity, here’s how to export your podcast
After you’ve finished editing your podcast, listen to it one more time to ensure you’re satisfied with the outcome, then save it to ensure you don’t lose your work if anything goes wrong during the export process. When you export your podcast, you’re creating an audio file that you can publish to your podcast host and share with others.
Here’s how to export the Audacity podcast:
- Select File > Export > Export as… from the File menu.
- After giving your podcast a name, click Save.
- If you wish to add metadata, you may do so now, or just hit OK to begin the exporting process.
- This procedure may take a long time if the podcast is lengthy or your machine is sluggish. During this procedure, keep your computer turned on & prevent it from sleeping and hibernating.
- You’re ready to publish your podcast to the podcast host once it’s finished exporting.
Conclusions
For recording, editing, & mixing your own podcast, an Audacity is a great option. And, like many podcasters, you could discover it meets your long-term requirements. With regard to voice effects, we talk about how people may use Filmora to modify and improve their voices. Filmora has the ability to re-speak video and audio, as well as previously recorded voiceovers. Video, audio, and voiceover files may all benefit from the Timeline’s Pitch feature. Change the tonality of a video or recording to give it a unique sound. It’s easy to replace the voices in the videos using Filmora. A video or narrative should accompany your viral in order for it to be effective. Changing Pitch allows you to alter the pitch of your voice. You may modify the pace of the video to alter the voice (Optional). Make a backup copy of the altered media.
For Win 7 or later (64-bit)
For macOS 10.12 or later
Audacity Pro Audio Recording Techniques: Focusing on Computer Sounds (2023 Update)
In modern times, it has become a common practice to record your audio files. This is usually beneficial for many purposes. Be it for business meetings, podcasts, or just an informative lecture you have taken down. You will always need to record computer audio from time to time in the year 2022.

Over the past decade or so, computer users have recorded their audio and converted it into a digital format with relative ease. However, users look to record computer audio at even the highest quality levels. And while the technology needed to achieve this is readily available in both software and hardware forms, it can be somewhat complex.
If you want to record any sound or audio on your computer, this article is meant for you. Whether you are looking to do a voice-over on a video or just want to record some random audio notes, you can easily make it happen. This article will guide you to record your computer audio using a PC easily. We will share different methods using which you can record computer audio.
This article is not directed at potential audio recorders but rather at those looking to improve the audio quality of their recordings. Users will already have their microphone and recording equipment, yet they may find this article useful.
Recording Voice On Windows
If you are using a pc or desktop, then keep in mind that most operating systems have their own default recording software that comes pre-installed. Most people don’t know about them, and they rush for 3rd party applications for sound recording purposes. It doesn’t matter if you use Windows 7, 8, 10, or 11. Windows operating system also has its recorder app. It will be available on your system, and all you need to do is find it and use it. If you are unsure how to do that, then follow the steps given below.
- Go to the search options of your windows and type “Voice Recorder” in it.
- Click on the search button, and the voice recorder app will appear in the top searches.

- Just open the app, and a recording button will appear on the screen. All you need to do is, click on the recording icon, and it will start recording your audio from your microphone, and when you are done recording, you click on the stop recording button, and it will automatically be saved on your computer.

Recording Voice On Mac
If you are using Mac operating system, then it also has its recording app. Just follow the steps given below:
Recordings can be created using the built-in microphone, an external microphone, or a headset with a supported microphone. If you’re signed in with the same Apple ID on your iPad, iPhone, or Mac, you can listen to your Voice Memos recordings on any of those devices.
- Click on the Record button (or use the Touch Bar) inside the Voice Memos app on your Mac.
- By clicking the Pause button, you can pause the video. You can resume the video by clicking Resume.
- At the bottom of the page, click Done when you are finished.
Record Voice Using Audacity
Although you can record the computer audio using built-in tools, many 3rd party tools like Audacity provide you with more features and better quality than the built-in tools. To use Audacity for recording your pc audio, follow the steps given below.
- First of all, you need to download the audacity software to your pc. Different versions of Audacity are available for different operating systems. So, you can try searching “audacity windows 7”, “audacity windows 8”, “audacity windows 10”, or “audacity mac” depending upon the operating system you are using.
- Once it is installed, run the software, and its interface will appear on your screen.
- Now you’ll need to customize the drop-down boxes above the timeline. The farthest thing on the left should be ‘Windows WASAPI’. From the next choice to the right, choose ‘Speakers (Realtek(R) Audio) (loopback)’.
- It’s important to set the Recording Channel to 2 (Stereo). Otherwise, an error message will likely appear. Verify that the output device is set to the appropriate speakers
- Once you have finished, click the red circle on top of your screen, and Audacity will record the audio that comes out of your speakers. If no audio is detected, the recording will be automatically paused. You can also stop by hitting the grey stop button at the top at any time
- Audio editing tools like Audacity allow you to edit your recording after recording it and export it in several formats based on what you recorded.
Final Verdict
That’s how it works. Here are two easy ways to record the audio coming from your PC. Record internal audio (such as what comes out of your microphone) with Windows/Mac 10’s built-in ‘Voice Recorder’ app or Audacity. These applications are both extremely simple to use. To get the best audio quality, we recommend trying our Filmora Audio tools. Although Audacity does the job pretty well with filmora audio tools and voice packs, you can add many voice effects and edit your audio professionally. Give it a try as it is free to use.
For Win 7 or later (64-bit)
For macOS 10.12 or later
Over the past decade or so, computer users have recorded their audio and converted it into a digital format with relative ease. However, users look to record computer audio at even the highest quality levels. And while the technology needed to achieve this is readily available in both software and hardware forms, it can be somewhat complex.
If you want to record any sound or audio on your computer, this article is meant for you. Whether you are looking to do a voice-over on a video or just want to record some random audio notes, you can easily make it happen. This article will guide you to record your computer audio using a PC easily. We will share different methods using which you can record computer audio.
This article is not directed at potential audio recorders but rather at those looking to improve the audio quality of their recordings. Users will already have their microphone and recording equipment, yet they may find this article useful.
Recording Voice On Windows
If you are using a pc or desktop, then keep in mind that most operating systems have their own default recording software that comes pre-installed. Most people don’t know about them, and they rush for 3rd party applications for sound recording purposes. It doesn’t matter if you use Windows 7, 8, 10, or 11. Windows operating system also has its recorder app. It will be available on your system, and all you need to do is find it and use it. If you are unsure how to do that, then follow the steps given below.
- Go to the search options of your windows and type “Voice Recorder” in it.
- Click on the search button, and the voice recorder app will appear in the top searches.
- Just open the app, and a recording button will appear on the screen. All you need to do is, click on the recording icon, and it will start recording your audio from your microphone, and when you are done recording, you click on the stop recording button, and it will automatically be saved on your computer.
Recording Voice On Mac
If you are using Mac operating system, then it also has its recording app. Just follow the steps given below:
Recordings can be created using the built-in microphone, an external microphone, or a headset with a supported microphone. If you’re signed in with the same Apple ID on your iPad, iPhone, or Mac, you can listen to your Voice Memos recordings on any of those devices.
- Click on the Record button (or use the Touch Bar) inside the Voice Memos app on your Mac.
- By clicking the Pause button, you can pause the video. You can resume the video by clicking Resume.
- At the bottom of the page, click Done when you are finished.
Record Voice Using Audacity
Although you can record the computer audio using built-in tools, many 3rd party tools like Audacity provide you with more features and better quality than the built-in tools. To use Audacity for recording your pc audio, follow the steps given below.
- First of all, you need to download the audacity software to your pc. Different versions of Audacity are available for different operating systems. So, you can try searching “audacity windows 7”, “audacity windows 8”, “audacity windows 10”, or “audacity mac” depending upon the operating system you are using.
- Once it is installed, run the software, and its interface will appear on your screen.
- Now you’ll need to customize the drop-down boxes above the timeline. The farthest thing on the left should be ‘Windows WASAPI’. From the next choice to the right, choose ‘Speakers (Realtek(R) Audio) (loopback)’.
- It’s important to set the Recording Channel to 2 (Stereo). Otherwise, an error message will likely appear. Verify that the output device is set to the appropriate speakers
- Once you have finished, click the red circle on top of your screen, and Audacity will record the audio that comes out of your speakers. If no audio is detected, the recording will be automatically paused. You can also stop by hitting the grey stop button at the top at any time
- Audio editing tools like Audacity allow you to edit your recording after recording it and export it in several formats based on what you recorded.
Final Verdict
That’s how it works. Here are two easy ways to record the audio coming from your PC. Record internal audio (such as what comes out of your microphone) with Windows/Mac 10’s built-in ‘Voice Recorder’ app or Audacity. These applications are both extremely simple to use. To get the best audio quality, we recommend trying our Filmora Audio tools. Although Audacity does the job pretty well with filmora audio tools and voice packs, you can add many voice effects and edit your audio professionally. Give it a try as it is free to use.
For Win 7 or later (64-bit)
For macOS 10.12 or later
Also read:
- Updated In 2024, The Sound Experts Choice 7 Innovative Free Transitions to Revolutionize Your Work
- In 2024, Free Soundtracks for Video Editors Where to Look
- 2024 Approved How to Change Pitch without Losing Quality in Audacity?
- How to Remove Audio From AVI-2023 Update
- Updated Mastering the Art of Audio Dampening Modern Techniques for a Silent End
- In 2024, The Ultimate Audio Editing Playbook Mastering the Use of Keyframes for Dynamic Filmmaking in Final Cut Pro X
- The Ultimate Starters Manual Implementing VoiceChanger on iPhone
- Updated Sculpting Soundscapes Advanced Methods for Isolating Lyrics From Harmonized Tunes
- 2024 Approved Exploring the Best Audio Separation Techniques in Video Editing Tools - Whats New
- New 2024 Approved The Art of Synchronizing Video to Music Techniques
- Updated Free, Open-Source Audio Tools Galore Select the Top Windows Software for 2024
- Updated Harmonizing Visual Content Adobe Premiere Pros Tools for Subduing Background Noise for 2024
- New Melodious Background Elements for Creatives Digital Broadcasts for 2024
- New 2024 Approved The Essential Guide to Recording Dynamic Digital Audio Broadcasts
- New Voice-Over Wizardry Identifying Leading Software and Websites for Creativity for 2024
- Updated 2024 Approved Explore the Best-Kept Secret 7 Premium Transition Sounds Available for Download
- New 2024 Approved Advanced Filmmaking Techniques Silencing the Distractions in Your Audio Recordings with Wondershare Filmora
- Updated 2024 Approved Final Cut Pros Audio Mastery Unlocking Potential Through Waveform Graphics and Animated Soundscapes
- Updated In 2024, The Art of Dividing Sounds From Videos in iMovie for Mac Enthusiasts
- Updated 2024 Approved Synthetic Cat Chirp Recording
- New 2024 Approved Unveiling the Best 5 Audio Mixers Engineered for Mac Enthusiasts
- New Experts Choice The Finest 10 Android Applications for High-Fidelity Voice Saving
- Fundamental Steps to Create a Premier Auditory Library on YouTube
- Updated MP4 File Optimization Removing Unwanted Audio Tracks for 2024
- Updated 2024 Approved Streaming Audio Preservation Methods and Equipment
- Updated High-Performance Music Editing Solutions for Mac Users - The Leading 4
- Updated 2024 Approved Composing the Perfect Audio Landscape Finding Silent Sound for Visual Narratives
- New Integrating Sound Into Visual Media Adobe Premiere Pro Guide for 2024
- New The Ultimate List of Gender-Neutral Voice Editing Programs for Aspiring Actors, Updated
- Updated In 2024, Reconstructing Clarity in Warped Audio A Step-by-Step Guide
- Updated In 2024, Streamlining Sound A Comprehensive Walkthrough to Tuning Audio Online
- New In 2024, The Complete Guide to Isolating Soundtracks with iMovie on macOS
- New Exploring the Acoustic Innovations Cambridge CXU Product Testing, Year 2023 Edition for 2024
- In 2024, How to use Snapchat Location Spoofer to Protect Your Privacy On Motorola Moto G24? | Dr.fone
- iPhone Transfer Transfer Contact from Apple iPhone 12 Pro to iPhone without iCloud | Dr.fone
- Want to Uninstall Google Play Service from Vivo Y02T? Here is How | Dr.fone
- Top 4 Ways to Trace Oppo Reno 9A Location | Dr.fone
- Unlocking iPhone 13 Lock Screen 3 Foolproof Methods that Actually Work | Dr.fone
- 4 Methods to Turn off Life 360 On Honor X50 without Anyone Knowing | Dr.fone
- Unlock Apple iPhone 13 Pro Max Without Passcode Easily
- All Things You Need to Know about Wipe Data/Factory Reset For Infinix GT 10 Pro | Dr.fone
- Authentication Error Occurred on Honor Magic 5 Pro? Here Are 10 Proven Fixes | Dr.fone
- How to Change/Fake Your Vivo Y200e 5G Location on Viber | Dr.fone
- In 2024, How To Unlock Vivo Y78 5G Phone Without Password?
- In 2024, Unlock iPhone 6s Plus With Forgotten Passcode Different Methods You Can Try
- Title: In 2024, Innovations in Home Audio Engineering Analyzing the Best and Worst of the Top Digital Music Makers This Year
- Author: Jacob
- Created at : 2024-05-20 00:04:13
- Updated at : 2024-05-21 00:04:13
- Link: https://audio-shaping.techidaily.com/in-2024-innovations-in-home-audio-engineering-analyzing-the-best-and-worst-of-the-top-digital-music-makers-this-year/
- License: This work is licensed under CC BY-NC-SA 4.0.
