
How to Add Audio Fade In Effect

How to Add Audio Fade In Effect?
When adding a song to fit a video, you may often end up with an abrupt start that can be rough on the ears. To solve this problem, you can use the audio fade to gradually increase the sound volume, which will smooth the boundaries of an audio track. If you want to add fade in effect to the audio track in a few clicks, Wondershare Filmora Video Editor is a good choice. Every audio clip in this program can easily be faded in without too much effort. Want to have a try? Just follow the detailed guide below to add audio fade in effect.
For Win 7 or later (64-bit)
For macOS 10.12 or later
How To Fade In Audio with Wondershare Filmora?
Step 1: Import your video to the program
Install and launch Video Editor and choose the “Import” button from the top menu. Then a browser window opens for you to navigate to the target video or audio file. Select the file you want and click the “Open” button. Then the file will be inserted into the library. You can also directly drag and drop the file to the program’s library.

Step 2: Add audio fade in effect to video
After that, drag and drop your video or audio file to the corresponding timelines. Double click on the target file and go to the “Audio” column. Then you’ll see several settings such as Volume, Fade In, Fade Out and Pitch in the context menu. Find the “Fade In” option and drag the slider bar to the right or left to set the fade in length manually. After that, playback your video and adjust the fade in effect until you achieve the desired sound.

Step 3: Save the new video
Hit the “Create” button to save the new file if you’re satisfied with the result. Here are several output options for you:
Save your video files into different formats, like WMV, AVI, MP3, MKV, and more;
Save to play on various devices such as iPhone, iPad, iPod, PSP, Zune, etc.;
Instantly upload your video to YouTube or Facebook for sharing with more friends;
Burn to DVD for better preservation.
Choose one option from a different tab; click “Create” again, and activate the format settings window. Wait for a few seconds, and then the edited file will automatically open in the output location.

See, it’s that easy to add audio fade in effect to your video. Now download Wondershare Filmora Video Editor and add more effects as you like!
Bonus Tips: Wondershare Filmora recently release lots of audio effect or sound effect to help you make more creative videos. Check the below video and find how does it work!
Versatile Video Editor - Wondershare Filmora
An easy yet powerful editor
Numerous effects to choose from
Detailed tutorials provided by the official channel
For Win 7 or later (64-bit)
For macOS 10.12 or later
How To Fade In Audio with Wondershare Filmora?
Step 1: Import your video to the program
Install and launch Video Editor and choose the “Import” button from the top menu. Then a browser window opens for you to navigate to the target video or audio file. Select the file you want and click the “Open” button. Then the file will be inserted into the library. You can also directly drag and drop the file to the program’s library.

Step 2: Add audio fade in effect to video
After that, drag and drop your video or audio file to the corresponding timelines. Double click on the target file and go to the “Audio” column. Then you’ll see several settings such as Volume, Fade In, Fade Out and Pitch in the context menu. Find the “Fade In” option and drag the slider bar to the right or left to set the fade in length manually. After that, playback your video and adjust the fade in effect until you achieve the desired sound.

Step 3: Save the new video
Hit the “Create” button to save the new file if you’re satisfied with the result. Here are several output options for you:
Save your video files into different formats, like WMV, AVI, MP3, MKV, and more;
Save to play on various devices such as iPhone, iPad, iPod, PSP, Zune, etc.;
Instantly upload your video to YouTube or Facebook for sharing with more friends;
Burn to DVD for better preservation.
Choose one option from a different tab; click “Create” again, and activate the format settings window. Wait for a few seconds, and then the edited file will automatically open in the output location.

See, it’s that easy to add audio fade in effect to your video. Now download Wondershare Filmora Video Editor and add more effects as you like!
Bonus Tips: Wondershare Filmora recently release lots of audio effect or sound effect to help you make more creative videos. Check the below video and find how does it work!
Versatile Video Editor - Wondershare Filmora
An easy yet powerful editor
Numerous effects to choose from
Detailed tutorials provided by the official channel
For Win 7 or later (64-bit)
For macOS 10.12 or later
How To Fade In Audio with Wondershare Filmora?
Step 1: Import your video to the program
Install and launch Video Editor and choose the “Import” button from the top menu. Then a browser window opens for you to navigate to the target video or audio file. Select the file you want and click the “Open” button. Then the file will be inserted into the library. You can also directly drag and drop the file to the program’s library.

Step 2: Add audio fade in effect to video
After that, drag and drop your video or audio file to the corresponding timelines. Double click on the target file and go to the “Audio” column. Then you’ll see several settings such as Volume, Fade In, Fade Out and Pitch in the context menu. Find the “Fade In” option and drag the slider bar to the right or left to set the fade in length manually. After that, playback your video and adjust the fade in effect until you achieve the desired sound.

Step 3: Save the new video
Hit the “Create” button to save the new file if you’re satisfied with the result. Here are several output options for you:
Save your video files into different formats, like WMV, AVI, MP3, MKV, and more;
Save to play on various devices such as iPhone, iPad, iPod, PSP, Zune, etc.;
Instantly upload your video to YouTube or Facebook for sharing with more friends;
Burn to DVD for better preservation.
Choose one option from a different tab; click “Create” again, and activate the format settings window. Wait for a few seconds, and then the edited file will automatically open in the output location.

See, it’s that easy to add audio fade in effect to your video. Now download Wondershare Filmora Video Editor and add more effects as you like!
Bonus Tips: Wondershare Filmora recently release lots of audio effect or sound effect to help you make more creative videos. Check the below video and find how does it work!
Versatile Video Editor - Wondershare Filmora
An easy yet powerful editor
Numerous effects to choose from
Detailed tutorials provided by the official channel
For Win 7 or later (64-bit)
For macOS 10.12 or later
How To Fade In Audio with Wondershare Filmora?
Step 1: Import your video to the program
Install and launch Video Editor and choose the “Import” button from the top menu. Then a browser window opens for you to navigate to the target video or audio file. Select the file you want and click the “Open” button. Then the file will be inserted into the library. You can also directly drag and drop the file to the program’s library.

Step 2: Add audio fade in effect to video
After that, drag and drop your video or audio file to the corresponding timelines. Double click on the target file and go to the “Audio” column. Then you’ll see several settings such as Volume, Fade In, Fade Out and Pitch in the context menu. Find the “Fade In” option and drag the slider bar to the right or left to set the fade in length manually. After that, playback your video and adjust the fade in effect until you achieve the desired sound.

Step 3: Save the new video
Hit the “Create” button to save the new file if you’re satisfied with the result. Here are several output options for you:
Save your video files into different formats, like WMV, AVI, MP3, MKV, and more;
Save to play on various devices such as iPhone, iPad, iPod, PSP, Zune, etc.;
Instantly upload your video to YouTube or Facebook for sharing with more friends;
Burn to DVD for better preservation.
Choose one option from a different tab; click “Create” again, and activate the format settings window. Wait for a few seconds, and then the edited file will automatically open in the output location.

See, it’s that easy to add audio fade in effect to your video. Now download Wondershare Filmora Video Editor and add more effects as you like!
Bonus Tips: Wondershare Filmora recently release lots of audio effect or sound effect to help you make more creative videos. Check the below video and find how does it work!
Versatile Video Editor - Wondershare Filmora
An easy yet powerful editor
Numerous effects to choose from
Detailed tutorials provided by the official channel
Mastering the Art of Downloading Podcast Episodes on Laptops and Desktops
Listening to Podcasts is a great way to gather information. Name a topic, and you will find a Podcast on it. You can always count on the best Podcast shows to get quality knowledge.
You can listen to those Podcasts online. But, sometimes, users want to download the Podcast. The reason can be anything; you might want to listen offline. There are various ways to get the job done. We will walk you through different methods to download Podcasts to the computer.
Can you download a Podcast as a file?
Yes, it’s possible. But the process is a bit different for many platforms.
If you’re downloading Podcasts from Podcast manager apps like Spotify and Apple Play. These apps will save your Podcast in the app’s library and make it available for offline listening.
Yet, you can’t get access to the saved Podcast on the PC. For this, you need third-party tools to download them to your computer. A step-by-step process of using apps and tools is given below!
But if you’re downloading a Podcast from a video platform like YouTube, then yes. You can download it as a file. Here are a few methods to download podcasts. Let’s walk you through them one by one.
Method 1- Direct Download Podcasts From Podcast Manager Apps
You can save Podcasts to your computer from Podcast manager apps. Various Podcast manager apps, such as iTunes, Spotify, Apple Podcast, and many others, allow such an operation. However, it is important to note that some podcast managers require a premium subscription to be able to download podcasts.
For example, if you’re using a Windows computer, you can use iTunes to download Podcasts. While Mac users can use Apple Podcasts. The steps below allow you to save Podcasts from Podcast manager apps like Spotify;
Step1 Install the Spotify app on your PC or Mac.
Step2 Open the Spotify app and login to your account.
Step3 Locate the Podcast show you wish to download.
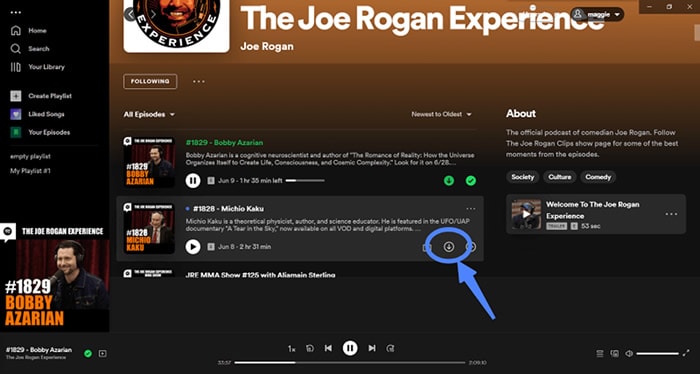
Step4 Move your cursor over the Podcast episodes and click the download button to download them to your computer.
The backward of using Podcast manager apps is that it can only save your Podcast in the manager app. If you uninstall the app accidentally, you lose access to the saved Podcast because it won’t be available on your PC.
To cope with this problem, we provide third-party apps to directly download the Podcast to your computer from the manager apps.
Method 2- Download Podcasts From Popular Podcast Manager Apps Using Third-Party Tools
To download Podcasts in unprotected formats from Spotify, you need a third-party tool to alter Spotify .ogg audio. The most helpful and commonly used tool is TuneFab Spotify Music Converter. It is free for 30 days, and you can purchase it after discovering it is compatible with you!
It will convert Podcasts and as well as download songs, audiobooks, and playlists into MP3, WAV, FLAC, and M4V. Follow the below instructions to get your hands on it!
Step1 First, download TuneFab Spotify Music Converter , then follow the outlines on the screen to get set up on your computer. Then launch this tool to start the conversion process.
Step2 Now, log in to your Spotify account in this tool to easily access your download list.
Step3 After that, find out the required Podcast and click on the “Add” button in front of the Podcast. You can also directly drag and drop the file into the “Add” button.
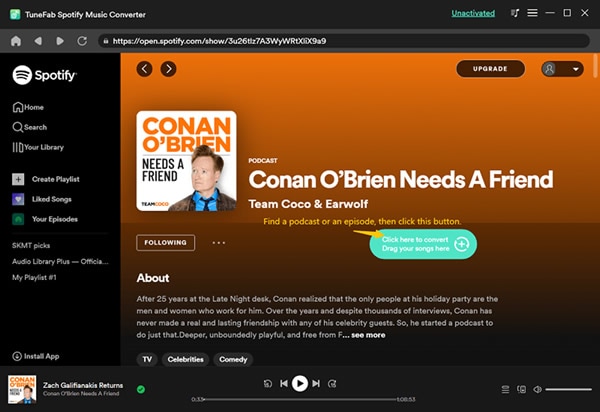
Step4 You can now get the download and convert option adjacent to every Podcast episode. You must check the file format and click on the available option to continue the process.
You can also change the output location of the Podcast on a PC, where you’ll find out easily.
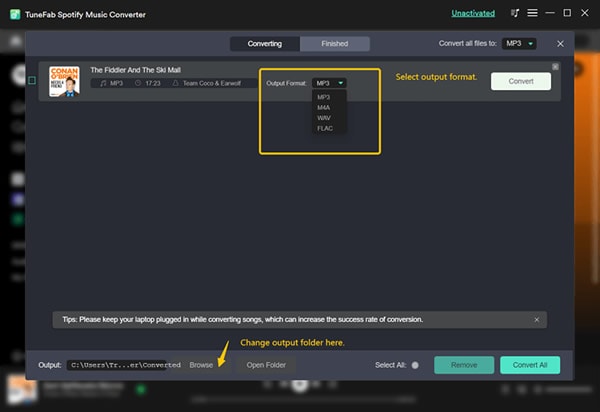
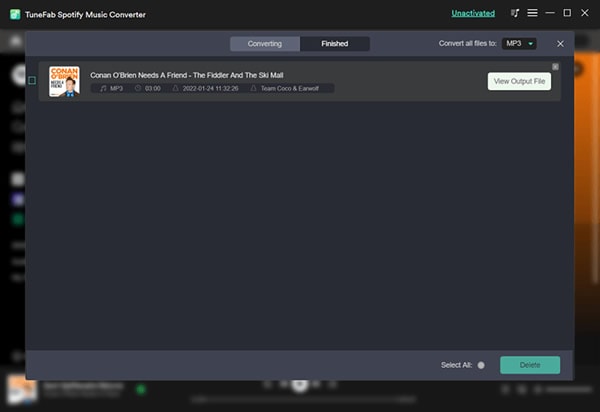
Step5 Then click on the “Convert” button and get your Podcast on your device in your required format.
Alternatives third-party tools
You can also use other third-party tools to download the Podcasts, such as:
- UkeySoft Spotify Music Converter.
- Leawo’s Prof. DRM .
- AudKit SpotiLab Music Converter.
If you want to download your Podcast in video format, then read more to get access!
Method 3- Download Podcasts From Video Platforms
Downloading Podcasts from video platforms is also simple. All you have to do is copy the link to the Podcast and paste it into a downloading tool. Let’s see this process in detail.
Here are the steps to download Podcasts from YouTube to the computer.
Step1 Open YouTube and locate the Podcast video you want to download.
Step2 Click the Share icon next to the video and click Copy Link from the pop-up on your screen.
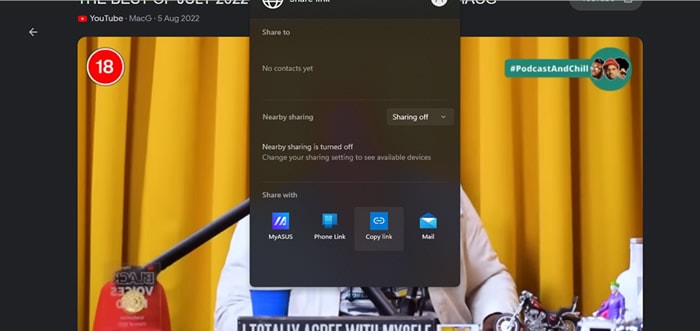
Step3 Open SSYouTube in your browser and paste the copied link in the relevant area. Then, select MP3 as the preferred output format.
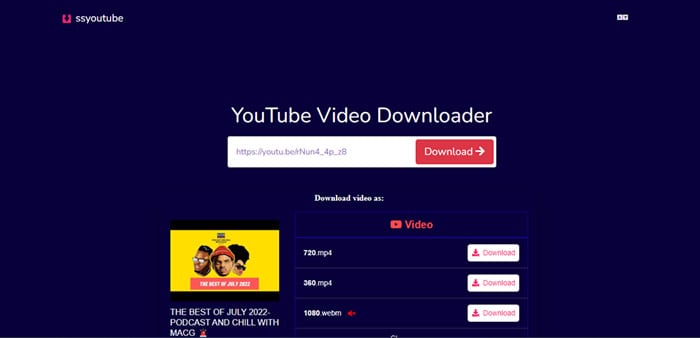
Step4 Download the Podcast video according to your preferred quality and save it to your computer.
Method 4- Download the Podcast With an Audio Recorder
You can also download Podcasts from websites by streaming with an audio recorder. Various tools like Filmora , Apowersoft, Audacity, and many others ease audio streaming. All it takes is only a few clicks!
Free Download For Win 7 or later(64-bit)
Free Download For macOS 10.14 or later
We’ve shown steps to download Podcasts from websites by streaming using a tool like Filmora;
Step1 Download the Wondershare Filmora on your computer.
Step2 Launch the installed app and open the home interface of Filmora.
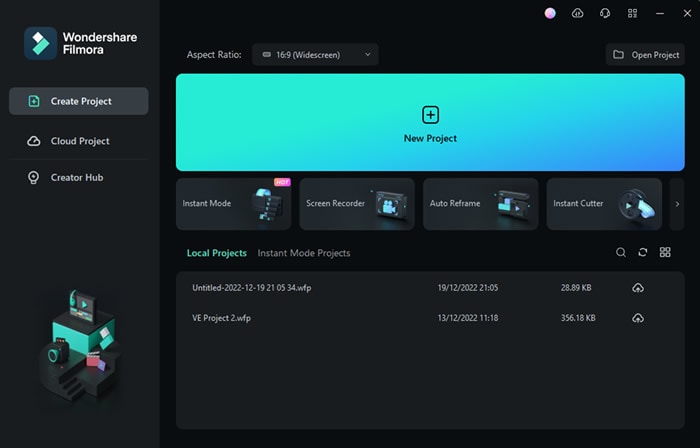
Step3 Then find the “Microphone” icon on the home screen of Filmora below the video display on the right side as shown below:
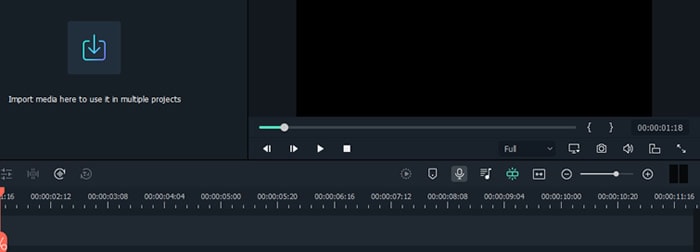
Step4 After clicking on the icon, the Record Audio box will pop up. Now, you have to start the podcast in the background on any Podcast Manager app. Adjacently, click on the Red button of the recorder on Filmora too.
![]()
Note: Make sure that background is noise-free to capture the Podcast audio easily.
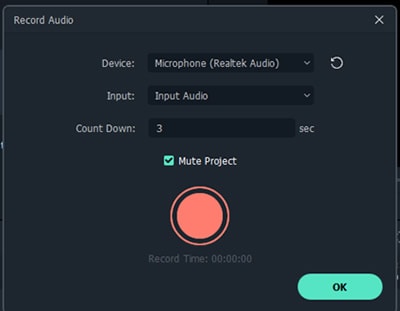
Step5 After you are all done with the Podcast recording, now again click on the Red button to stop the recording, and your audio will be recorded in the audio track as shown below:
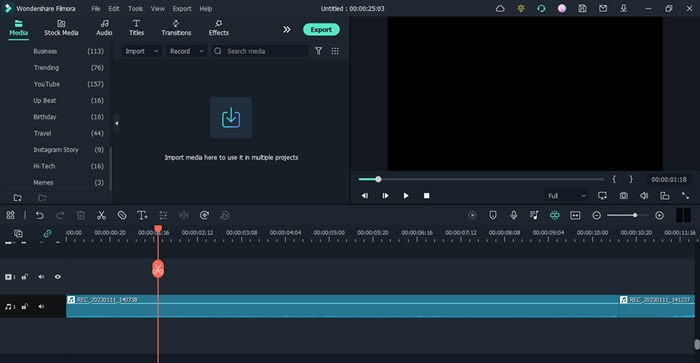
Step6 Then click on the Export button at the top middle side to export it on your device in the required format.
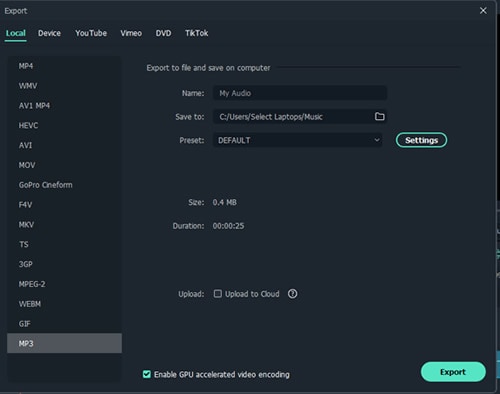
It’s all done, and you’ve successfully exported the podcast to your computer in a few steps!
FAQs
When you save a Podcast, where does it go?
Saved Podcasts are usually added to the saved list in your Podcast library and will be available for offline listening. But if you want to get access directly on your computer, then you need a third-party tool to download it from the Podcast manager app to your PC, as mentioned above in the article.
Is listening to a Podcast the same as downloading?
No. Podcast download involves saving a Podcast episode to your Podcast app. But listening to a Podcast refers to the number of times you played a Podcast.
Final words
You can download the Podcast from a Podcast manager app, an audio recorder, or a video platform. You can also use third-party tools to get directly downloaded Podcasts on your Computer.
Ensure you follow all the steps mentioned above smoothly. Now, enjoy your Podcast with high audio formats wherever you are!
Free Download For macOS 10.14 or later
We’ve shown steps to download Podcasts from websites by streaming using a tool like Filmora;
Step1 Download the Wondershare Filmora on your computer.
Step2 Launch the installed app and open the home interface of Filmora.

Step3 Then find the “Microphone” icon on the home screen of Filmora below the video display on the right side as shown below:

Step4 After clicking on the icon, the Record Audio box will pop up. Now, you have to start the podcast in the background on any Podcast Manager app. Adjacently, click on the Red button of the recorder on Filmora too.
![]()
Note: Make sure that background is noise-free to capture the Podcast audio easily.

Step5 After you are all done with the Podcast recording, now again click on the Red button to stop the recording, and your audio will be recorded in the audio track as shown below:

Step6 Then click on the Export button at the top middle side to export it on your device in the required format.

It’s all done, and you’ve successfully exported the podcast to your computer in a few steps!
FAQs
When you save a Podcast, where does it go?
Saved Podcasts are usually added to the saved list in your Podcast library and will be available for offline listening. But if you want to get access directly on your computer, then you need a third-party tool to download it from the Podcast manager app to your PC, as mentioned above in the article.
Is listening to a Podcast the same as downloading?
No. Podcast download involves saving a Podcast episode to your Podcast app. But listening to a Podcast refers to the number of times you played a Podcast.
Final words
You can download the Podcast from a Podcast manager app, an audio recorder, or a video platform. You can also use third-party tools to get directly downloaded Podcasts on your Computer.
Ensure you follow all the steps mentioned above smoothly. Now, enjoy your Podcast with high audio formats wherever you are!
Illuminating Soundscapes with Imagery: Techniques for Photographic Audio Amalgamation [2023 Art & Technology Insights]
How to Add Photos to Audio

Shanoon Cox
Mar 27, 2024• Proven solutions
Want to add photos to audio so that you can upload it to YouTube? Or want to turn your photo albums into a stunning slideshow? You can do it quickly in the video editing software like Wondershare Filmora (originally Wondershare Video Editor) . This powerful tool will help you easily make a creative creation on your own. Follow the simple five-step instructions below to learn how to add photos to audio with just three simple steps.
Simply free download filmora video editor if you don’t have it yet.
 Download Mac Version ](https://tools.techidaily.com/wondershare/filmora/download/ )
How to add photos to audio step by step guide
1Import your photo and audio files
Install and run Video Editor. Choose from “16:9” or “4:3” ratio rate. Then click the “Import” button to import your photo and audio files. You can also directly drag and drop the files to the program.

2Add photos to audio and rearrange them
Then select these added files and move them to the corresponding tracks on the timeline panel below. The photos should be placed on the video track and the audio file on the music track. Then put the photos in the order you want them to appear in your creation. After that, adjust timing by highlighting and target file and moving the red slider.
Besides that, you can also improve the quality of your photos and even apply special effects to them. To review the list of available filters and effects, click the “Effects” button in the tool bar to display the menu. Here is a detailed guide about how to apply effects to video.
If the audio file needs editing, double click it and adjust the volume and pitch or add fade in or fade out effect in the pop up window.

3Share or save our own creation
After adding photos to audio, you can save the creation in different ways. In the “Format” tab, you can save the file in any popular media format. If you want the file be played on mobile devices, go to the “Device” tab and choose one of the devices from the list.
Of course, publish it in social media like Facebook and YouTube is also another good choice if you want to share the video with your friend. To do this, click the “Create” button and go to the “YouTube” tab. Fill in the information and this program will publish your creation to the social media pages - it will be uploaded promptly and properly. You can also burn a DVD and present your family or friends with a beautifully packaged disk.

 Download Mac Version ](https://tools.techidaily.com/wondershare/filmora/download/ )

Shanoon Cox
Shanoon Cox is a writer and a lover of all things video.
Follow @Shanoon Cox
Shanoon Cox
Mar 27, 2024• Proven solutions
Want to add photos to audio so that you can upload it to YouTube? Or want to turn your photo albums into a stunning slideshow? You can do it quickly in the video editing software like Wondershare Filmora (originally Wondershare Video Editor) . This powerful tool will help you easily make a creative creation on your own. Follow the simple five-step instructions below to learn how to add photos to audio with just three simple steps.
Simply free download filmora video editor if you don’t have it yet.
 Download Mac Version ](https://tools.techidaily.com/wondershare/filmora/download/ )
How to add photos to audio step by step guide
1Import your photo and audio files
Install and run Video Editor. Choose from “16:9” or “4:3” ratio rate. Then click the “Import” button to import your photo and audio files. You can also directly drag and drop the files to the program.

2Add photos to audio and rearrange them
Then select these added files and move them to the corresponding tracks on the timeline panel below. The photos should be placed on the video track and the audio file on the music track. Then put the photos in the order you want them to appear in your creation. After that, adjust timing by highlighting and target file and moving the red slider.
Besides that, you can also improve the quality of your photos and even apply special effects to them. To review the list of available filters and effects, click the “Effects” button in the tool bar to display the menu. Here is a detailed guide about how to apply effects to video.
If the audio file needs editing, double click it and adjust the volume and pitch or add fade in or fade out effect in the pop up window.

3Share or save our own creation
After adding photos to audio, you can save the creation in different ways. In the “Format” tab, you can save the file in any popular media format. If you want the file be played on mobile devices, go to the “Device” tab and choose one of the devices from the list.
Of course, publish it in social media like Facebook and YouTube is also another good choice if you want to share the video with your friend. To do this, click the “Create” button and go to the “YouTube” tab. Fill in the information and this program will publish your creation to the social media pages - it will be uploaded promptly and properly. You can also burn a DVD and present your family or friends with a beautifully packaged disk.

 Download Mac Version ](https://tools.techidaily.com/wondershare/filmora/download/ )

Shanoon Cox
Shanoon Cox is a writer and a lover of all things video.
Follow @Shanoon Cox
Shanoon Cox
Mar 27, 2024• Proven solutions
Want to add photos to audio so that you can upload it to YouTube? Or want to turn your photo albums into a stunning slideshow? You can do it quickly in the video editing software like Wondershare Filmora (originally Wondershare Video Editor) . This powerful tool will help you easily make a creative creation on your own. Follow the simple five-step instructions below to learn how to add photos to audio with just three simple steps.
Simply free download filmora video editor if you don’t have it yet.
 Download Mac Version ](https://tools.techidaily.com/wondershare/filmora/download/ )
How to add photos to audio step by step guide
1Import your photo and audio files
Install and run Video Editor. Choose from “16:9” or “4:3” ratio rate. Then click the “Import” button to import your photo and audio files. You can also directly drag and drop the files to the program.

2Add photos to audio and rearrange them
Then select these added files and move them to the corresponding tracks on the timeline panel below. The photos should be placed on the video track and the audio file on the music track. Then put the photos in the order you want them to appear in your creation. After that, adjust timing by highlighting and target file and moving the red slider.
Besides that, you can also improve the quality of your photos and even apply special effects to them. To review the list of available filters and effects, click the “Effects” button in the tool bar to display the menu. Here is a detailed guide about how to apply effects to video.
If the audio file needs editing, double click it and adjust the volume and pitch or add fade in or fade out effect in the pop up window.

3Share or save our own creation
After adding photos to audio, you can save the creation in different ways. In the “Format” tab, you can save the file in any popular media format. If you want the file be played on mobile devices, go to the “Device” tab and choose one of the devices from the list.
Of course, publish it in social media like Facebook and YouTube is also another good choice if you want to share the video with your friend. To do this, click the “Create” button and go to the “YouTube” tab. Fill in the information and this program will publish your creation to the social media pages - it will be uploaded promptly and properly. You can also burn a DVD and present your family or friends with a beautifully packaged disk.

 Download Mac Version ](https://tools.techidaily.com/wondershare/filmora/download/ )

Shanoon Cox
Shanoon Cox is a writer and a lover of all things video.
Follow @Shanoon Cox
Shanoon Cox
Mar 27, 2024• Proven solutions
Want to add photos to audio so that you can upload it to YouTube? Or want to turn your photo albums into a stunning slideshow? You can do it quickly in the video editing software like Wondershare Filmora (originally Wondershare Video Editor) . This powerful tool will help you easily make a creative creation on your own. Follow the simple five-step instructions below to learn how to add photos to audio with just three simple steps.
Simply free download filmora video editor if you don’t have it yet.
 Download Mac Version ](https://tools.techidaily.com/wondershare/filmora/download/ )
How to add photos to audio step by step guide
1Import your photo and audio files
Install and run Video Editor. Choose from “16:9” or “4:3” ratio rate. Then click the “Import” button to import your photo and audio files. You can also directly drag and drop the files to the program.

2Add photos to audio and rearrange them
Then select these added files and move them to the corresponding tracks on the timeline panel below. The photos should be placed on the video track and the audio file on the music track. Then put the photos in the order you want them to appear in your creation. After that, adjust timing by highlighting and target file and moving the red slider.
Besides that, you can also improve the quality of your photos and even apply special effects to them. To review the list of available filters and effects, click the “Effects” button in the tool bar to display the menu. Here is a detailed guide about how to apply effects to video.
If the audio file needs editing, double click it and adjust the volume and pitch or add fade in or fade out effect in the pop up window.

3Share or save our own creation
After adding photos to audio, you can save the creation in different ways. In the “Format” tab, you can save the file in any popular media format. If you want the file be played on mobile devices, go to the “Device” tab and choose one of the devices from the list.
Of course, publish it in social media like Facebook and YouTube is also another good choice if you want to share the video with your friend. To do this, click the “Create” button and go to the “YouTube” tab. Fill in the information and this program will publish your creation to the social media pages - it will be uploaded promptly and properly. You can also burn a DVD and present your family or friends with a beautifully packaged disk.

 Download Mac Version ](https://tools.techidaily.com/wondershare/filmora/download/ )

Shanoon Cox
Shanoon Cox is a writer and a lover of all things video.
Follow @Shanoon Cox
Also read:
- 2024 Approved Discovering Logitech's Top-Tier 4K Video Camera
- 8 Solutions to Solve YouTube App Crashing on Xiaomi Redmi 12 | Dr.fone
- Advanced Techniques for Inputting Grouped Coordinates in Google Maps Efficiently
- Breathing Life Back Into Disconnected Adapters: A Six-Step Guide on WinOS
- In 2024, Enhancing PC Sound Quality with Audacity Modern Techniques and Setup
- In 2024, How PGSharp Save You from Ban While Spoofing Pokemon Go On Lava Yuva 2? | Dr.fone
- In 2024, How To Remove iCloud On Apple iPhone 15 Pro Smoothly
- New 2024 Approved Explore These 5 Pinnacle Platforms for Efficient MP3 File Tagging
- New In 2024, 10 Popular Sites to Download BGM Music
- New In 2024, How to Seamlessly Convert Your Podcast Into the Universal MP3 Format
- Updated In 2024, Top List Looking for The Best App for Removing Background Noise
- Title: How to Add Audio Fade In Effect
- Author: Jacob
- Created at : 2024-10-28 17:54:16
- Updated at : 2024-10-29 23:03:34
- Link: https://audio-shaping.techidaily.com/how-to-add-audio-fade-in-effect/
- License: This work is licensed under CC BY-NC-SA 4.0.