
:max_bytes(150000):strip_icc():format(webp)/tesla-bot-f6353f76ae214924916445da1da620ca.png)
Essential Compilation Discovering the Top 11 Free Audio Customization Tools for iOS & Android Gadgets
Essential Compilation: Discovering the Top 11 Free Audio Customization Tools for iOS & Android Gadgets
Best Voice Changer Apps for iPhone and Android

Benjamin Arango
Mar 27, 2024• Proven solutions
Have you ever wondered what your voice would sound like if you were a cartoon character, a robot, or an older version of yourself? Changing how your voice sounds has never been easier, regardless of the Smartphone model you have, since voice changer apps can be used on both iPhone and Android devices.
Even though there is nothing wrong with modulating your voice to have fun with your friends, using voice changer apps to pull malicious pranks or bully strangers online is far from acceptable. Read on if you would like to find out more about the best voice changer apps for iPhone and Android devices and discover the one you enjoy using the most.
Best Voice Changer Apps for iPhone and Android
Creating a new ringtone, making a voice recording, or having fun with your friends are only a few reasons why so many people choose to try out voice changer apps. The vast majority of these apps feature well-equipped audio effects libraries that enable users to have fun with their friends and hear how they would sound if they were drunk or after inhaling helium. So, let’s take a look at some of the best voice changer apps on the market.


Changing video voice on Windows and Mac with Wondershare Filmora
Do you want to change the voice in video on Windows and Mac and don’t know which software can meet this requirement? Try Filmra video editor , which provides several ways to change voice over, such as changing the voice speed or changing the pitch. Download the trial version below and find out more possibility in video creation with Filmora.
1. Celebrity Voice Changer – Face
Price: Free, but offers in-app purchases
Compatibility: iOS 9.0 or later
User Rating: 4.0
In case you would like to sound like your favorite movie star of TV host, then Celebrity Voice Changer is one of the best choices you can make. Besides the standard set of options, the app also lets you request new voices since its machine learning technology can mimic virtually anyone’s voice. However, Celebrity Voice Changer is currently only available in English and it cannot modulate speech in other languages. In addition, you must make an in-app purchase in order to gain access to all of the app’s features or unlock the unlimited usage of the app.
Pros
- Automatic voice modulation
- Huge selection of voice filters
- The app generates video files that are better adjusted to the audience on social media than audio files
- Excellent impressions of celebrities
Cons
- Unreasonably expensive
- The app’s Deep Learning technology still has a lot of room for improvement
2. Snapchat
Price: Free, but offers in-app purchases
Compatibility: iOS 10.0 or later, Android 4.4 or up
User Rating: 3.8
With more than 203 million daily users, Snapchat is one of the largest messaging platforms on the market. Previously, we’ve shared how to change gender on Snapchat , beside that, the app lets its users capture short moments or the so-called Snaps and share them with friends. In addition to hundreds of video filters , Snapchat also features a broad spectrum of voice changing effects that make Snaps more entertaining. Even so, the audio recording options Snapchat offers are far from ideal, because the app doesn’t allow you to edit the files you create with it. Using Snapchat will drain your battery quickly, which is why you must pay attention to how frequently you use this app.
Pros
- The easy voice modulation process
- Excellent messaging options
- Grants you access to a large community of likeminded people
- Lenses and filters are updated on a daily basis
Cons
- Editing voice changes after you create a Snap is not possible
- Snapchat is not primarily a voice changer app
Check the detailed information about How to Change Voice on Snapchat with 2 Easy Methods >>
3. Voice Changer
Price: Free
Compatibility: Android 4.1 and up
User Rating: 4.3

Changing your voice with this app won’t take more than a few moments of your time. You just have to launch the app and hit the microphone button to record a message or a joke you would like to modulate. Once you’re happy with the audio recording you made, you can proceed to choose from more than twenty voice effects that will make you sound like a dwarf, a robot, or an alien. The app’s file-sharing capabilities enable you to post your audio recordings to any social media platform of your choosing or store your files and use them as many times as you want.
Pros
- Entertaining and easy to use
- The simple three-step voice modulation process
- Good selection of voice filters
- Excellent file sharing options
Cons
- The app displays ads
- No audio editing tools
4. Voicy: Celebrity Voice Changer
**Price:**Free, but offers in-app purchases
Compatibility: iOS 10 or later
User Rating: 4.3

Impersonating your favorite celebrity can be a fun way to prank your friends on social media. Voicy features a broad selection of celebrity voice impersonations you can use to make you sound like a famous actress or TV personality. The app utilizes a machine learning technology that can generate more than forty avatars and allows the users to experiment with different voice effects. The free version of the app offers only limited capabilities, so if you want to gain access to all of the Voicy’s features, you must choose a weekly, monthly or an annual subscription.
Pros
- Equipped with a powerful machine learning technology
- Offers a vast selection of voice avatars
- The quick voice modification process
- A great choice if you want to make a parody
Cons
- More expensive than the competition
- Support only the English language
5. Video Voice Changer – Fun Editor
Price: Free, but offers in-app purchases
Compatibility: iOS 8.0 or later
User Rating: 4.4

Changing the voices in the videos you record with your iPhones or iPads is a straightforward process that takes a minimum amount of effort. You can either use this iOS-based app to capture videos you’re going to dub or import them from the albums in which they are stored. The Video Voice Changer app is a great option if you want to dub videos directly from your phone because it enables you to change the voices in your videos and make them sound like mice, bears or ghosts. There are over thirty voice effects to choose from, so you can easily pick the one that best fits the video you’re editing.
Pros
- Equipped with video recording tools
- Excellent dubbing features
- A rich selection of voice effects
- Allows users to share their creations on Facebook, Instagram, and other social media platforms
Cons
- You must make an in-app purchase to unlock all of the app’s features
- No audio mixing options
6. Video Voice Changer FX
**Price:**Free, but offers in-app purchases
Compatibility: Android 4.1 and up
User Rating: 4.1

This is a simple app, anyone can use to change the voices in a video. Simply upload a video file from an SD card in your phone and choose an audio effect you want to apply. The app’s collection of funny voices includes options like echo, squirrel, space ship or chipmunk. As soon as you select the voice effect you want to add to a video, the app will start generating a new video that will be saved to your phone. Sharing the videos you edit with Video Voice Changer FX to social media directly from the app is not an option.
Pros
- Fun and easy to use
- Great price to performance ratio
- Changing a voice requires just a few taps
- Allows users to switch between effects while the video is playing
Cons
- No audio or video recording capability
- Doesn’t support social media sharing
7. Squeak Voice Changer
**Price:**Free, but offers in-app purchases
Compatibility: Android 4.3 and up
User Rating: 3.9

Every joke you want to share with your online friends is going to be a little funnier if you record it with Squeak Voice Changer. You just have to tap on the Record button and choose one of the available effects. Each voice changing effect this app offers is represented by a character so you should select Jamie the Jolly if you want to make your voice sound like you’re at a party or Bruce the Sentimental Bot if you want your voice to sound artificial. All the recordings you make with Squeak Voice Changer can be easily shared on social media.
Pros
- Equipped with audio recording options
- Cute and memorable characters that represent voice effects
- Inexpensive and fun to use
- Functional app design
Cons
- Poor selection of voice effects
- The AI only recognizes the English language
8. Voice Changer with Effects
**Price:**Free
Compatibility: Android 4.1 and up
User Rating: 4.5
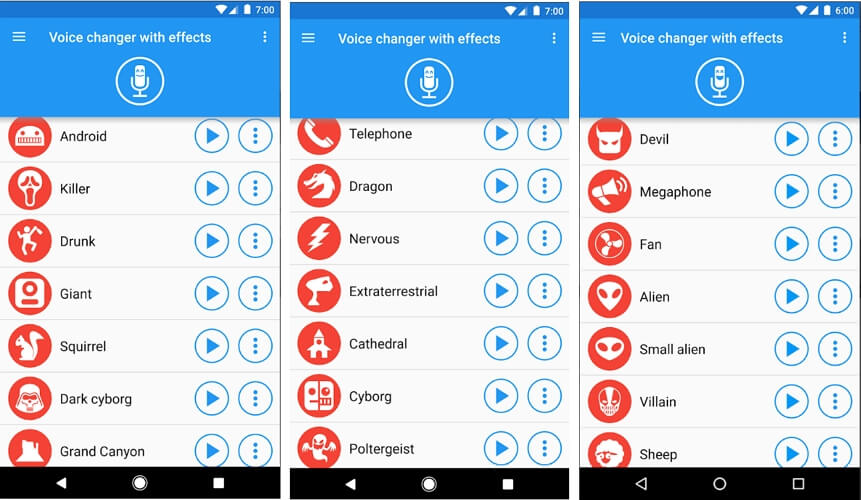
This Android-based app is designed to make fun and easy since voice modulation features enable you to play voice recording backward or change your voice to sound robotic or even alien. Besides recording your voice, the app also lets you modulate pre-recorded sounds and save them to your phone or use them as ringtones or notification sounds. Furthermore, the app lets you add sounds to images and share them to Facebook. The Voice Changer with Effects enables you to share all audio files you process with it to any of the most popular social media platforms.
Pros
- The app has over 50,000,000 installs
- Equipped with a text to voice feature
- Setting a new ringtone with this app is easy
- Supports editing of pre-recorded audio files
Cons
- Contains ads
- No audio or video editing options
9. Voice Changer
**Price:**Free
Compatibility: Android 4.1 and up
User Rating: 4.4

If you are looking for an Android app that lets you modulate your voice quickly and effortlessly, then Voice Changer may be one of the best options you can find on the market. You can record your voice by simply tapping on the microphone and speaking into your phone’s speaker and then apply one of the audio effects this app offers. Optionally, you can import an audio file you already recorded into the app and then apply Martian, Foreigner, Giant or Child effects to your voice recording. The best part is that you can apply each effect to the audio files you’re editing as many times as you want.
Pros
- Loads of funny effects
- Simple audio recording setup
- Intuitive and modernly designed interface
- Enables users to share audio files via Bluetooth or social media platforms
Cons
- No video editing tools
- The quality of output audio files can vary
10. Voice FX
**Price:**Free, but offers in-app purchases
Compatibility: Android 4.0.3 and up
User Rating: 3.8

Modulating voices in all types of audio files is a straightforward and fun process that can be completed in just a few taps. During the audio recording session, you can apply all voice effects to the sound you are recording and stream it live to your web browsers or media players you’re using. Voice FX changes your voice in real time, which enables you to preview your results before deciding if you want to save them. All files you export from this app will be saved in the MP3 format so you can use them as ringtones on your Android device.
Pros
- Allows users to modulate pre-recorded audio files
- Voice effects are applied in real time
- Offers live streaming features
- Exports files in the MP3 format
Cons
- Prone to glitches
- A limited selection of voice effects
11. Voice Changer Plus
**Price:**Free, but offers in-app purchases
Compatibility: iOS 8.0 or later
User Rating: 4.8
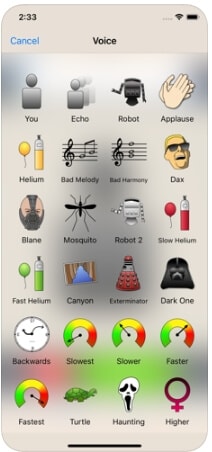
iPhone and iPad owners in need of a voice changer app that grants them complete creative freedom over the modulation of the voices they record, should consider using the Voice Changer Plus. The app features more than fifty voice effects and it provides support for voiceover recordings. Moreover, you can edit all your audio files even after you saved them, enabling you to find new ways to improve your recordings over time. Voice Changer Plus is also equipped with trim controls, so you can remove all parts of your audio files you don’t want to share with your friends on social media.
Pros
- Offers more voice effects than most of its competitors
- Provides voiceover recording options
- Users can trim their audio files
- All audio recordings can be edited after the voice modulation
Cons
- In-app purchase is required in order to unlock all of the app’s features
- Modulating audio in video files is not an option
Below is a quick comparison table among these voice changer apps, hope it will be helpful.
| App | Supported OS | User Rating | Voice Templates |
|---|---|---|---|
| Celebrity Voice Changer - Face | iOS 9.0 or later | 4.0 | Yes |
| Snapchat | iOS 10.0 or later, Android 4.4 or up | 3.8 | No |
| Voice Changer by e3games | Android 4.1 and up | 4.3 | Yes |
| Voicy: Celebrity Voice Changer | iOS 10 or later | 4.3 | Yes |
| Video Voice Changer – Fun Editor | iOS 8.0 or later | 4.4 | Yes |
| Video Voice Changer FX | Android 4.1 and up | 4.1 | Yes |
| Squeak Voice Changer | Android 4.3 and up | 3.9 | Yes |
| Voice Changer with Effects | Android 4.1 and up | 4.5 | Yes |
| Voice Changer | Android 4.1 and up | 4.4 | Yes |
| Voice FX | Android 4.0.3 and up | 3.8 | Yes |
| Voice Changer Plus | iOS 8.0 or later | 4.8 | Yes |
Conclusion
Everybody enjoys a good joke, and the apps we featured in this article enable you to have a lot of fun while experimenting with different voice modulation options. All of the voice effects these apps offer can change a voice automatically, but if you would like to alter the voices in your videos you must choose an app that supports this option. Which of the best voice changer apps for iPhone and Android devices are you going to choose? Leave a comment, and share your opinions with us.
Benjamin Arango
Benjamin Arango is a writer and a lover of all things video.
Follow @Benjamin Arango
Benjamin Arango
Mar 27, 2024• Proven solutions
Have you ever wondered what your voice would sound like if you were a cartoon character, a robot, or an older version of yourself? Changing how your voice sounds has never been easier, regardless of the Smartphone model you have, since voice changer apps can be used on both iPhone and Android devices.
Even though there is nothing wrong with modulating your voice to have fun with your friends, using voice changer apps to pull malicious pranks or bully strangers online is far from acceptable. Read on if you would like to find out more about the best voice changer apps for iPhone and Android devices and discover the one you enjoy using the most.
Best Voice Changer Apps for iPhone and Android
Creating a new ringtone, making a voice recording, or having fun with your friends are only a few reasons why so many people choose to try out voice changer apps. The vast majority of these apps feature well-equipped audio effects libraries that enable users to have fun with their friends and hear how they would sound if they were drunk or after inhaling helium. So, let’s take a look at some of the best voice changer apps on the market.
Changing video voice on Windows and Mac with Wondershare Filmora
Do you want to change the voice in video on Windows and Mac and don’t know which software can meet this requirement? Try Filmra video editor , which provides several ways to change voice over, such as changing the voice speed or changing the pitch. Download the trial version below and find out more possibility in video creation with Filmora.
1. Celebrity Voice Changer – Face
Price: Free, but offers in-app purchases
Compatibility: iOS 9.0 or later
User Rating: 4.0
In case you would like to sound like your favorite movie star of TV host, then Celebrity Voice Changer is one of the best choices you can make. Besides the standard set of options, the app also lets you request new voices since its machine learning technology can mimic virtually anyone’s voice. However, Celebrity Voice Changer is currently only available in English and it cannot modulate speech in other languages. In addition, you must make an in-app purchase in order to gain access to all of the app’s features or unlock the unlimited usage of the app.
Pros
- Automatic voice modulation
- Huge selection of voice filters
- The app generates video files that are better adjusted to the audience on social media than audio files
- Excellent impressions of celebrities
Cons
- Unreasonably expensive
- The app’s Deep Learning technology still has a lot of room for improvement
2. Snapchat
Price: Free, but offers in-app purchases
Compatibility: iOS 10.0 or later, Android 4.4 or up
User Rating: 3.8
With more than 203 million daily users, Snapchat is one of the largest messaging platforms on the market. Previously, we’ve shared how to change gender on Snapchat , beside that, the app lets its users capture short moments or the so-called Snaps and share them with friends. In addition to hundreds of video filters , Snapchat also features a broad spectrum of voice changing effects that make Snaps more entertaining. Even so, the audio recording options Snapchat offers are far from ideal, because the app doesn’t allow you to edit the files you create with it. Using Snapchat will drain your battery quickly, which is why you must pay attention to how frequently you use this app.
Pros
- The easy voice modulation process
- Excellent messaging options
- Grants you access to a large community of likeminded people
- Lenses and filters are updated on a daily basis
Cons
- Editing voice changes after you create a Snap is not possible
- Snapchat is not primarily a voice changer app
Check the detailed information about How to Change Voice on Snapchat with 2 Easy Methods >>
3. Voice Changer
Price: Free
Compatibility: Android 4.1 and up
User Rating: 4.3
Changing your voice with this app won’t take more than a few moments of your time. You just have to launch the app and hit the microphone button to record a message or a joke you would like to modulate. Once you’re happy with the audio recording you made, you can proceed to choose from more than twenty voice effects that will make you sound like a dwarf, a robot, or an alien. The app’s file-sharing capabilities enable you to post your audio recordings to any social media platform of your choosing or store your files and use them as many times as you want.
Pros
- Entertaining and easy to use
- The simple three-step voice modulation process
- Good selection of voice filters
- Excellent file sharing options
Cons
- The app displays ads
- No audio editing tools
4. Voicy: Celebrity Voice Changer
**Price:**Free, but offers in-app purchases
Compatibility: iOS 10 or later
User Rating: 4.3
Impersonating your favorite celebrity can be a fun way to prank your friends on social media. Voicy features a broad selection of celebrity voice impersonations you can use to make you sound like a famous actress or TV personality. The app utilizes a machine learning technology that can generate more than forty avatars and allows the users to experiment with different voice effects. The free version of the app offers only limited capabilities, so if you want to gain access to all of the Voicy’s features, you must choose a weekly, monthly or an annual subscription.
Pros
- Equipped with a powerful machine learning technology
- Offers a vast selection of voice avatars
- The quick voice modification process
- A great choice if you want to make a parody
Cons
- More expensive than the competition
- Support only the English language
5. Video Voice Changer – Fun Editor
Price: Free, but offers in-app purchases
Compatibility: iOS 8.0 or later
User Rating: 4.4
Changing the voices in the videos you record with your iPhones or iPads is a straightforward process that takes a minimum amount of effort. You can either use this iOS-based app to capture videos you’re going to dub or import them from the albums in which they are stored. The Video Voice Changer app is a great option if you want to dub videos directly from your phone because it enables you to change the voices in your videos and make them sound like mice, bears or ghosts. There are over thirty voice effects to choose from, so you can easily pick the one that best fits the video you’re editing.
Pros
- Equipped with video recording tools
- Excellent dubbing features
- A rich selection of voice effects
- Allows users to share their creations on Facebook, Instagram, and other social media platforms
Cons
- You must make an in-app purchase to unlock all of the app’s features
- No audio mixing options
6. Video Voice Changer FX
**Price:**Free, but offers in-app purchases
Compatibility: Android 4.1 and up
User Rating: 4.1
This is a simple app, anyone can use to change the voices in a video. Simply upload a video file from an SD card in your phone and choose an audio effect you want to apply. The app’s collection of funny voices includes options like echo, squirrel, space ship or chipmunk. As soon as you select the voice effect you want to add to a video, the app will start generating a new video that will be saved to your phone. Sharing the videos you edit with Video Voice Changer FX to social media directly from the app is not an option.
Pros
- Fun and easy to use
- Great price to performance ratio
- Changing a voice requires just a few taps
- Allows users to switch between effects while the video is playing
Cons
- No audio or video recording capability
- Doesn’t support social media sharing
7. Squeak Voice Changer
**Price:**Free, but offers in-app purchases
Compatibility: Android 4.3 and up
User Rating: 3.9
Every joke you want to share with your online friends is going to be a little funnier if you record it with Squeak Voice Changer. You just have to tap on the Record button and choose one of the available effects. Each voice changing effect this app offers is represented by a character so you should select Jamie the Jolly if you want to make your voice sound like you’re at a party or Bruce the Sentimental Bot if you want your voice to sound artificial. All the recordings you make with Squeak Voice Changer can be easily shared on social media.
Pros
- Equipped with audio recording options
- Cute and memorable characters that represent voice effects
- Inexpensive and fun to use
- Functional app design
Cons
- Poor selection of voice effects
- The AI only recognizes the English language
8. Voice Changer with Effects
**Price:**Free
Compatibility: Android 4.1 and up
User Rating: 4.5
This Android-based app is designed to make fun and easy since voice modulation features enable you to play voice recording backward or change your voice to sound robotic or even alien. Besides recording your voice, the app also lets you modulate pre-recorded sounds and save them to your phone or use them as ringtones or notification sounds. Furthermore, the app lets you add sounds to images and share them to Facebook. The Voice Changer with Effects enables you to share all audio files you process with it to any of the most popular social media platforms.
Pros
- The app has over 50,000,000 installs
- Equipped with a text to voice feature
- Setting a new ringtone with this app is easy
- Supports editing of pre-recorded audio files
Cons
- Contains ads
- No audio or video editing options
9. Voice Changer
**Price:**Free
Compatibility: Android 4.1 and up
User Rating: 4.4
If you are looking for an Android app that lets you modulate your voice quickly and effortlessly, then Voice Changer may be one of the best options you can find on the market. You can record your voice by simply tapping on the microphone and speaking into your phone’s speaker and then apply one of the audio effects this app offers. Optionally, you can import an audio file you already recorded into the app and then apply Martian, Foreigner, Giant or Child effects to your voice recording. The best part is that you can apply each effect to the audio files you’re editing as many times as you want.
Pros
- Loads of funny effects
- Simple audio recording setup
- Intuitive and modernly designed interface
- Enables users to share audio files via Bluetooth or social media platforms
Cons
- No video editing tools
- The quality of output audio files can vary
10. Voice FX
**Price:**Free, but offers in-app purchases
Compatibility: Android 4.0.3 and up
User Rating: 3.8
Modulating voices in all types of audio files is a straightforward and fun process that can be completed in just a few taps. During the audio recording session, you can apply all voice effects to the sound you are recording and stream it live to your web browsers or media players you’re using. Voice FX changes your voice in real time, which enables you to preview your results before deciding if you want to save them. All files you export from this app will be saved in the MP3 format so you can use them as ringtones on your Android device.
Pros
- Allows users to modulate pre-recorded audio files
- Voice effects are applied in real time
- Offers live streaming features
- Exports files in the MP3 format
Cons
- Prone to glitches
- A limited selection of voice effects
11. Voice Changer Plus
**Price:**Free, but offers in-app purchases
Compatibility: iOS 8.0 or later
User Rating: 4.8
iPhone and iPad owners in need of a voice changer app that grants them complete creative freedom over the modulation of the voices they record, should consider using the Voice Changer Plus. The app features more than fifty voice effects and it provides support for voiceover recordings. Moreover, you can edit all your audio files even after you saved them, enabling you to find new ways to improve your recordings over time. Voice Changer Plus is also equipped with trim controls, so you can remove all parts of your audio files you don’t want to share with your friends on social media.
Pros
- Offers more voice effects than most of its competitors
- Provides voiceover recording options
- Users can trim their audio files
- All audio recordings can be edited after the voice modulation
Cons
- In-app purchase is required in order to unlock all of the app’s features
- Modulating audio in video files is not an option
Below is a quick comparison table among these voice changer apps, hope it will be helpful.
| App | Supported OS | User Rating | Voice Templates |
|---|---|---|---|
| Celebrity Voice Changer - Face | iOS 9.0 or later | 4.0 | Yes |
| Snapchat | iOS 10.0 or later, Android 4.4 or up | 3.8 | No |
| Voice Changer by e3games | Android 4.1 and up | 4.3 | Yes |
| Voicy: Celebrity Voice Changer | iOS 10 or later | 4.3 | Yes |
| Video Voice Changer – Fun Editor | iOS 8.0 or later | 4.4 | Yes |
| Video Voice Changer FX | Android 4.1 and up | 4.1 | Yes |
| Squeak Voice Changer | Android 4.3 and up | 3.9 | Yes |
| Voice Changer with Effects | Android 4.1 and up | 4.5 | Yes |
| Voice Changer | Android 4.1 and up | 4.4 | Yes |
| Voice FX | Android 4.0.3 and up | 3.8 | Yes |
| Voice Changer Plus | iOS 8.0 or later | 4.8 | Yes |
Conclusion
Everybody enjoys a good joke, and the apps we featured in this article enable you to have a lot of fun while experimenting with different voice modulation options. All of the voice effects these apps offer can change a voice automatically, but if you would like to alter the voices in your videos you must choose an app that supports this option. Which of the best voice changer apps for iPhone and Android devices are you going to choose? Leave a comment, and share your opinions with us.
Benjamin Arango
Benjamin Arango is a writer and a lover of all things video.
Follow @Benjamin Arango
Tuning In Smoothly: Learning to Adjust Audio Volumes on Audacity
Audacity is a free, open access, cross-platform sound editing and recording tool. It is compatible with Windows, Mac OS X, Linux, and various other operating systems. All of these aspects have contributed to Audacity’s worldwide popularity. Audacity features an amplified effect that alters the loudness of your chosen audio and other practical tools that can change the sound in different ways.
As a result, Audacity can not only assist you in modifying the level of an audio file, but it can also help you equalize, reduce, normalize, and so on.
Yes, you have heard it right, Audacity increase volume, but the primary question is how? But don’t worry, you will get the answer after reading the article. This article will explain how you can increase or decrease the volume of a whole and a specific segment of the audio file. Let’s get started.
In this article
01 How to Increase or Decrease Volume Without Distortion and Clipping in Audacity
02 How to Increase Volume of Multiple Files in Audacity?
03 How to Increase Volume in Certain Parts of Track?
04 What’s the Difference between Normalize and Amplify?
Part 1: How to Increase or Decrease Volume Without Distortion and Clipping in Audacity
Audio clipping occurs when the audio input becomes too loud for an amplifier to produce, and the surplus signal creates distortion. When editing, you cannot add additional volume to your audio clip forever because this would result in clipping. In this case, you can use the Audacity application to emphasize your material by turning the volume up or down without distortion and clipping on a track or recording.
Learn how Audacity increase volume without distortion by following the procedure described below:
Step 1: First, download and install the Audacity software on your computer.
Step 2: Select the File from the menu above and click Open to open the audio file.

Step 3: Choose the audio track, go to the Effect menu and pick the Amplify option from the drop-down menu.

Note: You can increase or decrease the volume by double-clicking the track and using the slider under the Gain title.
Step 4: Increase or decrease the volume by sliding the slider or typing the amplification value in the text box next to it in the Amplify window as needed.

Note: Ensure that the Allow Clipping checkbox remains unchecked to avoid clipping. Moreover, keep in mind that increasing the volume to a greater extent can result in distortion.
Related: How to Change Audio Volume in Filmora
Part 2: How to Increase Volume of Multiple Files in Audacity?
Audacity is an open-source audio editing tool. It is used for various purposes, like audio recording, music creation, and audio file editing. It also allows you to increase and decrease the volume of audio files.
You may also apply the modifications to multiple files at once, rather than one at a time. Check out the instructions below to learn how to change the volume of multiple audio files:
Step 1: Select the Import option from the File menu, and then pick the Audio option. Browse to your audio files, choose all of them, and then click the Open option.

Step 2: To select all the files, press Ctrl + A, click on the Effect option in the menu bar and pick Amplify.

Step 3: Now, either enter the value in the text box next to the Amplification Decibels tab or use the slider under it. To verify the operation of increasing the volume, check the allow clipping checkbox. When you’re through with the options, click the Ok button.

Step 4: Amplification will be applied to all the tracks. Go to the File option from the above menu to export the files and then select the Export option.

If you’re running Audacity on macOS computer, you can watch the video tutorial below to apply effects to multiple files.
Part 3: How to Increase Volume in Certain Parts of Track?
The audacity software also allows you to alter a specific section of an audio file. The selection tool can assist in locating a particular area of the track. After you’ve chosen a section of the audio file, you may utilize the amplification effect to increase its loudness. Check out the instructions below to learn how you can achieve it:
Step 1: Launch the Audacity software on the computer. To open the audio file, go to the File menu and select Open. You may also open the file by dragging it.
Step 2: Ensure that the Selection tool is active now. Click and hold the mouse left-click to move from one spot on the track to another.

Step 3: After picking the part, go to the Effect option from the menu and select Amplify.

Step 4: Now, for that specific region, modify the amplification and click OK. This will only change the volume for the area you have selected.

Part 4: What’s the Difference between Normalize and Amplify?
Amplify and Normalize are two essential features of the Audacity tool. Many people think they are the same thing, they are right up to some extent, but there exists a big difference between both the features. Before discussing the differences, you need to know what the terms Normalize and Amplify imply.
Amplify
It is the quickest approach to comprehend the effect’s name if you want to know precisely what impacts are. The frequency of the vibration is enhanced to increase the amplification effect. As previously said, it raises a tiny sound.
Furthermore, because this amplification is extended to all frequencies and amplitude, the noise increases. If you choose ten sources and magnify them by ten decibels, each source will be ten decibels louder than your present sound.

Normalize
The meaning of normalizing is standardized, which is also a feature of its name. Whenever you pick an audio input and use the normalize feature, the level is adjusted automatically according to the previously indicated average volume size in Oda City.
As a result, when one sound source is normalized, there is no discernible difference between it and the amplification mechanism. Still, the effect is evident when several sound sources are performed concurrently.
By pressing Ctrl + A and selecting all ten various audio sources, you may compute the required standard of every sound source, enhance the audio input that is smaller than the normal, and create the audio signal more significant than the standard. Shrink the size of each noise source, such as the name, and normalize the sound.

Related: Best Audio Normalizers for Windows
Differences
To differentiate the meaning and impact precisely, amplification means increasing or reducing the sound, whereas normalizing means equalizing the sound. Simply defined, if you magnify ten sources by ten decibels, each of the shorter and louder noises equals ten decibels in their actual loudness.
When the ten sources are normalized, the louder sounds grow louder, conforming to the standard sound source size. Because the amplifying is done regardless, the little noises are going insane during this procedure.
Conclusion
All in all, Audacity does an excellent job at audio editing. If you simply need to modify an audio file, Audacity is a great option. For increasing and decreasing the volume of single and multiple audio files, Audacity is still one of the best bets in the market. We hope that now know how Audacity increase volume of the audio files after reading this article.
02 How to Increase Volume of Multiple Files in Audacity?
03 How to Increase Volume in Certain Parts of Track?
04 What’s the Difference between Normalize and Amplify?
Part 1: How to Increase or Decrease Volume Without Distortion and Clipping in Audacity
Audio clipping occurs when the audio input becomes too loud for an amplifier to produce, and the surplus signal creates distortion. When editing, you cannot add additional volume to your audio clip forever because this would result in clipping. In this case, you can use the Audacity application to emphasize your material by turning the volume up or down without distortion and clipping on a track or recording.
Learn how Audacity increase volume without distortion by following the procedure described below:
Step 1: First, download and install the Audacity software on your computer.
Step 2: Select the File from the menu above and click Open to open the audio file.
Step 3: Choose the audio track, go to the Effect menu and pick the Amplify option from the drop-down menu.
Note: You can increase or decrease the volume by double-clicking the track and using the slider under the Gain title.
Step 4: Increase or decrease the volume by sliding the slider or typing the amplification value in the text box next to it in the Amplify window as needed.
Note: Ensure that the Allow Clipping checkbox remains unchecked to avoid clipping. Moreover, keep in mind that increasing the volume to a greater extent can result in distortion.
Related: How to Change Audio Volume in Filmora
Part 2: How to Increase Volume of Multiple Files in Audacity?
Audacity is an open-source audio editing tool. It is used for various purposes, like audio recording, music creation, and audio file editing. It also allows you to increase and decrease the volume of audio files.
You may also apply the modifications to multiple files at once, rather than one at a time. Check out the instructions below to learn how to change the volume of multiple audio files:
Step 1: Select the Import option from the File menu, and then pick the Audio option. Browse to your audio files, choose all of them, and then click the Open option.
Step 2: To select all the files, press Ctrl + A, click on the Effect option in the menu bar and pick Amplify.
Step 3: Now, either enter the value in the text box next to the Amplification Decibels tab or use the slider under it. To verify the operation of increasing the volume, check the allow clipping checkbox. When you’re through with the options, click the Ok button.
Step 4: Amplification will be applied to all the tracks. Go to the File option from the above menu to export the files and then select the Export option.
If you’re running Audacity on macOS computer, you can watch the video tutorial below to apply effects to multiple files.
Part 3: How to Increase Volume in Certain Parts of Track?
The audacity software also allows you to alter a specific section of an audio file. The selection tool can assist in locating a particular area of the track. After you’ve chosen a section of the audio file, you may utilize the amplification effect to increase its loudness. Check out the instructions below to learn how you can achieve it:
Step 1: Launch the Audacity software on the computer. To open the audio file, go to the File menu and select Open. You may also open the file by dragging it.
Step 2: Ensure that the Selection tool is active now. Click and hold the mouse left-click to move from one spot on the track to another.
Step 3: After picking the part, go to the Effect option from the menu and select Amplify.
Step 4: Now, for that specific region, modify the amplification and click OK. This will only change the volume for the area you have selected.
Part 4: What’s the Difference between Normalize and Amplify?
Amplify and Normalize are two essential features of the Audacity tool. Many people think they are the same thing, they are right up to some extent, but there exists a big difference between both the features. Before discussing the differences, you need to know what the terms Normalize and Amplify imply.
Amplify
It is the quickest approach to comprehend the effect’s name if you want to know precisely what impacts are. The frequency of the vibration is enhanced to increase the amplification effect. As previously said, it raises a tiny sound.
Furthermore, because this amplification is extended to all frequencies and amplitude, the noise increases. If you choose ten sources and magnify them by ten decibels, each source will be ten decibels louder than your present sound.
Normalize
The meaning of normalizing is standardized, which is also a feature of its name. Whenever you pick an audio input and use the normalize feature, the level is adjusted automatically according to the previously indicated average volume size in Oda City.
As a result, when one sound source is normalized, there is no discernible difference between it and the amplification mechanism. Still, the effect is evident when several sound sources are performed concurrently.
By pressing Ctrl + A and selecting all ten various audio sources, you may compute the required standard of every sound source, enhance the audio input that is smaller than the normal, and create the audio signal more significant than the standard. Shrink the size of each noise source, such as the name, and normalize the sound.
Related: Best Audio Normalizers for Windows
Differences
To differentiate the meaning and impact precisely, amplification means increasing or reducing the sound, whereas normalizing means equalizing the sound. Simply defined, if you magnify ten sources by ten decibels, each of the shorter and louder noises equals ten decibels in their actual loudness.
When the ten sources are normalized, the louder sounds grow louder, conforming to the standard sound source size. Because the amplifying is done regardless, the little noises are going insane during this procedure.
Conclusion
All in all, Audacity does an excellent job at audio editing. If you simply need to modify an audio file, Audacity is a great option. For increasing and decreasing the volume of single and multiple audio files, Audacity is still one of the best bets in the market. We hope that now know how Audacity increase volume of the audio files after reading this article.
Revitalize Audio Diminishments in Video Presentation
How to Increase Volume of the Media Files

Liza Brown
Mar 27, 2024• Proven solutions
Have you ever come with this situation: even with the volume in the highest level, your recorded media file sill sound very slight? Or you may want to increase volume in video or audio so as to enjoy it even in noise environment. As a matter of fact, it can be every easy as long as you use a powerful video editing tool- such as Wondershare Filmora . With it, you can increase volume of media files in various formats no matter it is in MP4, MP3, MKV, MOV, WAV etc . In this article, we will show you how to increase video volume with Filmora video editor. Now follow the steps below to see how to achieve it.
To begin with, click the Free Download button below to get a free trial copy of Wondershare Filmora on your Windows or Mac computer.
Learn more details about How to Adjust Audio Volume in Videos [4 Ways]
1. Add files that are in low volume
Free download Wondershare Filmora or Filmora for Mac (Originally Wondershare Filmora Video Editor), install and run it. Then click New Project to enter the main screen to import and add files that are in low volume to Filmora. You can also directly drag-n-drop the target media files to the primary window. Wondershare Filmora supports almost all video & audio formats supported, including WMV, MOV, AVI, MKV, MP4, MPG, MPEG, MOD, DV, MTS, avchd, M2TS, TS, MP3, MKA, and more. So there will be no obstacle to increase MP4/MP3/MKV/MOV/WAV/AVI video volume at all.

You may also like: How to Normalize Video Audio
2. Increase audio volume and prelisten
Drag-n-drop the Video file to the video track and then double click the clip in the timeline to enter the editing panel. Switch to Audio tab to adjust the audio settings such as volume, fade in and fade out, pitch, audio equalizer and remove audio noise. To increase the video volume, move the Volume slide bar up to increase the volume. Filmora also allows you to crease the left channel volume or right channel volume as well. If you want to listen to the real-time audio effect, just click the play icon.

Besides that, Filmora also allows you mute the audio and change the audio speed. To remove the audio background, you can use the Denoise feature. You can also set Fade in/fade out to increase the audio volume louder or lower at the begining or at the end, fine tune the pitch, etc. in the Audio tab or switch to “Video” column to rotate, adjust contrast, saturation, brightness, nue and speed of the video.
In case that you want to add your own voice over to video which has audio sounds already, you can drag your voiceover file to the audio track and then click it to enter the audio editing panel. To make your voice louder, you can increase the volume of it and lower down the video audio a little bit.

You can adjust the height of tracks based on your needs by clicking Adjust Track Height; it is recommended to set the track height to Big to edit audio more visible.
3. Set output video/audio formats
If you’re satisfied, click “Export” to save the changed media files. Here’re several options for you:
- Save to fit the devices such as iPhone, iPad, Apple TV, Samsung Galaxy, Google Pixel, Xbox 360, PSP.
- Save as various formats such as WMV, MOV, AVI, MKV, MP4 and more.
- Directly upload to YouTube/Vimeo or burn to DVD.

You see, it’s just so easy to increase volume in the media files with the above detailed guide. Besides increase volume, Wondershare Filmora can even split video , merge videos into one , rotate video , trim and crop video , add image to video and more. Just get this ideal video editing tool and enrich your video world.
Download Mac Version ](https://tools.techidaily.com/wondershare/filmora/download/ )
Quick Tip 1: How to increase video volume in Windows Movie Maker for free?

In case that you are using Windows Movie Maker, you can adjust the video volume for free. After adding videos, click the video that you want to change the volume of and then go to Edit tab. You will see the Video Volume in the left side, click it and then drag the slide bar to right to increase the volume of the video.
Quick Tip 2: How to increase volume with iMovie for free?

There are several ways to adjust video volume in iMovie, here I will share with you the easiest way to do that: after importing media files to the timeline, click the audio or the video clip which has audio, and then drag the horizontal line across the audio waveform up to increase the volume.
Add Voiceover to Video [Video Tutorial]
Liza Brown
Liza Brown is a writer and a lover of all things video.
Follow @Liza Brown
Liza Brown
Mar 27, 2024• Proven solutions
Have you ever come with this situation: even with the volume in the highest level, your recorded media file sill sound very slight? Or you may want to increase volume in video or audio so as to enjoy it even in noise environment. As a matter of fact, it can be every easy as long as you use a powerful video editing tool- such as Wondershare Filmora . With it, you can increase volume of media files in various formats no matter it is in MP4, MP3, MKV, MOV, WAV etc . In this article, we will show you how to increase video volume with Filmora video editor. Now follow the steps below to see how to achieve it.
To begin with, click the Free Download button below to get a free trial copy of Wondershare Filmora on your Windows or Mac computer.
Learn more details about How to Adjust Audio Volume in Videos [4 Ways]
1. Add files that are in low volume
Free download Wondershare Filmora or Filmora for Mac (Originally Wondershare Filmora Video Editor), install and run it. Then click New Project to enter the main screen to import and add files that are in low volume to Filmora. You can also directly drag-n-drop the target media files to the primary window. Wondershare Filmora supports almost all video & audio formats supported, including WMV, MOV, AVI, MKV, MP4, MPG, MPEG, MOD, DV, MTS, avchd, M2TS, TS, MP3, MKA, and more. So there will be no obstacle to increase MP4/MP3/MKV/MOV/WAV/AVI video volume at all.
You may also like: How to Normalize Video Audio
2. Increase audio volume and prelisten
Drag-n-drop the Video file to the video track and then double click the clip in the timeline to enter the editing panel. Switch to Audio tab to adjust the audio settings such as volume, fade in and fade out, pitch, audio equalizer and remove audio noise. To increase the video volume, move the Volume slide bar up to increase the volume. Filmora also allows you to crease the left channel volume or right channel volume as well. If you want to listen to the real-time audio effect, just click the play icon.
Besides that, Filmora also allows you mute the audio and change the audio speed. To remove the audio background, you can use the Denoise feature. You can also set Fade in/fade out to increase the audio volume louder or lower at the begining or at the end, fine tune the pitch, etc. in the Audio tab or switch to “Video” column to rotate, adjust contrast, saturation, brightness, nue and speed of the video.
In case that you want to add your own voice over to video which has audio sounds already, you can drag your voiceover file to the audio track and then click it to enter the audio editing panel. To make your voice louder, you can increase the volume of it and lower down the video audio a little bit.
You can adjust the height of tracks based on your needs by clicking Adjust Track Height; it is recommended to set the track height to Big to edit audio more visible.
3. Set output video/audio formats
If you’re satisfied, click “Export” to save the changed media files. Here’re several options for you:
- Save to fit the devices such as iPhone, iPad, Apple TV, Samsung Galaxy, Google Pixel, Xbox 360, PSP.
- Save as various formats such as WMV, MOV, AVI, MKV, MP4 and more.
- Directly upload to YouTube/Vimeo or burn to DVD.
You see, it’s just so easy to increase volume in the media files with the above detailed guide. Besides increase volume, Wondershare Filmora can even split video , merge videos into one , rotate video , trim and crop video , add image to video and more. Just get this ideal video editing tool and enrich your video world.
Download Mac Version ](https://tools.techidaily.com/wondershare/filmora/download/ )
Quick Tip 1: How to increase video volume in Windows Movie Maker for free?
In case that you are using Windows Movie Maker, you can adjust the video volume for free. After adding videos, click the video that you want to change the volume of and then go to Edit tab. You will see the Video Volume in the left side, click it and then drag the slide bar to right to increase the volume of the video.
Quick Tip 2: How to increase volume with iMovie for free?
There are several ways to adjust video volume in iMovie, here I will share with you the easiest way to do that: after importing media files to the timeline, click the audio or the video clip which has audio, and then drag the horizontal line across the audio waveform up to increase the volume.
Add Voiceover to Video [Video Tutorial]
Liza Brown
Liza Brown is a writer and a lover of all things video.
Follow @Liza Brown
Also read:
- Updated Top 8 Digital Audio Workstations (DAWs) for Mac and PC for 2024
- New Hear & Save Discovering the Best Audio Devices for Effortless Voice Recording for 2024
- Updated In 2024, The Art of Pitch Correction Implementing Autotune Effects Seamlessly in Audacity
- Updated Investigative Summary The State-of-the-Art in Sound Forges Design
- New In 2024, List of Online Repositories Featuring Cat Vocalizations in MP3
- New 2024 Approved The AMR Audio Experts Resource A Complete Walkthrough for Mastering AMR Files
- 2024 Approved Find Wolf Howling Sound Effect
- In 2024, Eliminating Echoes and Interference AI Strategies for Pristine Sound Quality
- 2024 Approved Straightforward Voice Customization Techniques Summary of Features, Protocols, and Alternative Solutions
- 2024 Approved Discovering the Finest No-Cost Auditory Effects Vaults
- Updated Beatmaking Breakdown Top 8 Digital Audio Workstations (DAWs) For Mac & PC Enthusiasts for 2024
- Updated Audioscapes Unveiled Selecting the Optimal Audio Codecs and Formats
- 2024 Approved Explore the Finest 6 Mobile Applications for Instantaneous Voice Change
- New Aural Canvas Weaving Soundtracks Into Video Tapestries with Filmora Software for 2024
- 2024 Approved Integrating AutoTune Into Your Audacity Projects
- Updated In 2024, The Cutting-Edge of Audio Production Adding Professional Voiceovers to Your Vids
- New The Mirthful Minutiae Handbook Compiling Genuine Guffaw Guideposts
- New 2024 Approved Fast-Track MP3 Splitting A Convenient Guide to Rapidly Dividing Audio Files
- Updated 2024 Approved Straightforward Speech Modification Software Overview, Principles, & Comparable Alternatives
- Updated In 2024, Exploring Acoustic Illusions in Motion Techniques to Illustrate Sound Tracks via Animated Waveforms Within Premiere Pro Workflow
- New Audience Cheers Reproducer
- Updated Harmonizing Audiovisual Elements The Science of Dynamic Volume Reduction for 2024
- New Auditory Precision in Filmmaking Employing Audio Ducking Strategies for 2024
- New 2024 Approved Hunt for Emotional Throat-Clearing Audio
- In 2024, A Complete Guide to Help You Record Audio on iPhone
- Updated 2024 Approved Essential Techniques for Striking Podcast Cover Designs Your Step-by-Step Guide
- Updated 2024 Approved A Spectrum of Screams The Best Places to Download Terrifying Tones Online
- New Premier Free Audio Editing Software on Linux A Comprehensive Guide for 2024
- Updated In 2024, Investigating the Pinnacle of Sound Design Software Assessing the Merits of MAGIX Samplitude
- Top-Rated Voice Transformation Software for Mobile for 2024
- Updated How to Add Audio to Video in Android
- The Filmmakers Guide to Vocal Impact Deepening Your Sound in Filmora
- Updated 2024 Approved Quietude in Quarter Notes Advanced Methods for Drum Ditching in Digital Music
- Updated 2024 Approved Enrich Your Music The Ultimate Photo-Audio Integration Guide Sonic Visualization
- How To Transfer Data From iPhone 14 Pro To Other iPhone 13 devices? | Dr.fone
- In 2024, How To Activate and Use Life360 Ghost Mode On OnePlus Nord 3 5G | Dr.fone
- In 2024, How to Bypass Google FRP Lock from Itel A60s Devices
- How to Access Your Apple iPhone 15 Plus When You Forget the Passcode? | Dr.fone
- Things You Dont Know About Honor 90 Lite Reset Code | Dr.fone
- Updated Create Engaging Audio Waveform Videos with These Online Generators
- In 2024, How to Watch Hulu Outside US On Oppo F23 5G | Dr.fone
- New Pencil2D Animation Tutorial Overview
- New In 2024, Convert Facebook Videos to MP3 with These 8 Reliable Sites
- 3 Ways for Android Pokemon Go Spoofing On Xiaomi Redmi 12 5G | Dr.fone
- In 2024, Is pgsharp legal when you are playing pokemon On Xiaomi Redmi K70E? | Dr.fone
- 2024 Approved Switch It Up Top-Rated Face Swap Apps for iPhone and Android Users
- 2024 Approved Free MKV Video Cutters The Ultimate 2023 Roundup
- In 2024, FCPs Cinematic Legacy 10 Timeless Movies Made with Final Cut Pro
- Unlock iPhone 14 Without Passcode Easily | Dr.fone
- The Best of the Best Top Animation Software for All Users
- new How to Translate YouTube Videos to English Subtitles
- The 6 Best SIM Unlock Services That Actually Work On Your Meizu Device
- 4 Solutions to Fix Unfortunately Your App Has Stopped Error on Nubia Z50S Pro | Dr.fone
- Updated Unleash Your Creativity Best Stop Motion Software for Mac and PC
- A Step-by-Step Guide on Using ADB and Fastboot to Remove FRP Lock from your Nokia 105 Classic
- 3 Ways to Fake GPS Without Root On Nokia G42 5G | Dr.fone
- How to Perform Hard Reset on Oppo Find N3? | Dr.fone
- Top 10 Password Cracking Tools For Nubia Red Magic 8S Pro+
- In 2024, How To Reset the Security Questions of Your Apple ID From Your Apple iPhone 15 Pro Max
- How Can We Bypass Xiaomi Redmi Note 12R FRP?
- In 2024, How Can You Transfer Files From Samsung Galaxy A05s To iPhone 15/14/13? | Dr.fone
- New 2024 Approved The Free and Easy Way to Edit GoPro HD Videos
- New How To Slow Down GIF Building an Understanding for 2024
- Fix Cant Take Screenshot Due to Security Policy on Tecno Spark 10C | Dr.fone
- New 2024 Approved This Article Talks About Pixel Art Wallpapers. It Gives Examples of Different Pixel Art to Show You How to Customize Your Own Pixel Art Wallpapers, and How to Make a Pixel Art Gif on Filmora
- What Pokémon Evolve with A Dawn Stone For Vivo T2 Pro 5G? | Dr.fone
- Title: Essential Compilation Discovering the Top 11 Free Audio Customization Tools for iOS & Android Gadgets
- Author: Jacob
- Created at : 2024-05-20 00:03:42
- Updated at : 2024-05-21 00:03:42
- Link: https://audio-shaping.techidaily.com/essential-compilation-discovering-the-top-11-free-audio-customization-tools-for-ios-and-android-gadgets/
- License: This work is licensed under CC BY-NC-SA 4.0.
