
:max_bytes(150000):strip_icc():format(webp)/what-is-bluesky-social-fea29392009e4482b7fd8c5c526f69ab.jpg)
2024 Approved Disable Incoming Audio Cues & Import Fresh Audiovisual Components via Windows Moviemaker Software
“Disable Incoming Audio Cues & Import Fresh Audiovisual Components via Windows Moviemaker Software”
How to Mute Audio in Windows Movie Maker?

Shanoon Cox
Mar 27, 2024• Proven solutions
Recording high-quality videos with Smartphones and consumer-level cameras is easy, but unfortunately the same can’t be said for the sound. The camera microphones often record low-quality audio and they pick up background noises that can make the video unwatchable.
In case you were looking for a quick way to mute or remove the audio in your videos, you came to the right place because in this article we are going to show you how you can mute audio in Windows Movie Maker or add new audio files to videos. We’re also going to provide you with an alternative solution that lets you have more control over the audio editing process.
- Part 1: How to Mute Audio in Windows Movie Maker?
- Part 2: Adding a New Audio Clip to a Video
- Part 3: A Better Way to Replace Original Audio on Windows
Part 1: How to Mute Audio in Windows Movie Maker?
Muting the audio in a video clip is simple, regardless of the video editing software you’re using. Windows Movie Maker lets you mute audio in just a few steps, so let’s see how you can mute videos with this video editor.
Step 1: In order to start editing a video, you must first import it into Windows Movie Maker. Click on the Add Videos and Photos icon in the software’s Home tab and proceed to select the clip you’d like to mute.

Click on the Open button in the Add Videos and Photos window and your clip will be imported into the software.
Step 2: After you added a clip to the storyboard you can preview it in order to decide which parts of the video you’d like to mute. Click on the Edit menu in the software’s ribbon, to gain access to the video editing tools Windows Movie Maker has to offer.
If you would like to mute only a portion of a video clip, you should position the playhead on the storyline at the exact location in the video where you want to make the cut and then click on the Split button.
Step 3: Make sure that the clip you want to mute is selected and click on the Video Volume icon on the left side of the Edit tab.

Drag the slider all the way to the left to mute the audio. Click the Play button in the preview window to make sure that video’s sound is muted.
Part 2: Adding a New Audio Clip to a Video
Windows Movie Maker also lets you replace the existing audio clip with a new one. Once again, this process is easy and it can be completed in a few steps.
Step 1: After you’ve muted the audio, click on the Add Music icon, that is located next to the Add Photos and Videos icon in the Home tab.

A drop-down menu will appear offering you to select music from an online source or to import an audio file from your computer. Moreover, you can select the starting point of the song you’re importing so you don’t have to adjust the position of the audio file in your project manually.
In order to do this, you just have to position the playhead at the desired location and select the Add music at the current point option from the drop-down menu. You can change the position of the audio file by dragging it to a new location in the storyboard. Using MP3 or WMA audio file is recommended since other audio file formats may not be compatible with Windows Movie maker.
Step 2: The audio file you imported will be automatically added to the video clip on the Storyboard. Click Play in the preview window to check if you like the result. Head over to the File menu and click on the Save Movie option. Windows Movie Maker will offer you a number of different options and if you’d like to save your video to the computer, you should select the For Computer option.

Part 3: Wondershare Filmora - A Better Way to Replace Audio Files in Videos on Windows OS
Windows Movie Maker has been discontinued a while ago, and its video and audio editing tools only enable you to perform basic video editing tasks. We suggest using Wondershare Filmora if you would like to mute or replace audio files in your videos because it offers more powerful audio and video editing features. Here’s how you can mute or replace audio files in Wondershare Filmora.
Step 1: Import the video clip into the software, by clicking on the Import button and then selecting the Import Media Files option. If you want to replace the audio of the clip you can also select the new audio file from your hard drive and click on the Open button. Filmora offers a rich royalty free music library, you can use if you already don’t have the music you want to add to your video.
Step 2: Drag and drop the video file to the timeline and then right-click on it. Select the Audio Detach option from the context menu. The audio file will appear in the newly created audio track, and you can just click on the Volume icon located at the begging of the audio track to mute that audio track.

For more details, check our guide about How to remove audio from video in Filmora on Windows.


If you want to add a new audio clip to your project and replace the old one, you should select the existing audio file and press the delete button on your keyboard. You can then drag and drop the new audio file to the timeline from the software’s Media Bin, or the Music tab, in case you decide to use songs featured in Filmora’s music library. You can cut, trim or adjust the start and end position of the audio file or use some of the audio effects the software offers. When done, click on the Export button and select the output format that is most suitable for the project you’re working on.
Conclusion
Videos that have poor sound quality won’t impress anyone, but you shouldn’t worry because muting or replacing audio files is a task that requires almost no effort. Windows Movie Maker can be used to quickly mute an audio file, but if you want to have access to more professional audio editing tools using Wondershare Filmora is a much better option. What’s your favorite method of replacing audio files in videos? Leave a comment and let us know.
Shanoon Cox
Shanoon Cox is a writer and a lover of all things video.
Follow @Shanoon Cox
Shanoon Cox
Mar 27, 2024• Proven solutions
Recording high-quality videos with Smartphones and consumer-level cameras is easy, but unfortunately the same can’t be said for the sound. The camera microphones often record low-quality audio and they pick up background noises that can make the video unwatchable.
In case you were looking for a quick way to mute or remove the audio in your videos, you came to the right place because in this article we are going to show you how you can mute audio in Windows Movie Maker or add new audio files to videos. We’re also going to provide you with an alternative solution that lets you have more control over the audio editing process.
- Part 1: How to Mute Audio in Windows Movie Maker?
- Part 2: Adding a New Audio Clip to a Video
- Part 3: A Better Way to Replace Original Audio on Windows
Part 1: How to Mute Audio in Windows Movie Maker?
Muting the audio in a video clip is simple, regardless of the video editing software you’re using. Windows Movie Maker lets you mute audio in just a few steps, so let’s see how you can mute videos with this video editor.
Step 1: In order to start editing a video, you must first import it into Windows Movie Maker. Click on the Add Videos and Photos icon in the software’s Home tab and proceed to select the clip you’d like to mute.
Click on the Open button in the Add Videos and Photos window and your clip will be imported into the software.
Step 2: After you added a clip to the storyboard you can preview it in order to decide which parts of the video you’d like to mute. Click on the Edit menu in the software’s ribbon, to gain access to the video editing tools Windows Movie Maker has to offer.
If you would like to mute only a portion of a video clip, you should position the playhead on the storyline at the exact location in the video where you want to make the cut and then click on the Split button.
Step 3: Make sure that the clip you want to mute is selected and click on the Video Volume icon on the left side of the Edit tab.
Drag the slider all the way to the left to mute the audio. Click the Play button in the preview window to make sure that video’s sound is muted.
Part 2: Adding a New Audio Clip to a Video
Windows Movie Maker also lets you replace the existing audio clip with a new one. Once again, this process is easy and it can be completed in a few steps.
Step 1: After you’ve muted the audio, click on the Add Music icon, that is located next to the Add Photos and Videos icon in the Home tab.
A drop-down menu will appear offering you to select music from an online source or to import an audio file from your computer. Moreover, you can select the starting point of the song you’re importing so you don’t have to adjust the position of the audio file in your project manually.
In order to do this, you just have to position the playhead at the desired location and select the Add music at the current point option from the drop-down menu. You can change the position of the audio file by dragging it to a new location in the storyboard. Using MP3 or WMA audio file is recommended since other audio file formats may not be compatible with Windows Movie maker.
Step 2: The audio file you imported will be automatically added to the video clip on the Storyboard. Click Play in the preview window to check if you like the result. Head over to the File menu and click on the Save Movie option. Windows Movie Maker will offer you a number of different options and if you’d like to save your video to the computer, you should select the For Computer option.
Part 3: Wondershare Filmora - A Better Way to Replace Audio Files in Videos on Windows OS
Windows Movie Maker has been discontinued a while ago, and its video and audio editing tools only enable you to perform basic video editing tasks. We suggest using Wondershare Filmora if you would like to mute or replace audio files in your videos because it offers more powerful audio and video editing features. Here’s how you can mute or replace audio files in Wondershare Filmora.
Step 1: Import the video clip into the software, by clicking on the Import button and then selecting the Import Media Files option. If you want to replace the audio of the clip you can also select the new audio file from your hard drive and click on the Open button. Filmora offers a rich royalty free music library, you can use if you already don’t have the music you want to add to your video.
Step 2: Drag and drop the video file to the timeline and then right-click on it. Select the Audio Detach option from the context menu. The audio file will appear in the newly created audio track, and you can just click on the Volume icon located at the begging of the audio track to mute that audio track.
For more details, check our guide about How to remove audio from video in Filmora on Windows.
If you want to add a new audio clip to your project and replace the old one, you should select the existing audio file and press the delete button on your keyboard. You can then drag and drop the new audio file to the timeline from the software’s Media Bin, or the Music tab, in case you decide to use songs featured in Filmora’s music library. You can cut, trim or adjust the start and end position of the audio file or use some of the audio effects the software offers. When done, click on the Export button and select the output format that is most suitable for the project you’re working on.
Conclusion
Videos that have poor sound quality won’t impress anyone, but you shouldn’t worry because muting or replacing audio files is a task that requires almost no effort. Windows Movie Maker can be used to quickly mute an audio file, but if you want to have access to more professional audio editing tools using Wondershare Filmora is a much better option. What’s your favorite method of replacing audio files in videos? Leave a comment and let us know.
Shanoon Cox
Shanoon Cox is a writer and a lover of all things video.
Follow @Shanoon Cox
“Sonic Resource Hub: A Curated List of Premium Websites with a Stockpile of Free Sound Scores
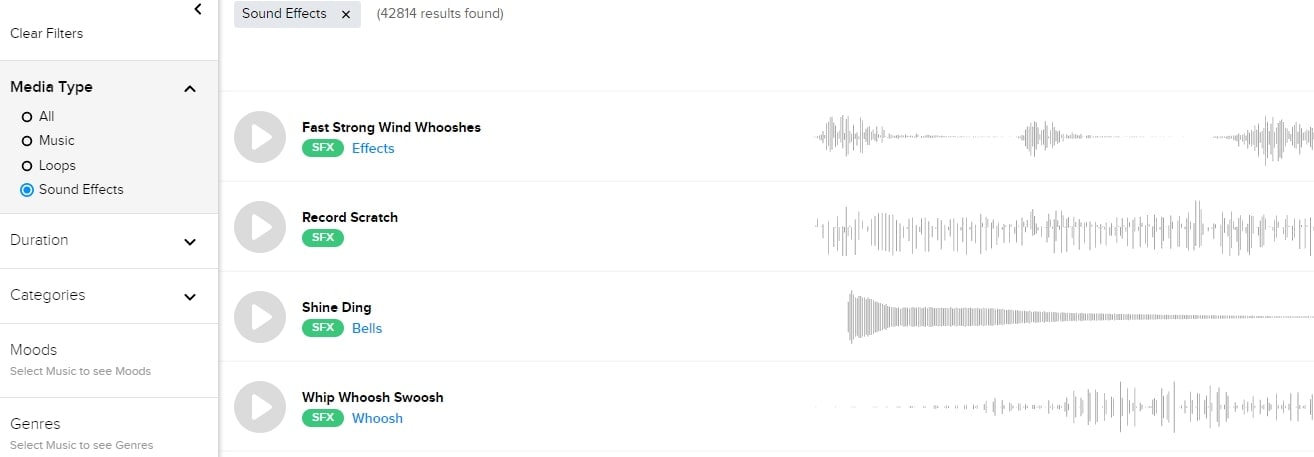
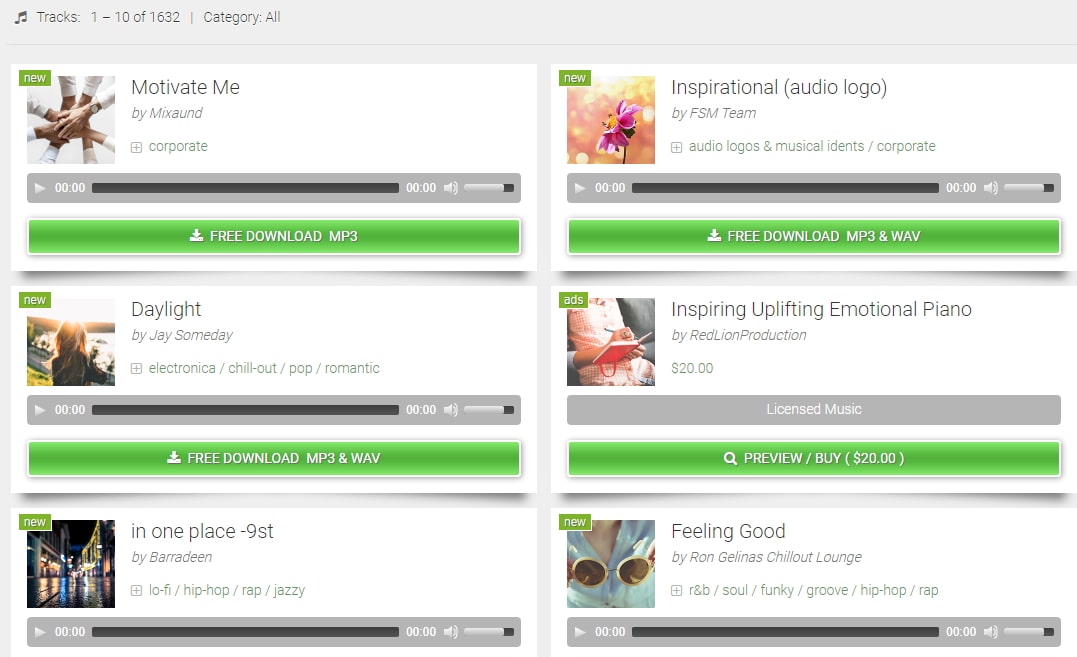
FREE Top 10 Best Websites to Download Sound Clips for Videos

Liza Brown
Mar 27, 2024• Proven solutions
Are you working on animation , video, game, music, or maybe some other media file? Sound is a vital factor for all. It is the effect of the sound that can make or break a project.
But it can be difficult to find perfect and quality free sound clips. There are thousands of software for creating excellent videos, adding sounds , titles, overlays, tracks, and more. But what if you don’t wish to create a piece for just jazzing up your already existing video?
Free sound clips are great resources to download for videos if you don’t want to create sound effects.
Many people want to know the source of high-quality free audio for videos. These free sound samples are easy to find on the Internet.
In this article, you will get to know the 10 best websites to download free sound clips.
10 Best Free Sound Samples to Use
1. Freesound
Licensed under the Creative Commons License , the Freesound comprises of a large sound database. You can choose from the huge collection of sounds and decide which one is free and which sound needs attribution.
You can ensure if the sound can be used in commercial products or not. If you are not a professional and just need free sound samples for personal use, you may use free sound download from any site. The features of Freesound include-
- You can search for sounds or browse by tags or geotags
- The pack feature helps you to find a bunch of similar sounds very easily
- Preview the sound without logging in
- For downloading the sound, you need to log in
- Add your audio samples to contribute to the database
- You get 5 free sound clips download
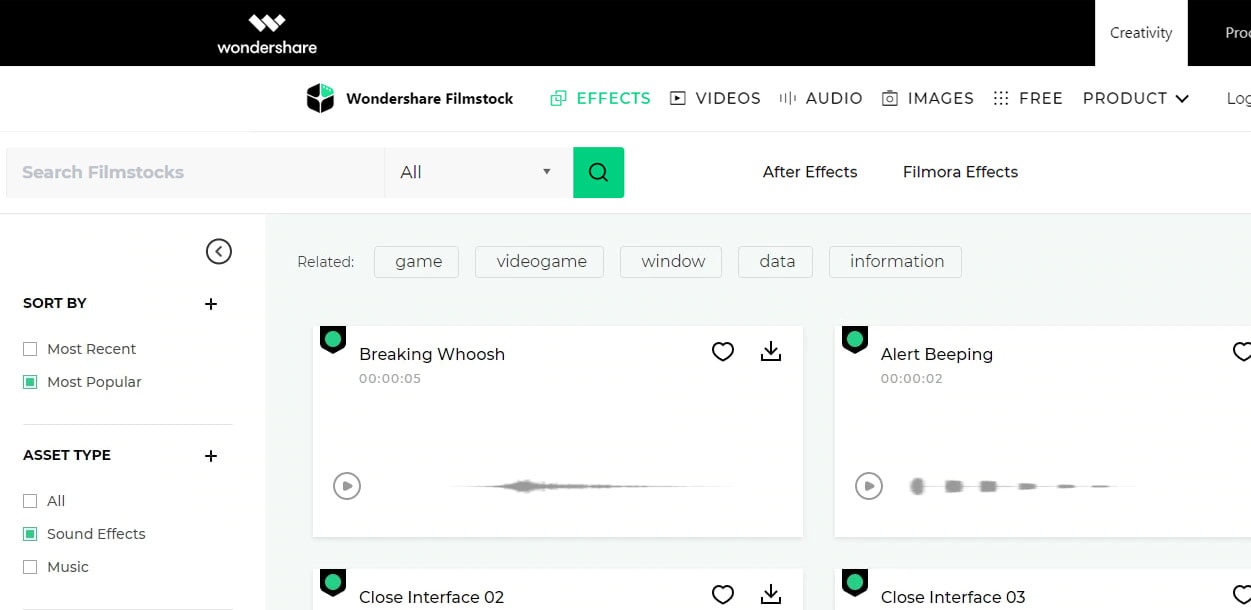
2. Filmstock
Filmstock from the house of Wondershare is one of the greatest libraries for free sound clips.
Any budget filmmaker would love to have this invaluable resource not just for free audio clips for videos but also for royalty-free sound clips.
You can bring your cinematic video to life from the Filmstock free-stuff one-stop-shop. The features of Filmstock include-
- Royalty-free video effects, audio, and stock media
- There are genres like science fiction, sci-fi, ufo, technology games
- Huge selection of curated quality stock images
- Filmstock library is continuously updated
- No attribution required for any project on Filmstock
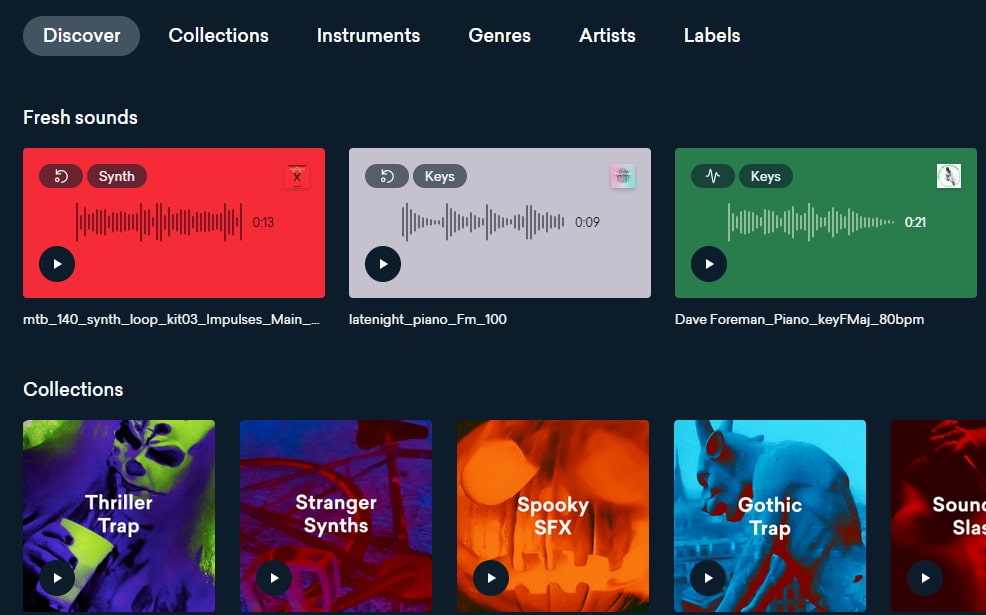
3. Landr
With a simple interface, Landr offers the best loops, packs, and samples to you. Make use of powerful Artificial Intelligence (AI) and you can spend lesser time searching and browsing. The features of Landr includes-
- You can browse free sound clips from the various collection of instruments
- Quickly find the right sound from the millions of free sound samples
- Get access to Selector tool powered by AI to make your browsing session faster
- Nourish your ideas with the curated collection and smart browsing
- The filter sounds by instrument, mood, BPM or key
- Go pro with your sampling
- Royalty-free sounds from today’s best artists, producers, and labels
4. Audio Micro
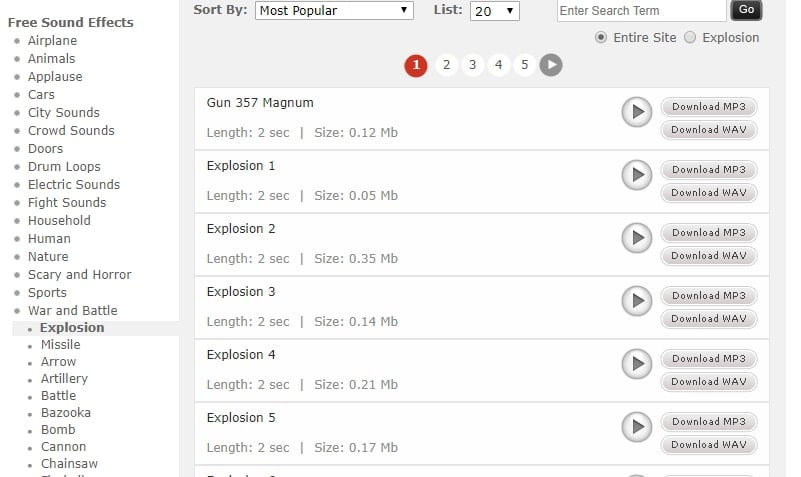
Audio Micro is one of the best tools for downloading horror-based free sound clips. Once you register with Audio Micro, you can easily download free audio clips for videos.
For downloading sound for commercial uses like TV or mass reproduction, you must be a paid subscriber. The features of Audio Micro are-
- Get access to the collection of royalty-free music and 2000 free good quality sound effects
- High-quality audio content for commercial use, available at competitive prices without any hidden cost
- Research, locate, purchase, and download stock audio
- Easy and fast search option with free sound collection visible from the navigation bar on the homepage
5. Audio Blocks
It is an intuitive platform to download loops, sound effects, and music. It has a low-cost subscription model and the content is constantly updated based on the search results. The features of Audio Blocks are-
- Unlimited royalty-free audio
- Loop, sound effects, and music download
- Low-cost subscription offers more content at a nominal price
- There are flexible plans for every budget
- Use content multiple times for commercial and personal projects
6. Free Stock Music
Whether YouTube project or your personal Vlog, Free Stock Music offers royalty-free music for a range of media platforms.
For any non-copyrighted sound clips free download, always feel free to reach Free Stock Music. The features are-
- Free access to non-copyrighted music
- Just put the attribution in credits to use the sound clips
- Unlimited royalty-free music in all moods, lengths, tempos, and categories
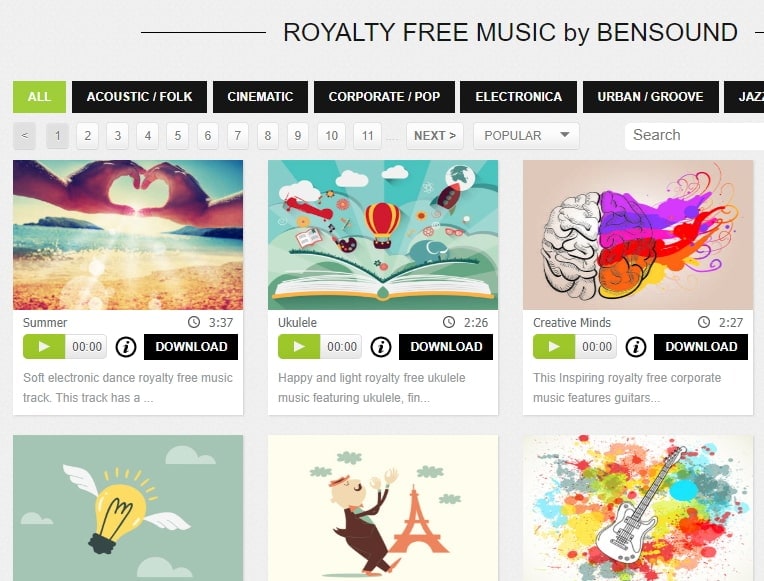
7. Bensound
Available under the Creative Common License, Bensound is used for multimedia projects like web applications or videos.
You can use the free tracks available with Bensound stock music in the various website background score, animations, web adverts, slideshows, etc. The features of Bensound include-
- Royalty-free stock music in various genres like electronica, urban, cinematic, jazz, rock, etc.
- Download free sound clips from the huge collection and add attributions in credits
- If you don’t wish to give credits and use the high-quality premium tracks, get the Bensound Pro License
8. Sounds Crate
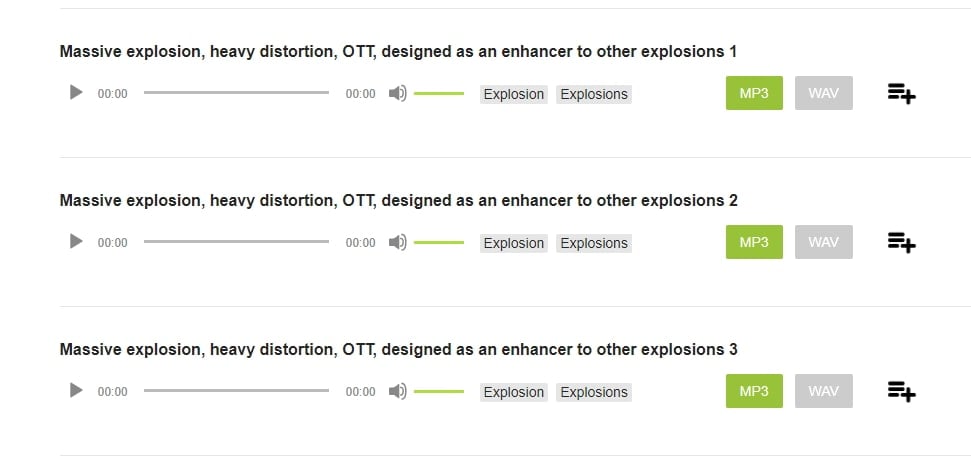
Are you looking for the best soundtrack for your video? Sounds Crate offers some of the best royalty-free music and sound FX.
With the tracks completely mastered for your production, Sound Crate offers 100% quality content created by industry professionals from Hollywood. The Sound Crate features include-
- Sound FX for electricity, gun, explosion, weapons, sci-fi, vehicles, movements, etc.
- Royalty-free music in diverse genres
- You can also use idents for corporate, news jingles, holiday idents, etc.
- Download and use the royalty-free sound clips easily
- Over 10000 plus HD assets
- No attribution required
- Browse from unlimited music, sound effects, etc.

9. ZapSlat
Do your audio and video editing projects need some cool soundtracks to jazz it up? Look no further. ZapSlat is one of the best free sound download sites to make your project successful. The features of ZapSlat are-
- Comprises over 54,000 professional free sound effects and royalty-free music files
- Variety of free sound effect packs
- Download royalty-free music from a variety of genres
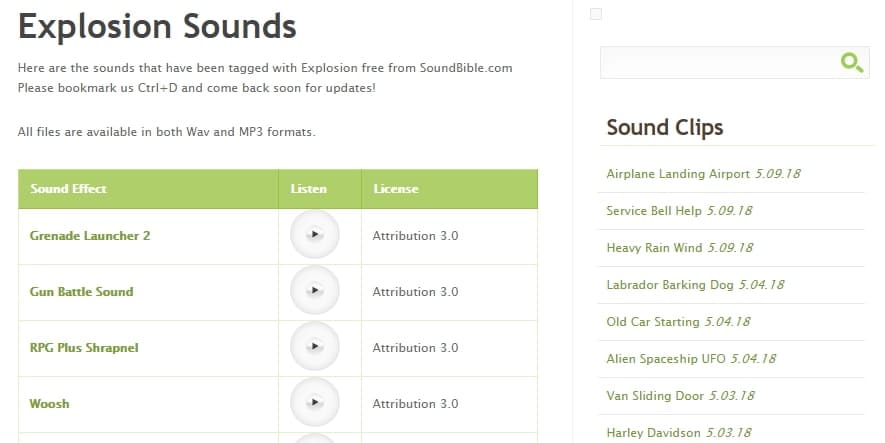
10. Sound Bible
Choose the best from 2000 free sound clips licensed under Creative Commons. To use the sound effect for commercial video, you can select from the royalty-free sounds. The features of SoundBible are-
- Download free sound clips without logging in or creating an account
- 2000 free sounds
- Copyright-free sound resources are weekly updated
Conclusion
Now that you know the best 10 free sound clip download sites, make use of it in your videos. Without worrying about the expense, you can use these sites to download free sound clips.
Liza Brown
Liza Brown is a writer and a lover of all things video.
Follow @Liza Brown
Liza Brown
Mar 27, 2024• Proven solutions
Are you working on animation , video, game, music, or maybe some other media file? Sound is a vital factor for all. It is the effect of the sound that can make or break a project.
But it can be difficult to find perfect and quality free sound clips. There are thousands of software for creating excellent videos, adding sounds , titles, overlays, tracks, and more. But what if you don’t wish to create a piece for just jazzing up your already existing video?
Free sound clips are great resources to download for videos if you don’t want to create sound effects.
Many people want to know the source of high-quality free audio for videos. These free sound samples are easy to find on the Internet.
In this article, you will get to know the 10 best websites to download free sound clips.
10 Best Free Sound Samples to Use
1. Freesound
Licensed under the Creative Commons License , the Freesound comprises of a large sound database. You can choose from the huge collection of sounds and decide which one is free and which sound needs attribution.
You can ensure if the sound can be used in commercial products or not. If you are not a professional and just need free sound samples for personal use, you may use free sound download from any site. The features of Freesound include-
- You can search for sounds or browse by tags or geotags
- The pack feature helps you to find a bunch of similar sounds very easily
- Preview the sound without logging in
- For downloading the sound, you need to log in
- Add your audio samples to contribute to the database
- You get 5 free sound clips download
2. Filmstock
Filmstock from the house of Wondershare is one of the greatest libraries for free sound clips.
Any budget filmmaker would love to have this invaluable resource not just for free audio clips for videos but also for royalty-free sound clips.
You can bring your cinematic video to life from the Filmstock free-stuff one-stop-shop. The features of Filmstock include-
- Royalty-free video effects, audio, and stock media
- There are genres like science fiction, sci-fi, ufo, technology games
- Huge selection of curated quality stock images
- Filmstock library is continuously updated
- No attribution required for any project on Filmstock
3. Landr
With a simple interface, Landr offers the best loops, packs, and samples to you. Make use of powerful Artificial Intelligence (AI) and you can spend lesser time searching and browsing. The features of Landr includes-
- You can browse free sound clips from the various collection of instruments
- Quickly find the right sound from the millions of free sound samples
- Get access to Selector tool powered by AI to make your browsing session faster
- Nourish your ideas with the curated collection and smart browsing
- The filter sounds by instrument, mood, BPM or key
- Go pro with your sampling
- Royalty-free sounds from today’s best artists, producers, and labels
4. Audio Micro
Audio Micro is one of the best tools for downloading horror-based free sound clips. Once you register with Audio Micro, you can easily download free audio clips for videos.
For downloading sound for commercial uses like TV or mass reproduction, you must be a paid subscriber. The features of Audio Micro are-
- Get access to the collection of royalty-free music and 2000 free good quality sound effects
- High-quality audio content for commercial use, available at competitive prices without any hidden cost
- Research, locate, purchase, and download stock audio
- Easy and fast search option with free sound collection visible from the navigation bar on the homepage
5. Audio Blocks
It is an intuitive platform to download loops, sound effects, and music. It has a low-cost subscription model and the content is constantly updated based on the search results. The features of Audio Blocks are-
- Unlimited royalty-free audio
- Loop, sound effects, and music download
- Low-cost subscription offers more content at a nominal price
- There are flexible plans for every budget
- Use content multiple times for commercial and personal projects
6. Free Stock Music
Whether YouTube project or your personal Vlog, Free Stock Music offers royalty-free music for a range of media platforms.
For any non-copyrighted sound clips free download, always feel free to reach Free Stock Music. The features are-
- Free access to non-copyrighted music
- Just put the attribution in credits to use the sound clips
- Unlimited royalty-free music in all moods, lengths, tempos, and categories
7. Bensound
Available under the Creative Common License, Bensound is used for multimedia projects like web applications or videos.
You can use the free tracks available with Bensound stock music in the various website background score, animations, web adverts, slideshows, etc. The features of Bensound include-
- Royalty-free stock music in various genres like electronica, urban, cinematic, jazz, rock, etc.
- Download free sound clips from the huge collection and add attributions in credits
- If you don’t wish to give credits and use the high-quality premium tracks, get the Bensound Pro License
8. Sounds Crate
Are you looking for the best soundtrack for your video? Sounds Crate offers some of the best royalty-free music and sound FX.
With the tracks completely mastered for your production, Sound Crate offers 100% quality content created by industry professionals from Hollywood. The Sound Crate features include-
- Sound FX for electricity, gun, explosion, weapons, sci-fi, vehicles, movements, etc.
- Royalty-free music in diverse genres
- You can also use idents for corporate, news jingles, holiday idents, etc.
- Download and use the royalty-free sound clips easily
- Over 10000 plus HD assets
- No attribution required
- Browse from unlimited music, sound effects, etc.
9. ZapSlat
Do your audio and video editing projects need some cool soundtracks to jazz it up? Look no further. ZapSlat is one of the best free sound download sites to make your project successful. The features of ZapSlat are-
- Comprises over 54,000 professional free sound effects and royalty-free music files
- Variety of free sound effect packs
- Download royalty-free music from a variety of genres
10. Sound Bible
Choose the best from 2000 free sound clips licensed under Creative Commons. To use the sound effect for commercial video, you can select from the royalty-free sounds. The features of SoundBible are-
- Download free sound clips without logging in or creating an account
- 2000 free sounds
- Copyright-free sound resources are weekly updated
Conclusion
Now that you know the best 10 free sound clip download sites, make use of it in your videos. Without worrying about the expense, you can use these sites to download free sound clips.
Liza Brown
Liza Brown is a writer and a lover of all things video.
Follow @Liza Brown
“Sonic Filmmaking: Embellishing Video Narratives Through Filmora’s Music Features”
Any media files capture the attention of the viewers through its mesmerizing background music. Choose the perfect soundtracks for your video using an innovative application. You would have come across surplus programs that help to add background music to video. Select the reliable ones and create an interactive video for your needs.
In this article, you will find impressive facts on optimal methods to edit the background music with the help of a reliable application Filmora. It is an incredible app that customizes the videos precisely. Quickly surf the below content to learn more about the Filmora video editor and its relevant features in editing the background music of the media files.

In this article
01 [What is Filmora?](#Part 1)
02 [How to add background music with Filmora](#Part 2)
03 [How to edit background music with Filmora](#Part 3)
Part 1 What is Filmora?
The Filmora is a prestigious product from a giant software developer Wondershare. It is an awesome program that helps you to make reliable edits to the videos. You can use this app to create and edit video files professionally with the help of the in-built functionalities. There are options to import the media files into the working space and edit them by tapping the perfect controls.
This program offers you a platform to make your video interactive and mind-blowing to attract the viewers precisely. Use Filmora to make the best out of the video and due to its simple interface, you can work comfortably hassle-free.
Wondershare Filmora
Get started easily with Filmora’s powerful performance, intuitive interface, and countless effects!
Try It Free Try It Free Try It Free Learn More about Filmora>

The remarkable features of Filmora video editor.
● Unleash your imagination by adding miraculous effects to the videos using its in-built filter effects, and transitions.
● Edit the background music of your video and add desired sound effects to engage the users optimally.
● Personalize the videos by changing their background using the Green Screen feature
● Enhance the audio tracks by enabling the audio ducking option
● Split the screens of your video to make it interactive precisely.
These are the incredible functionalities of the Filmora Video Editor application. You can use this program without any prior knowledge as the controls are displayed explicitly for quick access.
Part 2 How to add background music with Filmora
You can add background music to your memorable video captures using the Filmora application. Follow the below steps to carry out the process efficiently.
Step1 Download the application
Go to the official webpage of Filmora video editor and download the correct version of this tool. Then, import the desired media file into the working environment by tapping the Import Media Files option. Then, click and drag the uploaded file into the timeline to make further edits to it.

Step2 Add background music
Now, click the Audio option on the Menu and choose the sound effects at the left pane followed by the desired audio track in the right pane precisely. Right-click the chosen audio file and select Apply option from the pop-up.
You can also click and drag the selected audio file into the working timeline to add background music to the uploaded video.

Step3 Import the edited video
Finally, you can have a preview of the edited video using the Preview panel and click the Export button to share it directly to social media platforms or any local storage space.

The above steps will help you to perform the respective edits on the background music of the video professionally. During the export process, you can make changes to the file format, video resolution. Click the Settings button to work on the advanced options of the edited video.
Part 3 How to edit background music with Filmora
The Filmora applications help you to carry out desired edits on the imported video using its in-built features. To make audio edits, double click on the audio file to make changes on the adjustment sliders that pop up with various options like volume, pitch, fade in and out effects. You can also choose the Denoise option from the popup screen to remove the background noise from the audio clippings.
To customize the audio with advanced settings, then tap Customize option and make manual adjustments. You can manually move the sliders and adjust the values precisely for better results.
There are options to detach the audio signal from the clippings by making a right-click on the media file and selecting Detach Audio option. Add voiceover to the detached audio-video file by using the Record Voiceover feature. This brings great fun and makes your video interactive. You can also trim audio clips and add new tracks as per your requirements. Set the audio speed and duration by right-clicking the audio file.

Use the Audio Equalizer from the popup that opens after a double click on the audio file. Customize the audio track using the in-built settings available with the Equalizer. It includes default, Classic, Low Bass, Sparkle, Pop, soft, and techno. You can also use Audio Mixer and edit the audio signals in two modes like Stereo and surround. The Audio ducking feature in Filmora helps you to lower the background music for a specific duration to enhance the voice of the speaker in the video file. It is used to improve the quality of the audio signal optimally.
Wondershare Filmora
Get started easily with Filmora’s powerful performance, intuitive interface, and countless effects!
Try It Free Try It Free Try It Free Learn More about Filmora>
Conclusion
Thus, in this article, you had a better understanding of how to add background music to video precisely. It is a perfect space to make desired edits on your video file using a sophisticated program Filmora video editor. It is a precise app that brings miraculous changes to the media files effortlessly. Create a quality media file using the Filmora video editor application. Connect with this incredible editor and make required changes on the media files to impress the audience in no time. Stay tuned for exciting facts about the best video edits with the help of the Filmora video editor tool. Choose the Filmora app and make reliable edits on memorable videos.
02 [How to add background music with Filmora](#Part 2)
03 [How to edit background music with Filmora](#Part 3)
Part 1 What is Filmora?
The Filmora is a prestigious product from a giant software developer Wondershare. It is an awesome program that helps you to make reliable edits to the videos. You can use this app to create and edit video files professionally with the help of the in-built functionalities. There are options to import the media files into the working space and edit them by tapping the perfect controls.
This program offers you a platform to make your video interactive and mind-blowing to attract the viewers precisely. Use Filmora to make the best out of the video and due to its simple interface, you can work comfortably hassle-free.
Wondershare Filmora
Get started easily with Filmora’s powerful performance, intuitive interface, and countless effects!
Try It Free Try It Free Try It Free Learn More about Filmora>
The remarkable features of Filmora video editor.
● Unleash your imagination by adding miraculous effects to the videos using its in-built filter effects, and transitions.
● Edit the background music of your video and add desired sound effects to engage the users optimally.
● Personalize the videos by changing their background using the Green Screen feature
● Enhance the audio tracks by enabling the audio ducking option
● Split the screens of your video to make it interactive precisely.
These are the incredible functionalities of the Filmora Video Editor application. You can use this program without any prior knowledge as the controls are displayed explicitly for quick access.
Part 2 How to add background music with Filmora
You can add background music to your memorable video captures using the Filmora application. Follow the below steps to carry out the process efficiently.
Step1 Download the application
Go to the official webpage of Filmora video editor and download the correct version of this tool. Then, import the desired media file into the working environment by tapping the Import Media Files option. Then, click and drag the uploaded file into the timeline to make further edits to it.
Step2 Add background music
Now, click the Audio option on the Menu and choose the sound effects at the left pane followed by the desired audio track in the right pane precisely. Right-click the chosen audio file and select Apply option from the pop-up.
You can also click and drag the selected audio file into the working timeline to add background music to the uploaded video.
Step3 Import the edited video
Finally, you can have a preview of the edited video using the Preview panel and click the Export button to share it directly to social media platforms or any local storage space.
The above steps will help you to perform the respective edits on the background music of the video professionally. During the export process, you can make changes to the file format, video resolution. Click the Settings button to work on the advanced options of the edited video.
Part 3 How to edit background music with Filmora
The Filmora applications help you to carry out desired edits on the imported video using its in-built features. To make audio edits, double click on the audio file to make changes on the adjustment sliders that pop up with various options like volume, pitch, fade in and out effects. You can also choose the Denoise option from the popup screen to remove the background noise from the audio clippings.
To customize the audio with advanced settings, then tap Customize option and make manual adjustments. You can manually move the sliders and adjust the values precisely for better results.
There are options to detach the audio signal from the clippings by making a right-click on the media file and selecting Detach Audio option. Add voiceover to the detached audio-video file by using the Record Voiceover feature. This brings great fun and makes your video interactive. You can also trim audio clips and add new tracks as per your requirements. Set the audio speed and duration by right-clicking the audio file.
Use the Audio Equalizer from the popup that opens after a double click on the audio file. Customize the audio track using the in-built settings available with the Equalizer. It includes default, Classic, Low Bass, Sparkle, Pop, soft, and techno. You can also use Audio Mixer and edit the audio signals in two modes like Stereo and surround. The Audio ducking feature in Filmora helps you to lower the background music for a specific duration to enhance the voice of the speaker in the video file. It is used to improve the quality of the audio signal optimally.
Wondershare Filmora
Get started easily with Filmora’s powerful performance, intuitive interface, and countless effects!
Try It Free Try It Free Try It Free Learn More about Filmora>
Conclusion
Thus, in this article, you had a better understanding of how to add background music to video precisely. It is a perfect space to make desired edits on your video file using a sophisticated program Filmora video editor. It is a precise app that brings miraculous changes to the media files effortlessly. Create a quality media file using the Filmora video editor application. Connect with this incredible editor and make required changes on the media files to impress the audience in no time. Stay tuned for exciting facts about the best video edits with the help of the Filmora video editor tool. Choose the Filmora app and make reliable edits on memorable videos.
Also read:
- Updated Show Audio Waveform and Add Waveform Animation in Final Cut ProTuto
- New 2024 Approved Essential Auditory Alteration Tools Top 5 Best Audio Editor Apps for Android
- Updated 2024 Approved Techniques for Transforming Your Voice Pitch and Quality
- New Acquiring Lifelike Vampire Sonic Traces for 2024
- Updated 2024 Approved Mastering the Art of Optimal Audio Format Selection
- New 2024 Approved Mastering OBS Audio Levels Techniques for Dynamic Ducking and Lifting
- Updated In 2024, Exploring the Most Reputable Web-Based Communication Tools Today
- Updated The Complete Users Manual to Expertly Navigate TwistedWaves Audio Workflow
- Updated 2024 Approved Pinpoint Synthetic Soundscapes Mimicking Brushwork
- New 2024 Approved Exquisite Compilation of Hits Best-Selling Pop Songs to Accompany Videos
- Updated Top 10 Gaming Voice Modification Tools Rankings and Analysis
- Updated 2024 Approved Top Online Tools For Removing Background Noise From Audio
- Updated Simplified Steps to Effortlessly Capture Your Ideas in a Podcast Format for 2024
- New In 2024, Uncovering Resources for Realistic Bellow and Exasperation Effects
- Updated The Sound of Depth Amplifying Voice Intensity Through Filmora Editing
- Mastering Microphone Inputs A Step-by-Step Guide for Windows 10 Users
- Updated Link and Paste Song File Within iMovie Narrative for 2024
- In 2024, Unveiling the Most Reliable Websites for Precision MP3 Tagging and Organizing
- In 2024, Unleashing Creativity on a Budget The Leading Free Digital Audio Workstations (For Newbies)
- Updated 5 Best Music Visualizers Free&Paid
- New Ultimate List of MP3 Recorders That Work Seamlessly with Windows and Mac OS for 2024
- New Audio Fusion Seamlessly Converting AIFF Files Into MP3 Format for 2024
- Updated Unlocking the Full Potential of Sound with Adobe Audition Features, Tips & Techniques for 2024
- Updated Mastering Your Voice on the Fly A Look at the Best 6 Apps for Instant Modification
- Updated Advanced Audio Editing in Adobe Premiere Pro Effortless Track Mixing Methods for 2024
- Updated From Silence to Symphony A Practical Approach to Changing Video Audio (Part 1)
- Updated Advanced Audio Manipulation in Adobe Premiere Pro (Windows Platform) for 2024
- New In 2024, Navigating the Capabilities of Lexis Audio Editor Comprehensive Reviews, Professional Demonstrations, and Instructional Content
- In 2024, Guide to Isolating and Removing Audio Tracks in Video Editing Using Premiere Pro
- Updated Speaking Without Words The Ultimate Collection of Affordable Audio-to-Text Conversion Apps for Modern Smart Devices for 2024
- The Ultimate Experts Walkthrough Mastering Windows 10 Audio Recording for 2024
- New Discover the Unbeatable Selection of Cost-Free Audio Editing Applications for Windows/Mac (Updated List, 2023)
- Updated 2024 Approved Mastering Audio Integration in Updated MKV Formats
- Purrfectly Artificial Meow Mix for 2024
- Advanced Digital Music Composer & Cutter Platform
- Updated In 2024, The Art and Science of Capturing Real-Time Audio for Digital Platforms
- The Complete Compilation Top 10 Editors to Shape High-Quality Podcasts, Including Both Free and Premium Choices
- Updated In 2024, Embarking on Editing Adventures with LexiEdit for Beginners
- Updated Crafting a Comprehensive Guide to Choosing Superior Sound Editors of the Current Decade for 2024
- 2024 Approved Premier Choices for Accessing Lofi Beats and Imagery
- Updated Best Bet AIFF to MP3 Suite Fast and Easy High-Quality Converting for 2024
- Clearing Up Sound Interference Isolating Audio From Distractions in Adobe Premiere Pro for 2024
- New 2024 Approved Transforming Your Tech Experience How to Modify Siris Voice Across iDevices
- In 2024, Economical MP3 Cutter & Adjuster Software for Apple Devices
- Updated Mastering the Art of AI-Based Signal Denoising
- In 2024, Digital Feline Audio Illusion
- New In 2024, Exploring Audible Wilderness Wolves in Vocal Display
- In 2024, How to Change OnePlus 11R Location on Skout | Dr.fone
- New 2024 Approved Top Online Lyric Video Creators Free and Paid Options
- New In 2024, Top-Rated Free Video Editing Tools for Chrome OS
- In 2024, How Do You Remove Restricted Mode on iPhone 6s Plus
- In 2024, Best Free Apple iPhone 13 Pro Max IMEI Checker
- New Motion Blur Made Easy A Comprehensive Guide for Final Cut Pro Users
- New Elevate Your Editing Professional Jump Cuts in Final Cut Pro X
- In 2024, The Ultimate List of Video Editors with Audio Features
- How To Unlock iPhone 15 Without Swiping Up? 6 Ways
- In 2024, 7 Ways to Unlock a Locked Vivo V30 Lite 5G Phone
- Updated Instagram Video Size Tips for Engagement and Visibility
- In 2024, How to Mirror PC Screen to Vivo V29 Pro Phones? | Dr.fone
- How to Remove Forgotten PIN Of Your Vivo G2
- Title: 2024 Approved Disable Incoming Audio Cues & Import Fresh Audiovisual Components via Windows Moviemaker Software
- Author: Jacob
- Created at : 2024-05-05 04:16:27
- Updated at : 2024-05-06 04:16:27
- Link: https://audio-shaping.techidaily.com/2024-approved-disable-incoming-audio-cues-and-import-fresh-audiovisual-components-via-windows-moviemaker-software/
- License: This work is licensed under CC BY-NC-SA 4.0.
